 |
| Apparently, I've had too much right brain activity lately... |

Wednesday, November 29, 2017
Wordless Wednesday #198: R-1 in the Backshop
Tuesday, November 28, 2017
Tuesday Tip - Hob-E-Tac vs. Aleene's Fast Grab Tacky Glue

I've been using these two adhesives interchangeably for a while now, but I'm just about out of Hob-E-Tac and wondering whether to buy more. The Aleene's Fast Grab Tacky Glue seems to be a pretty good substitute, especially since I haven't noticed much difference between how it behaves and the Hob-E-Tac.
But once I started paying attention, I noticed three important differences:
- The Hob-E-Tac comes with a brush on the cap;
- The Fast Grab Tacky Glue is thicker (has a higher viscosity); and perhaps most important...
- The Hob-E-Tac retails for about $3.50 per ounce versus the Fast Grab Tacky Glue which retails for about $.81 per ounce.
I think I'm going to stick with the Fast Grab Tacky Glue (see what I did there? %^) and use an old brush if I need one.
Has anybody else had any experience with both products? Is there anything I'm missing? Let us know in the comments!
Monday, November 27, 2017
Modeling Monday - (Long) Weekend Progress: Ballasting, Grade Crossing, Airbrushing, Static Grass
After musing about the Muse in my last post, I doubled-down on finishing the Somerset module. As I mentioned before, the most glaring "incomplete" was the unballasted trackwork and I also needed to install a grade crossing to get folks from the "town" to the station. While all that was drying, I revisited my B&O P-11 flatcar and finished up the painting - which included airbrushing cheap WalMart craft paints(!). I also discovered a (partial) solution to my old vs. new scenery problem, finished up the ballasting, and tackled static grass for the first time.
Whew! It was a fun-filled weekend of breaking through some mental roadblocks in the hobby. So, pictures being worth a thousand words - and not wanting to bore you or type my fingers off - here are some photos, with captions as needed:

After considering my options for the old/new scenery problem, I realized I hadn't vacuumed/cleaned the layout in a long time forever. I figured 8 yrs worth of dust and such would likely make a difference - and it did. Check out the roof above to see the difference vacuuming makes (that's a lot of dust!!)
While it didn't totally cure the dark vs. light scenery problem described in my last post, it certainly made the difference a bit less stark.

Next, I tackled the grade crossing. You can see where the road just stops at the tracks above - so I took out some of my pre-stained stripwood (thanks Pieter!) and cut some to road-width length.

I then pieced them in, attaching them to the ties with full-strength white glue. It's not perfect, but it's better than nothing and it's a fair distance away from view.

Finishing the ballasting was next on the list. The photo above shows what I had on-hand and have been using: Woodland Scenics "Medium" brown ballast, and "Fine" cinders. I took the pic above primarily to see how the two sizes would look in photos. I'm considering using all "Fine" size in the future, since it looks like the "Medium" may be too large. What do you think?

But "bird in hand" as they say - so I just continued to use these grades on the module (which - as I've mentioned before - acts as a sort of practice/testing ground for techniques/materials before using them on the "real" layout). The photo above shows me starting in the tunnel at the right end of the Somerset module - it's darker cuz I just finished wetting it down with 70% alcohol and gluing it down with 1:1 white glue - both applied with pipettes.

I stopped my ballast progress at the grade crossing since I needed to fill-in the area between the main track and siding - otherwise, I'd use up a LOT of material unnecessarily. For fill, I troweled in some ground goop, being careful to come up only to level with the bottom of the siding ties and the top of the main track roadbed.


When I got to the grade crossing, I troweled in an extra thick layer of goop as "asphalt", working it into the ends of of the ties and bringing it up level with the tops of the rails (and avoiding the switch throwbar!). The plan here was (had been) to paint the goop to match the rest of the road.

While all that was drying, I got myself to the paint room, pulled up "Miracle on 34th Street" on the iPad (1947 radio show version - with the original stars(!), so I wouldn't be visually distracted), and got the flatcar parts together to paint.

I wanted to try airbrushing cheap craft paint, so shot the crates first with a khaki color from Apple Barrel, thinned way-too-much with the "high performance acrylic thinner" recommended by Model Railroad Hobbyist's "Acrylic Painting Guide." How thin is "way-too-much"? Well, for some now-forgotten reason, I started by thinning 3:1 - that's thinner-to-paint. And continued to add more thinner until the paint actually sprayed. Then I realized that I wasn't getting the coverage I wanted, so I made the rookie mistake of laying it on too heavy. You guessed it - with all that thinner, paint pooled at the bottom of the crates. I wicked up the paint with the corner of a paper towel and plan to touch it up later.

I had a much better experience with the flatcar deck. I've forgotten the thinning ratio I used, but it was much less. I still used an Apple Barrel craft paint (this time a gray), but I exercised more patience in laying the paint down in lighter passes, holding the airbrush further away. I'll be heavily weathering the deck anyway, so I wasn't too worried how it came out.
Later that day, I found an old RMC article about airbrushing craft paints which recommended adding airbrush medium and flow aid to the paint, instead of thinner. I'm looking forward to trying that next time (and in a case of coincidence/serendipity, just today I see that the December MRH has a craft paint weathering article that references the RMC article!)

With the actual flatcar carbody, I wasn't going to take any chances. I airbrushed Badger's ModelFLEX "weathered black" which I took straight from the bottle after thoroughly mixing it and straining it through a piece of pantyhose. As you can see above, it worked beautifully. Even though I laid it on a bit heavy on the underframe, the paint settled in well and didn't run. And hey - it's the underframe. The carbody sides/ends look great and the car is finally ready for its final build and decals!
After waiting overnight for everything to dry, I discovered that my ground goop shrunk a bit. As a result, the nice "pavement" between the tracks on my grade crossing was no longer level with the rails. Ugh!

So I decided to go over it again with a layer of vinyl spackle. First, I laid out two forms using stripwood, as you see in the photo above . . .
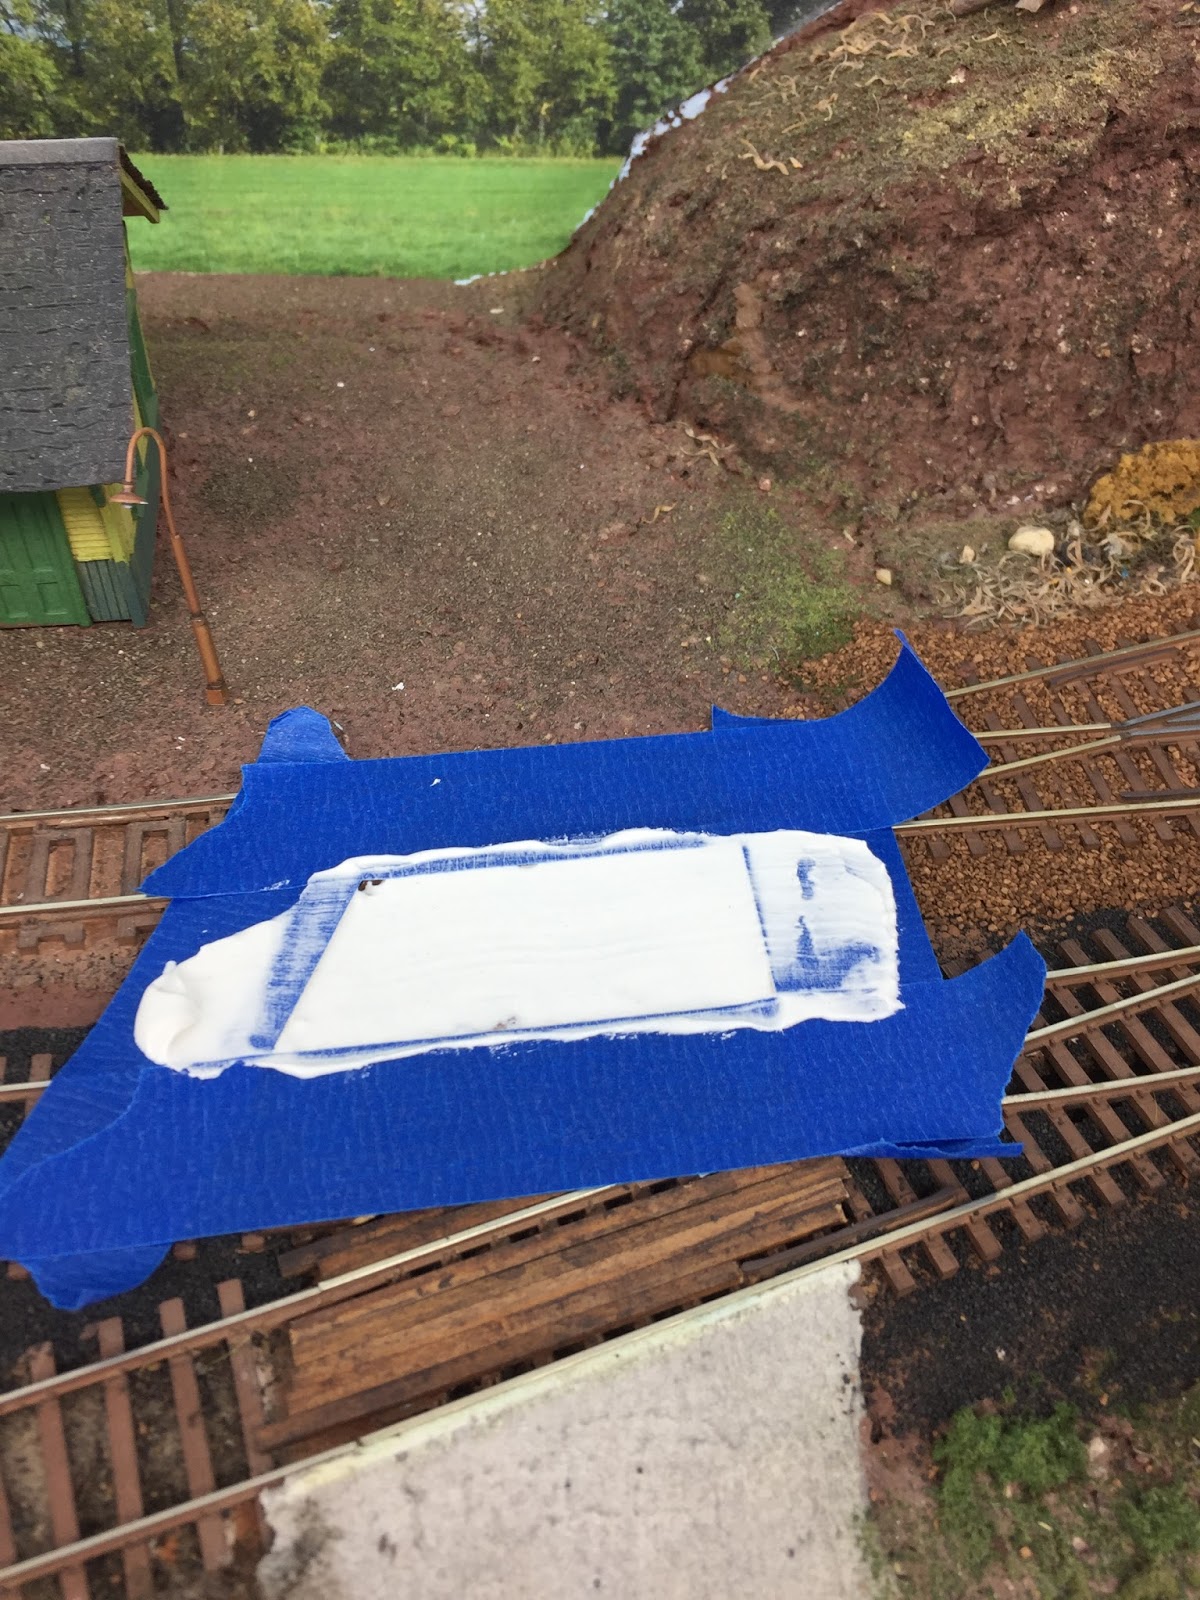
. . .and I masked off the track/rails and surroundings with painters tape. Then it was just a matter of troweling in the spackle and "screeing" it across to make it level with the tape. I removed the tape after the spackle had started to set up, and used a wet finger to tamp down any glaring imperfections.
 |
| Proof that I can, in fact, make a mess. And that staging box sure makes a nice work shelf! |

Most sane folks do static grass as part of their initial scenery - and well before structures are installed. I of course didn't have that choice here, so these photos show what I did to protect everything from the spraying and grassing.

Newspapers over the backdrop, large baggies and plastic film over the structures. Not shown is the paper towel I tore (irregularly) into a strip to cover the track (I weighed it down with some water I sprayed on). You can see the grassing starting in the photo above (back left).

Since things were going so well (surprisingly!), I went ahead and continued along the back of the module until I hit the hill.

I wish I had a good "before" photo to go with this "after" view - but imagine the above with just brown dirt/sand in that area next to the station and you can appreciate the difference made by adding the grass. The Missus mentioned that the static grass color doesn't quite match the backdrop grass color, but she said it's pretty close considering I'm color blind %^)
Before I forget it for next time, here's the process I used:
- Squirt straight (undiluted) white glue over the area (no more than 1-2 square feet)
- Spread evenly with a damp brush
- Spray the area with "wet" water until damp (not soaking wet - you just need enough to ensure the electricity/static charge gets everywhere you want it)
- Apply the static grass with an applicator, tapping it on the side and holding it no more than 1/2" away from the layout surface, if possible (I used the narrow nozzle for around the buildings and next to the backdrop - in a few areas, I still couldn't get the applicator as close to the layout as recommended)
- Go back over the area with the applicator only - still charged/on but not applying grass, holding it just above the fibers to get them to stand up more
- After the glue starts to set (10-15 minutes or so?), go over the grass with a vacuum, holding the nozzle close enough to get the fibers to stand up even more, but not so close to suck them up.
Any other suggestions/tips/guidance?
I've read where you shouldn't try to cover everything with one pass - that you should go back over the grass with hairspray and add more grass on top. I haven't tried that yet and am a little afraid I'll mess things up. What's been your experience?
So there you have it - a Long weekend with a LOT of activity. Apologies if that's resulted in a post that's far too long, but I wanted to be sure and get all this stuff down on "paper"/pixels before I forgot. Hopefully, if nothing else, my experience over the past few days will encourage you to break through some of the barriers that have been holding back your hobby progress.
The next barrier I have in my sights is resin casting - but I think I'll wait for the next large block of time before tackling that. In the meantime, I have a flatcar to finish . . .
Friday, November 24, 2017
Friday Fail - New Scenery Over Old
It's strange how the Model Railroad Muse behaves sometimes. I've gone for months (if not years) avoiding certain aspects of the hobby - scenery and airbrushing in particular - and then, AllOfASudden, The Muse strikes and I can't imagine doing anything else. That explains a bit why I jumped into scenery a bit last Sunday (I'll cover yesterday's airbrushing in another post). But sometimes jumping into the deep end of the pool isn't always the best way to get started.
Case in point: the team/bulk track at Somerset. I'd done the first pass of scenery in this area 8 years ago (almost to the day, as I discovered), but I hadn't ballasted/covered any of the track.
So - 8 yrs later - I figured I'd start finishing this area by "ballasting" (actually, adding dirt to) the siding/bulk/team track. Unfortunately, it turned out that I didn't have quite enough of the dirt material I needed, but I put down what I had left, soaked the area with 70% alcohol and then added 1:1 white glue:
Unfortunately, it looks like that may have been a mistake. I should have done all the scenery at the same time 8 years ago, because the previous scenery and "new" scenery ain't matching...
I took the photo above this morning, 3 days after soaking/gluing the area. It doesn't look like it, but it's actually all dry. But it obviously doesn't match - it's like I added a great big watermark to the area(!). What did I do wrong??
Lesson learned - do all scenery in an area at the same time, or else risk that it will "weather" differently and you won't be able to match it in the future.
So now the question is - What do I do about it? Any suggestions?
Case in point: the team/bulk track at Somerset. I'd done the first pass of scenery in this area 8 years ago (almost to the day, as I discovered), but I hadn't ballasted/covered any of the track.
 |
| Somerset - 11/27/2009 |
 |
| Tuesday, 11/21/17 |
 |
| Friday, 11/24/17 |
Lesson learned - do all scenery in an area at the same time, or else risk that it will "weather" differently and you won't be able to match it in the future.
So now the question is - What do I do about it? Any suggestions?
- If I had more of the dirt (which actually matched the old stuff in color and texture), I'd cover the dark area and just leave it loose without soaking/gluing it.
- I could try going over the dark area with PanPastels/chalk to try and match the color of the surrounding area (at least the texture is the same), but I think that'd look just as obvious - I won't be able to match the subtle gradations of color of the prior scenery.
- Alternatively I could go over the entire dirt area around the siding with some pastels/chalk to try and at least blend it all together.
- Last resort - I could spread some glue over the entire dirt area and add static grass.
That last idea would certainly kickstart my static grass practice, but talk about jumping in the deep end of the pool! I'm afraid that just might make things worse. Problem is - I don't know what I don't know - and certainly don't have the experience to know what to expect from these different options.
So I'm asking for any suggestions/advice on how best to proceed. What would you do?
Thursday, November 23, 2017
Happy Thanksgiving!!
On this special day, let's remember all the wonderful blessings we have of family, friends, and - yes - a great hobby that brings so many of us together.
Here's wishing you and yours a Very Happy Thanksgiving!
 |
| Over the River and Through the Woods.... Valley Local carrying passengers southbound over Shailerville Bridge, Haddam, CT |
Wednesday, November 22, 2017
Wordless(er) Wednesday #197
(on the Valley and Airline today....)
 |
| Today's version of the Valley Local - G&W (nee P&W) on the Valley Main just north of Middletown (pic by the Missus) |
 |
| Today's version of the Airline Local, Reed's Gap - Middlefield, 11/19/17. |
 |
| A closer, brighter view. |
Tuesday, November 21, 2017
Tuesday Tips: Cab Addresses & Another "Tripod" for Smartphone Photography
Here's a treat - not just one, but two tips for this week's Tuesday Tip . . .
Cab Address List
While I have a wifi throttle server installed on my layout, I don't have enough physical throttles to handle all the trains I have nowadays. So, I ask folks to bring their own throttles if they're willing (and if they have NCE) and it's also nice to have backups in case a throttle dies during the session (as happened to me last year).
My most-recent ops session highlighted another need though: the need to know the addresses on each of my throttles (aka "cab addresses" or "Cab ID"). If a throttle has the same ID as another throttle, strange conflicts happen. So every throttle must have its own unique ID and if there's any duplication, as the ops session host you should change your throttle addresses to accommodate the folks who were kind enough to bring their throttles to supplement your stash (you can of course change them back after the session).
But to do all that, you first need to know what your cab addresses are - for NCE, that's a simple matter of plugging in the throttle and noting the CabID (that pops up and disappears quickly) on the screen. And then, if your memory is at all like mine, you should place a listing of said IDs in a prominent place. Thus:
 |
| Cab Address List for my four throttles, mounted right at the A/O's desk. |
*******
Smartphone Camera Holder
As you can probably tell from recent posts, I've poked my head down the rabbit hole of layout/model photography. And while I built a great tripod for holding my P&S digital camera - and it'll even hold my iPhone securely - it still doesn't allow me to take those true "eye level" photos.
But as luck would have it, the model railroad press has published not one, but TWO great articles on smartphone layout photography this month. Lance Mindheim did an extensive article in Model Railroad Hobbyist, and Pelle Soeborg has an article in Model Railroader. While Lance's article goes into great detail about focus stacking (which I'm really looking forward to trying), Pelle's article has a great tip for how to secure your smartphone to make it easier to take such photos:

He used pieces of styrene strip, 1/8" square tube, and halves of 3/8" tube to make a holder for his phone. Using his idea - and modifying it somewhat to use what supplies I had on-hand - I built one of my own:

It was a really fun evening project that went together really quickly with raw styrene and Tenax. The most difficult part of the process was figuring out how best to hold/clamp pieces while I applied the solvent (oh, and trying to cut 3/8" tube in half - lengthwise - was no picnic). It's always enjoyable to spend time at the workbench - especially when you can produce something as quick as it is useful:

I'm really looking forward to using this holder whenever I use my phone for photos (as opposed to my larger/better camera) - bonus: the styrene doesn't short out the rails. In fact, this is the setup I used to take the videos I took over the weekend back in October, 1948.
*******
Hope you enjoyed this week's tips! If you did - and especially if you made a list or holder of your own - I hope you'll let me know in the comments!
Monday, November 20, 2017
Sunday Straddle - Scenery & Sound
It's no wonder model railroading is "The World's Greatest Hobby" - there are so many different aspects to it that, no matter what you might be in the mood to do, there's always something you can do on a model railroad.
But that wide variety of choice does make for some indecisive days from time to time. Yesterday was a good example . . .

I started by getting the scenery carts out. I've been waffling about doing "real scenery" in the Wethersfield scene, but my lack of confidence in doing it "right" the first time keeps me from making further progress in this area. But I figured with a large block of time to just push through the mental barrier, I'd finally get something done scenery-wise. And to further bolster my confidence - not to mention my motivation - I decided to go back to my Airline branch modules for practice.
While they are among the most complete areas of the layout (since they actually have some scenery), they're still not finished: I need to finish ballasting, do some more ground cover, and install trees. I figured since I really couldn't mess up any of that too bad, that success - and increased confidence - would be just about certain. So I did some ballasting . . . and then stopped when I realized I didn't have enough of the ground cover I needed to match what was already there.
One of the problems I'm discovering with my stash of scenery materials - as extensive as it is - is that it's made up of a lot of different textures/colors, but only tiny amounts of each. I also realized that, since adding the staging to the front of the Somerset module, it's really difficult to reach the back of that scene to do any scenery. I considered borrowing one of these, but I think I can manage with just a taller step stool.
But while I pondered all that, I decided to dial-in the decoders on my DER-1s (Alco DL-109s) . . .

Bill did the ESU decoder installs on these and even modified the stock programming to put the independent brake on F7, to match my mogul. But since then, I've done some extensive function key mods myself to my other ESU decoders, and the sounds on these DLs needed to be modified as well. So up to the workbench they went, and I fired up the Lokprogrammer.
First, I changed the stock horn (a Leslie, IIRC) to the Wabco E2. Then, I maxed the Master Sound Volume and backed off all the other sounds except for the horn. Interestingly, if you reduce the Master Sound (CV63 IIRC), it reduces the horn proportionally - which is as expected, except the prime mover sound is always much louder, overpowering the horn (not cool). So this is the only work-around that I've discovered to make the horn (much) louder than the prime mover. Bonus: editing the sounds this way allows you to dial-in exactly how you want everything to sound relative to everything else. Then the Master Volume can be used as expected - to reduce/increase all the sounds by the same amount and in the correct proportion.
Finally, I changed all the function key assignments to match what I'm doing in my other ESU-equipped engines - primarily moving Drive Hold to F5 and and the brake to F6. That way, you can see on the NCE dogbone screen whether or not those functions are engaged.
Once I did all that to the first DL-109, I made a copy of the .esux file to download into the next unit in line - 0742. Strangely, when I did that, I could no longer get 0742 to run! And - scariest of all - when I put the engine on the NCE programming track, it couldn't read the decoder(!). Fortunately (and strangely), it did read the decoder version and I could then get it to run. So back up to the bench it went. And the same problem happened.
A reboot of the Lokprogrammer software seems to have solved the problem. But we'll see tonight when I try and finish the programming on 0742.
That is, unless I feel like doing scenery. Or finishing up my flatcar (not to mention the Rt 15 overpass). Or taking some more photos. Or....
Well, you get the idea. Depends on what I'm in the mood for. "World's Greatest Hobby" indeed!
Saturday, November 18, 2017
Sittin' at the Station - Old Saybrook, CT October 1948
I went down to the station last month (almost 70 yrs ago) and took these videos of a few of the Shore Line passenger trains. Even the locals are powered by DER-1s now (Alco DL-109s), and the new stainless steel equipment is just starting to join the old heavyweight parlor cars.
I still have a lot to learn about videography, but whattaya want - I'm just learning how to use this new 8mm home movie camera. At least they got a bit better as the afternoon went on . . .
Enjoy!
I still have a lot to learn about videography, but whattaya want - I'm just learning how to use this new 8mm home movie camera. At least they got a bit better as the afternoon went on . . .
Enjoy!
Friday, November 17, 2017
Friday Fun: NER Convention Ops Session
Way back in May, I was invited to participate in this year's NMRA/Northeast Region Convention operating sessions, which would entail me opening the layout to any convention attendees that wanted a chance to run on the Valley Line. Since my ops sessions had up to that point been limited to those that help build the layout and other close friends, the prospect of inviting "all and sundry" was a little intimidating at first. In fact, I even posted about my concerns here (and subsequently in Model Railroad Hobbyist magazine here).
But I needn't have worried at all. I'd already planned on having some of my regulars as "pilots" on the 4 locals, if only to provide helpful tips/hints to newbie operators along the way. And as it turned out, over 1/2 of the conventioneers that showed up were folks I already knew or was acquainted with. In fact, the only one I knew only by email was the guys responsible for organizing the NER sessions themselves. So I figured all would be well.
And it was. In fact, like most (if not all) of my sessions, it was a blast. Heh - at least *I* thought so. Getting to see the layout come to life is the goal of every session host; it's the operators that have the challenge of navigating the session that the host created.
This session was like my previous ones with a few new innovations. Now, instead of each crew having to report to the agent in each town to get their paperwork and go "on sheet," they sign a Train Register and get their paperwork from new boxes I've installed at each station. Click here for more detail on that process and how it's evolved.
I also decided to try staggering the crew start times to reduce congestion, especially at Old Saybrook. When the railroad has two-man crews on the locals, I can easily require 11 people to operate the layout (8 on locals, 1 "mole" in each staging yard, 1 A/O). And with 2 locals in Saybrook at the same time, other locals waiting to get started, and mainline trains going through as well, it can get very crowded. I didn't want to reduce crew size (and limit the fun!), so this time I got the Valley Local started first (they have the longest day), got the Airline local out next (and out of the way), and just had PDX-1 (by far the shortest job) be the only train with a 1-man crew.
That did the trick - everybody staggered out nicely and didn't run into any congestion. Now, if I could just do something about the liftouts/duckunders.......
So with all that as prologue, here are some photos from a great afternoon running trains on the Valley Line:
Despite my initial misgivings - especially with regard to crew size/congestion - this was probably one of the most successful sessions to date - definitely since the Shore Line got into full operation. The layout ran well (with only a couple minor glitches at the beginning, despite having JUST tested everything an hour beforehand!), there were no major incidents, and everybody seemed to have a great time.
But - as is always the case with ops sessions - a few punch list items surfaced:
THAT is to have a chance to have friends - and future friends - over to share in the love of railroading and help get the time machine we've created off the ground and running.
But I needn't have worried at all. I'd already planned on having some of my regulars as "pilots" on the 4 locals, if only to provide helpful tips/hints to newbie operators along the way. And as it turned out, over 1/2 of the conventioneers that showed up were folks I already knew or was acquainted with. In fact, the only one I knew only by email was the guys responsible for organizing the NER sessions themselves. So I figured all would be well.
And it was. In fact, like most (if not all) of my sessions, it was a blast. Heh - at least *I* thought so. Getting to see the layout come to life is the goal of every session host; it's the operators that have the challenge of navigating the session that the host created.
This session was like my previous ones with a few new innovations. Now, instead of each crew having to report to the agent in each town to get their paperwork and go "on sheet," they sign a Train Register and get their paperwork from new boxes I've installed at each station. Click here for more detail on that process and how it's evolved.
I also decided to try staggering the crew start times to reduce congestion, especially at Old Saybrook. When the railroad has two-man crews on the locals, I can easily require 11 people to operate the layout (8 on locals, 1 "mole" in each staging yard, 1 A/O). And with 2 locals in Saybrook at the same time, other locals waiting to get started, and mainline trains going through as well, it can get very crowded. I didn't want to reduce crew size (and limit the fun!), so this time I got the Valley Local started first (they have the longest day), got the Airline local out next (and out of the way), and just had PDX-1 (by far the shortest job) be the only train with a 1-man crew.
That did the trick - everybody staggered out nicely and didn't run into any congestion. Now, if I could just do something about the liftouts/duckunders.......
So with all that as prologue, here are some photos from a great afternoon running trains on the Valley Line:
 |
| Mike Redden, Randy Hammill & Pete Luchini - Randy is the head operator at New London/Fort Yard staging (representing "points east" to Boston) and is explaining why some changes are necessary. Mike is acting as Randy's apprentice, getting qualified to run the yard in the future. And Pete is sole-operator of PDX-1 in Old Saybrook. |
 |
| Meanwhile, at the "other end of the line" in New Haven/Cedar Hill Yard staging (representing "points west" to New York), Tom Derwin is getting another eastbound train ready to go, while Dave Ramos and Al Oneto are on PDX-2, trying to figure out how to switch Essex. |
 |
| Further up the Valley Line in Wethersfield, James Mayo acts as conductor on HDX-7 (The Valley Local) while Sudro Brown keeps a firm hand on the throttle. |
 |
| Heading back down the Valley and banging a westward turn at Middletown, we find Bill Schneider and Howard Miller working the Airline local at Mill Hollow. |
 |
| A better shot of Tom, Dave and Al - all smiles . . . |
 |
| . . . . until they realize they're still not done switching Essex. |
 |
| As typically happens - on the model railroad as well as on the prototype - the Airline local and the Valley local are in Middletown at the same time. Well, actually, in this case, they're in the "Middletown Aisle" at the same time - HDX-7 is actually still in Rocky Hill at this point. |
 |
| After finishing Essex, Dave and Al discovered that the rest of the work goes pretty quickly. Here they are back at the south end of the Valley Line in Old Saybrook having already done their work up to East Haddam and back. They're waiting for permission from the dispatcher (um, who's taking the photo) to occupy Main Track 1 so they can continue to Cedar Hill Yard and home. |
But - as is always the case with ops sessions - a few punch list items surfaced:
- Some couplers have developed issues - specifically, I need to (re)check the coupler heights on all the DER-1s (DL-109s) as well as the centering on the DERS-1b (RS-1) and a few freight cars.
- Even though I distinguished operating notes for the Shore Line trains (so the operators know clearly which notes pertain to them), I'm considering just creating separate sheets for each of the Shore Line operators to make the schedule easier to follow and the staging easier to execute.
- I need to check the trackwork at the east (left) end of the Saybrook station area, as well as tweak the Airline liftout. Seems about this time every year I have a similar issue, due to seasonal expansion/contraction. No derailments (thankfully), but any height-mismatched couplers would tend to disengage in these areas.
- And - a first for this session - the main power toggle switch got bumped and shut down the layout. So I'm considering putting a toggle guard around it to prevent future unintended shutdowns. %^)
- Finally, signing of the Train Registers in each town was spotty. So I'm considering returning to in-person reporting to the Agent. Then they'll HAVE to report in - if only to know what work they have to do in town >:^)
Comparing this list to previous punch lists, it's gratifying to see that the quirks are being worked out of the layout over time. That sort of improvement is one of the reasons to host regular operating sessions - but it's certainly not the most important reason.
THAT is to have a chance to have friends - and future friends - over to share in the love of railroading and help get the time machine we've created off the ground and running.
Thanks again to Mike, Randy, Pete, Dave, Al, Tom, Howard, Bill, Sudro, and James for making it such a great day! I'm already looking forward to the next session (as soon as I can get through the punch list...)
Thursday, November 16, 2017
More from Don Janes . . .
I mentioned in passing a couple days ago that Don Janes and Greg Stubbings had been able to visit the Valley Line recently. Well, while Greg and I were operating the Valley Local, Don was using his considerable photography skills to capture some scenes from the layout. He certainly makes things look nice!
He's uploaded a post over at George Dutka's White River Junction blog with more about the visit. If you get a chance, I hope you'll take a minute and click over to see it!
Thanks again to Don and Greg for visiting and for such a great time - and thanks to George for giving Don a place to upload such wonderful photos!
Wednesday, November 15, 2017

Tuesday, November 14, 2017
Quick Update: Canadian Visit, NYHRR Ops Session & Prep for NER Convention
Wow - I just realized I haven't done a substantive modeling update since October 23. Unfortunately, work got especially busy during that time and whatever hobby time I had I've mostly spent working on layout & backdrop photography. Thanks to some great help from Brooks Stover, I've been improving - though still nowhere near where I want to be. Fortunately, "backdrop photography" consisted of something I am actually proficient at - taking pictures outdoors. So I took advantage of the teeny tiny foliage season to get some more shots I can (hopefully) use for backdrops.
I also had a visit from Don Janes and Greg Stubbings and was able to host a quick ops session with Greg, while Don took photos (unfortunately, I didn't get any photos myself - but hope to be seeing Don's pics soon!). They were down from Canada visiting New England and were in the neighborhood - click here for Don's report on their visit to the Valley RR.

Speaking of Ops Sessions, I was able to make it down to Dave Ramos' and was able to meet Tim Harrison and Stuart Chirls in person, which was an unexpected treat. It was amazing how long it took us (a 3-man crew) to switch a yard, a few industries, and a car float. But it's always a blast to visit the NYHRR. (sorry guys - next time I promise to relinquish the throttle...)
As for modeling, unfortunately, the B&O flatcar and Rt. 15 bridge are still in primer, ready for the next step. But I did get some layout work done, thanks VERY much to DaveM for some additional Valley Coal structures, thanks to scenery help from Bill and sadly-blogless-Pete, and thanks to a looming scheduled ops session hosting folks from the NMRA/New England Region Convention in Newport, RI.
The photos tell the story . . .

In addition to the Valley Coal office and oil tanks, Dave also sent models of the coal bins and garage - built according to what prototype photos I had available and a plot plan I'd sent him. They all arrived recently and I started doing a final mock-up of the scene.

Once I got everything in a good place - and as close to prototype arrangement as practicable - I decided to raise the terrain with foam core so that it would be more in line with the tops of the rails (thereby "sinking" the siding) and cut some openings to accommodate the masonite structure bases.


Then it was a matter of adding Ground Goop to feather everything in (hiding the edges of the foam core, primarily) and painting the foam base to make things look a little nicer (and to prep for further scenery materials.

The road will definitely get additional treatment - this was just a quick paint job to hide the foam. There's much scenery to be done here...

Meanwhile, Bill worked on modifying/sizing/printing a photo backdrop for where Middlesex Turnpike hits the masonite in the Goff Brook scene. Here he's creating a fillet of paintable caulk to feather the edge between the 3D road and 2D road on the backdrop.
Just because you need to move details and such out to keep them out of harm's way doesn't mean you can't set up a little mini-scene in the meantime... And it's a great way to keep motivation high.

Pete and I also got back to the East Berlin scene to add Ground Goop and get it ready for further scenery. Turns out, we worked so fast that this is the only shot I got of the progress - I promise more pics later.
While it's always nice to show some additional layout progress to my regular operators, I have to remember that the NER guests will not have seen the layout in person yet - so everything will be "new" to them at least. That realization kept me from getting too stressed about getting a lot more accomplished - but knowing they were coming still gave mea timely kick-in-the motivation to press ahead a little further at least.
So what's next? Ah - there is SO much to do. I'd like to finish up the B&O flatcar, as well as teach myself resin casting so I can copy the girder parts for the Rt. 15 overpass (thanks to Don Janes for the encouragement to try casting...) and get that done. And I really want to maintain my motivation to do scenery - something that's always been a major hurdle for me. Thanks to Bill and Pete, I've got a good start - I just have to keep pressing forward (and finally try out that static grass applicator myself - are you listening Ted?). Steam decoderization is waiting for decoders, and I still need to dial-in the installs I did recently.
But all in good time - they don't call this The World's Greatest Hobby for nuthin' - it certainly is all-consuming with an amazing variety of different things to do and skills to learn. Hope you'll continue to enjoy following along as the Valley Line continues to evolve - or at least learn what not to do along the way... %^)
 |
| Not a "backdrop photo" but something I saw while out shooting landscapes for same. Housatonic Railroad local freight, North Canaan, CT 10/27/2017 |

Speaking of Ops Sessions, I was able to make it down to Dave Ramos' and was able to meet Tim Harrison and Stuart Chirls in person, which was an unexpected treat. It was amazing how long it took us (a 3-man crew) to switch a yard, a few industries, and a car float. But it's always a blast to visit the NYHRR. (sorry guys - next time I promise to relinquish the throttle...)
As for modeling, unfortunately, the B&O flatcar and Rt. 15 bridge are still in primer, ready for the next step. But I did get some layout work done, thanks VERY much to DaveM for some additional Valley Coal structures, thanks to scenery help from Bill and sadly-blogless-Pete, and thanks to a looming scheduled ops session hosting folks from the NMRA/New England Region Convention in Newport, RI.
The photos tell the story . . .

In addition to the Valley Coal office and oil tanks, Dave also sent models of the coal bins and garage - built according to what prototype photos I had available and a plot plan I'd sent him. They all arrived recently and I started doing a final mock-up of the scene.

Once I got everything in a good place - and as close to prototype arrangement as practicable - I decided to raise the terrain with foam core so that it would be more in line with the tops of the rails (thereby "sinking" the siding) and cut some openings to accommodate the masonite structure bases.


The road will definitely get additional treatment - this was just a quick paint job to hide the foam. There's much scenery to be done here...

Meanwhile, Bill worked on modifying/sizing/printing a photo backdrop for where Middlesex Turnpike hits the masonite in the Goff Brook scene. Here he's creating a fillet of paintable caulk to feather the edge between the 3D road and 2D road on the backdrop.
 |
| Trucks sitting in front of Gra-Rock, on the site of the old passing siding across from the Wethersfield station. |

Pete and I also got back to the East Berlin scene to add Ground Goop and get it ready for further scenery. Turns out, we worked so fast that this is the only shot I got of the progress - I promise more pics later.
While it's always nice to show some additional layout progress to my regular operators, I have to remember that the NER guests will not have seen the layout in person yet - so everything will be "new" to them at least. That realization kept me from getting too stressed about getting a lot more accomplished - but knowing they were coming still gave me
So what's next? Ah - there is SO much to do. I'd like to finish up the B&O flatcar, as well as teach myself resin casting so I can copy the girder parts for the Rt. 15 overpass (thanks to Don Janes for the encouragement to try casting...) and get that done. And I really want to maintain my motivation to do scenery - something that's always been a major hurdle for me. Thanks to Bill and Pete, I've got a good start - I just have to keep pressing forward (and finally try out that static grass applicator myself - are you listening Ted?). Steam decoderization is waiting for decoders, and I still need to dial-in the installs I did recently.
But all in good time - they don't call this The World's Greatest Hobby for nuthin' - it certainly is all-consuming with an amazing variety of different things to do and skills to learn. Hope you'll continue to enjoy following along as the Valley Line continues to evolve - or at least learn what not to do along the way... %^)
Subscribe to:
Posts (Atom)