Monday, January 9, 2023

Modeling Monday: B&M SW1 #1109 is Finished!

After adding the final details (except for the lantern, which is on its way), I just had some final weathering to do.

Here are the steps I took:

  • Applied an overall coat of semigloss.
  • Using prototype photos as a guide, added major oil spills using dots of lamp black oil paint, "pulled down" with a brush dampened in mineral spirits.
  • Added many minor spills and details using Tamiya Black Panel Line Accent Color (a.k.a. "Taco Sauce").
  • Applied some burnt umber gouache "rust" to the handrails, grabs, cooler/lunchbox, and couplers.
  • Waited 3 days for everything to dry thoroughly (mostly cuz I couldn't get to it again for that long - YMMV).
  • Sealed the whole engine with a coat of Dulcote
  • Rubbed the side of a pencil along the handrails, grabs, door handles, hood railings - anywhere crew members would be handling metal. Oh - don't forget the top edge of the lunchbox, step edges, top edges/corners of the truck sideframes, etc.
  • "Freshened up" some of the oil spills with AK "Engine Oil" and Mig "Fresh Engine Oil" applied with a small brush.
  • Applied black Pan Pastel to tone down the brass bell (no pun intended), more to the top of the stack, and along the top of the hood and cab roof.
Thanks again to The Mudfather for his extensive weathering advice & guidance, including all the final finishes noted above (except, notably, the Pan Pastel - which he most certainly would not have recommended :)

Once the final weathering was done, it was time to remove the masking tape, add a crew, and put everything back together!


I've really come to love the Walthers model. It just comes apart and goes back together so easily - thankfully! After removing the masking tape from the windows, I had to reinstall the glass, then glue the rear light mount back to the top/inside of the cab roof, press fit the rear light contact board to the cab, and route the wires/light back to the housing.

All along, I wanted to try and include a crew, but the Keep Alive takes up a lot of the cab space. Thankfully, it doesn't rise above the windows, so I figured I'd do a little surgery and see what I could come up with . . .

I think the Brotherhood may have something to say about my crew "accommodation"


I searched through my stash of crew members and found a couple that I could get to fit.


They're not super easy to see, but you notice if they aren't there and they sure to add a lot to the interior (and incidentally help to disguise the KA).

Once the crew were added (affixed in place with wax candle adhesive - I'll use thick CA if they start to come loose...), all I had left to do was insert the front light into the housing, put the hood on, then the cab, and FINALLY put it on the layout!

Enjoy the "finish photos" and the video - I hope to have more detail shots (and a much better video) in a future post (and remember, you can always click on the image for a larger view) . . .


From the first time I even considered modeling the 1109 way back in the fall of 2021, this project has been a group effort. While I may have been the one to do the "work," many have made this final product possible and deserve many thanks:
  • First and foremost, Philip Taylor who I'd met through the A Modeler's Life (AML) podcast and who - when he heard I was looking for an SW1 model - sent me a brand new Walthers engine (and even the "right" 2nd run one!). Anyone that's been following this project knows that it's provide many, many hours of enjoyment.
  • The Walthers model was painted for the PRR, and to model the 1109 in the livery I wanted, I needed decals. Dave Owens and Tom Murray came through with what I needed.
  • A quick search of the internet pointed me to "The Model Railroader's Guide to B&M/MEC Diesel Paint Schemes" which not only educated me on all the different liveries, but is a wealth of information and photos.
  • David Hutchinson - who happens to be the moderator/owner of that FB group - gets a HUGE thank you for not only providing many prototype photos of the 1109 right off the bat, but he also contributed some critical detail parts and additional decals. I couldn't have finished the detailing and lettering without his help.
  • Hunter Hughson and Seth Lakin provided some fantastic articles and prototype information that was priceless early on and helped me figure out what details I was going to need.
  • Speaking of details, thanks goes to Rick Abramson and John Kasey for additional details I'd forgotten.
  • And finally, this project could not have been truly finished without a good "finish" - and by that, I mean weathering. Other than a quick dusting with chalks and dulcote, I'd never truly weathered a locomotive before - especially not based on prototype photos. But Ralph Renzetti (a.k.a. "The Mudfather"), someone else I met through the AML, offered to help - being my "training wheels" and guiding me through the process. No small feat considering he lives in Canada(!) We spent many hours "together" in my paint room, with him watching over my shoulder via FB Messenger Video and my iPad. One of the biggest challenges in weathering - for me at least - is knowing what materials to use, when to use them, and what they're (in)compatible with. Knowing Ralph was there to keep me from totally screwing up such a nice loco gave me the confidence to go for it. The final finish is the direct result of his helpful guidance..
Being a New Haven modeler, I never considered the 1109 as anything more than "just" a "leased" loco (so why do it at all? click here for that story), so I figured it'd be a good project to practice on and develop some new skills. No risk of screwing up one of my NHRR locos . . .

But as the project evolved, and more folks became involved, the 1109 became so much more - and I don't mind saying that it's become my favorite diesel. And I've definitely learned many new skills that I'm looking forward to using on future projects!

Now that this loco is done, I really need to get back to the layout. There's only a few weeks left until the Big Springfield show and it'd be great to get some scenery down in Essex before then. Onward!

Saturday, January 7, 2023

Adding Final Details to the 1109

After finishing the initial weathering, I decided to go ahead and add some B&M-specific details: lunchbox/cooler, rerailers, a hook for a lantern, and a poling pole.

You can make out the rerailer beneath the cab (and there's one on the other side as well) and the poling pole under the walkway above the engineer's side front truck.


The cooler/lunchbox is located on the back of the cab to the left of the cab door.

Though not the 1109, this photo shows where the B&M had some hooks to hang lanterns.

First I got some rerailers (Precision Scale 31644) and drilled some holes for the hooks to go into...


I made the poling pole from a toothpick, and used some flat brass strip to make mounting hooks. . .


I found it easier to glue the hooks to the rerailers and poles beforehand (using CA), basically making them into parts I could then glue to the underside of the frame (also using some thick CA).


After painting, I installed them using the prototype photos as reference.


One of the things I was initially worried about was whether these parts would interfere with the trucks when negotiating curves. After eyeballing the engine on an 18" radius curve (the sharpest I'll ever allow the loco to negotiate), I was pleased to discover that the details would work just fine - though the poling pole is just a little farther outboard than the prototype, just to be sure.

Here are some additional closeup photos of the finished parts installed . . .


With the under-frame details done, I turned my attention to the lunch box, which needed to be scratchbuilt using the prototype photos as a guide . . .


I just eyeballed/guesstimated the dimensions, making it up from three separate parts. The box was made from .125x.250 styrene strip (Evergreen 189), the lid is a piece of .010x.125 strip (Evergreen 106), and the "latch" was, honestly, just a little bit of styrene scrap that I found laying on my cutting pad.


I painted it black and weathered it to match the back of the cab.


I'm prone to allow lack of information to become a brick wall that stops all progress, and in this case I didn't have any dimensions of the lunchbox - but I think you'll agree that just eyeballing it worked out just fine.


The last detail was a hook used to hang a lantern (I actually have an HO scale Adlake lantern on the way from my friend Bernard over at Miniprints). For the hook itself, I used an eyebolt/lift ring and snipped part of the circle away. That saved me having to try and bend such a small hook.

I "painted" it with a black sharpie, but it'll be further weathered later (it's only dry fit in the photo above).

With the addition of these details, there's literally nothing else to add - except more weathering! Stay tuned next time for that . . .

Sunday, January 1, 2023

Happy New Year & B&M 1109: Initial Weathering

Since this is my first post of 2023, I want to wish you and yours a Very Happy New Year! Here's hoping you have a very safe, healthy, and productive year and that you're able to knock off your to-do/bucket list some things that have been lingering for a bit too long.

One of the things that's been lingering a bit long here at The Valley Local is the B&M SW1 - though I admit I've been having a blast working on it and am simultaneously reluctant to finish it and chompin' at the bit to get it on the layout and into revenue service!

To that end, it's been a VERY productive - what - 12 days?? Despite having Christmas and New Years happening since we got back from Cape Cod on the 18th, I've just about completed this loco . . . but I'm getting a bit ahead of myself . . .

The last time I posted about it, I'd realized that I'd forgotten to add two final decals on each side sill. With the decaling/lettering now finished, I'm at the point where I usually stop. Or at least that's where I left the DEY-5. But the 1109 is "just" a "leased unit" for the Valley Line, so no risk - no pressure - no reason not to try out weathering(!)

Thankfully, my friend Ralph (who also happens to be a professional weather-er - a.k.a. "The Mudfather") was willing to be my "training wheels" and mentor me through the process. Follow along as I try and convey a few of the techniques he shared - and which, to my surprise, I discovered are not only relatively easy, but yield fantastic results!

Truck Sideframes

For the sideframes, Ralph had me try daubing on gouache with a sponge.


I started by spraying them with a dull coat and while that dried I prepared a sponge by tearing little bits off the corners, to create a random spotty effect. Once the sponge is soaked and wrung out with windshield washer fluid, you tap it lightly into the gouache and then tap it lightly on the trucks. Best first to try on a piece of scrap paper to get the effect - you want just the random bits to show up. Colors are Burnt Umber along the tops, and Raw Umber along the lower sides and bottoms.


I also added some thinned black oil paint to the journals and once all dry I sealed with another coat of dullcoat. Finally, I added some Bragdone rust powder to the springs. Somewhere in there I also cleaned off the wheel faces with alcohol and painted them with Tamiya Linoleum Deck Brown using a small brush.

Fading the Cab & Hood

The black cab and hood were faded using two different methods.

Acrylic Fade
I'd already sealed the cab & hood with a coat of Tamiya Semi-Gloss Clear (X-35) after applying the decals, so the first fade was an acrylic fade. This was made up of 1 part white (Tamiya X-2) and 9 parts 91% alcohol, airbrushed at 12-15 psi down on top of the hood and cab at about a 60 degree angle, to hit mostly the tops. I found that this mix ratio required a LOT of coats in order to notice a difference - but it allowed me to build up the effect slowly. And I got a lot of practice using my airbrush.

Oil Dot Fade
After the acrylic fade dries for at least 10 minutes, you can move on to the oil fade. Unfortunately, I don't have any in-process pictures so I'll try to describe what I did... I daubed on dots of black and white oil paint along the top center of the cab and hood, alternating between black and white. I then took a soft brush, dipped it in mineral spirits and wiped it off on a paper towel so it would only be damp. Then I held the brush at a shallow angle - not quite parallel to the surface (about 30 degrees) - and brushed/pulled the dots down across the top of the cab/hood and down the sides, blending the black and white dots as I went and trying to keep the strokes as vertical as possible. If either the black or white looked too "heavy," I simply went over it again with the brush.


While that may have described what I did, there's no good way to describe how I felt. Ralph will attest to the fact that I initially HATED this oil dot method and all during the first 5-10 minutes was totally convinced that I'd ruined a perfectly fine painted loco. But boy! did I come around... As the minutes went by, I became more comfortable with this technique - and when I started to see the results, I changed from critic to fan. The pictures above don't really do it justice - to my eye, the cab & hood transformed from black painted plastic to weathered black steel. Very cool!

Once I saw the effect on the carbody, I decided to use the same techniques on the frame, being sure to mask off the mech and electronics.

"Burning" the Stack
It seems like each step of this weathering process has started with Ralph suggesting a technique, me totally balking, but then deciding to try it, and finally coming up with a great result. This process was especially evident in the exhaust stack. I'd just planned on weathering it with some black Pan Pastels, but Ralph convinced me to paint it silver (even though it didn't look silver in the prototype photos). As with most weathering (as well as scenery, so I'm finding out), success is all about layering - and silver is the first layer on a stack. . .

After that, I used my newly-acquired sponge/gouache technique to daub on Burnt Umber near the top of the stack, "fading" the random pattern/dots toward the bottom.


Keep at it until it looks rusty/heat burned near the top, and mostly silver at the bottom. You can see the result above - though I did add more black to the very top after this photo was taken.

Adding Road Dust
This step was one of the easiest, but it provided the biggest bang for the time spent. I mixed a 1:1 mixture of Tamiya Buff (XF-57) and 91% alcohol and airbrushed it along the bottom of the loco - angling the airbrush up slightly so as to hit mostly the trucks, frame, and the bottom of the carbody. This provides a nice road dust/grime effect and ties everything together (including toning down the sideframes a bit).


While I was at it, I added a bit more on the ends - in line with the wheels - to simulate road grime that's gotten kicked up along the way.

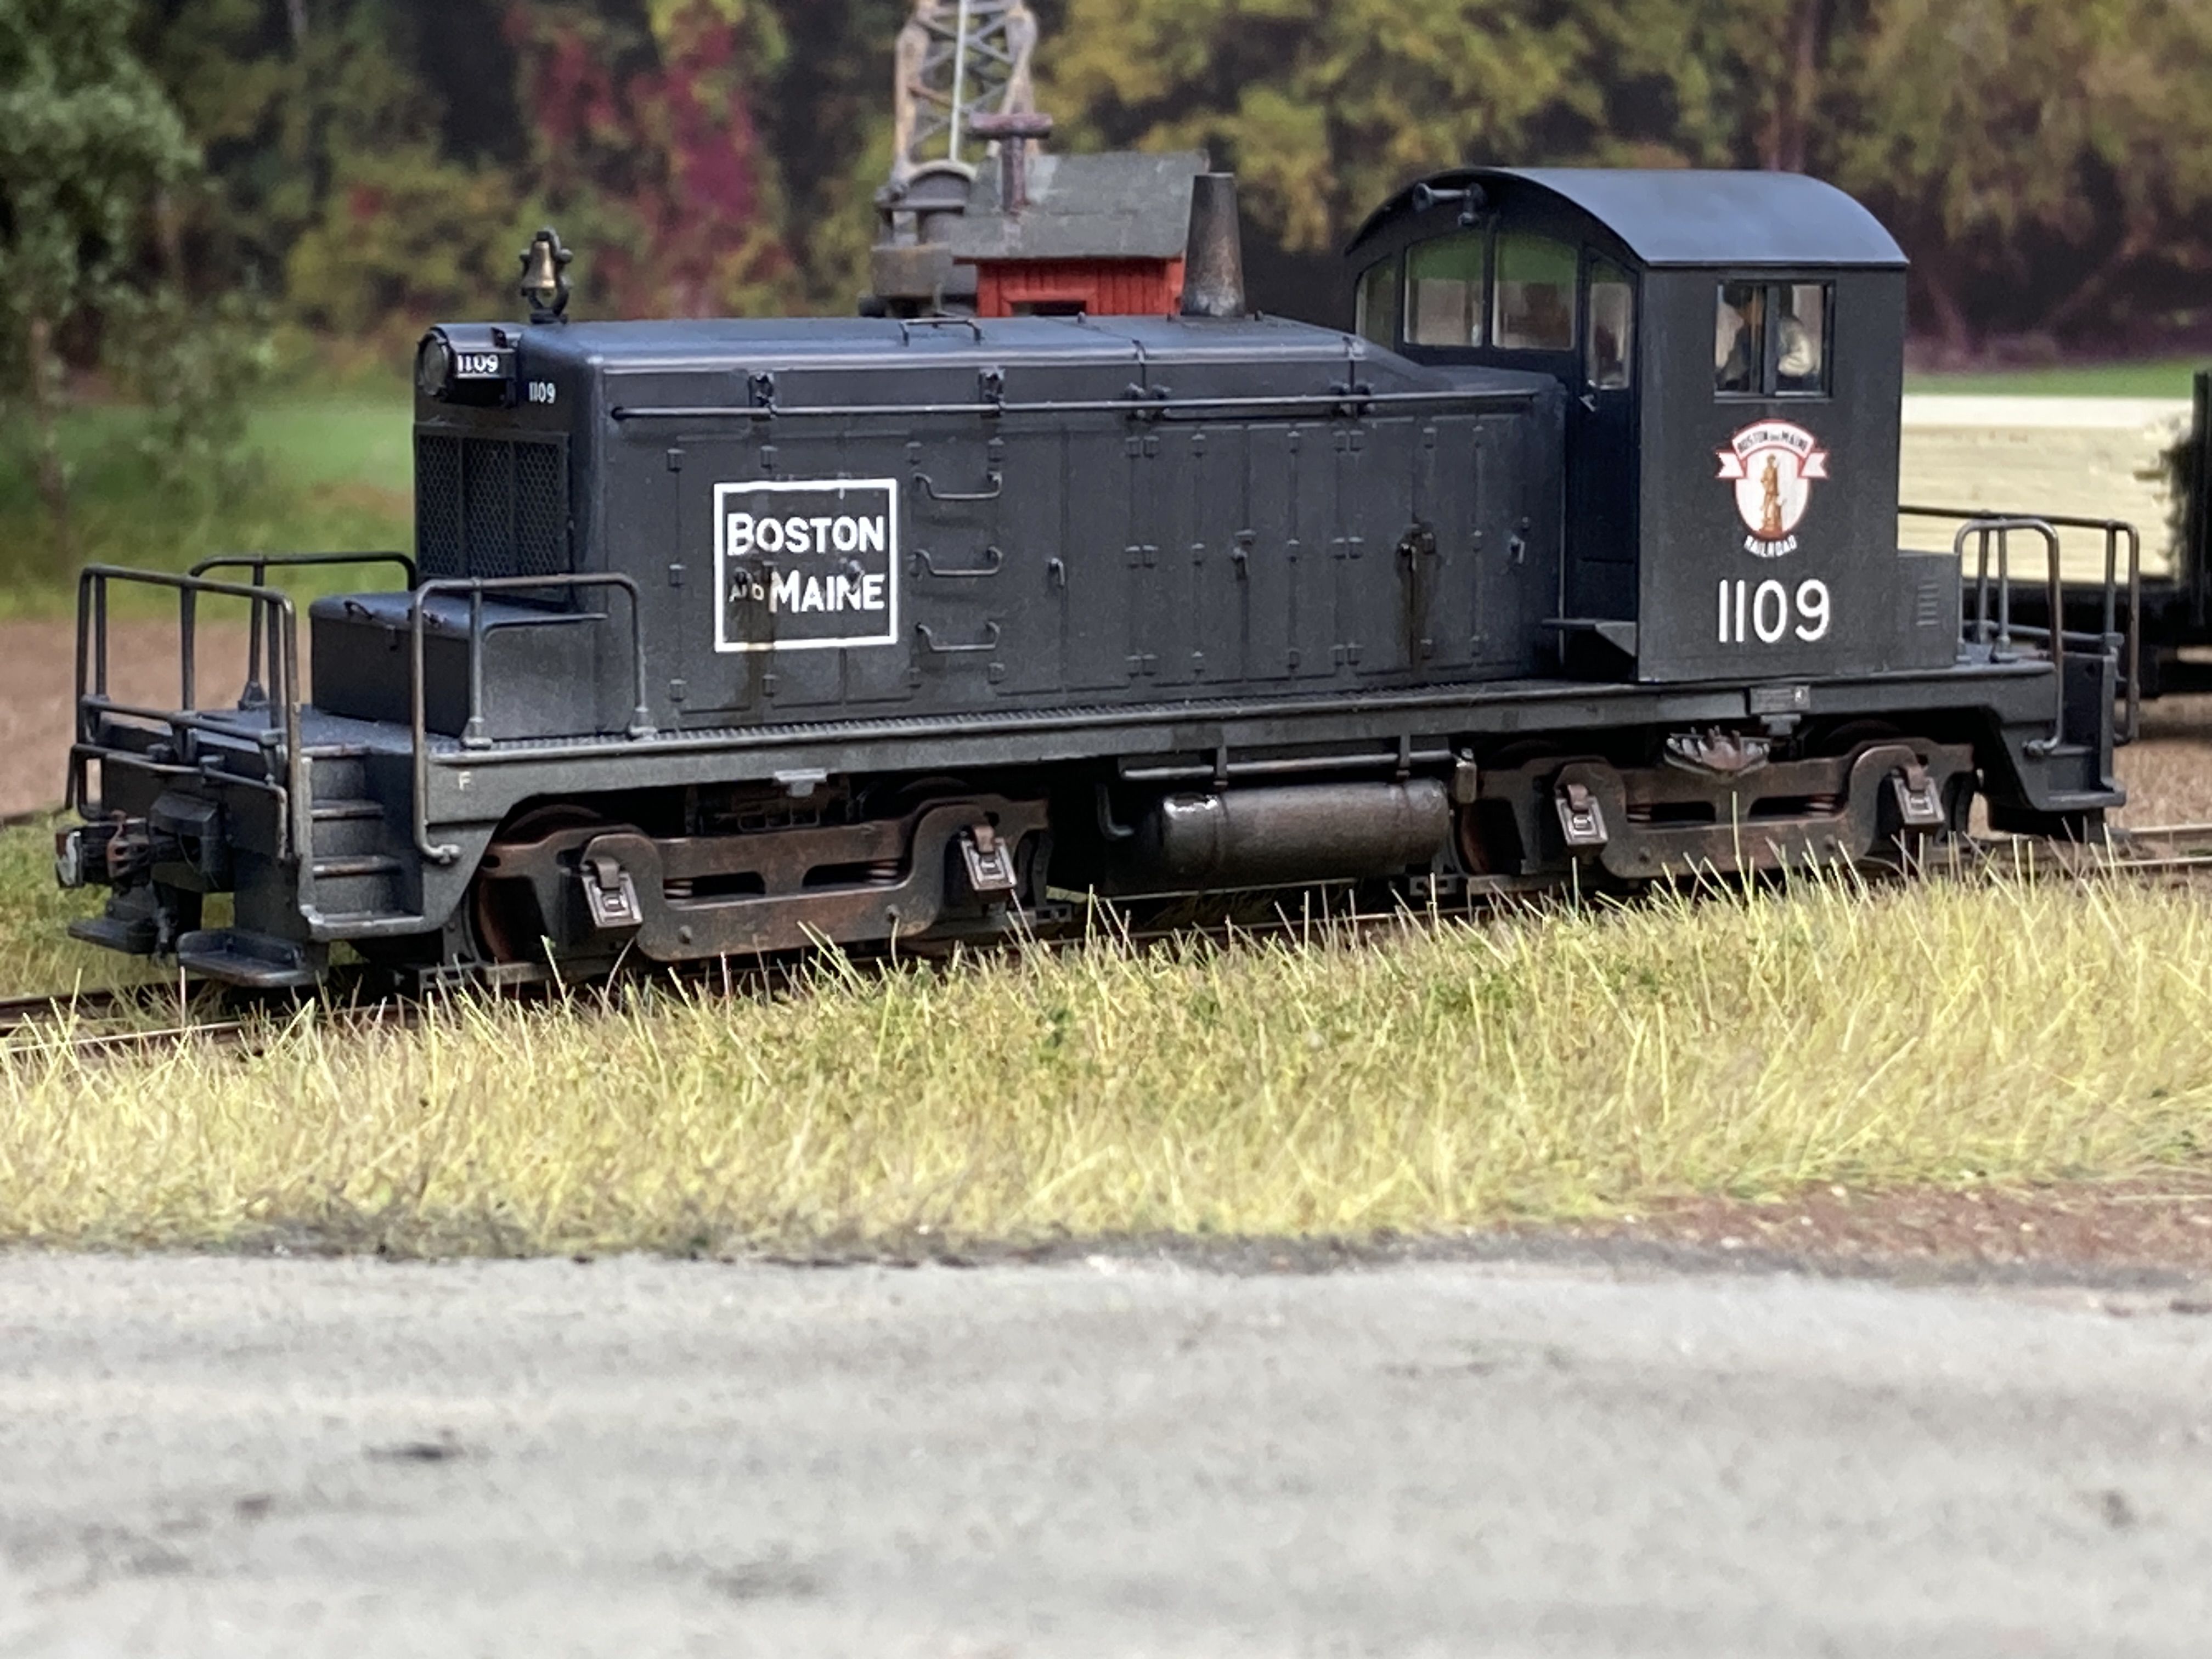
After all that's done, here's the result:


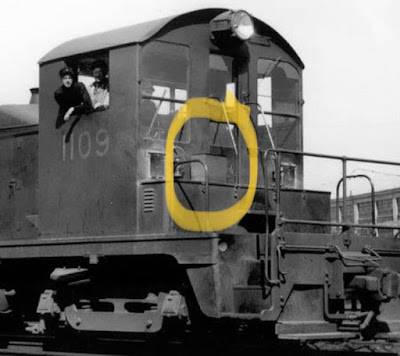
At this point, it looked so great to me I was VERY tempted to call it "done," put it back together (including windows & couplers) and put it into service. But the research prompted by my trip down the rabbit hole (aided and abetted heavily by David Hutchinson and his excellent Facebook Group on B&M/MEC paint schemes) produced this photo:


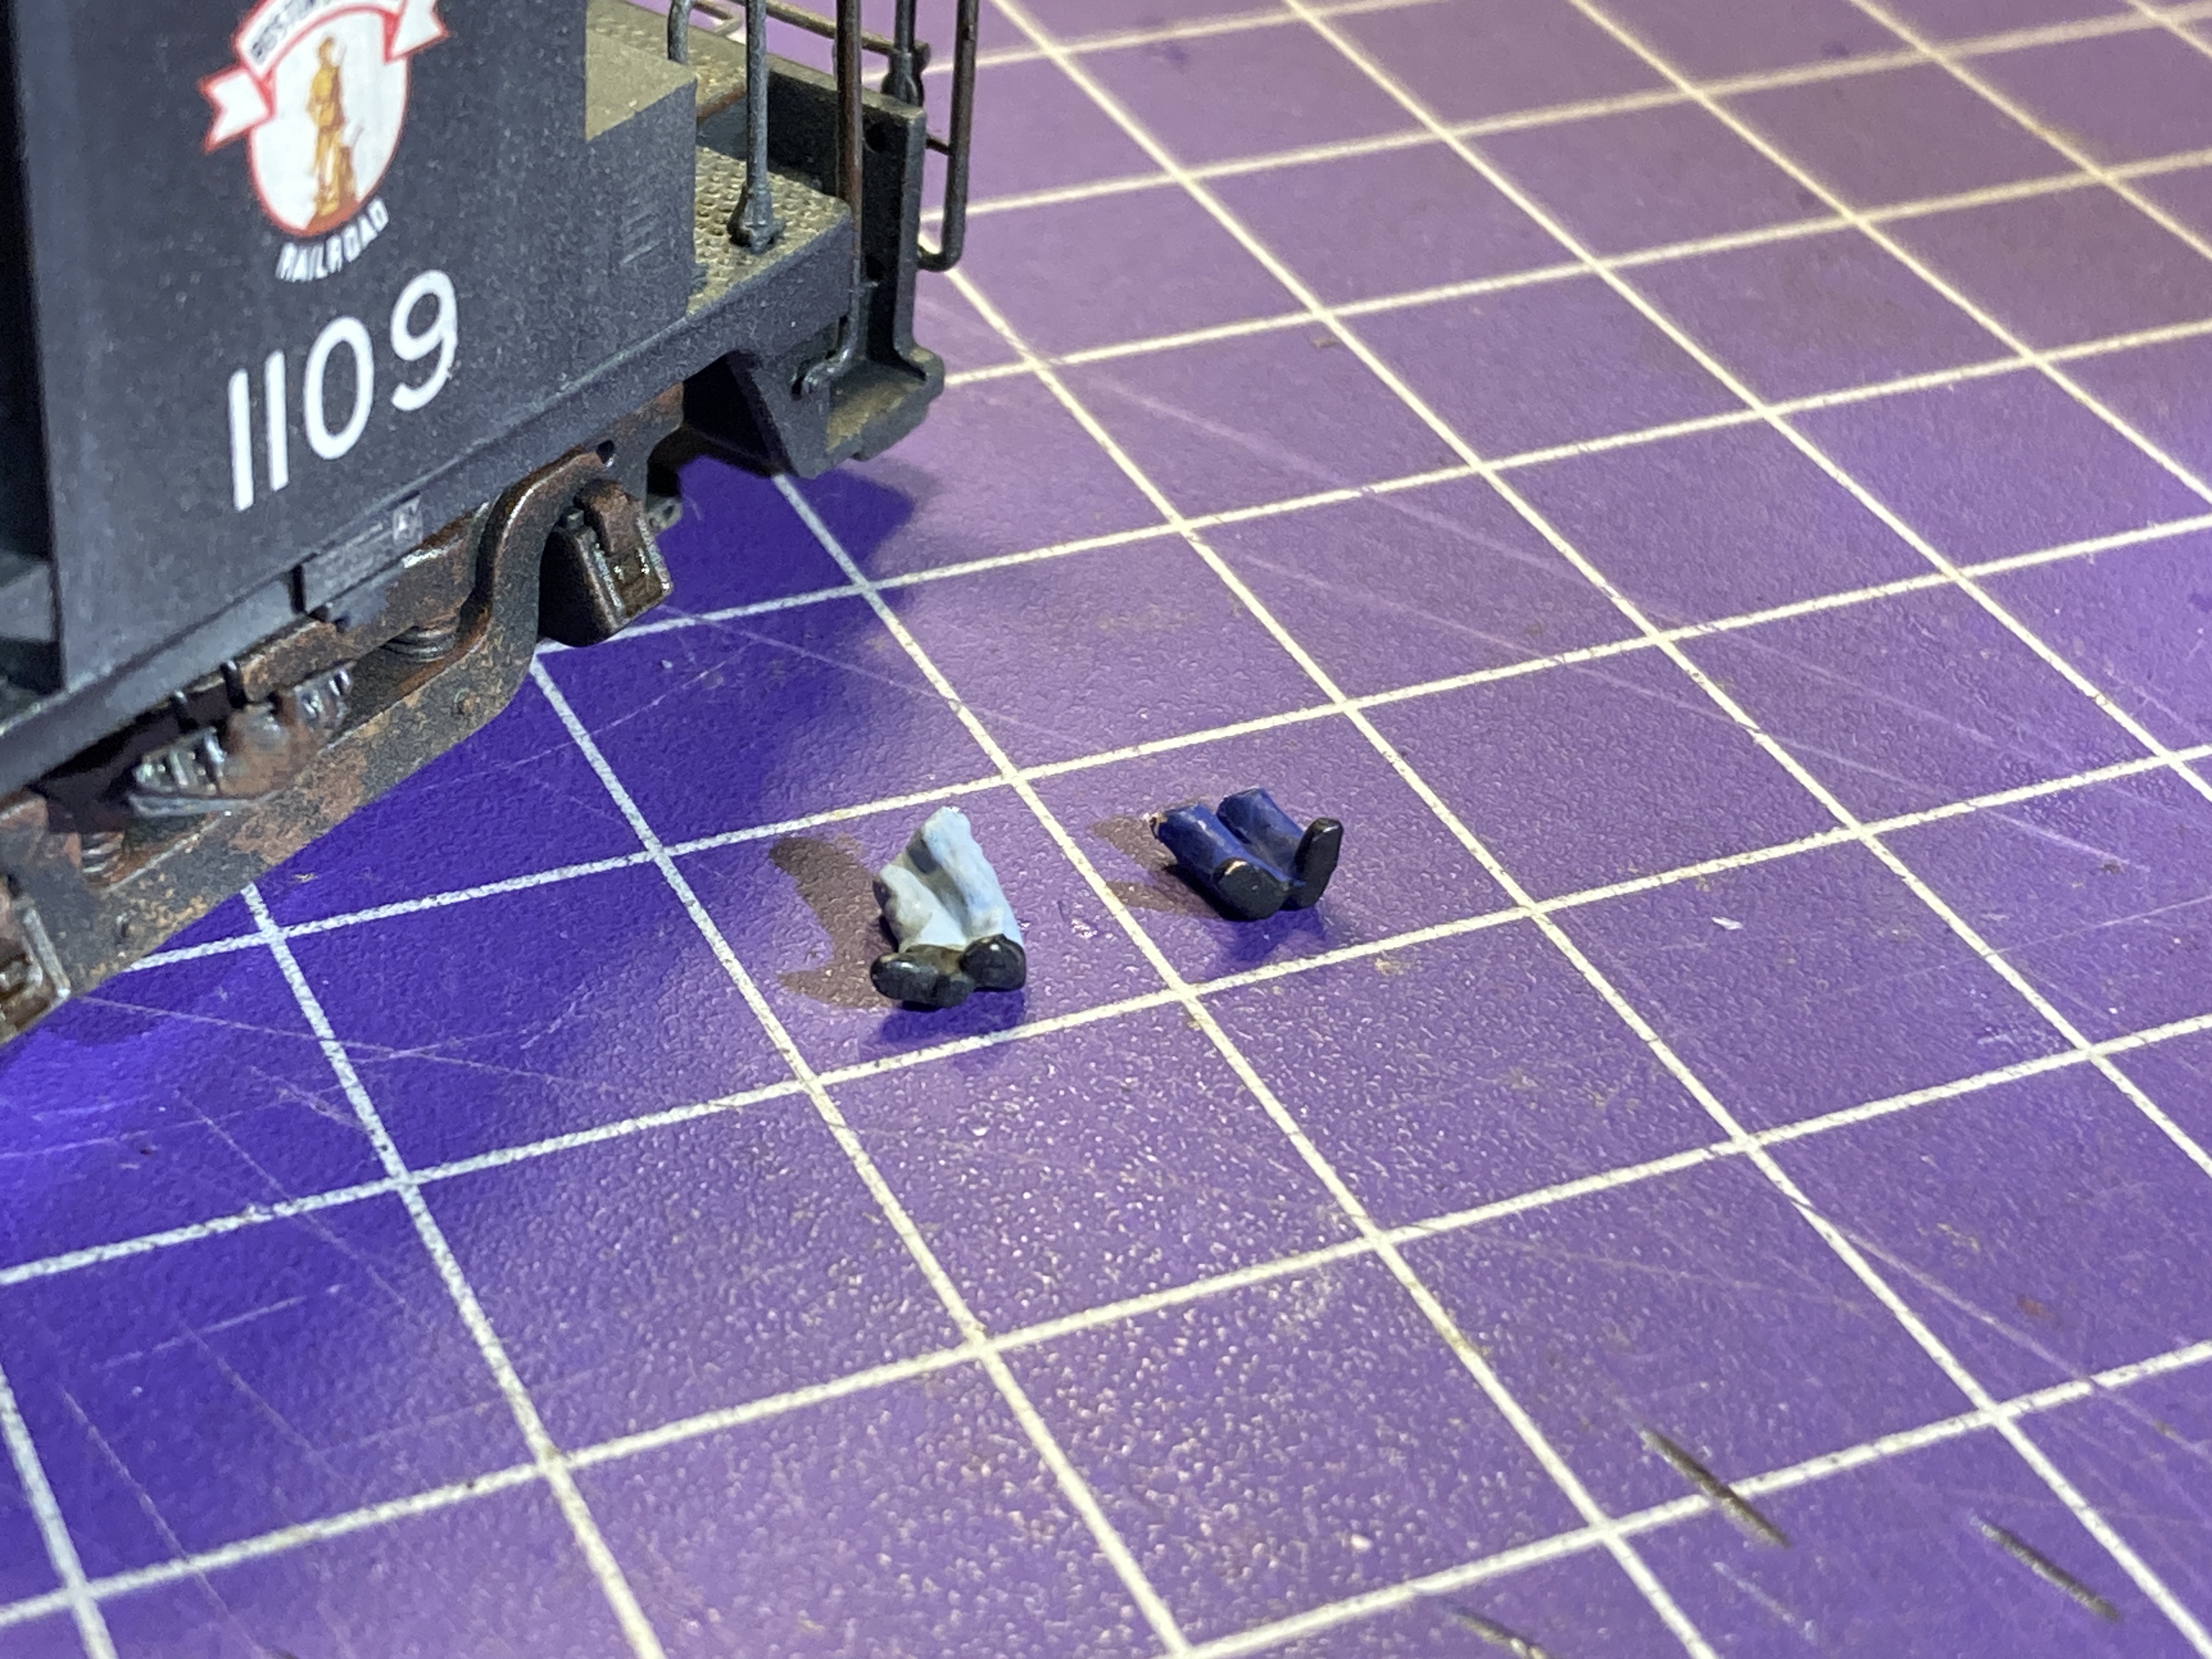
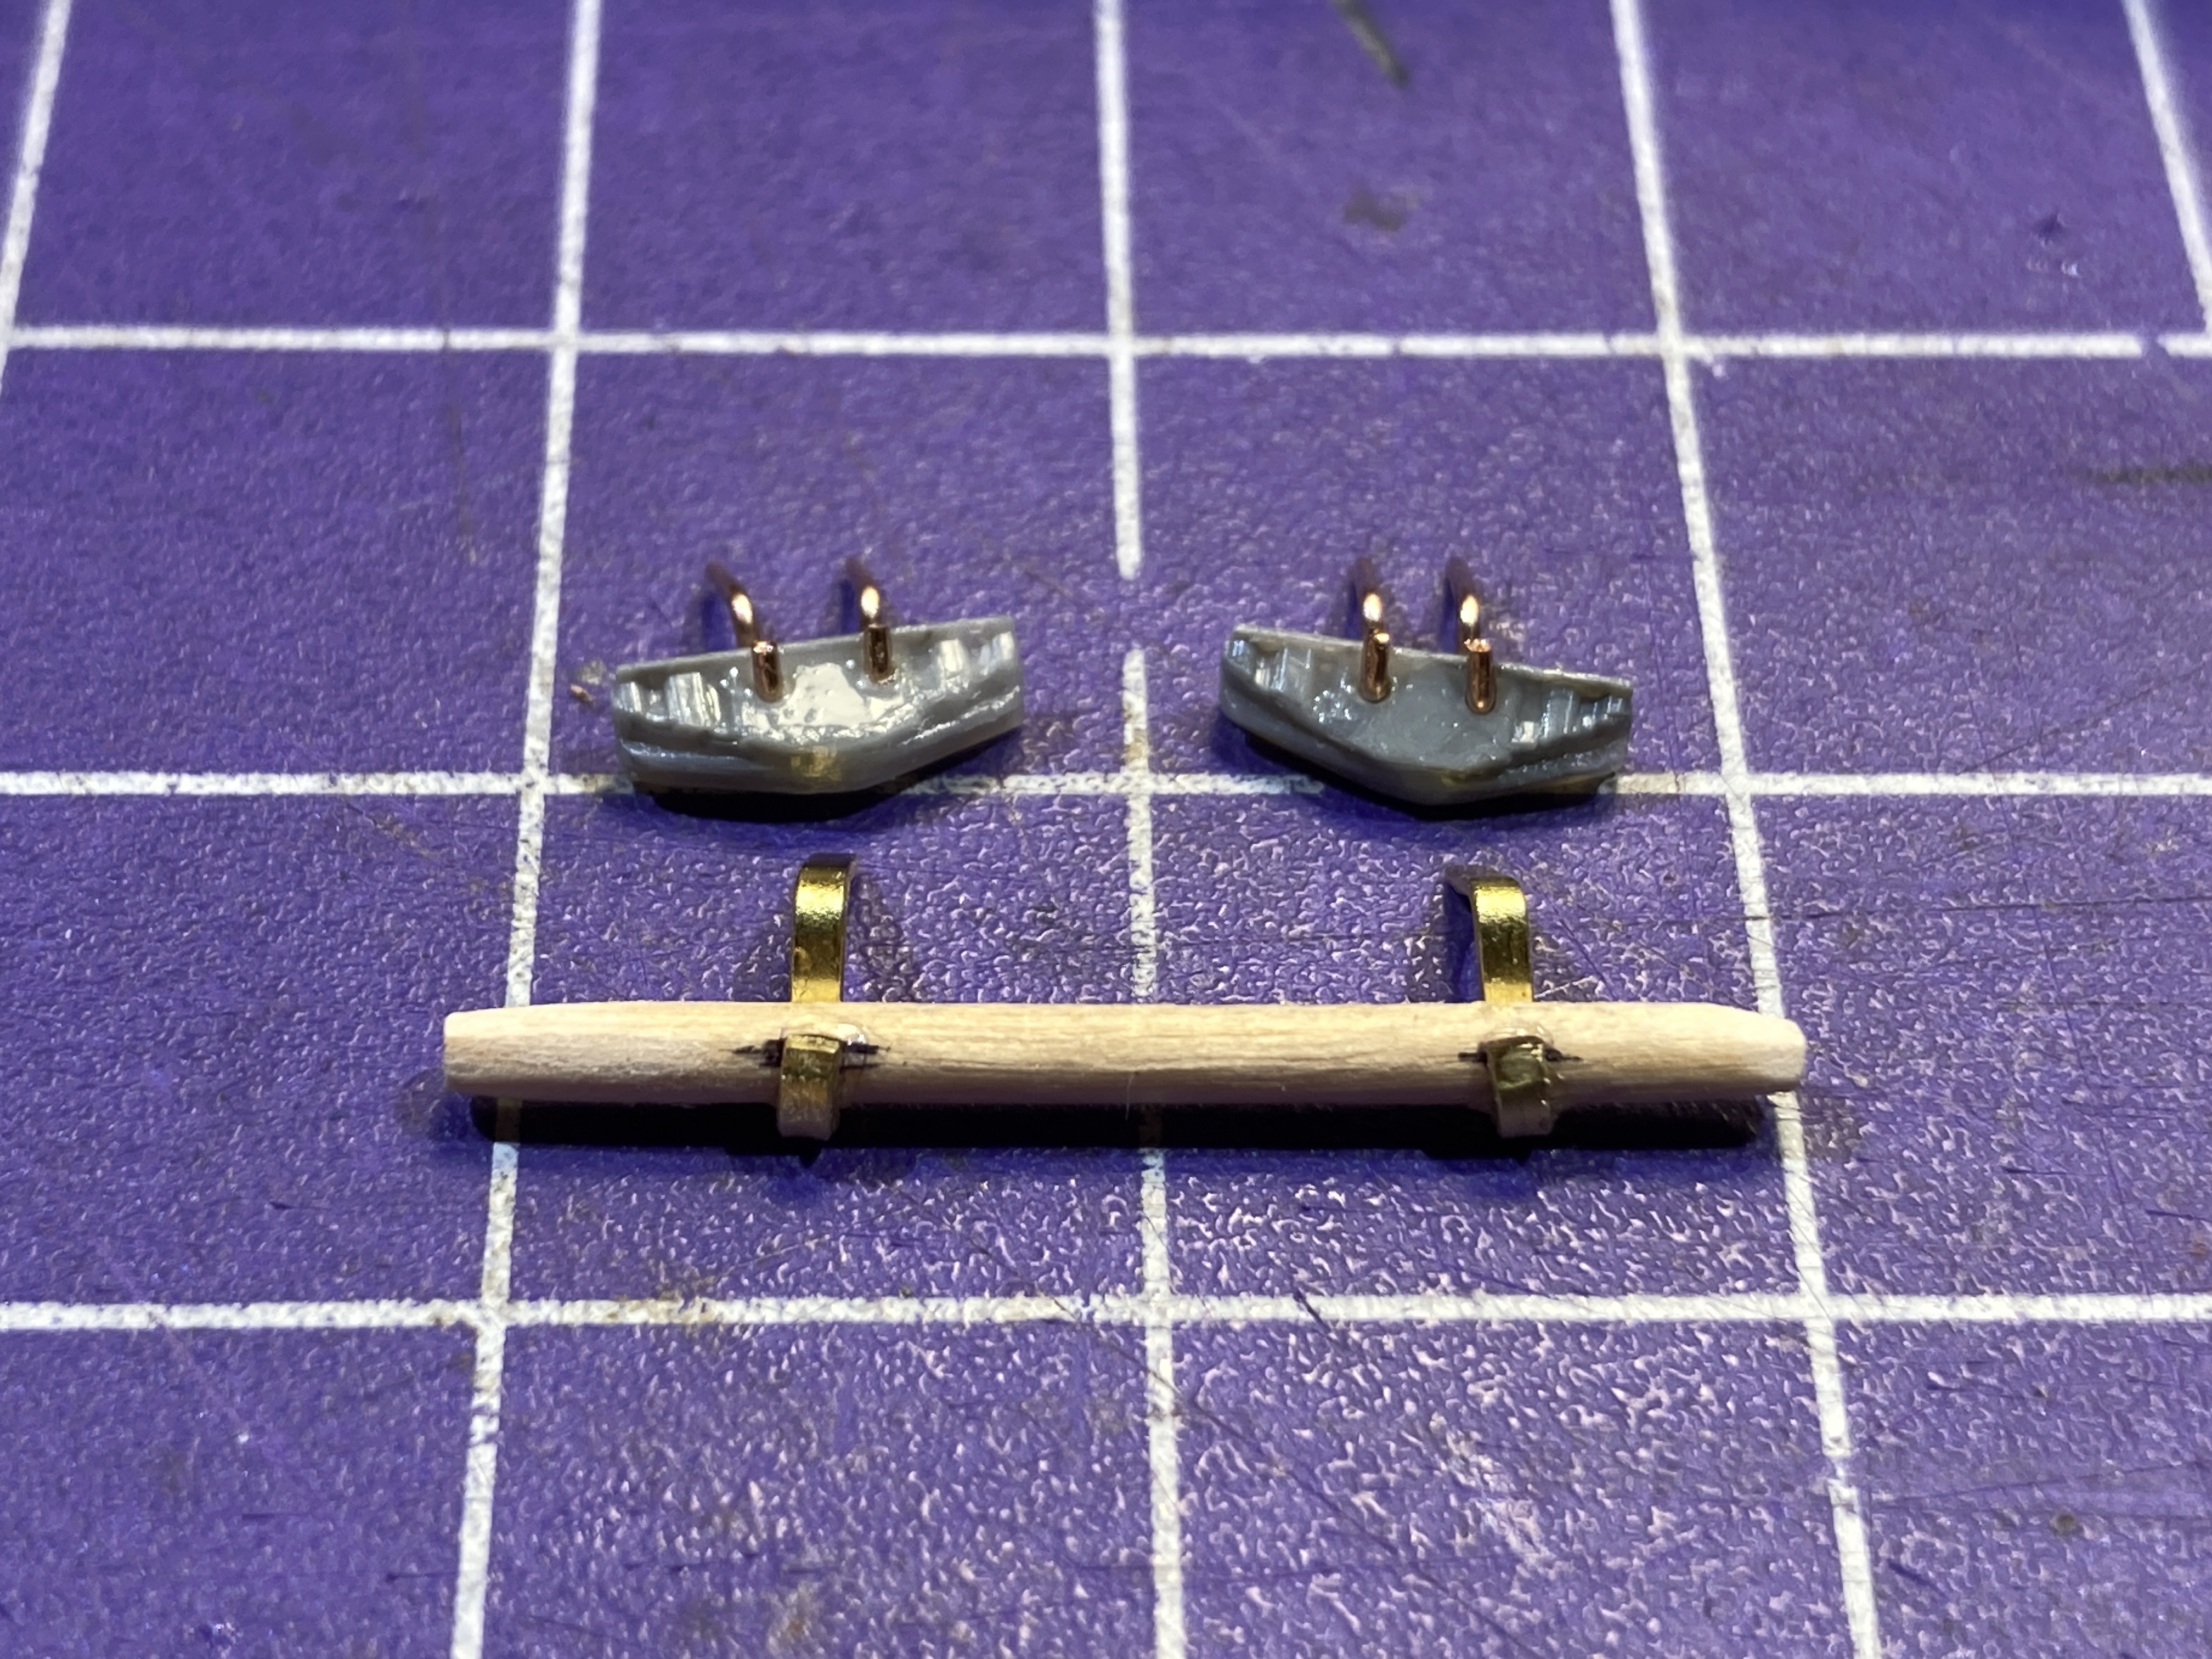
Apparently, B&M SW1s - specifically the 1109-1111 - had rerailers mounted on each side below the cab, and there was a poling pole mounted on the engineer's side over the front truck.

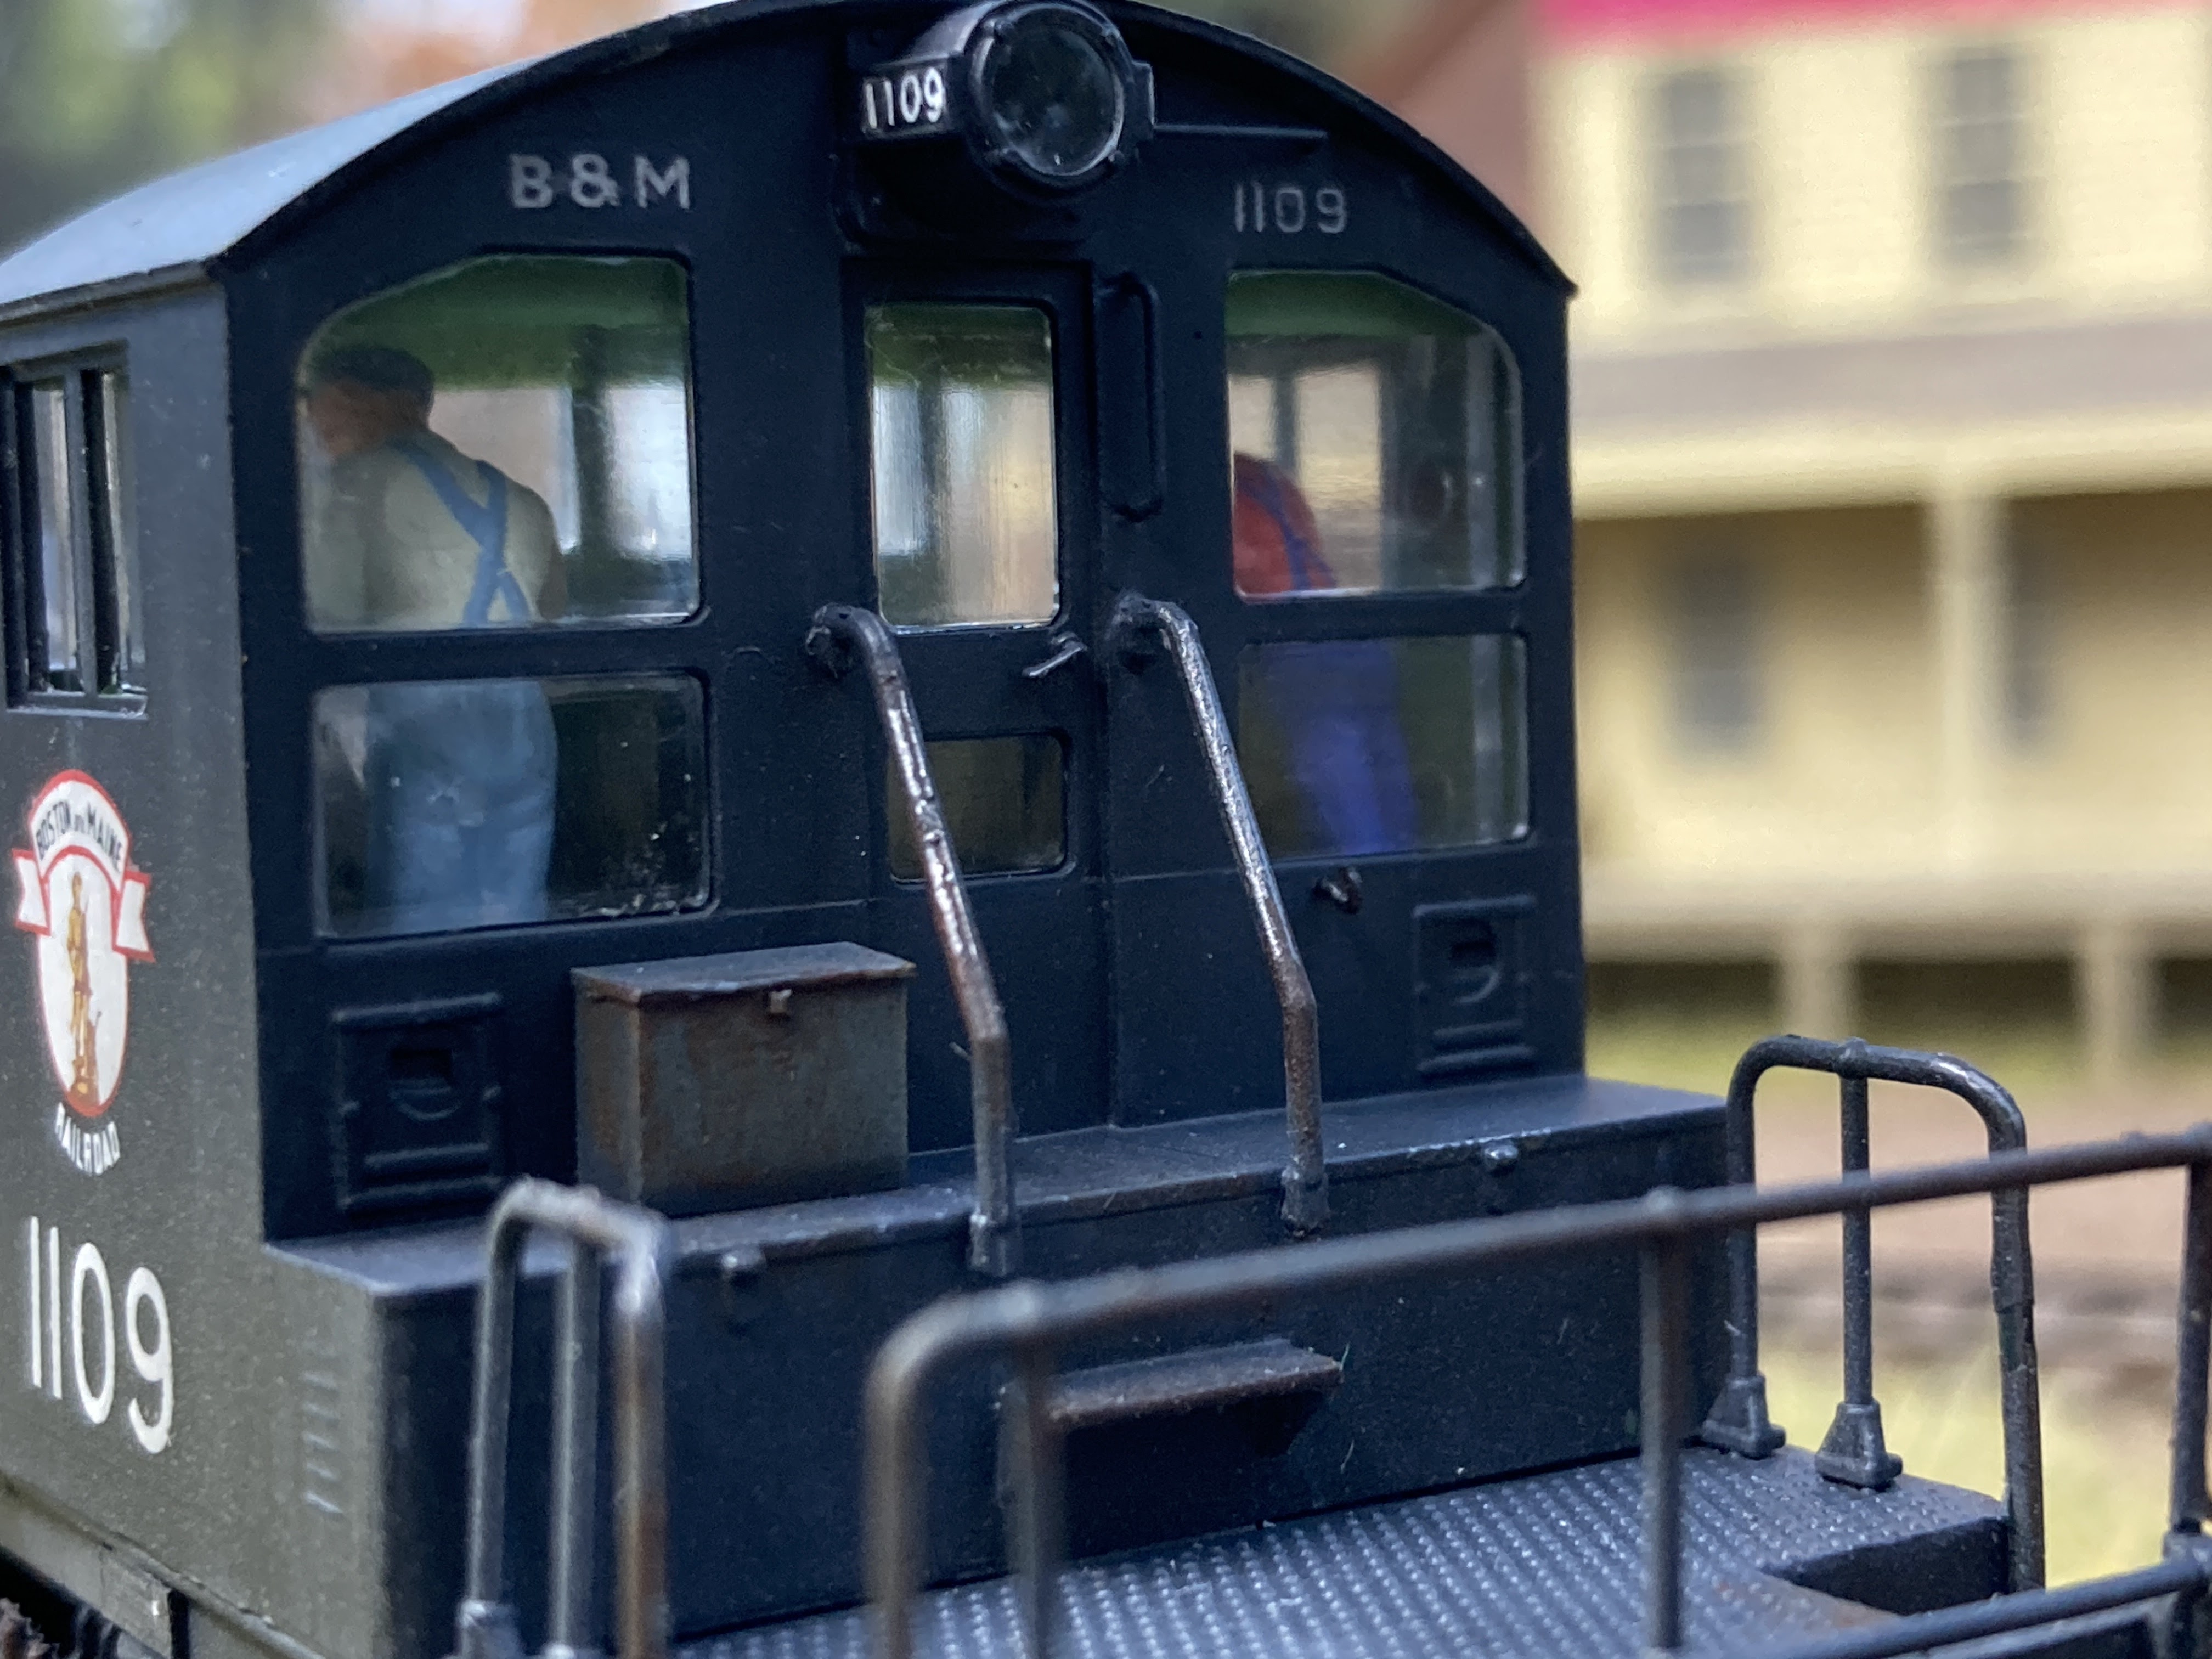
And as if that wasn't enough, the B&M also typically had some sort of cooler/lunch box on the back deck, along with hooks to hold lanterns:


I knew about these details early on, but had opted not to add them since I didn't think they were all that necessary or noticeable and - in the case of the rerailers and poling pole - might interfere with the trucks and undermine reliable operation.

But I'd come this far with this engine, so I figured out a way to add these additional details as well. Stay tuned next time for how I went about it . . .