Showing posts with label Photography. Show all posts

Sunday, April 19, 2026

Playing with AI to Create a Backdrop (first tries)

My back still isn't, um, "back" to 100% so I can't get to the layout. But I can play around with Google Gemini (an AI program) to try and create some more backdrop images to fill in behind the foreground buildings at the north end of Middletown . . .

I started by asking Gemini for "fronts of factory and mill buildings, viewed straight on" and got this image that included 4 images.


I then used the MS snipping tool to crop & save each of these images as a separate image. The one at the top left ("Riverfront Textiles") is fine to use as-is, but the others need to be rotated. So, I started with the image in the lower right ("Pinewood Paper"). Here are the screenshots of exactly what I did . . .


Not fantastic (when I rotated it, I lost a bit of the character of the varied roofline), but pretty darn good for less than 5 minutes' work.


I'll do the same thing with the other images and then see how they look. But HOLY COW! For someone like me that enjoys creating photo backdrops, Google Gemini is an amazing tool!

Just check out this before-and-after . . .

Here's the image I started with:

Point A

And here's what I ended up with:

Point B

Still a bit too "peak autumn" looking for my layout (which is set more in early Autumn), so I'll be doing some PhotoShop work to get it into final form, but from the B&W image to the image above took me no more than 7-10 minutes, if that.

Truly amazing!

I can't even imagine how long it would have taken me to get this result by regular PhotoShopping - even if I had all the skills needed. And this is certainly a long way from "just" colorizing a B&W photo (which I've been doing for over 5 years now - here's my original post on that, and the RMC article).

I actually screenshotted the nine separate instructions I used to get from Point A to Point B. So if anyone's interested in seeing those, let me know in the comments or contact me directly. It really is shockingly easy.

I'm not a huge fan of AI in most other contexts, but for making backdrops for your model railroad? I'm finding it pretty hard to beat. It's definitely a remarkable time to be in the hobby.

So give it a try - and if you do, I hope you'll let us know!

Thursday, February 4, 2021

A Few Words about Wordless Wednesday #348 - Colorizers

Long time readers of this blog will no doubt recall my persistent road block (pun not intended) when it comes to running foreground roads straight into the backdrop. I have no less than 3 such roads in my Wethersfield scene - and, thus, I have avoided doing the backdrop in Wethersfield for years. Literally.

So, instead, I've been focusing my efforts on completing the Dividend section of the layout. But I inevitably eventually had to confront the Backdrop Problem. Fortunately, no need for roads going straight into the backdrop here. Unfortunately, I needed to try and relearn PhotoShop Elements in order to even start a photo backdrop. Thankfully Bill was willing to help walk me through some of the basic tools and along the way I happened to mention the old Hartford postcard another friend had colorized for me to create a "Hartford" backdrop at the north end of the Wethersfield scene. Then he casually mentioned that he'd been playing with some online colorizers.

Whaaaaat?? There's such a thing? I had no idea.

Before he had a chance to send me a link to the one he was using, I worked the Google on the Internet Machine and came up with a few to try out. I'll go through them here to give you a sense of what's possible - and I suspect you're going to be just as excited as I am to discover such wonderful technology.

The four I tried out were:

Here's the image I started with:


As you can see, this would be a perfect image for a road-going-into-the-backdrop on a layout set in 1948, like mine. In fact, MANY photos that would provide great backdrop fodder for older-era layouts would be wonderful - but for the fact that almost all of them are in black & white.

That's where colorization comes in - and you don't have to do it yourself manually in Photoshop.

Here's the same image uploaded and processed by Algorithmia:


Same image uploaded and processed by DeepAI:


Same image uploaded and processed by PlaybackFM:


As you can see, each site processes the image a bit differently, with different colors, saturation, etc. And, while they're all free (at least to try), they accept different image sizes. For those reasons, IMO, one site came out on top. For direct comparison, here's the original photo again:


And here's the same image uploaded and processed by MyHeritage:


It just looks right to me and noticeably better than the others. The trees & grass are a nice shade of green, the road a brownish gray, and even the Woody is rendered much more accurately than the others. Overall, the colors all appear much more saturated. And because MyHeritage also accepts much larger (read: higher resolution) images than the other services, you have a much wider range of freedom on how to size the image for your particular situation.

Now, lest you think these free (and fast! each image only took a few seconds to process) are perfect, remember YMMV (your mileage may vary). While the above image was my first attempt, I realized it was also a bit of beginner's luck. Here's the next image I tried:


The original size of this photo is over 8 megs, so to use it on three of the sites, I had to resize it much smaller (under a meg) in order to get it to process. Here are the results:

Algorithmia

DeepAI

PlaybackFM


As you can see, it barely looks like any colorization happened at all on the first three - and the MyHeritage one (which is the best, IMO) is a bit muddy and dark.

But for backdrop use, it's still a lot more suitable than the original B&W image. And I should be able to take this image into PhotoShop Elements and play a bit with the lightness/darkness, etc.

Heh - and I'm back full circle to having to deal with PSE(!) But now that I can (relatively) easily convert late 1940s images to suitable backdrop photos, I have a much stronger incentive to master PSE and finally get that Wethersfield backdrop done!

For those of you that model the "black & white" era, don't despair for finding suitable images for your photo backdrops. Sure, you can do what I and others have done (and will likely continue to have to do) and take current-day photos of scenes that "look like" the scenes you need for your backdrops. But for in-town photos, or - as in my case - road photos, you can't beat finding shots that have lots of vintage autos and architecture already there for you. And now that we can colorize these image so easily, a whole new world of photo backdrop possibilities opens up for us.

If you've found a colorizer that you like - or if you have any additional tips or suggestions on how to create photos backdrops for pre-color eras - I hope you'll share them here!

Saturday, October 24, 2020

Portals into the Past: Railfanning the Batten Kill RR

What do you think about when you think about October?

The smell of wood smoke? The crisp nip in the air? The brilliant fall foliage? The shushing sounds your shoes make through the leaves after they've fallen to the ground?

What about ghosts? Sure, there's Halloween, but what about the ghosts of the past?

I've always thought of the month of October as the perfect time to see some ghosts. As the leaves reveal their true colors, right before they fall from the trees, and things begin to slow down a bit, we can start to recall - or sometimes we have to imagine - what life used to be like, before all the craziness of modern life.

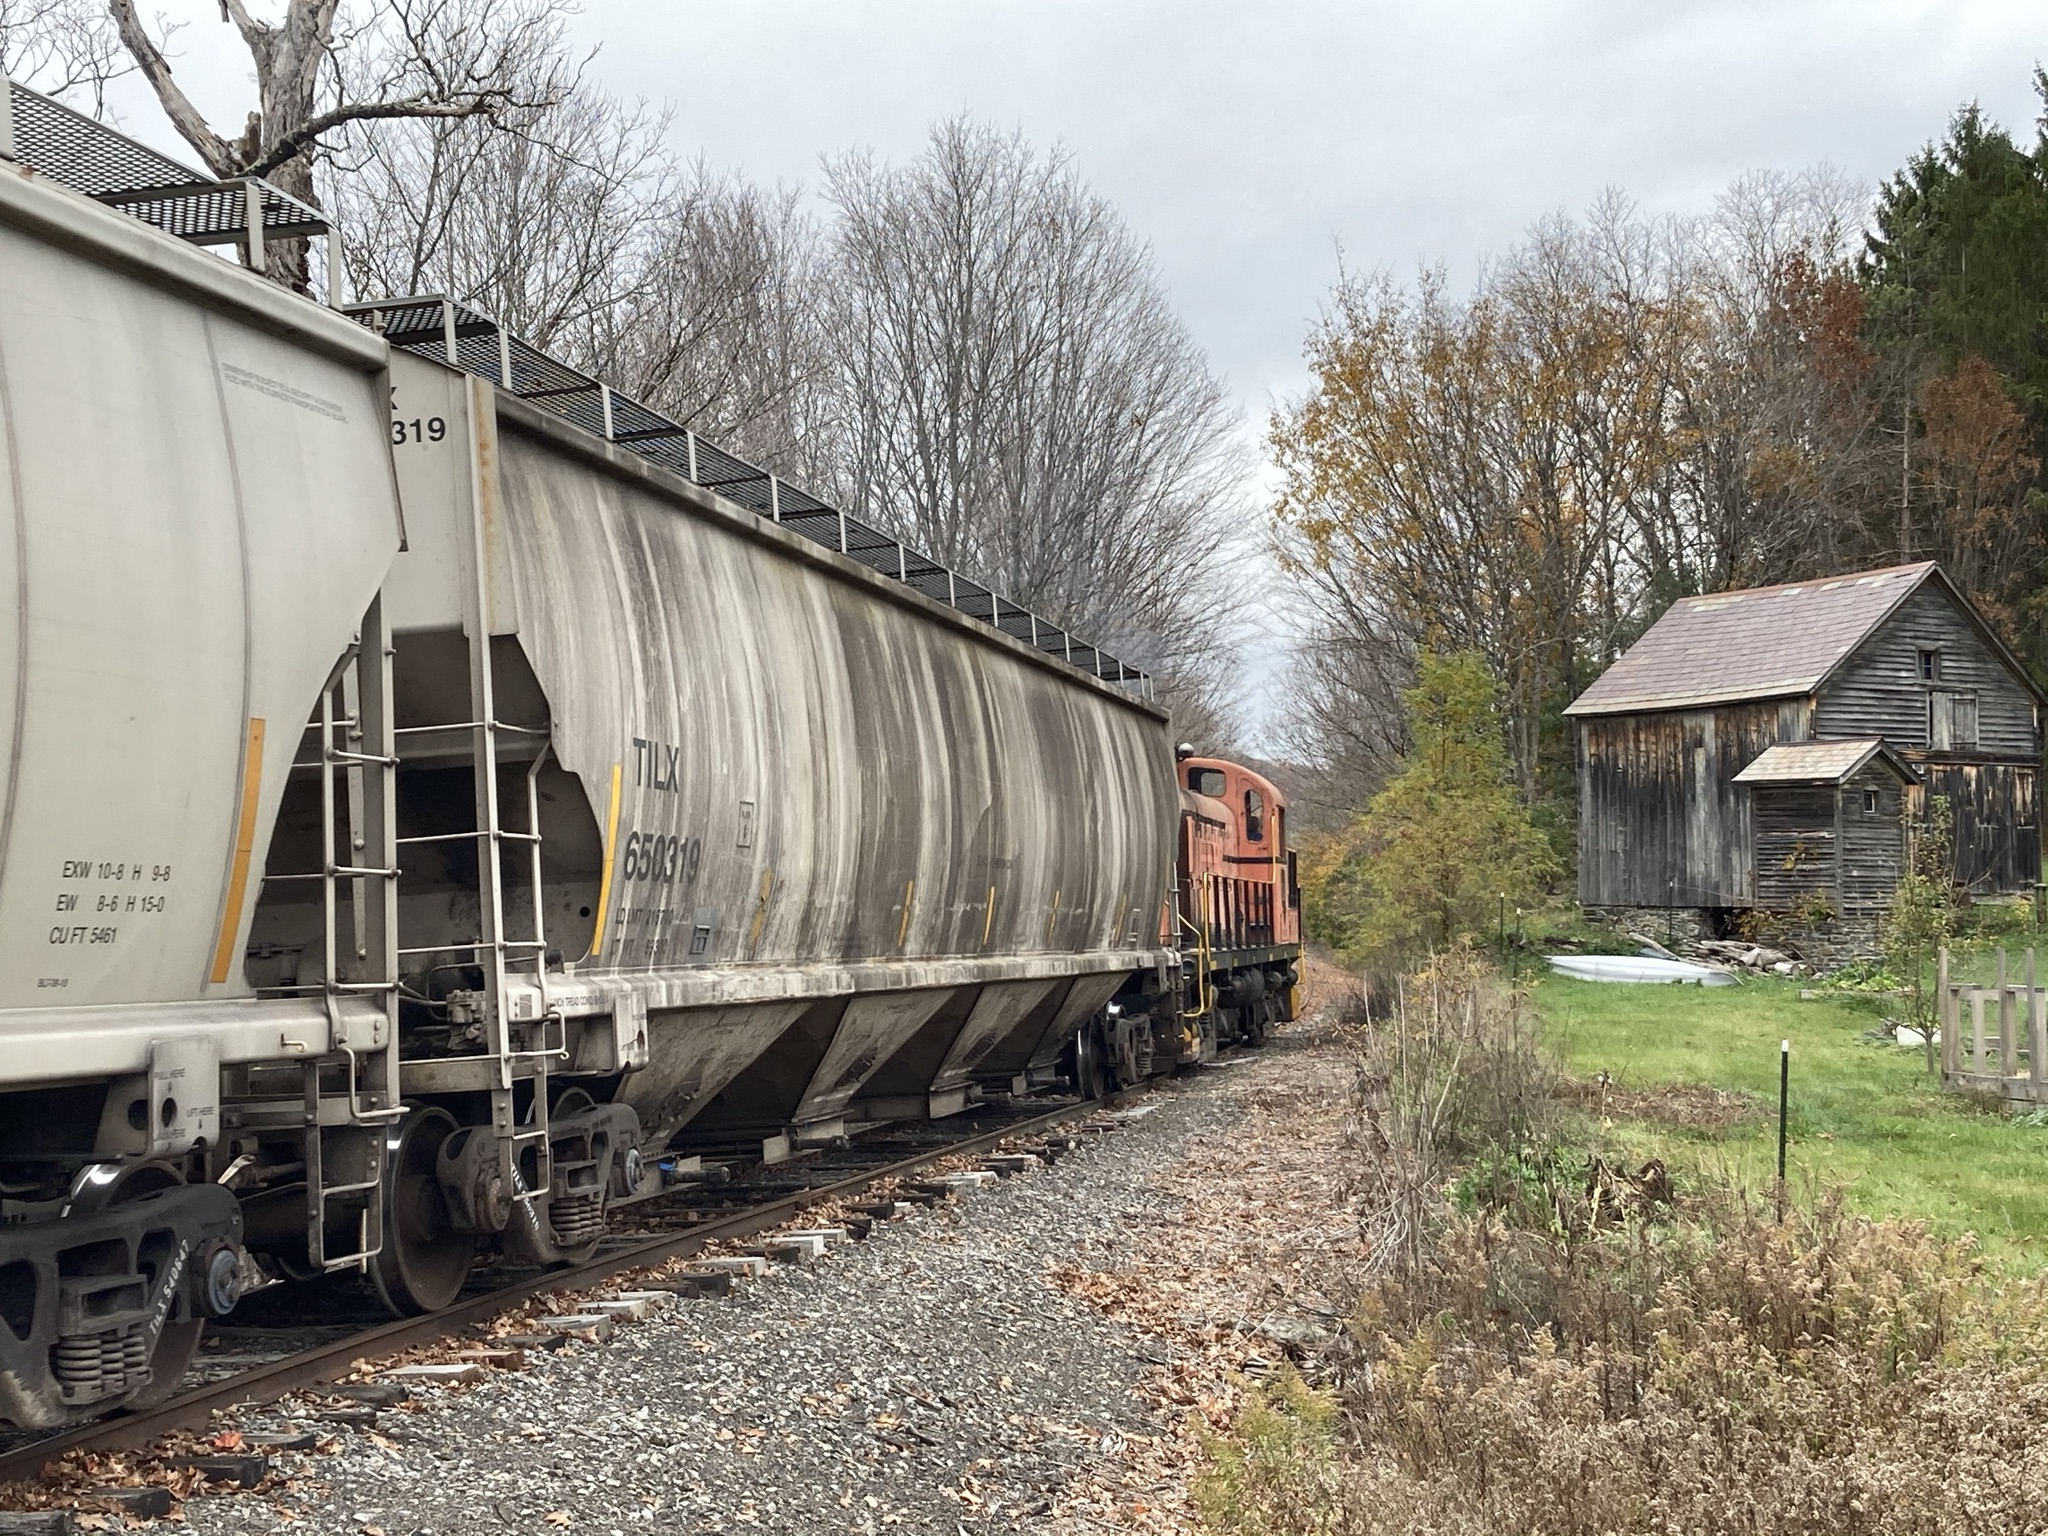
And if you find yourself in just the right spot during the month of October, you might just think you've fallen through a portal into the past - and if you're truly lucky, you might just see some ghosts of 1950s railroading in upstate New York.

That's what happened to me on a recent Autumn day, exploring the Rod Serling countryside along the Batten Kill River. Follow along as I share some of the memories with you . . .

Evoking the old D&H, switching the feed mill near Greenwich Jct., NY

The main ghost, spotted - Former D&H RS-3, near the end of its life and fading, like so much of the foliage surrounding it, but still serving the same stretch of railroad it's run on for years - shot through the Rexleigh Covered Bridge.

And just off to the right, you can make out the ghost of an old mill along the river....


Southbound through Shushan, NY - only the modern vehicles spoil the specter of a mid-20th century meet between two freight trains in small-town America.

Two ghosts, divided by 100 years - Station built c. 1852, Locomotive built 1952

21st century digital zoom softens the colors and captures an echo of railroading from almost 70 years ago.

Our fading pumpkin of a locomotive makes its way over the railroad's namesake river and past a fading farm.


A little paint, a little polish, and a lot of elbow grease, and this ghost of a car might just live to chase another train on another day . . .

Grab shot tension

New meets Old

The gathering clouds and fading foliage provide the perfect metaphor for a farm which has seen better days.

Heading back north from Eagle Bridge, NY


Ghosts sometimes do cast a reflection...


Cornfield, barn, trees, engine - all fading, evocative, beautiful.

Only another unfortunately parked vehicle spoils the illusion of 1950s railroading, including one of the last (if not THE last) crossing sign of this type in the country.

Nature's Reclamation

Mirrored Streaks of Weathering - Heading back to the Junction, and finishing up for the day.

I hope you've enjoyed this little portal into the past - and that it's inspired you to keep your eyes open, especially during this time of year. You may find a few happy hauntings of your own. And if you do, I hope you'll share them here . . . I'm always looking for new opportunities for a little time travel . . .

* * * * *

Given the ephemeral nature of the BKRR, you really can never just "find yourself in 'just the right spot" when trying to capture it. You need a guide - someone who knows the place as well as the member of the family that it's become. My guide for this once-in-a-lifetime trip was Ken Karlewicz, who went out of his way - literally and figuratively - not only to give me the heads up that the BK was running the RS-3, but to make sure I was in every good location at every right moment all throughout the day. While "finding oneself in just the right spot" works well as a foil for telling a story of ghosts, the reality is that it doesn't actually happen that way, and never by accident. Thank you, Ken, for an amazing day and especially for sharing your love of the BKRR.

Technical Info: All original, unretouched, unfiltered photos shot with iPhone SE

Tuesday, November 21, 2017

Tuesday Tips: Cab Addresses & Another "Tripod" for Smartphone Photography

Here's a treat - not just one, but two tips for this week's Tuesday Tip . . .

Cab Address List

While I have a wifi throttle server installed on my layout, I don't have enough physical throttles to handle all the trains I have nowadays. So, I ask folks to bring their own throttles if they're willing (and if they have NCE) and it's also nice to have backups in case a throttle dies during the session (as happened to me last year).

My most-recent ops session highlighted another need though: the need to know the addresses on each of my throttles (aka "cab addresses" or "Cab ID"). If a throttle has the same ID as another throttle, strange conflicts happen. So every throttle must have its own unique ID and if there's any duplication, as the ops session host you should change your throttle addresses to accommodate the folks who were kind enough to bring their throttles to supplement your stash (you can of course change them back after the session).

But to do all that, you first need to know what your cab addresses are - for NCE, that's a simple matter of plugging in the throttle and noting the CabID (that pops up and disappears quickly) on the screen. And then, if your memory is at all like mine, you should place a listing of said IDs in a prominent place. Thus: 
Cab Address List for my four throttles, mounted right at the A/O's desk.
While you're at it, you may want to put an address label on the back of each throttle - that way, you know the ID for when you take it to another's layout...

 *******
Smartphone Camera Holder

As you can probably tell from recent posts, I've poked my head down the rabbit hole of layout/model photography. And while I built a great tripod for holding my P&S digital camera - and it'll even hold my iPhone securely - it still doesn't allow me to take those true "eye level" photos.

But as luck would have it, the model railroad press has published not one, but TWO great articles on smartphone layout photography this month. Lance Mindheim did an extensive article in Model Railroad Hobbyist, and Pelle Soeborg has an article in Model Railroader. While Lance's article goes into great detail about focus stacking (which I'm really looking forward to trying), Pelle's article has a great tip for how to secure your smartphone to make it easier to take such photos:


He used pieces of styrene strip, 1/8" square tube, and halves of 3/8" tube to make a holder for his phone. Using his idea - and modifying it somewhat to use what supplies I had on-hand - I built one of my own:


It was a really fun evening project that went together really quickly with raw styrene and Tenax. The most difficult part of the process was figuring out how best to hold/clamp pieces while I applied the solvent (oh, and trying to cut 3/8" tube in half - lengthwise - was no picnic). It's always enjoyable to spend time at the workbench - especially when you can produce something as quick as it is useful:


I'm really looking forward to using this holder whenever I use my phone for photos (as opposed to my larger/better camera) - bonus: the styrene doesn't short out the rails. In fact, this is the setup I used to take the videos I took over the weekend back in October, 1948.

*******
Hope you enjoyed this week's tips! If you did - and especially if you made a list or holder of your own - I hope you'll let me know in the comments!

Tuesday, October 17, 2017

Tuesday Test Shots

Went down to Saybrook to try out the homemade tripod some more . . .
Shot with my iPhone 6 - no regard to settings; Nikon Coolpix P4 on the tripod.
Unless otherwise noted:
 no flashlayout lights only, auto white balance
macro setting, auto focus
ISO 50 f7.6 @ 1/8th sec (self-timer)
8 megapixel 2448x3264 @300dpi
Exposure Bias -1 step
Exposure Bias -0.7 step
1/6th sec, Exposure Bias -0.7
1/7th sec, Exposure Bias -0.3
1/20th sec, Exposure Bias -0.3
I'm really pleased with how these came out - except for the last one, which came out too dark. I bracketed all my exposures starting at -0.3 (underexposed) and going darker by 1/3 EV (exposure value) down to -1. Doing so gave me at least one shot of each lot that I liked. Unfortunately, the best shot of the last image was the one I shot first - at -0.3. A normal exposure at 0.0 would have been better for that shot.

As I continue to learn I continue to covet your constructive criticism and guidance, as well as any tips you have to share. Of course, if you have any kudos/compliments to share that'd be encouraging as well!