Other than the low-profile cab, there are two other details that will make this Atlas S-2 into a New Haven RR DEY-5: the distinctive whistle, and the cab control box.
As I may have mentioned elsewhere, the New Haven considered its diesel locomotives to be electric locos with their own on-board power plant. Stands to reason since the NH was one of the first major railroads to electrify its mainline starting in 1904. As a result of this attitude, many of its diesels were set up like their electric brethren, including everything from a similar control stand setup to the same Pullman Green and Dulux Gold paint scheme.
One of the other distinct features was the use of an air whistle instead of a more traditional air horn (a practice which was broken by the delivery of DL-109s with their Wabco E2 horns in December, 1941)

On the DEY-5, these whistles were mounted on the corner of the long hood, ahead of the engineer's side of the cab. While the exact position varied on the DEY-3 units (Alco S-1s, as pointed out here), on the DEY-5s, they all appear to be mounted just past half-way between the front of the cab and the first vertical rivet line.
In addition to the distinctive looking (and sounding) whistle, the New Haven also equipped many of its DEY-3 and DEY-5 switchers with cab signal equipment for road service (as detailed here). According to the Shoreliner article, eight DEY-5s received such equipment - and it just so happens that I was able to blow up a prototype photo of the 0604 to show what exactly it had.
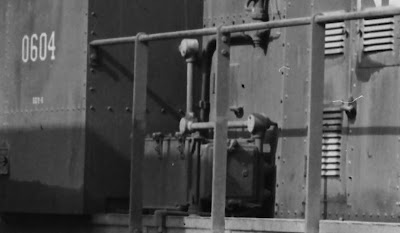
As you can see, it's mounted on the engineer's side running board just ahead of the cab. It was at about this point in my research that I realized that, other than the cab, all of the NH-specific details were located on the engineer's side . . . and on my layout, the prototype orientation of the engine is typically showing the fireman's side. <facepalm>
Thankfully,
Custom Finishing Models (formerly, "Custom Finishes by Bob Rzasa") makes the required details parts in HO scale. But, as you'll see below, that doesn't (necessarily) mean you can just plop them on the model.

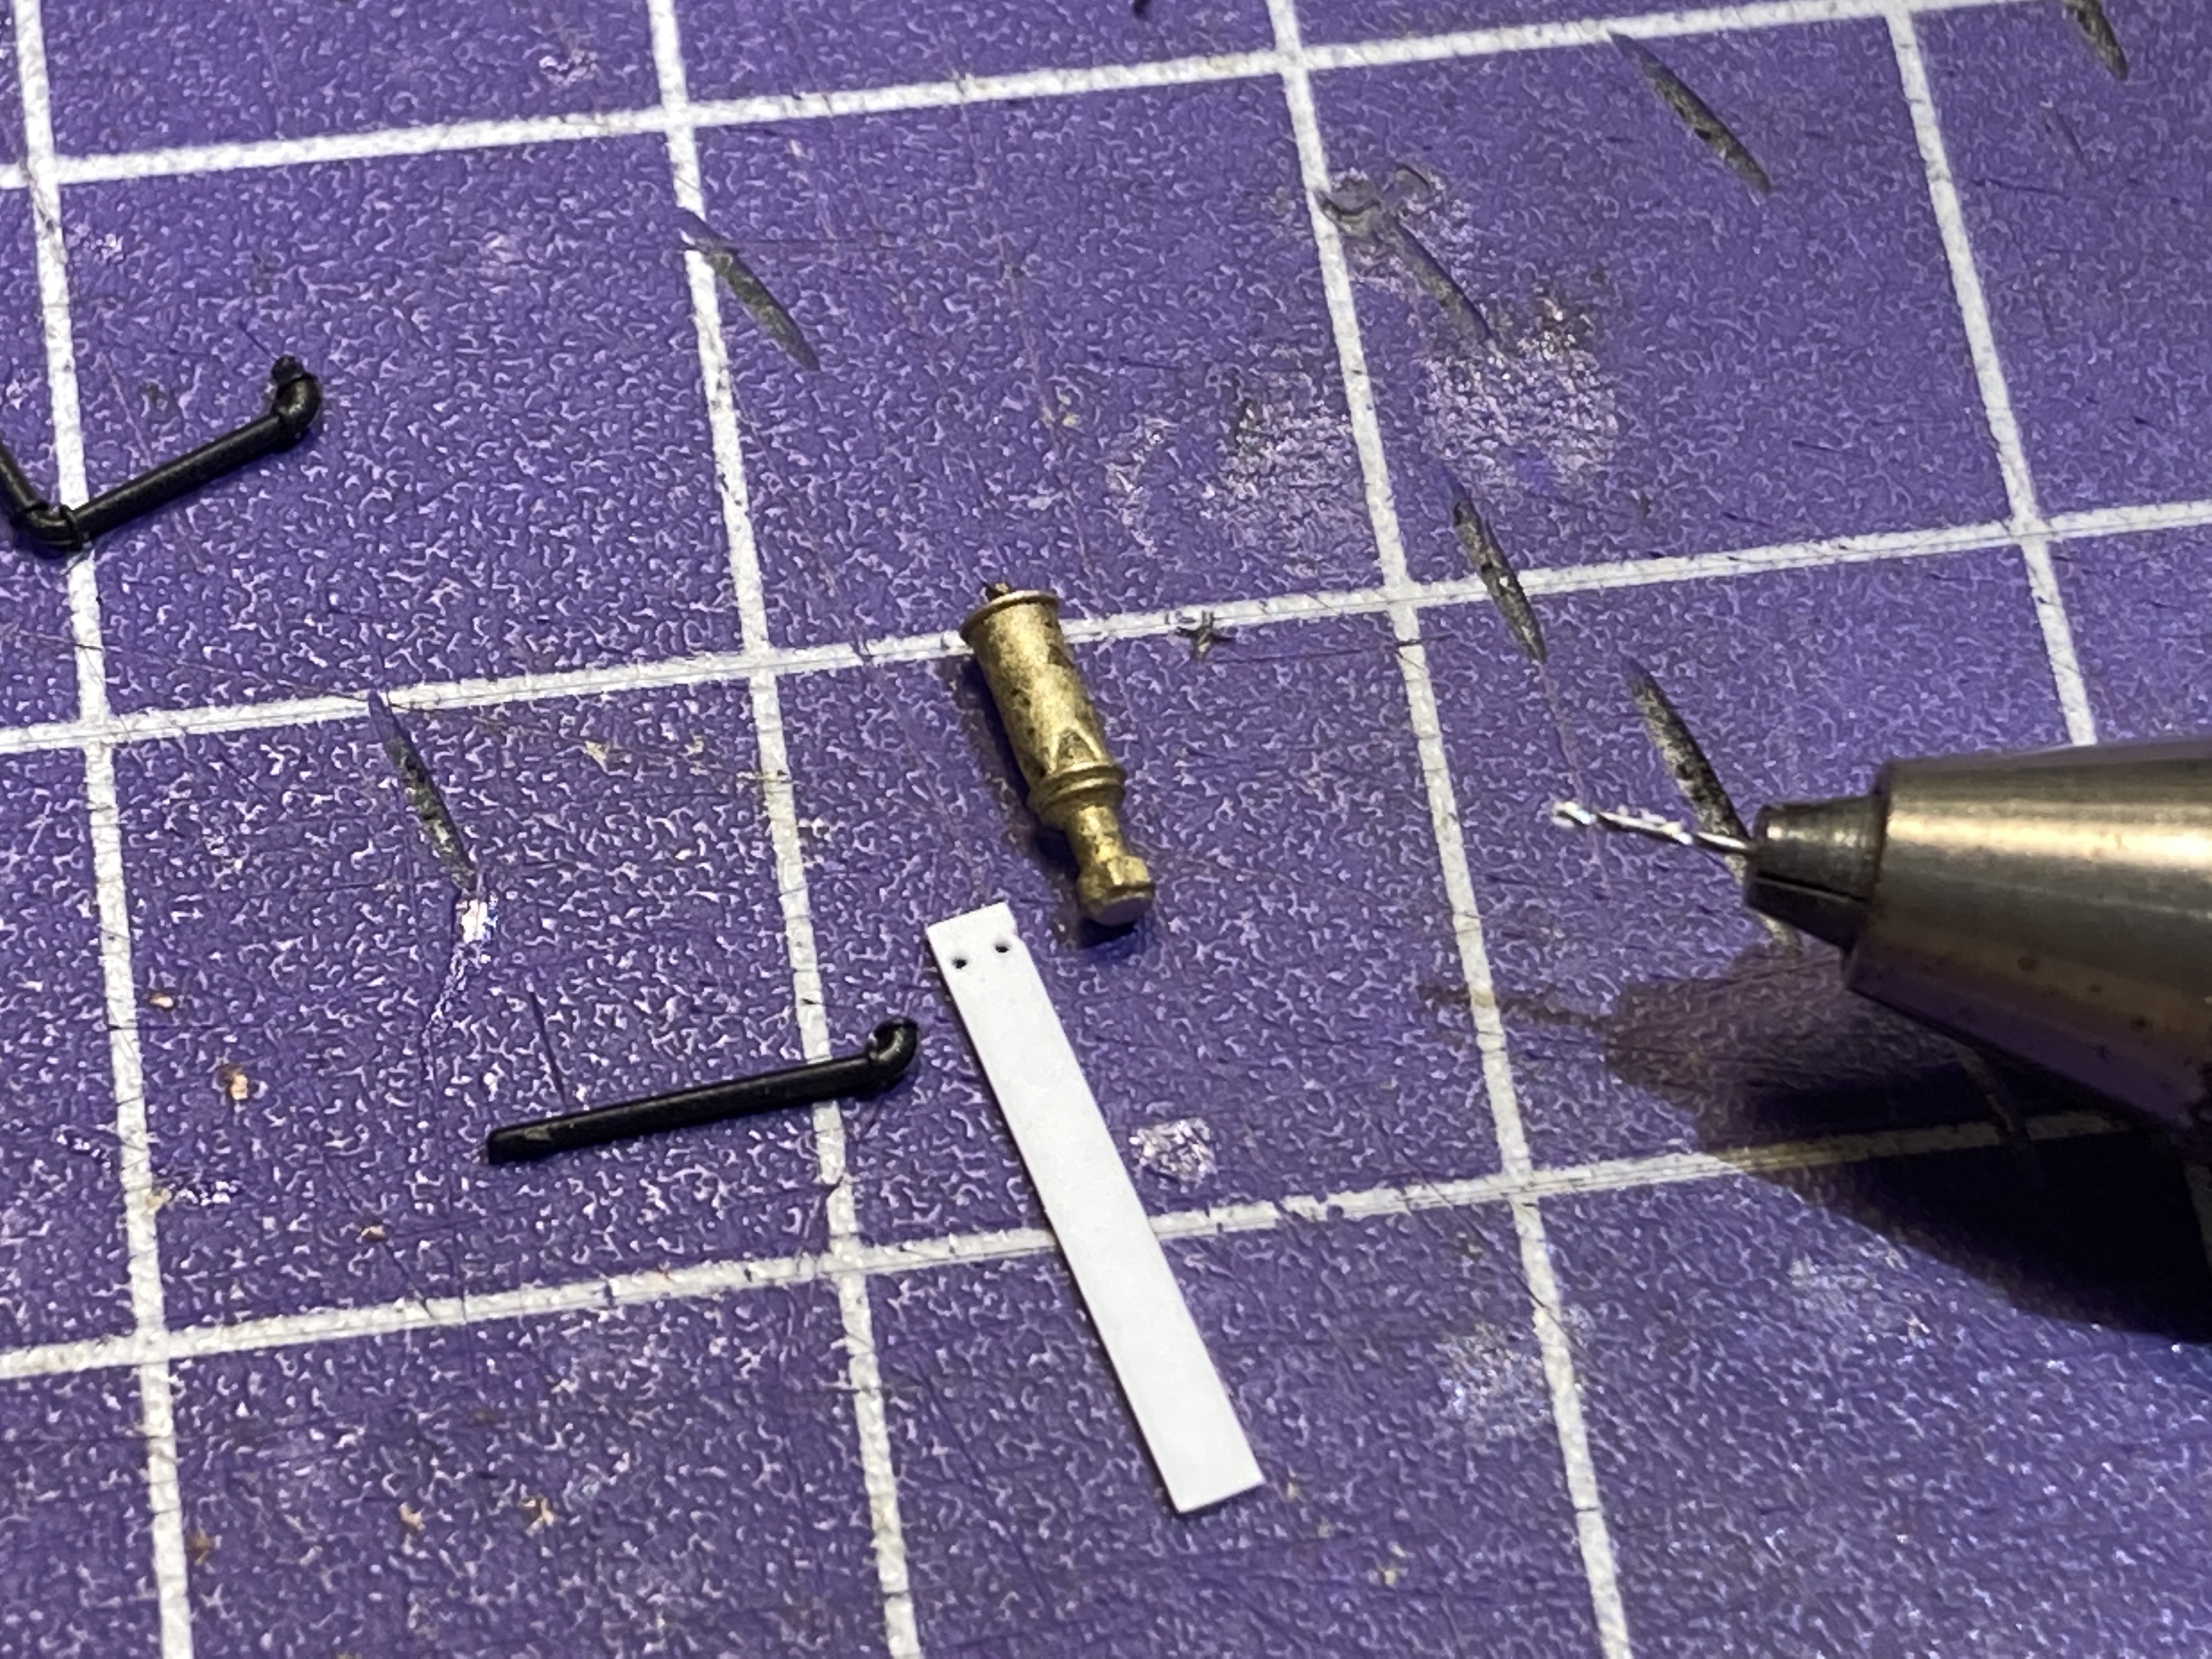
As you can tell from the prototype photo, the whistle at least needs a bracket that you'll need to scratchbuild. Other than the teeny, tiny holes I drilled for the loop of wire to hold the whistle, the most challenging part was sourcing the pipe. Turns out, my buddy
Joe Smith turned me on to a good idea when he mentioned he used some piping in his parts box that he had from snipping away some passenger car underbody detail (for better operation). I found a similar pipe and elbow
behind the triple valve on one of my car underbodies which is NEVER seen (unless you turn the car over - and know where to look), so I snipped that out and used it for the air pipe. The bracket itself is styrene strip (.011 x .066") and I filed the bottom of the whistle nice and flat to provide the best bonding surface for the pipe that I could.
The loop of wire (.008" IIRC) is not only prototypical, but it adds some mechanical security in addition to the glue. The styrene strip was fused together with
Scalecoat Probond (similar to the old Tenax) and the wire/whistle assembly was glued with CA applied with a microbrush. Note in the pic above I'm assembling it using one of my
1-2-3 blocks and holding it in place with painter's tape.
I thought the final bit would be
really finicky and delicate, so I used a combination of tape and tweezers to hold the air pipe in place and then applied CA to the joint between the pipe and the bottom of the whistle. Turns out, this bond is actually surprisingly (and thankfully) strong.
It's certainly not perfect (I'm still not sure how the pipe got offset slightly), but it looks pretty great, if I don't say so myself. By the way, this entire assembly is only 1/2" tall - and consists of 5 separate parts. And, for some reason, I found it one of the most enjoyable and rewarding parts of this build.
I ended up obsessing a bit about how to have the pipe go into the cab, as on the prototype. On the one hand, I didn't just want it ending in space - on the other hand, having it actually go into the cab would make is VERY vulnerable to breakage any time I'd have to remove the cab. So I ended up compromising - drilling a hole for the pipe, but trimming the pipe so it just barely meets/goes into the hole.
It took a bit of eyeballing to figure out where exactly to drill the hole, but once I figured it out, I used a #74 bit as you see above (I figured out the bit size by using my caliper to determine the diameter of the pipe).
Next up - the cab signal box.
Now, most folks would just mount the box and leave well enough alone. But I had three strikes against me: 1) I had a really good prototype photo that showed additional piping, 2) I actually had just found (in relation to another project) a few pipe connector parts, and 3) I'm a little OCD. . .
Here's the pipe junction part. It's actually a "T" junction, but I filed off one of the sides to make it an elbow.
After a couple of aborted attempts to drill out these parts for wire, and buoyed by my CA experience on the whistle pipe, I figured I could just glue styrene pipes (scrap styrene rod) to the cab box and junctions. So that's what I did.
Dimensions/lengths were just approximated by eyeballing the prototype photo.
The final step - since I'd procrastinated in doing these details, when I should have done them at the beginning - was to paint them.
I really like the look of the brass whistle, so I masked that off . . .
. . . then primed with my rattle can of Tamiya Fine Surface Primer . . .
. . . then used my new airbrush to paint the whistle assembly Pullman Green (to match the body color) and the cab control box black (to match the frame/walkway color).
Once the paint fully cured, all that was left was to add the details to the model. With regard to the whistle assembly, this turned out to be a bit more stressful than I figured. Since everything was already painted, I knew I'd have to use CA (slow/thick in this case) and I'd only have one shot to get it right - with little latitude for adjustment. So I trimmed the bracket down to size (I'd left the bottom part longer as a handle for painting) and then dry fit it where I wanted it to go. Then I made the
faintest mark at that spot, daubed a bit of CA on the bracket with a toothpick, and applied the bracket to the hood, being sure I lined the pipe up with the hole in the cab.
Again, not perfect, but this view is WAY closer than any normal view. Under typical viewing, it looks pretty great. But next time, I'll definitely add this assembly to the body before painting in order to get it perfect.
By contrast, the cab box was super easy - basically just add some CA to the "feet" and plop it on the walkway. The piping in the prototype photo looked like galvanized pipe - or at least lighter than the box - so I brushed on some neutral gray PanPastel (820.5). I think the effect turned out pretty nice.
Here are the detail parts together and close up:
Before doing final assembly, including adding the handrails, endrails, and cut levers, I got a bright idea about the headlight (see what I did there?) . . .
You may recall
waaaaay back when I first assessed this model that I didn't like where the headlight was positioned - especially because it was especially bright. In case you don't feel like going back to look, here's a quick illustration:
Turned out, not only was the bulb WAY too bright (so much so that it came right through the plastic), but also way too tall (so that all that brightness didn't even come out through the lens).
I used flat black craft paint to coat the inside of the hood to keep light from bleeding through . . .
. . . and to address the bulb height, I considered milling down the speaker mount to lower the speaker and bulb. But then I got a bright idea (sorry, couldn't resist)!
I had a few nano LED bulbs on-hand I'd been wanting to try, so this seemed like the perfect opportunity. Once I figured out how to use them (involves sanding the coating off the hair-thin wire and figuring out which wire is the anode), I used a small daub of Aleene's Clear Gel Tacky Glue to glue the bulb to the center of the stock Atlas lens. Since the OEM bulb was also an LED, I knew I could just plug the wires into the Atlas board and wouldn't need additional resistors.
And it works GREAT! The light comes through the lens and NOWHERE else - just like it's supposed to. In fact, it works a little too great. The bulb is so bright, it will literally burn your retina. Fortunately, I'll be able to dial down the brightness with some decoder programming. But I'll save programming for another post sometime...
For now, and with the lighting figured out and done, all I needed to do was to put everything back together and admire the finished product:
I first got this undec model back in January of 2018 - but that ended up being a pretty difficult year, and between work, other projects, and the pandemic, I didn't actually start working on this project until last August when I added the details that came with the model (grab irons, etc.). Then, between wigging myself out about assembling the resin cab - and the holidays - I didn't pick it up again until January, when I painted it.
But since then, it's been pretty steady - though very sporadic - work to get to the finish line. The effort was worth it though - I have a very distinctive engine, perfect for my prototype, and I learned a lot (both what to do for the next build, as well as what not to do). Speaking of the next build . . . I'm going to take the lessons I learned from the DEY-5 and apply them to DEY-3 #0967. That's the diesel that the Valley Local used starting in 1949 and, as the flagship diesel, I want to do an even better job on it than I did on the 0604.
The base model is an old, undec, Proto2000 Alco S-1. It needs more work than the Atlas S-2 did (including isolating the motor to make it DCC ready, adding a decoder & speaker, as well as some moderate body work on the hood), but I'm hoping the practice I got on the 0604 will make this build go quicker. And I hope to make only new mistakes . . .
Let me know if you've enjoyed this build and look forward to the next one. Otherwise, I may take a break from engine building and do some more scenery :^)