Saturday, August 31, 2019

Slow but Sure Scenery: Coal Yard, Station Planting, Siding Grass

One thing that's really getting to me is how glacially sloooooow I am at doing scenery. I suspect it's because I'm having such a hard time putting my left-brainess aside and embracing my right-brain. I'm much more comfortable building a freight car or detailing a locomotive - more into engineering than art. But I've resolved to keep at it - to keep hacking through and blaze some new neural pathways. And I figured the best place to do this safely is in the somewhat-freelanced area of East Berlin.

Here's what I've been up to since my last scenery update, along with some calls for help.

Coal Yard
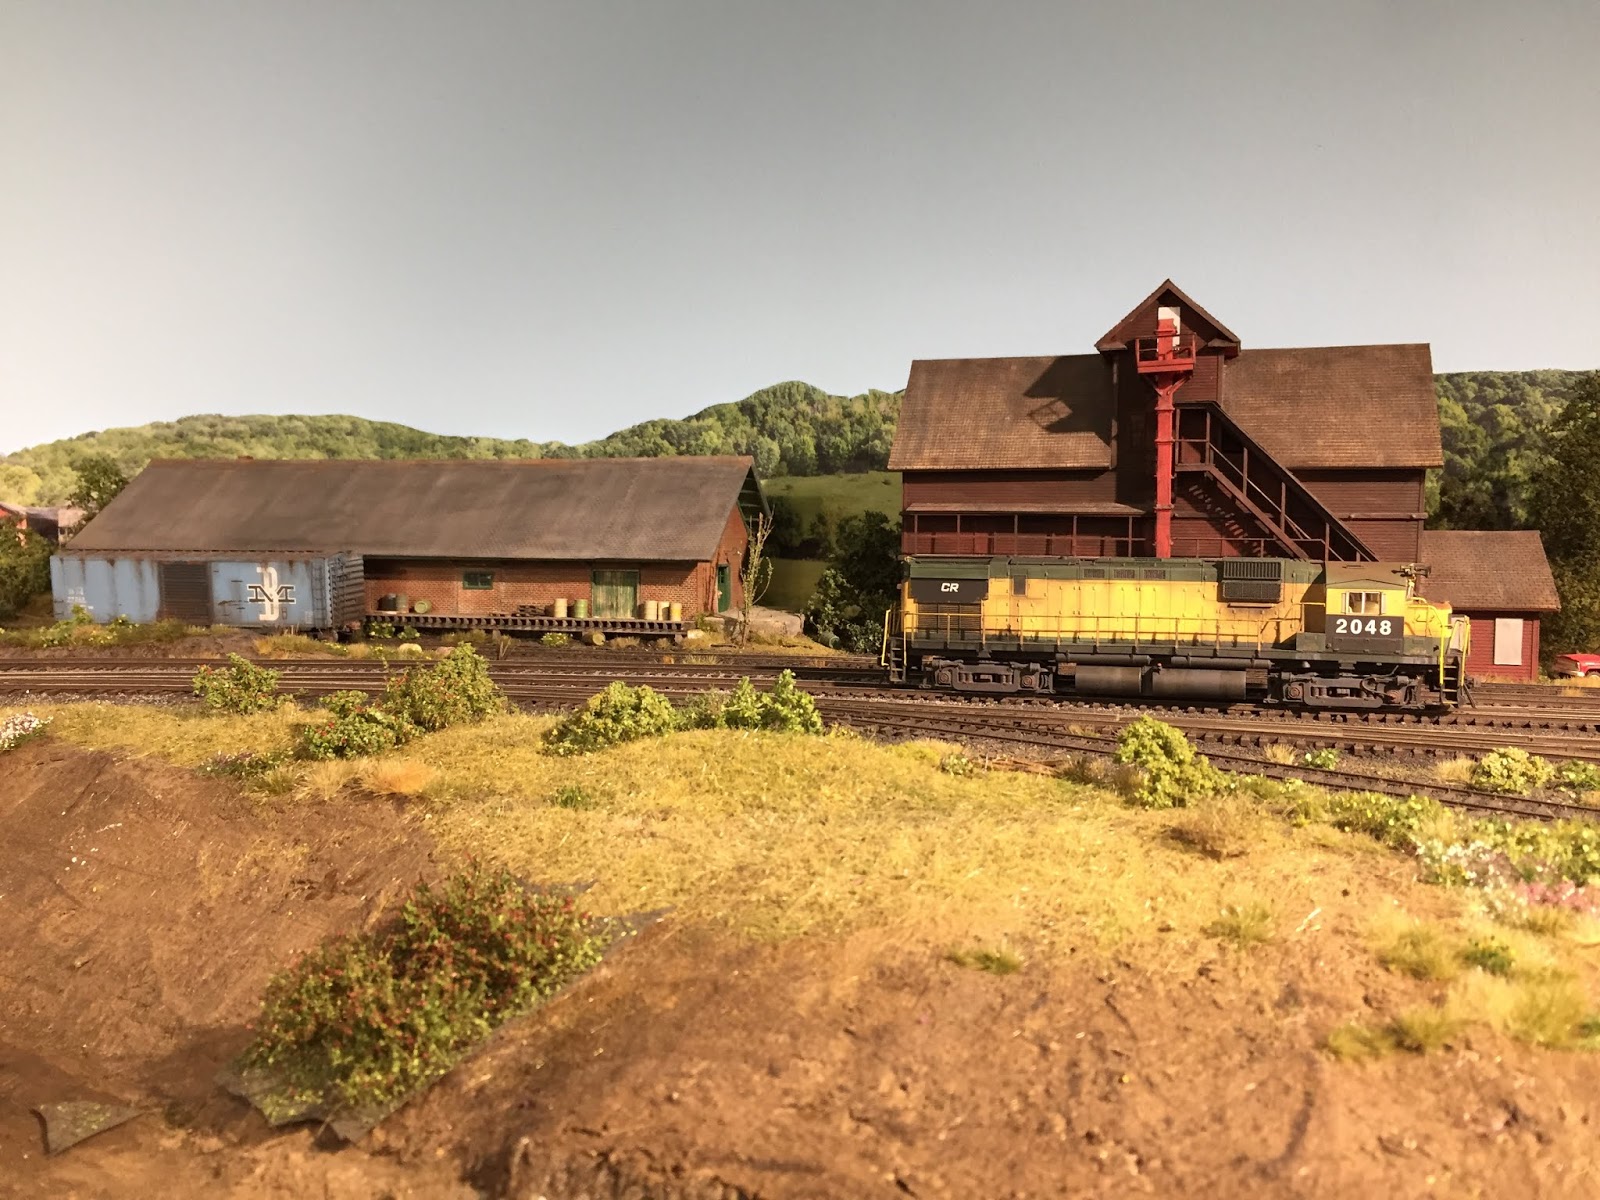
The building complex which will eventually become Stanley Chemical includes a power plant. So I thought having place to dump/store coal would be an appropriate addition and - bonus! - another car type to spot in the siding.


So I got some fencing out of the parts bin to hid the foreground/backdrop seam and added a little blacksmith's shed - just cuz it looks cool (heh - "relaxing the prototype" indeed...). The photo above shows the result, right after I sprayed 70% isopropyl alcohol and dribbled on 3:1 water:glue with a pipette.


While it sure looked OVERwet (and I probably did use a little too much glue), it dried nicely. And that coal ain't goin' anywhere. Ever. I actually had to straight-up chisel a trench for the coal unloader to go between the ties...


There was a gap between the bottom of the shop fence and the ground, and that area needed some weeds anyway, so I dripped on some drops of full-strength glue and added some pinches of static grass.  Along the back (left side) of the shop, I used medium ground foam in a mix of colors. Unfortunately, the ground foam isn't quite as realistic looking as the static grass.


Above is a drone's view, still waiting for the glue to dry.


After the glue dried, the static grass looks ok, but I'm open to suggestions on how to make it look better. I'm trying for a "weedgrown" effect here.


But it still looks a bit better than the ground foam. Which doesn't look that bad IMO. At least it's something.

By the way - given that this will eventually be a paint factory, I should probably try and include a way to unload tank cars. Could be something as simple as a pipe/hose along the track. It'd just allow for another car type and spot. Any suggestions/photos of such a small facility would be most welcome!

Planting East Berlin Station


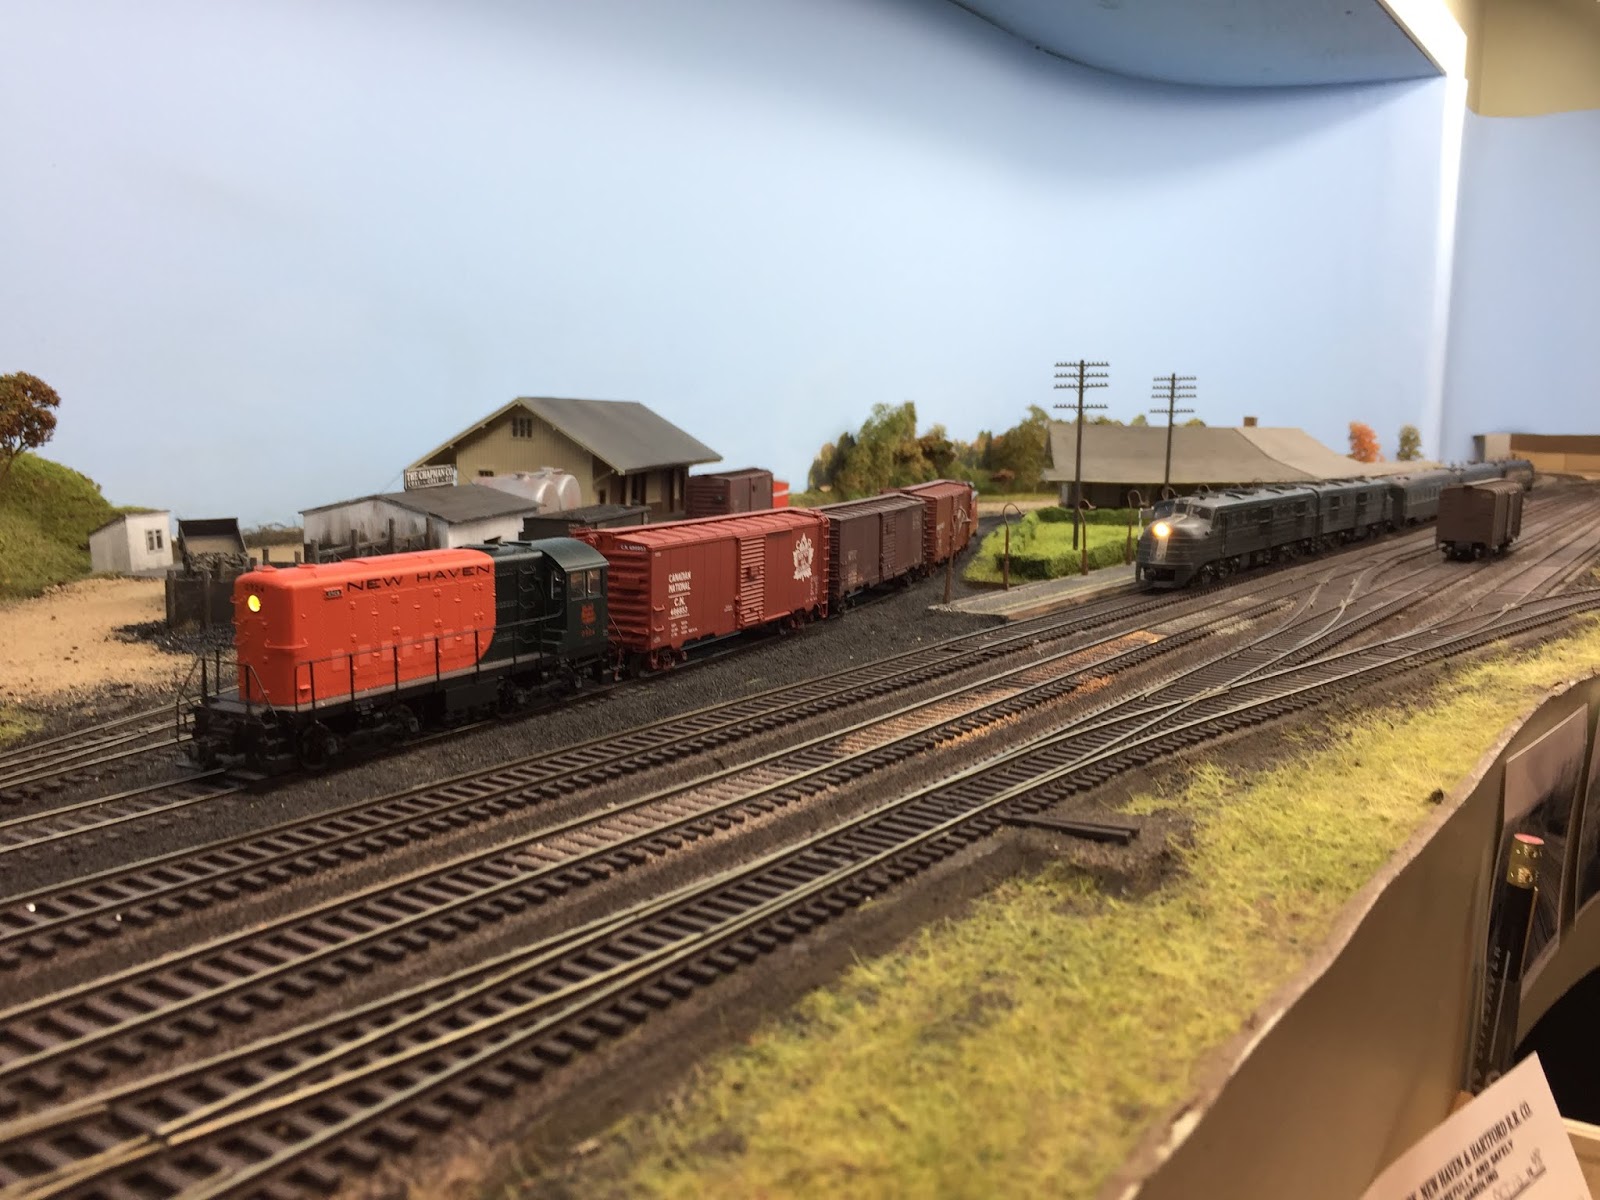
In my last post, I announced the arrival of the East Berlin station from my friend Dave Messer but I also mentioned that I'd need to "plant" it into the scenery. As you can tell in the photo above, it needs to come down a bit in order for the platform to hit at the bottoms of the doors.


Fortunately, this is where working with a foam base (or, rather in this case, foamcore) makes things easy. I just marked an outline around the base of the station . . .

. . . and then used a utility knife and an old steak knife to remove the scenery down to the foamcore. As you can see, the foamcore doesn't actually go all the way across since I used a combination of foamcore and traditional cardboard lattice/plaster cloth as a scenery base.


But fixing that was a simple matter of hot-gluing in a scrap piece of foamcore.


It took a little fiddling & dressing up of the edges, but now the station is firmly planted. No structure-to-scenery gaps here!


I'll probably add some static grass/weeds around the base of the building as I did the other building here.

Some Grass Between the Rails
Speaking of grass, having some grass & weeds "grow" between your rails really sets the track off as un- or little used, so I definitely wanted to try that effect in East Berlin. I didn't find any articles on how to do it, so I figured I'd experiment.

The next two photos show what I started with . . .


The first step was to use full strength white glue (just like I do when applying static grass normally) and add some random drops in between the rails as you see above. I spread the glue with a brush where I wanted the grass to be more evenly applied, but left the drops of glue alone. Then I sprayed a heavy mist of wet water over the area, using a piece of paper to protect the structure from overspray.


Then I applied the static grass in the usual fashion. Problem here is that I couldn't get the narrow nozzle/funnel attachment to work very well (I've never had good luck with it - it tends to allow the grass to dump in clumps), so I had to try and get the normal 3" wide applicator as close to the structure as possible and over the track - without banging the structure. Next time, I'll plan further ahead and do this effect before I put the structure in place (i.e. when I applied the static grass under the loading docks).


Despite the tight quarters, I was able to get grass all over the track as I'd hoped. And it covered pretty well as intended - splotchy between the rails, more even outside the track.


Despite the fact that I applied a mix of colors and lengths, the grass still looks a little too uniform and green to my eye. And based on some comments over at the Valley Local Facebook Group (click here to join :) I may try adding some additional colors & lengths, as well as some fine ground foam to give it some texture. I'm also considering a radical experiment of my own warped imagination: "weathering" the grass by drybrushing, or maybe using chalks or PanPastels. If any of you have done that before, help a brutha out and let me know how you did it!

All in all though, I'm pretty happy with how things are turning out - just not so happy with how slowly they're progressing. I figure I'll get quicker as I do it more - and perhaps also as I get less OCD about it.

Again, and always, I really appreciate all your feedback/comments/suggestions on alternatives & what I could do better and/or how you do it. I feel like I'm on the steep part of the learning curve, but at least I'm enjoying the journey so far. Just have to keep that machete sharp and keep moving forward!

Friday, August 30, 2019

Friday Fun: East Berlin Station Arrives!

Since East Berlin became a little more proto-freelanced once I decided to add non-prototype structures from my friend Bill Maguire (not to mention due to the lack of prototype photos of the area), I figured I'd just use an old RDA station kit (it's "New Haven" - but New Haven, VT!) for the station building there. This decision was made even easier by the lack of photos of the East Berlin station during my era.


Well, that changed when I actually found some photos of the station. And, being mugged by the prototype, I couldn't unsee them. Thankfully, my friend Dave was looking for another structure project, so I sent him copies of the photos I'd found as well as footprint dimensions and he was off to the races.

Check it out:


I had to extend the riverbank a little to the left to allow enough room for the prototype-length, but I think you'll agree it was more than worth it.

All I have to do is lower it into the scenery (you'll see it's sitting up a bit) and weather it pretty heavily. As far as I've been able to find out, by the late-'40s this station would have been out of service. So it should probably look a bit more like the Rocky Hill station, which was in the same situation at the time:


But thanks to Dave, it's onsite and completes the structure requirements at East Berlin! Heh - so now there's even less excuse to keep going with the scenery, not to mention finally doing the backdrop that needs to go behind the station.

All in good time though. For now, I'm just enjoying seeing the end of the Berlin Branch coming together so nicely. Thanks Dave!!

Thursday, August 29, 2019

Throwback Thursday: August Ops Session

Operating with Greg, Dale, and Kaylee at sadly-blogless James Mayo's Shreveport & Central Mississippi
I've been so involved with scenery and operating at other layouts lately that I totally forgot to put up a post about the latest Valley Line ops session earlier this month!

Since the layout hadn't operated since my "out-of-state" ops session last March, and regular/formal monthly sessions start next month, I decided it was time to invite my core crew over for a shake down session. Fortunately, the railroad operated well, with only a few glitches (related almost exclusively to too-long cars going around too-tight curves at too-fast speed %^) and a relatively short Punch List of stuff to address. Which is great, cuz that way I can Get More Scenery Done!

But as wonderful as it is to have nice scenes for the trains to run through, the main point of having operating sessions is to be able to get together with your friends as they breathe life into the world you've created. Unfortunately, all too often I'm so immersed in what all's going on that I totally forget to take pictures. Fortunately, this wasn't one of those times - I at least got shots of the participants.

Randy & his buddy, first-timer John, operating PDX-2 westbound from Fort Yard, New London and heading up the Valley Line here at Saybrook Jct.

But first, they have to pick up a hopper of coal from Track 7 for the power plant at Dickinson's Witch Hazel plant in Essex, up the branch. In the meantime, PDX-1 - eastbound from Cedar Hill Yard, New Haven - has just arrived on Track 6 behind the station.

Bill holds down the Agent/Dispatcher's desk for the day.

New Nutmeg Division, NMRA Superintendent (and AML regular) Kaylee was assigned to West End (Cedar Hill/New Haven/NYC) staging duties. Clearly, there was a lull in the action :^)

And holding down the East End staging duties (Fort Yard/New London/Boston), waaaaay back in the back is James Mayo.

Since we had just the core crew, the work on HDX-7 (The Valley Local) fell to just one man. Here's Pieter working the southbound train at Wethersfield (to orient you, East Berlin is way back in the corner).

Meanwhile, back in Saybrook, yours truly held down the PDX-1 job, switching cars on tracks 6, 8, and 10.

It's rare enough that the layout host gets to actually operate a train during an ops session, but this time I got to operate two! I've just brought the Airline Local into Middletown from Cedar Hill Yard. Meanwhile, the Valley Local waits at the diamond.

The prototype Airline local would typically leave a cut of cars for the Valley Local at Middletown and continue across the river to Portland, CT and points east, leaving all Middletown switching for the Valley Local. But since on my layout the Airline ends at Middletown, the two crews split the switching.

One of the downsides of having too-few staging tracks on the west end is that PDX-2 often has to hold for a while in Saybrook while waiting for a track to open up in Cedar Hill. But that gives its crew (in this case, Randy) a chance to just watch the parade of trains on the Shoreline
Thanks Randy, Bill, Pieter, Kaylee, James, and John for putting the layout through its paces and helping me get it ready for the 2019/2020 operating season. Already looking forward to the next session!

Sunday, August 25, 2019

Scenery Inspiration: A Visit to Ken Karlewicz' D&H Cherry Valley Branch

Since my last post about doing scenery in East Berlin, there have only been two developments - one major, and one minor.

The "minor" development is that I've added a coal yard next to the power plant at the building-soon-to-be-Stanley-Chemical. I'm still working on it, so not quite ready to report much on it yet.

The "major" development is that Dave Messer sent me the model he did of the East Berlin station(!). I'll do a proper post about that soon (with pics), so stay tuned.

Additional news about those developments will have to wait for now, because today I got to visit - and operate on - a layout I've been admiring for a long time. And in the process, got a HUGE dose of scenery inspiration and ideas to try on my own layout.

If you've been 'round these parts for a while, you know I tend to gravitate toward layouts that depict the "smaller" side of railroading - the short lines, the branch lines, the secondary routes. Jim Dufour's Cheshire Branch and Kip Grant's Sonnyvale Branch are two great examples, just to name a couple I've had the privilege of seeing in person.

Well, now I can add Ken Karlewicz' Cherry Valley Branch to my list of favorites. Ken's beautiful layout has been in the hobby press a lot lately, from his "Perspective" article in this month's Railroad Model Craftsman, to being featured on the cover of this year's Model Railroad Planning magazine. I'll leave it to those magazines - and others - to describe the layout in detail, but suffice it to say here that Ken has really nailed the look & feel of the D&H in upstate New York. Everything looks right and more than anything else gives you - to use Ken's words - "a sense of place."

While I and other "prototype modelers" do everything we can to depict our prototypes as accurately as possible, I fear that sometimes we can miss that certain je ne sais quoi* that really captures and conveys our prototype realistically. Sometimes, in the pursuit of being technically "correct," we lose the essence of what we're modeling. Worse yet - at least in my case - being "correct" sometimes becomes so difficult it actually stops our progress. Or am I the only one to never get around to modeling a certain building or putting in a backdrop because the photos don't exist?....

But Ken has mastered the "Art" of railroad modeling. The scenes he depicts and the lines he models may not be "correct" in the sense of being a perfect rendition of actual places, but every place he shows through his models convey the sense of the actual places. And that, in some ways, is even more powerful - and, dare I say, "correct" than the perfect copy.

Really good fiction can speak to you and hit you in ways that the best non-fiction can't.

So, in that spirit, I'll close by sharing a selection of the photos I took on the Cherry Valley Branch today. They come nowhere close to doing the layout justice. There are no captions or descriptions of what you're seeing. But if you're familiar with Ken's work, you know these places already. If not, the beauty of his art speaks for itself.

Enjoy!


*It's a testament to Ken's influence that I actually felt it necessary to use the French. It just sounded so much more "arty" :^)
Thanks to Ken, Tim, John, Jim, Mike, and Dave for such a great day - hope to get to operate with you all again sometime soon!
* * *
If you want to receive notifications of new blog posts by email, be sure to submit your email address in the upper-left corner of this page. Thanks!