Friday, March 31, 2023

Friday Fun - '48 Firetruck

As stated over at the Valley Local website (in case you didn't know - there is such a thing ;^):

This site is dedicated to information on life in the Connecticut River Valley during the early post-war period. While all aspects of that period are fodder for exploration, the primary focus is on re-creating the day-to-day movement of freight along the picturesque Valley & Airline branches of the New York, New Haven & Hartford Railroad during an Autumn day in the late 1940s.
So, sometimes, I post about something other than railroading or my layout depicting it.

Case in point: Yesterday, and for the first time, I took my car to the local Ford dealership for an oil change. Now, it just so happens that that dealership has been in Old Saybrook since 1913 and will eventually show up in my Saybrook scene somewhere. So I figured while I was there waiting, and considering they're one of the oldest Ford dealerships anywhere, I'd see if they had any old photos that I could use for reference.

Well, turns out not only did they have some photos, but the guy I was talking to said: "I saw an old movie once of a Ford firetruck that Old Saybrook bought - and it was filmed right here. Maybe you can find it."

Just a quick Google search later, and find it I did!

Apparently, Old Saybrook was one of the first (if not the first?) purchaser of Ford's new "combat fire truck" and FoMoCo commissioned this movie to commemorate its use. Sadly, there's no audio (well, I'd definitely recommend that you mute the era-inappropriate ragtime music that was dubbed in), but remarkably - and speaking of era-appropriateness - guess when the movie was filmed?

Right in the middle of my chosen modeling era: 1948(!!)

So sit back and enjoy this short little piece of Americana - and a really cool glimpse into late-1940s Old Saybrook.


Monday, March 27, 2023

A Tale of Two Sundays: Old Deep River Road

With the backdrop done in Essex, along with some (very) basic ground cover, and grade crossings, I wanted to get some terraforming done north of Essex - between Essex and Deep River - around the Old Deep River Road grade crossing.

This is the first public crossing north of the Essex station area and notable in that it provides a great photo opportunity of the northbound steam trains. There's not a cut there per se, but the track curves around a hill with some rock outcroppings, then crosses the road and goes alongside a tributary of the Falls River (which, due to its being dammed upstream to power mills of yore, is little more than a large creek).

Old Deep River Road itself is notable as the original alignment of the old Middlesex Turnpike. But the ol' Turnpike crossed the railroad twice in short succession here - and both times on curves - so an early (c.1907?) realignment of the road resulted in Old Deep River Road being truncated to a dead end, an reduced to just providing access to a couple of homes on the east side of the tracks.

Given the topography and the history, I definitely wanted to include the scene on my layout - and the turnback curve at the end of the peninsula between Essex and Deep River would be the perfect place.  So, as BillS and I were brainstorming last Sunday on how to go about modeling the scene and trying to figure out just the right topography, it suddenly occurred to us: Why not just take a quick field trip and get some photos of the area?

Now, not everybody is lucky enough to live near their chosen prototype, but I certainly am - so I definitely took advantage of the opportunity. Into Bill's truck we jumped and north we headed. And I'm really glad we did, as you'll see . . .


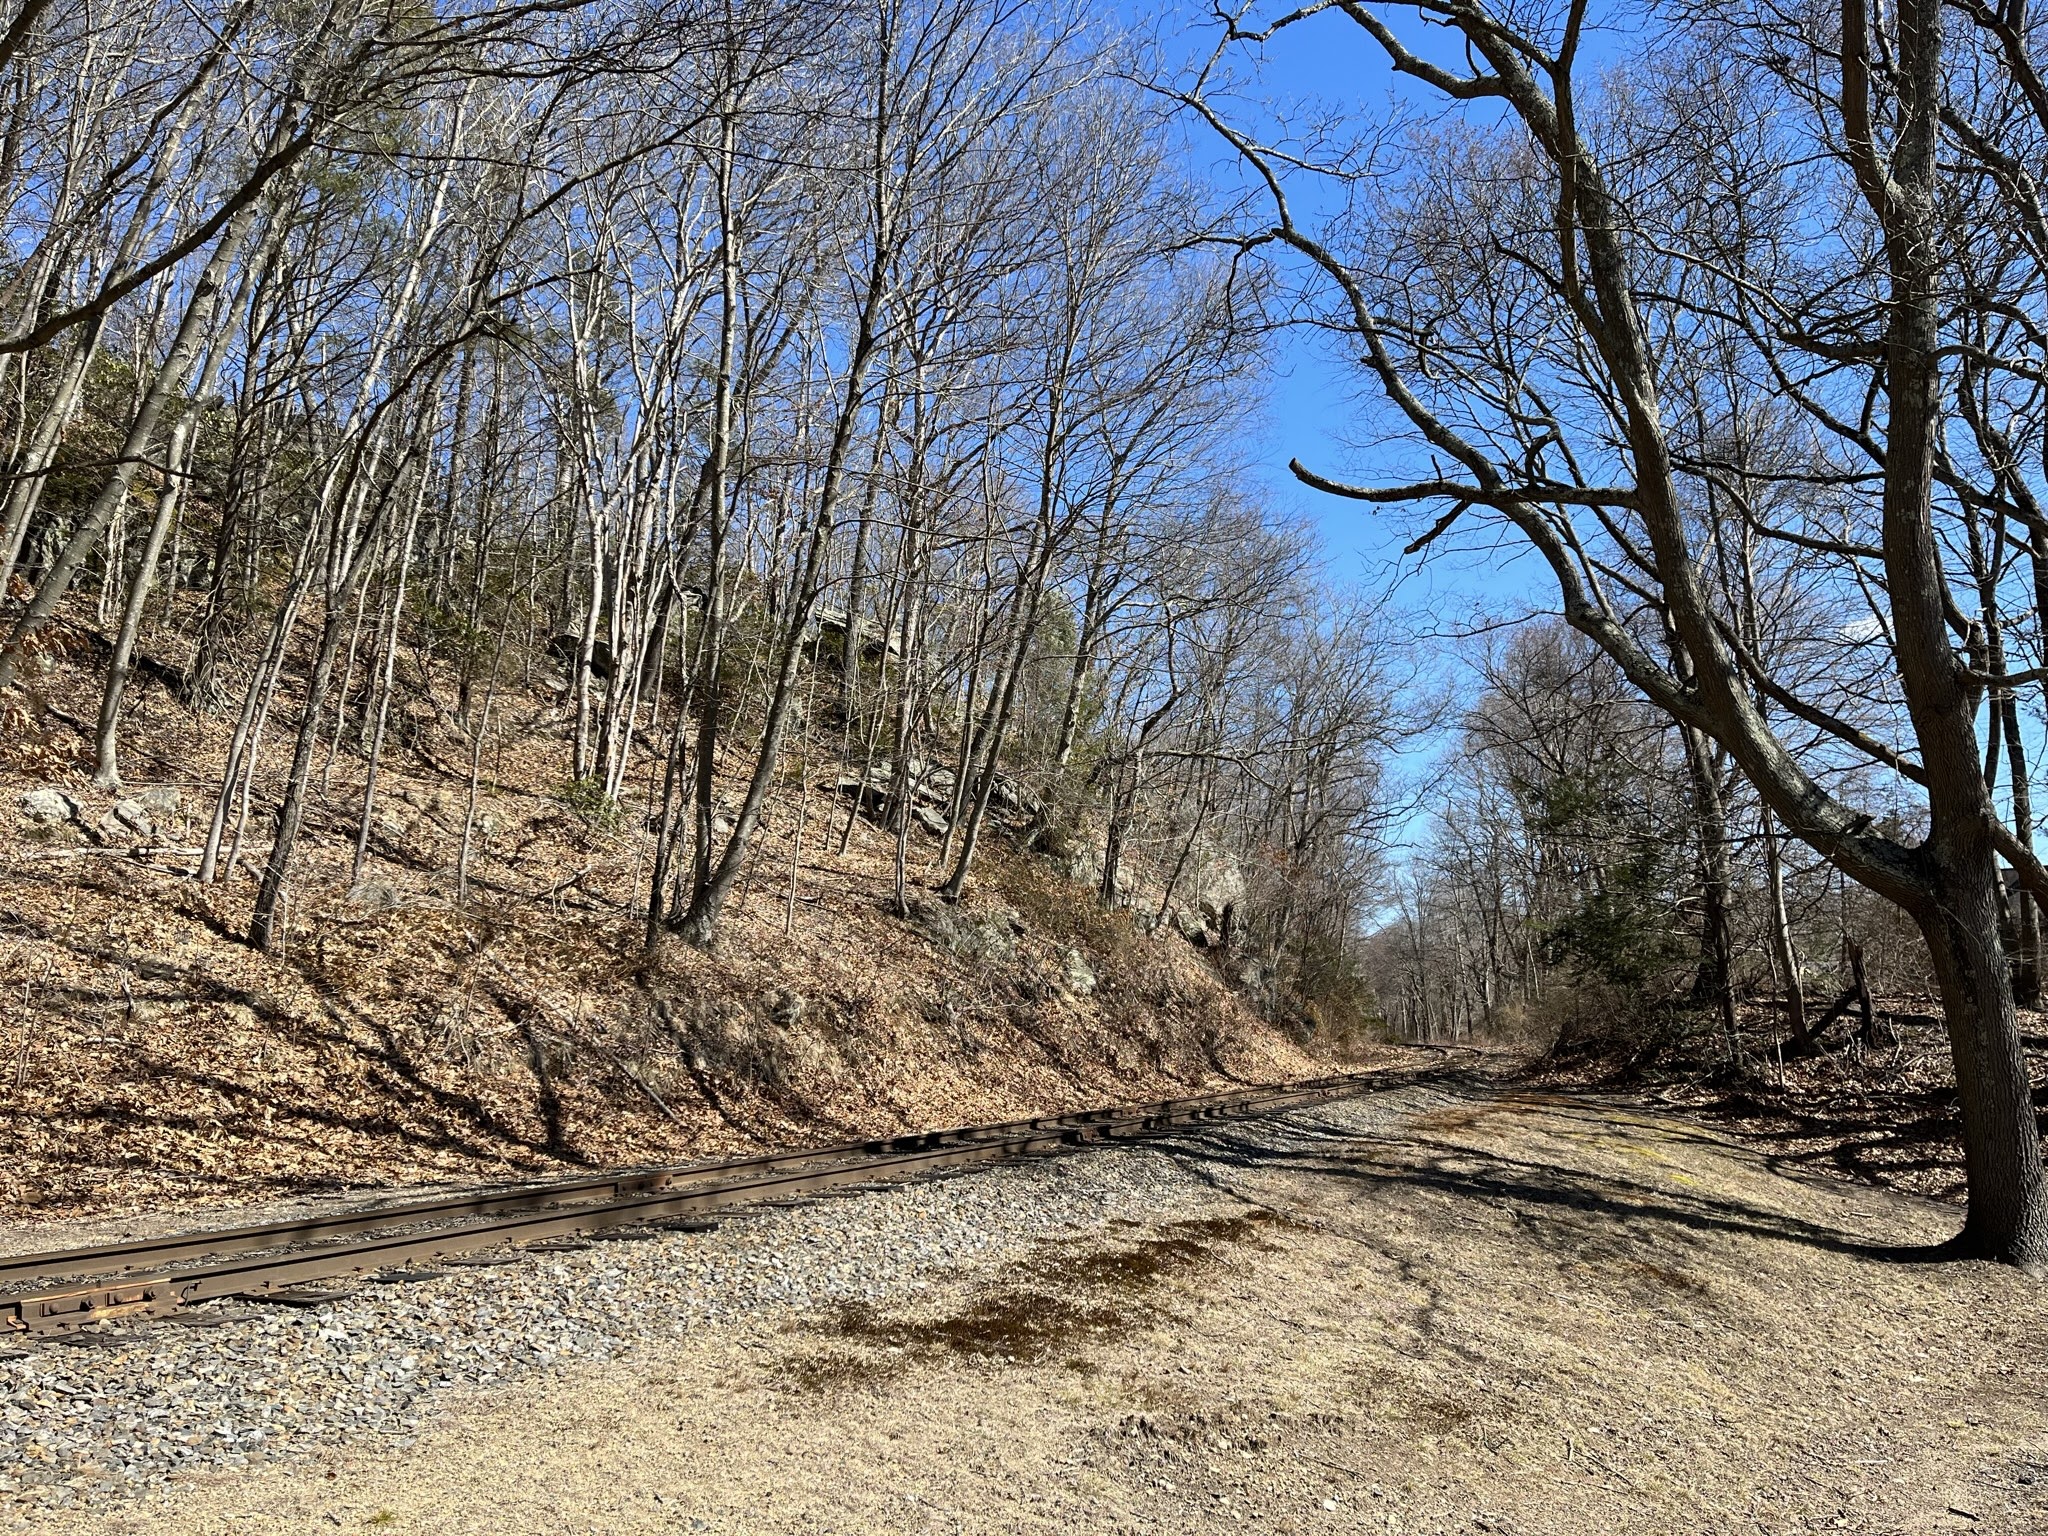
This is the view from the road looking south back toward Essex - and the first thing that occurred to us was that the "cut" wasn't really a cut after all - and the hill wasn't as tall, or as steep, as we'd thought. While the track looks straight here, we're actually on the outside of a curve.


After walking a bit south, I turned to get this shot looking north toward the crossing itself. I took special note of all the rocks, which I never notice (or really see) during the rest of the year when all the trees are filled in with leaves.


Perspective looking east - note not only the rocks, but also the difference in elevation between the road, the land leading up to the track, and - of course - the hill.


Another shot, southeast, showing the road and track (and hill, and rocks)


Last of all is a shot looking due north along the road. It dead-ends in the far distance, with the track continuing to curve until it parallels the road. The track continues to curve and used to cross the road again, but the Rt. 9 highway (just out of sight in the far distance) has obliterated all evidence of that. And incidentally, while you can't really see it here, there's a brook to the left of the track and road that flows into the Falls River.

Having photo-documented this area, we figured since we were out anyway, we might as well head up to Deep River proper to get some additional detail shots of Tate's Cut (a signature scene north of the station) and the station area itself - especially since that'll be the next place where we'll tackle terraforming.  I'll save those reference photos for when we get around to that - but I definitely wanted to share a bit of serendipity . . .


We went for the cut and the station, but we were pleasantly surprised to find a steam locomotive doing some switching! We had no idea they'd be there - the VRR seldom uses the steamers for switching - but there was the #40, switching cars on the old house track. Incidentally, I got some shots of another "faux cut" south (off the back) of where the engine is here - which I'll also try to model.

After allowing ourselves to be thoroughly distracted by #40 for a bit, we figured we'd walk north to the other end of the station area to get what we came for: Shots of Tate's Cut. And just as we did, we heard a whistle - but it wasn't coming from the steam loco . . .


It just so happened that a special train was coming into town from the north - through Tate's Cut -  powered by this 80-ton centercab diesel and blowing its Hancock air whistle for the crossing!

Talk about lucky! Two trains, diesel and steam, meeting in town, which we got to see only by chance since we were doing some prototype research. Pretty cool!

But time was ticking by, so it was time to do something with that research. So we headed back to the basement . . .


Unlike me, Bill is a true aficionado of the foam scenery technique. In fact, it's really his fault he's the reason I even bothered departing from my tried-and-true cardboard lattice/plaster cloth to try foam on the Essex-Deep River-East Haddam section (and it really didn't start well - click here for that story. I can't believe it's been over 7 years already!). I'll admit, it goes pretty fast - at least if you're Bill . . .


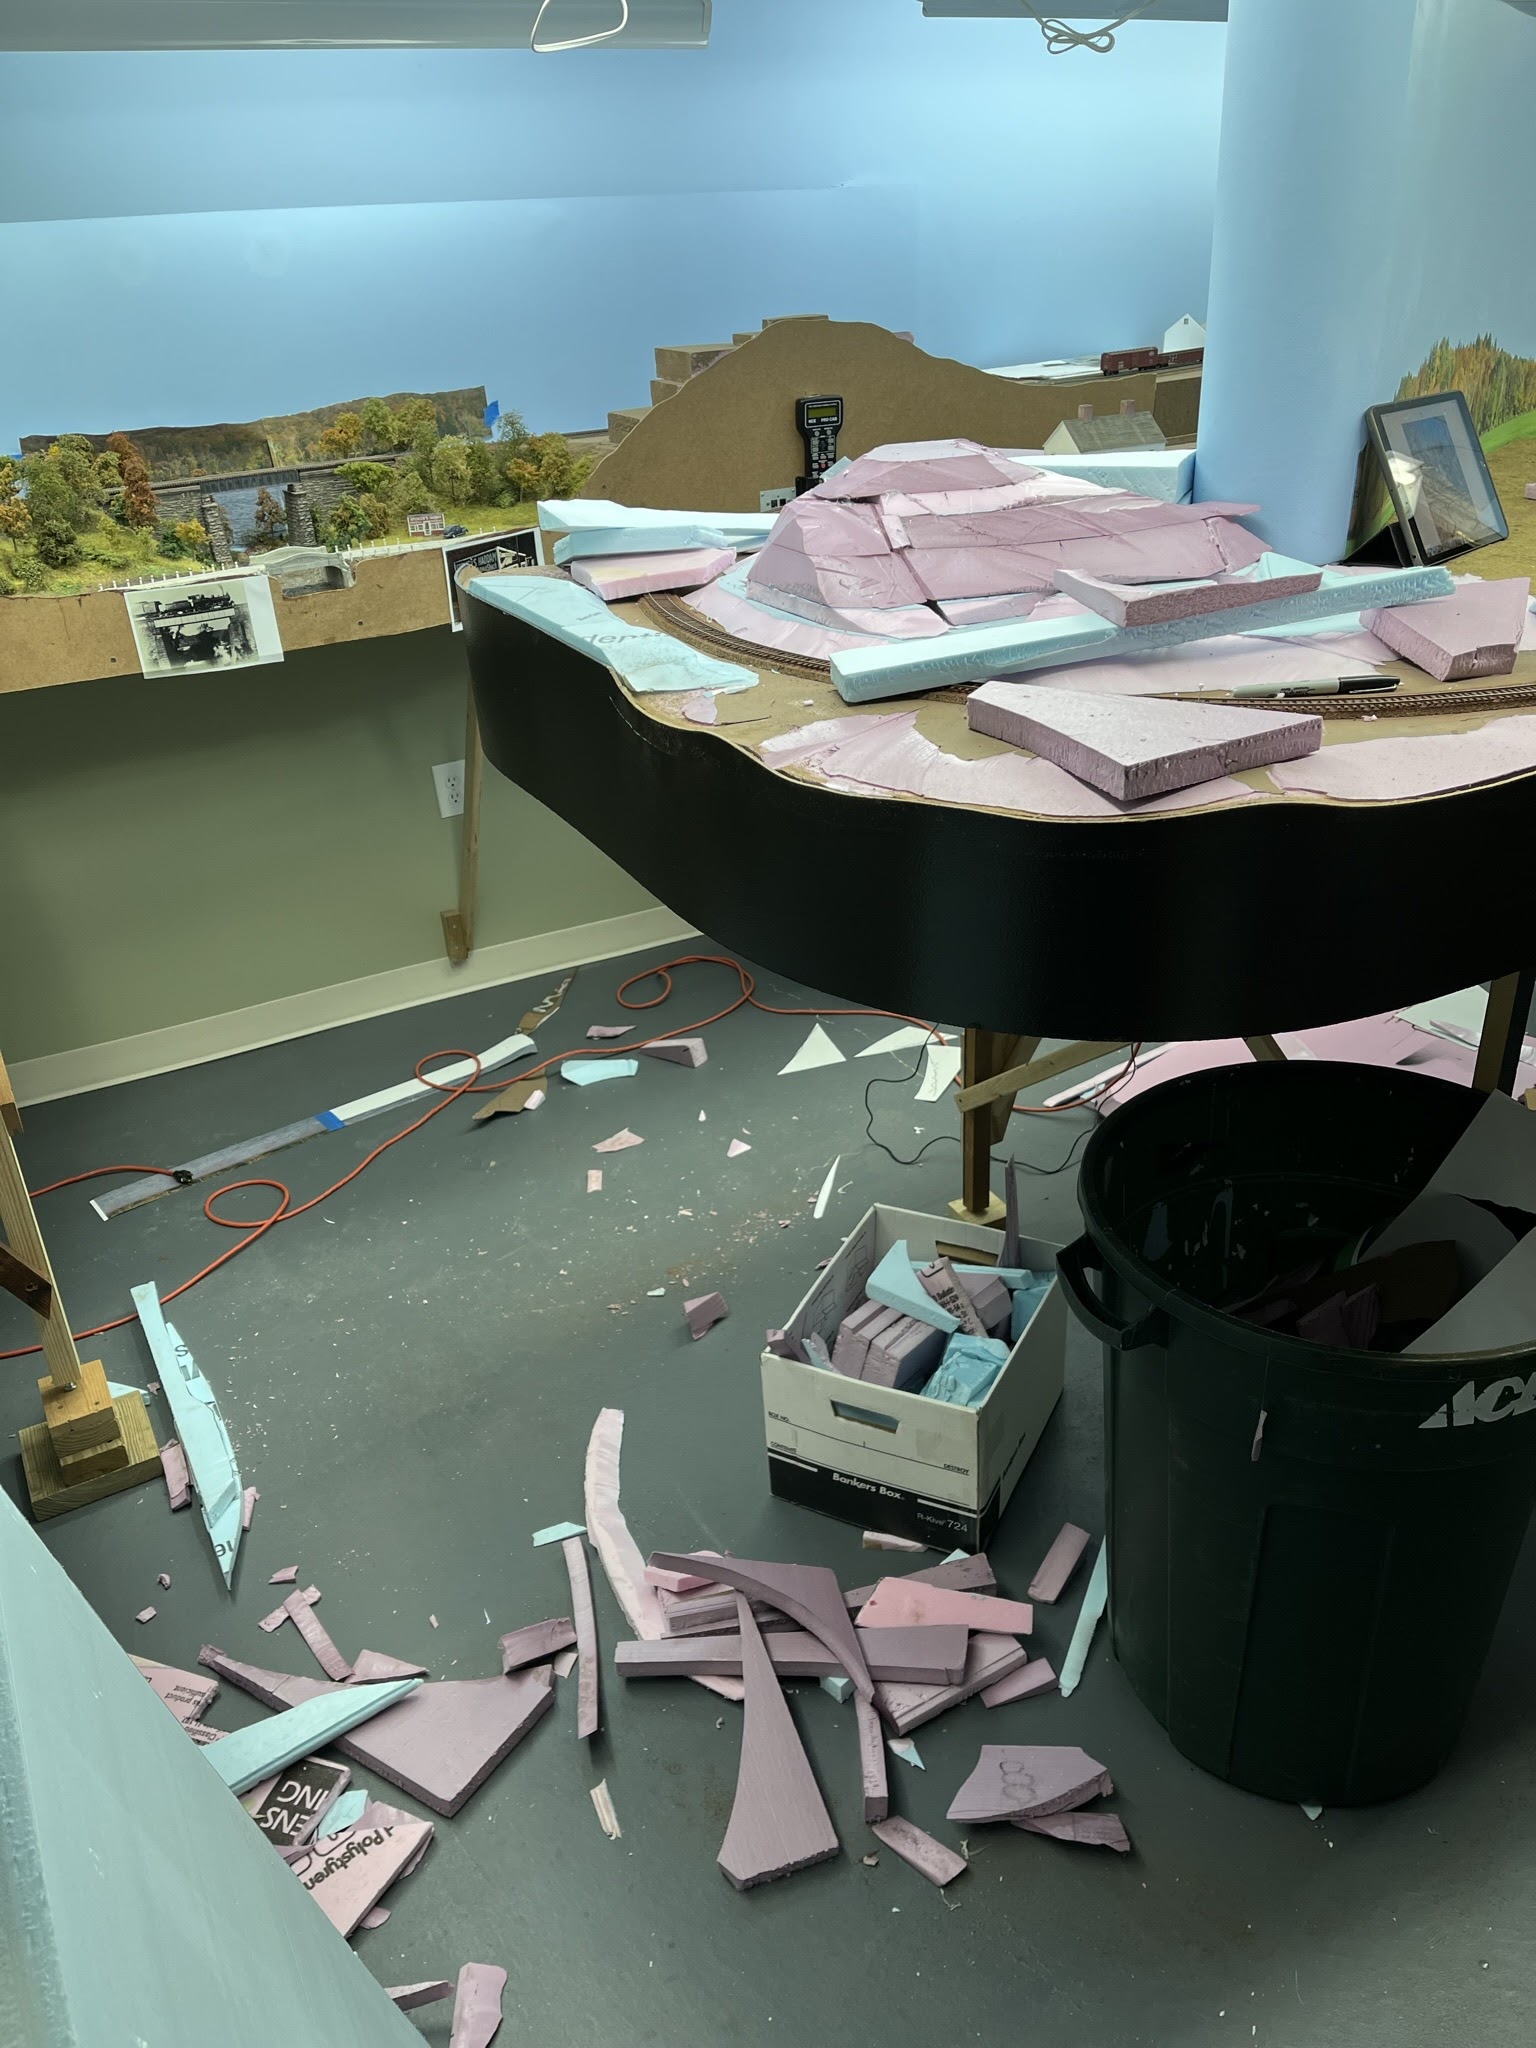
And it makes a heck of a mess! This view doesn't even show all the static-charged foam "dust" that seems to get everywhere during process. But pick your poison - it's either this or plaster cloth...


But you can just start to see the Old Deep River Road scene starting to take shape - from the hill in the first photo, to the brook and road on this side of the hill in the pic above.

Other than the mess, another common "downside" I've discovered with this technique (or maybe it's just how fast Bill works) is that it sometimes goes TOO fast! Case in point: We were motoring along and cut the foam and fascia(!) way too low (IMO) for the little brook:


Yeah - that's a bit too deep . . .


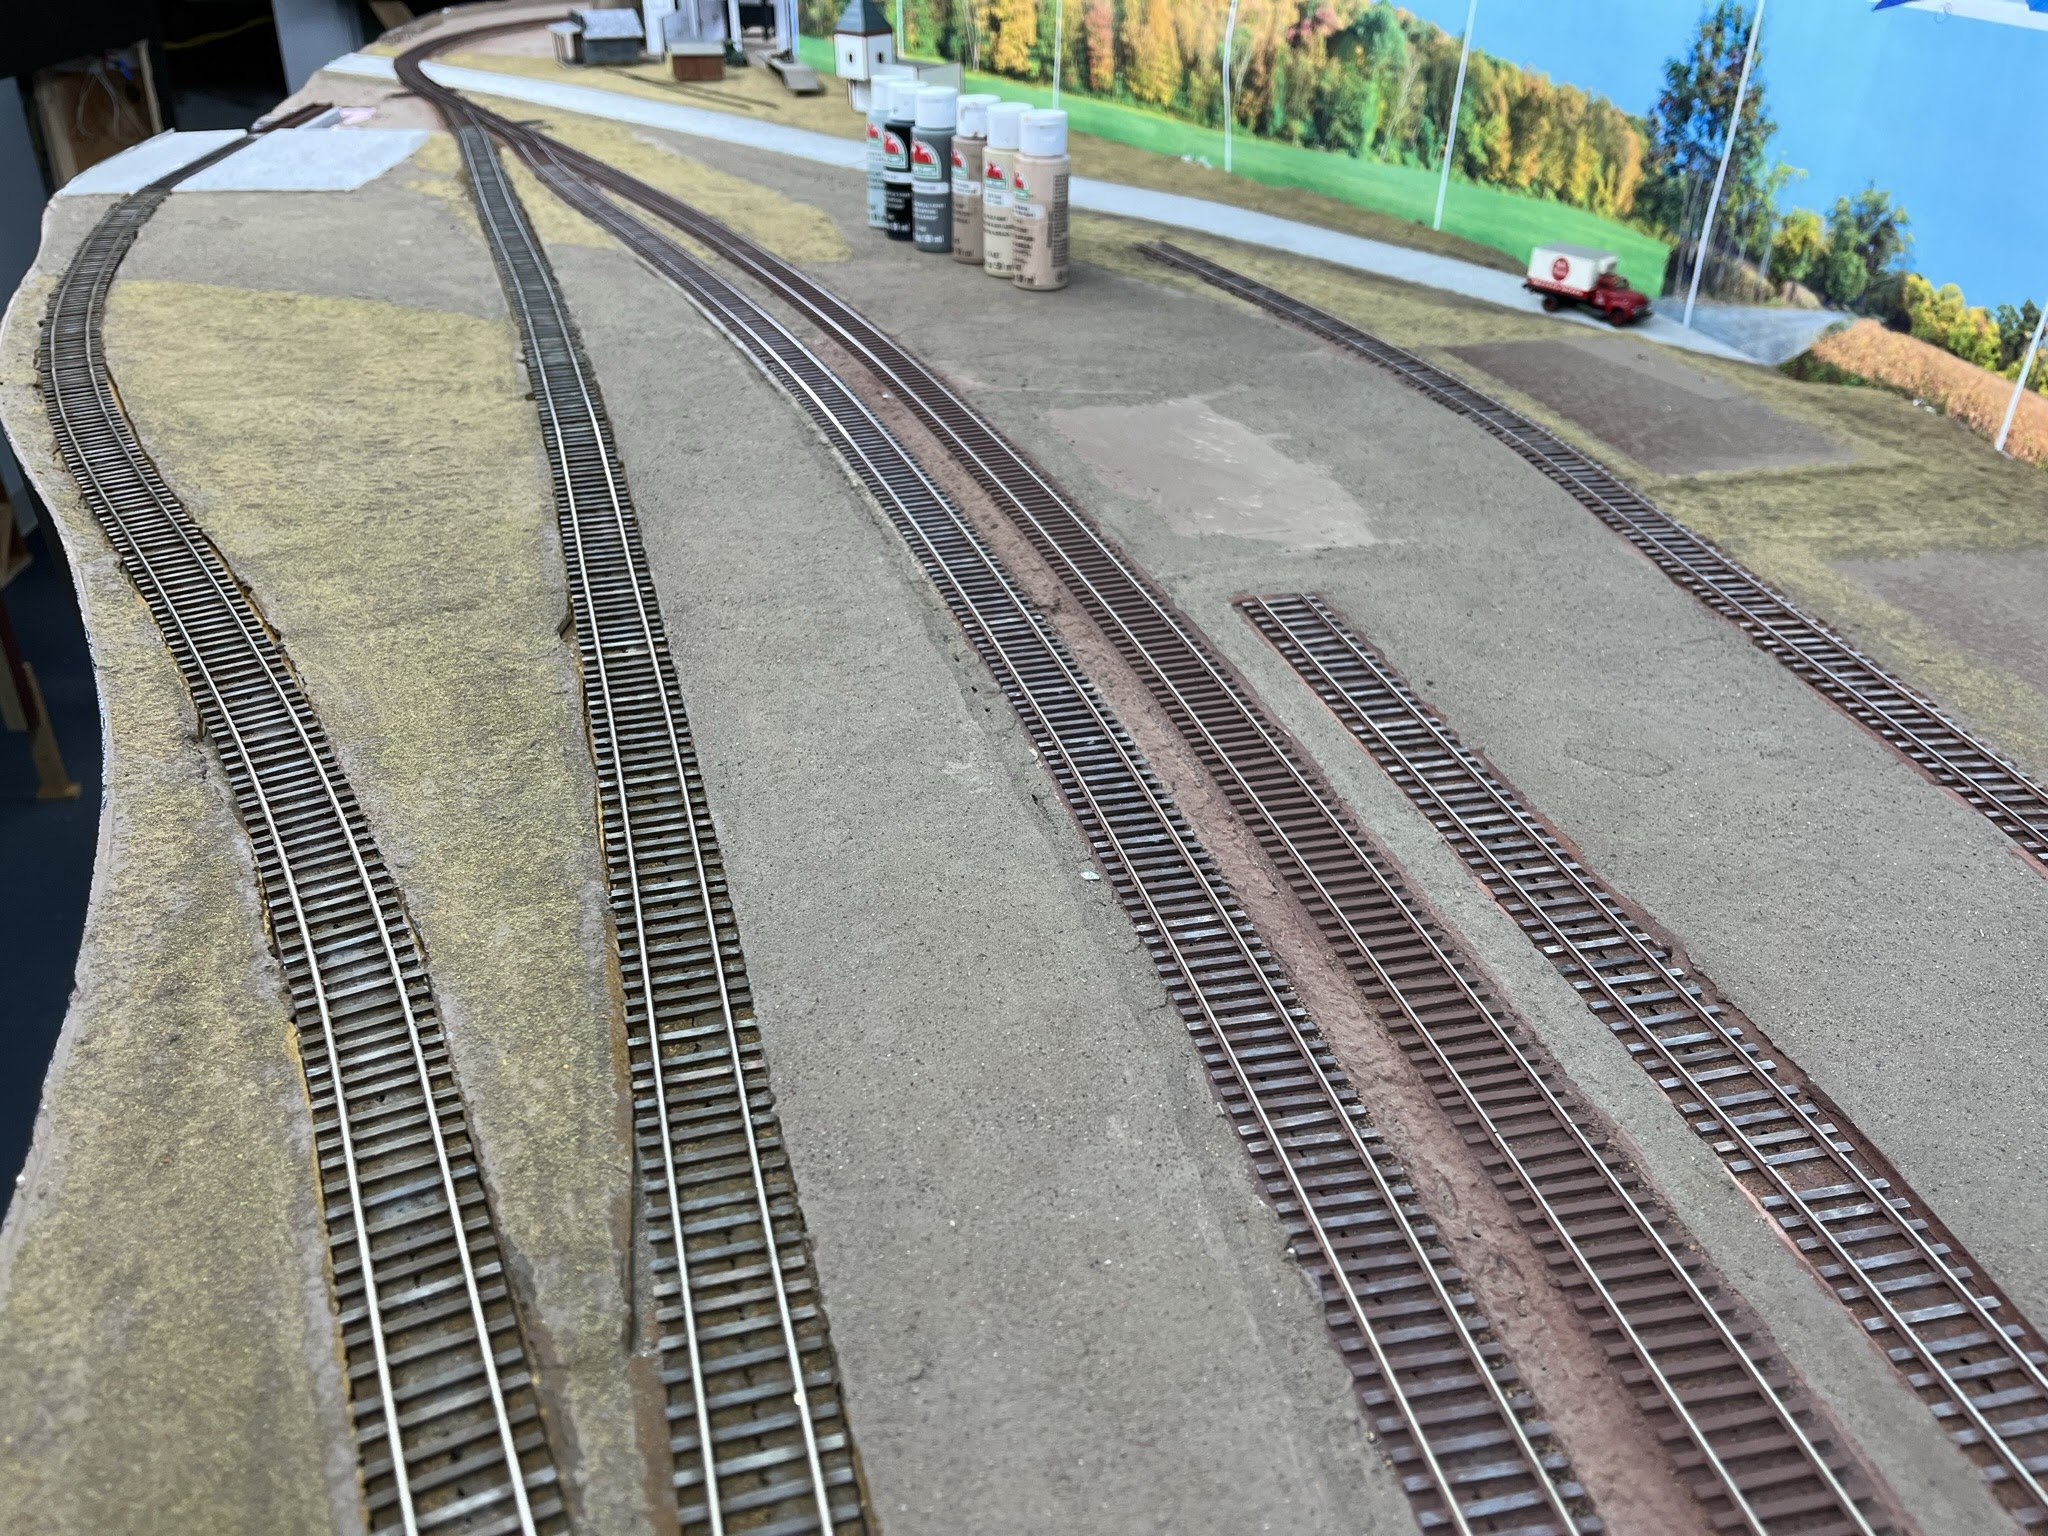
Other than the ravine brook, if you compare this view to the prototype photos, you might agree that the scene is coming along nicely..


And just to orient you a bit, this is looking "north" from Middlesex Tpke at the north end of Essex showing the curve around the big hill.

The hill needs rocks though, so after Bill left I decided to cast some out of hydrocal. I often mention that the main reason I continue with the blog despite how easy FaceBook is by comparison is so that I have a (b)log of my past efforts. So I looked back through the archive to see how I'd done rocks before...


Turns out, as I suspected there's an app a blogpost for that! Click here for the details, which I followed again this time around . . .


. . . to great effect. I now have a BUNCH of rock castings I can use in the Old Deep River road scene. Now, I just have to color them . . . Thankfully, I have TWO posts on how to do that - here, and here - which I'll follow when the time comes.

So that was the first of two Sundays. Here's what I did yesterday (well, it took the whole weekend, but was essentially finished yesterday...)


I fixed that "ravine" that was bugging me... One of the many important lessons you learn as you advance in this hobby is that you really can fix just about ANYthing. And that's super important to know since, if you know how to UNdo something, you're much more likely to DO something. Analysis paralysis is real and if you never DO, you'll never ACCOMPLISH. And if you're afraid to even try, you'll seldom DO. I - and many others - have discovered that if you know you can UNdo, your fear of trying diminishes greatly. Ergo - more "DO" happens.

At least that's what I think %^)

In the pic above, you can see that I "backfilled' the fascia and foam with the cut-off fascia and more scrap foam. I covered over the seams/joints in the fascia with drywall mesh tape and then coated it all with a few coats of drywall topping. Mesh tape has helped me fix a number of things - click here for a detailed how-to.


It may not be obvious in the pic above, but the topography here is MUCH better and will be much more in line with the prototype. I really like how it's all shaping up - literally. I just have to be patient and keep working (an be willing to REwork) it until it looks the way I want.

While I still have to do some sanding on the topping, I didn't have time since friend ChrisZ was on his way over with a few friends to see the layout. Thankfully, I got everything cleaned up in time and enjoyed the remaining hours of Sunday afternoon having a great visit with Chris, Andre, Mike, and Stu. Unfortunately, there's no pic to document the visit - but at least I got them to sign the guestbook! (and I may have converted at least one of them to the ProtoThrottle... we'll see!)

So, all in all, a pretty productive couple of Sundays. And - bonus! - the layout is cleaned up in time for my next op session which is coming up later this week. But a post on that will need to wait...

Saturday, March 25, 2023

Continuing Progress at Essex: Concrete Pad & Backdrop

Persistence in my quest to catch up on this here blog is paying off . . . With this progress post, I'm now only one week behind(!) Thanks much for the encouragement to keep up with the blog - it's a bit more work than the FB group, but here I can post more detail, info, and pics - and I own the content.

So without further ado, here's what I was up to last Saturday . . .

Concrete Pad at Dickinson Witch Hazel


I used the same technique I used for the grade crossings on this concrete pad. The main part of the pad itself is foamcore with the paper peeled off (Pro Tip: Use the $2.99 foamcore from Hobby Lobby - the paper will peel off in large sheets without leaving bits of paper on the foam) and painted with gray craft paint. The track is Micro Engineering Code 70, already painted with a base coat of Rustoleum Earth Brown camo paint. I didn't bother weathering the ties since they'd be covered by "concrete." The guardrails are also Code 70 - same height is important to keep the "concrete" all level. I used Xuron rail nippers to cut the guardrails to length, used needlenose pliers to bend the ends, and used my fingers to give the rails a slight curve to match the track. Then I used thick CA (my go-to brand lately is the Loctite pictured above) to glue the guardrails onto the ties, snug up against the tieplates/spikes.


Next, I used the Tamiya 3mm curve-able tape (pictured in the previous post) to mask the flangeways and painters tape to mask off the surrounding area to protect it from the spackle.


I then spread on the spackle using a piece of dense foam to spread it. I would have used a putty knife, but I discovered that the foamcore is ever so slightly thicker than the ME Code 70 track is tall. So, to blend the difference without a visible step, I used something more flexible than a metal putty knife to spread the spackle.


As with the grade crossings, I needed a second coat to smooth it out better after the first coat had dried and shrunk.


The Big Reveal is always fun - here, I've removed the Tamiya tape to uncover the flangeways. Oh So Satisfying


And here's the final result after removing the painter's tape. I still need to paint the spackle/concrete to match, but I decided I was done here for now...

Essex Backdrop

I used the same basic process (outlined here) that I've used elsewhere on the layout (click here and scroll down). Additional details can be found in the hyperlinks, but here's a quick overview:


The process starts with gathering together the photos I've taken of the area modeled - or, if I don't have or couldn't get any, then shots that "look like" they may have been taken in the area - and Photoshop them together. In this case, I had to add a couple of roads to match the two roads in the Essex station area I'm modeling. Fortunately, I was able to get an actual shot looking northbound on Plains Road to include the "Yellow Label" store (part of the Dickinson complex - click on the photo above for a larger view - the store is there in the trees on the right).

Next, I print out a mockup on regular copy paper to finalize overall look and position. Once I'm happy with that, I save the .psd file to a .pdf banner file. I take the pdf to my local Staples store to have them print it out on their indoor polypropylene banner paper. This particular backdrop was almost 15' long, so I divided it into two sections and had it printed one section on top of the other. The whole backdrop you see above was about $34.00


Other than the Photoshop work, the most time-consuming part of the process is trimming along the tops of the trees to remove the sky. Pro Tip: be sure and match the sky color on your backdrop image to the paint color you use on your masonite (or preferred backdrop support). That way any top "border" left after trimming will just about disappear. In the photo above, I've finished all the trimming (incidentally, while hanging out with the AML Wednesday night chat group) and it's ready to mount.


So here's what we're starting with... Just plain blue masonite. That's Middlesex Turnpike (Rt. 154) heading toward the backdrop, and you can see the Dickinson concrete pad/foundation and coal dump there on the right.


And looking the other way... that's Plains Road (Rt. 153) on the right. The Yellow Label store will be on the backdrop there on the left side of the road. In order to make vertical positioning easier, I cut a gap between the horizontal layout base and vertical backdrop. The backdrop photo will slide down into that gap.


I use wallpaper/border adhesive to attach the backdrop to the masonite and I have some water on-hand to wipe off any adhesive that oozes out (though I try not to let that happen).


The positioning process involves scooting the backdrop down into the gap/slot and making sure it's level and at the right height. In the past (and as you see above), I've marked where the top of the backdrop falls with tape - since that would show me the maximum height to apply the glue. But in my case, the tape ended up taking some of the sky blue paint with it when I removed it.

So now, instead of bothering to mark where the top of the backdrop falls, I just apply adhesive to the lower part of the masonite, staying well below where I know the top of the backdrop will be, attach the bottom part of the backdrop, then apply more adhesive to the top part/back of the backdrop itself and finish attaching it, smoothing it as I go. If any adhesive oozes out of the top, I wipe it off with a rag or paper towel dipped in the water.


I'd planned ahead for 1) the backdrop being in two pieces given its long length, and 2) the seam between the two pieces being behind the big Dickinson warehouse where it wouldn't be seen. That turned out to be an even better idea than I'd planned since - despite my best efforts/planning - the two sections didn't match height-wise (likely due to how I had to position them at the roads). There was also a lot more overlap than I'd expected, so I ended up having to trim the end off of one side. But again, you don't see any of this behind the warehouse.


And here's the payoff for all the work... What a difference a backdrop makes! Compare this to the "before" photo above for the full effect. I especially like how the road ended up blending into the backdrop. But, speaking of blending, I have a lot of work left to do to blend the foreground scenery into the backdrop...


And here's the "south" end of the Essex station scene. Click on the image for a larger view to be able to see the Yellow Label store down Plains Road.

I don't think I'm alone in lamenting about how little progress I make on the layout - Real Life has a way of interfering. But one of the unexpected benefits of taking the time to document and recount my progress here is being reminded of how much I'm actually accomplishing.

Of course, the prospect of getting feedback and encouragement from you all is another great reason to post here as well as on FB. And of course, keeping a (b)log my techniques helps me keep track of what's worked in the past - and what hasn't. You've hopefully noticed the hyperlinks to past posts I pepper throughout for reference - I find those especially helpful and hope you do too.

While I'd hoped to be "done" with scenery in Essex by now, I decided to take a break to get some more terraforming done north of Essex to East Haddam. I'll be tackling that in the next post . . .


Friday, March 24, 2023

Grade Crossings at Essex

With the track/ties in Essex painted/weathered, it was time to do the grade crossings. But before getting to those, here's an "after" photo of the new scenery at the north end of Wethersfield (by the Rt. 15 overpass) that I should have included last time . . .


From this perspective, you can see the variety of colors and textures a bit better. I can't emphasize enough (and have to regularly remind myself) how critically important a variety of colors, textures, and layers are to achieving realism in scenery. The good news is that you can always add more; the bad news is that you may sometimes feel you don't have the time to add enough. But suffice it to say, adding ANYthing is far better to having nothing but plywood and foamboard to look at.

Which provides a good segue back to my work in Essex . . .


The last time I worked in Essex, I only posted quick photos of me and JimD doing the initial ground cover. As you can see in the photo above, I didn't get much further during the following weeks, but I did get the photo backdrop mocked up and the roads painted. And as I mentioned at the top of this post, since I got the track painted & weathered, the next step is to do the grade crossings.


There are two grade crossings which "bookend" the station area in Essex. The Middlesex Turnpike (aka Rt. 154) borders the north end, with Plains Road (aka Rt. 153) anchoring down the south end. While I decided to do both crossings with "concrete" (DAP spackle), the Middlesex Tpke crossing has scrap rail to guard the flangeways. I bent some rail to match the curve, bent the ends in, and then used gap-filling ACC to attach the "guard rails" right up against the spikes on the ties.
 

To protect the flangeways from the spackle, I used Tamiya 3mm curvable tape which I had on-hand. Turns out, it's perfect for the task.


I used the same tape to protect the flangeways at the Plains Rd. crossing - but the only flangeways here are those on the turnout. Turns out (see what I did there?) I didn't really need to use the tape here since I didn't bother adding any other guardrails, opting instead to "carve out" the flangeways later. I also used some blue painter's tape to protect the surroundings from the spackle.


Once I masked around the north end crossing, it was time to apply the spackle!


The spackle shrinks a bit as it dries/cures, so I needed to do two coats to make sure everything was filled in nicely.

And here's how the south end crossing looked once I pulled up the tape. The "speckles" were actually loose ground foam that I accidentally blew on before the spackle fully dried. OOPS! No worries - between carving out the flangeways, cleaning off the top of the rails, and painting the "concrete" you won't (shouldn't) even notice.


I decided not to do full guardrails here since, being a turnout, it would have required a bunch of little pieces of rail and I wanted to try and avoid that. And I figured I could, by just carving out the flangeways later.


Thankfully, I didn't have to worry about that with Middlesex Tpke. Just peeling off the tape was sufficient to create nice, clean, clear flangeways. Just have to make sure I can get paint way down there at the bottom of the flangeway...


After cleaning off the tops of the rails, it was time to do a test run . . .


And there you have it - pretty straightforward. I think I may try precoloring the spackle in the future since, once it's painted, it may be difficult to clean the tops of the rail without scraping the paint off and having the white show through.

But for now, I'll just hope the there aren't any derailments on Middlesex Tpke or Plains Rd during the next op session... Fingers crossed!

Thursday, March 23, 2023

A Welcome & Progress Report

First off, I want to say a hearty "Welcome!" to anyone who's visiting here for the first time having heard of The Valley Local on the NERx this week. While I admit I post most regularly on the Valley Local Facebook Group page, I really want to get better at posting more detailed content here at the blog (and, ergo, on the Valley Local website).

Unfortunately, it's been just over a month since my last full progress blogpost and FB group members have gotten a little taste of what's been going on 'round here. But over the next few days, I'll get the blog caught up - and with additional detail . . .

I set up a work session in late February where I was able to enlist the help of some fellow modelers. Here's Pieter and Roman providing some HUGE help in coloring/weathering ties & track in Essex. As a younger/newer modeler, Roman hadn't ever done this before so I pointed him to my blogpost on the technique I use (scroll down) and he did a great job. While I'd love to think his success was due to my impeccable instructions, I suspect it had at least - if not much more - to do with having experienced-modeler Pieter alongside for guidance.

No matter how experienced a modeler you might think you are though, you can always benefit from others' perspective and experience. So while Pieter and Roman were working on track in Essex, I had the privilege of having Jim Dufour help me with scenery in Wethersfield.

Here's the "before" photo of the area I wanted to improve. It's looked like this for, literally, years now and it was high time to fianlly add some additional texture over the base scenery - and hide the left end of that bridge abutment.

The only downside of getting more scenery done is that it gets harder to find where to put down your stuff! Here I'm using a variety of items: Hairspray, white glue, different colors of fine ground foam, green polyfiber, and Scenic Express Super Trees.

Here's the "after" photo. . . Briefly, the technique was to: 1) make "underbrush" - pull/stretch the polyfiber very thin, spray some hairspray on the layout surface, apply the polyfiber, more hairspray, add some groundfoam on top of the polyfiber; 2) add trees; 3) add additional textures/colors to taste.

I used a common, but tried & true, technique for hiding the bottom edge of the backdrop here. . . polyfiber right along the bottom and placed a fence in front of that.
(remember, you can always click on an image for a larger view)

I continued the polyfiber "brush and brambles" to hide the transition between horizontal scenery and vertical backdrop, but I'm not really happy with the result here so far since it creates too much of a difference between the two without blending them - just the opposite of what I want to achieve. So I stopped at this point and will be reassessing - perhaps by adding some fine ground foam in a color that's closer to what's on the backdrop and foreground . . .

Meanwhile, the guys back in Essex made great progress on the track, coloring/weathering all the ties except those on the mainline.

You can also get a few glimpses of the backdrop mockup in Essex. I'll be detailing that process in a future post.

As you can probably guess, weathering the ties like this can be REALLY tedious/time-consuming work so having Pieter and Roman tackle it for me was a huge help! And it was a bonus that, having two different guys doing it, with different levels of experience, went a long way to making it all look very prototypically random. All I had left to do was the mainline!

And of course it probably goes without saying that having somebody like JimD provide guidance on scenery-making is priceless. I have a long way to go before my grasp gets anywhere close to my reach, but getting such a good start on the "layering" aspect of scenery has certainly put me on the right path.

Thanks to Jim, Pieter, and Roman for such a productive and fun day!