Saturday, January 31, 2015

Snow Day Modeling - Valley Coal Co.

Ah, winter - otherwise known by some as Modeling Season. You're (hopefully) all nice and cozy indoors with no outdoor distractions or chores to keep you from making some progress on your railroad. Even better are Snow Days - if you're lucky enough to get enough snow to have your office shut down for the day (and a helpful neighbor with a quad and a plow, so you can model rather than shovel).


We had a snow day recently and I took advantage of the inexplicable motivation I've had for building lately to tackle modeling the Valley Coal Co. in Wethersfield.

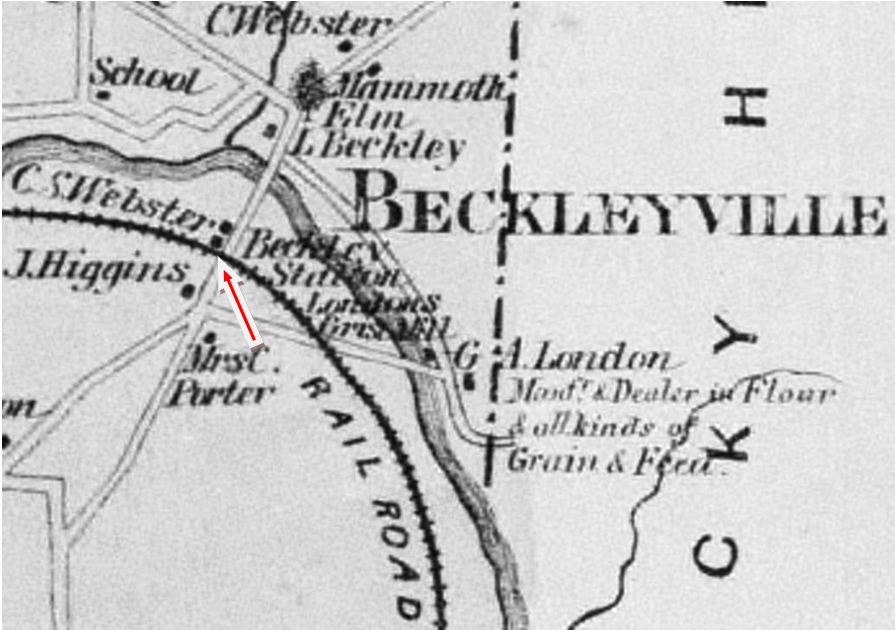
To refresh your memory about Wethersfield, click here and scroll down to see the description of Valley Coal. Here's the Sanborn map, oriented as you'll see it on the layout (standing in the aisle looking west, north goes to your right:


Just one relatively short siding north of Wells Road. The office is over there on the left on Wells Road. What the map doesn't show is the tower/conveyor.

There's only one known photo of the Valley Coal conveyor that's at all useful, but it at least provides a hint of what was there.


Looks like the hopper dumps into an under-and-between-the-rails hopper that contains a dump car that's then pulled up to the top of the tower by a winch/cable and in turn dumps the coal into the chute to dump into the coal yard. There's no way I would be up for scratchbuilding this structure, even if I was inclined to. Thankfully, Walthers again provided an alternative:


Yes, it's not a coal conveyor but an ashpit and cinder conveyor. But hopefully you can see - as I did - that it'll be a nice representation - especially if I don't have that shed on top.


Assembly was pretty straightforward, though some of the parts were difficult to put together. Many times I really could have used a third - or fourth! - hand. But if you take your time, and use thicker glue to tack things together until you can add more glue, things go together fine.


After complaining for the umpteenth time that I needed a third hand - I finally realized I had one(!) Unfortunately, most of the kit was already together. Fortunately, I discovered this handy tool just in time for what would have been one of the toughest parts of the assembly (the coal chute itself).


Stringing the rigging was actually pretty satisfying, though it did give me an even higher appreciation for what shipbuilders go through. I'm sure there are better, more specialized tools that would have made this process even easier, but a pair of tweezers was all I ended up using.

And I glued the thread to the pulleys with ACC and ZipKicker (click here for a great tip on using these together) which had the effect not only of holding the thread, but it stiffened it as well so it didn't droop and look like, um, thread.

Unlike the other structure kits I've built recently, I just assembled this without prepping/painting ahead of time. It'll be all one color black, so I figured I'd just paint it after it was built.

Since I wanted to paint on Tuesday (which was the Snow Day!) here's where things were as of Monday night:


It already looks different from the kit - and more like Valley Coal - by not having the shed building over the winch. But it lacked something. It needed a railing...

So, I figured I'd consult the Google on the Internet Machine and learn what "typical industrial railings" were made of, and what their dimensions are. I came across this site and this site which gave me the information I was looking for - check them out if you want to learn more about prototype railings (don't laugh - it's actually interesting). But if you just want to know what to use to model them, here's a list & assembly steps:

  • .020" wire (represents 1.5" prototype pipe)
  • Two railings - one top, one 1/2 way between the top railing and the platform
  • Top railing is 4' high on the prototype (so the posts have to be over 4' long)
  • Solder together and bend to fit

As you'll see, that's easier said than done...


My first step was to use a safety pin to make dimples in the platform where I wanted the railing posts to go (dimples keep the drill bit from traveling all over).


Then I used my handy-dandy Dremel, outfitted with a flexshaft attachment and a #75 drill bit, to drill holes for the .020" wire I'd be using.


Once I finished the holes, I used a dial caliper to measure the distance between each hole. I'd use the sum of these measurements to determine how long the railings would be. I already knew how many posts I'd need (8 holes = 8 posts).

Next, I took a piece of scrap wood to use as a base for my soldering template. To make the template itself, I used my caliper to transfer the measurements between the posts to the wood.


I drew all my posts first, then drew my top railing and then my middle railing a scale 2 feet below:


Once I had my template done, it was just a matter of cutting the .020" wire to proper lengths and taping them to the wood to hold them for soldering:


Use good soldering practices (clean, flux, hot iron) and you'll end up with something like this:


Use poor practices (as I did), and when you go to bend the railings to shape, they may end up like this:


The above photo is an example of a few things:

  1. I didn't clean the joints enough before soldering, so ended up with weak solder joints. Consequently, when I went to bend the railings, many of the posts popped off.
  2. I obviously can't bend wire in one plane. As you can see, they all went askew.
  3. I didn't account for the fact that wire can't be bent (or at least I can't bend it) right at the post. So the bend in the railing tends to occur after the post - and throw the rest of the railing off. Next time, I may try bending the railings to fit first and then add the posts. Or try using styrene rod instead.
At this point I was just about ready to chuck the whole railing idea. But "in for a penny in for a pound" - and I'd already wasted spent almost 1/2 my snow day making a railing when I should've been painting. So I just manhandled the railing into position as best I could, and ACC'd the posts as needed.


The result isn't as nice as I would have liked, but it's a LOT better than nothing IMO. They look prototypically "battered" at least(!)


All in all, I'm satisfied with how it came out. Airbrusing a coat of Grimy Black over everything makes it look even better and blends the railings in with the rest of the structure.


And here it is in place temporarily on the layout. I have to cut a hole in the plywood and place the conveyor's hopper under the track, but this will give you and idea of how things will look. Compare this seen to the prototype photo at the top of the post. Hopefully you'll agree that I'd at least captured the "look" of Valley Coal even if it's not a perfectly prototypical model.

Friday, January 30, 2015

Wethersfield Lumber - Peeling Paint & Assembly Part 1

I'm quickly discovering that the step that takes the longest in assembling a structure has little to do with structure assembly - it's all about the prep and painting. I've already covered how I've painted the kit I'm using for the Wethersfield Lumber Co. and how I started prepping the walls to look like weathered wood with peeling paint.

After the black dye stain dried, this is what the wall parts looked like:


Making the walls look like weathered wood is just the "base" over which you'll add the top coat in the color of the bulding itself. But before that, the next step in the "peeling paint" process is to brush on rubber cement:


I just used common Elmer's rubber cement, though I'd be curious to hear if others have tried different brands and what their experience has been. I brush it on fairly thin - using enough to cover the walls, but not enough to "glop" things up. I figured that'd be the best way to avoid obscuring detail - though I wondered later whether I'd used enough rubber cement...

I applied the cement over the weekend and then airbrushed grey PollyS (water-based acrylic) paint on Tuesday. The next step is to use an erasure to erase/peel off the topcoat to reveal the weathered wood siding below.  I didn't get around to the "erasure" step until Thursday - and wonder if I waited too long. I found it very difficult to remove the paint. LOTS of elbow grease required!

But the result was worth it:


It's obvious which wall has been "erased" - what you don't know is that that wall was the first one I'd applied the cement to, and it had "glopped" on. But since the erasure removes the globs, no detail was obscured, and the peeling paint effect is very pronounced. Much more so than on the other walls. See below:


Before/After of the side walls. As you can see, the "peeling paint" look here looks more like a "weathered paint" look - the wall still looks in need of a repaint, but the peeling isn't as obvious as it was on the wall where I'd glopped on the rubber cement.


And here are all the walls having been "erased." Overall, I'm really happy with the effect - though adding all the steps involved together adds up to a LOT of time involved. But there's no arguing with success - these styrene walls look great, even up close. And they don't look at all like plastic.

Oh, that windowed wall at the bottom of the photo? I was so happy with the "weathered wood" look that I decided to leave it exposed here and airbrushed a nice new even topcoat on the rest of the wall. Since I'd totally forgotten about doing a peeling paint effect on the windows, and the windows are all nicely finished in dark green, I decided to pretend that the shed was getting a new coat of paint and that the painter had already done the window frames. And you can see his progress right around the 3rd window from the left. Adding a painter, a small HO scale can of paint and a ladder will make for a really cool mini-scene (eventually - I have to find those detail parts first!)


Once all the parts are finally painted and otherwise prepared, assembly can finally begin. Fortunately, assembly of the Walthers kit is pretty straighforward and all that interior bracing looks very impressive. Somebody actually thought it was all individual pieces (flattering, for sure), but it was actually only 3 pieces per shed (2 vertical sections and 1 horizontal).

I used the Model Masters liquid cement with the needlpoint applicator. I like using this glue for parts I have to stick together first. I found Tenax and other watery glue harder to use for much of this kit.

Given the added "thickness" of the parts due to their being painted, I realized that some of them could be press fit together. In those cases, I did use the Tenax, using a microbrush applicator to wick in at the joints.


That meant not much clamping was required, but as you can see above, clamps were helpful when attaching the windowed clerestory walls. BTW, as is my usual practice nowadays, I used Formula 560 Canopy Glue to attach the clear plastic "glass" to the windows. And I glued the window frames themselves with Tenax since they press fit into the openings.

I still have a little ways to go before assembly is complete. I have to add the clerestory section above the tracks and add the roofs. I'm a little apprehensive about the roofs since they look perfectly pristine now in their fresh "grimy black" paint. They'll definitely need to be weathered to match the "age" of the walls. Let me know if you have any suggestions on how to weather roofs . . .

Oh, and let me know if you have any suggestions for making lots and Lots and LOTS of lumber piles. That interior, as beautiful as it is, is pretty darn empty right now.


But over all, I'm really happy with how this kit is coming out and you see it in its current state in the photo above, placed on the layout temporarily for tonight's operating session.

Wednesday, January 28, 2015

A Few Words about Wordless Wednesday #53 ... and #52


So - this is Beckleys, a railroad station (more like a flag stop) on the Berlin Branch - in the town of Berlin, in fact. You're looking northeast. The track down to Middletown goes off to your right.


And this (Wordless Wednesday #52) is apparently a train heading into Beckleys. My best guess is that it's south/east bound and the station is behind us on the other side of the track.


In addition to the station, there was a siding to a milling company, back in the day. I'm just not sure when "back in the day" was on this particular map.


Interestingly, the view above - shot looking northwest - shows three tracks.  Perhaps there was a passing siding there at some point? Looks like the milling co. siding is in the foreground.

So what of Beckleys? Apparently, according to the excellent website Tyler City Station (curated by friend - and Photo Librarian - Bob Belletzkie), the station was here primarily for a prominent Berlin family. Perhaps they even owned the milling company. Their name? Why, "Beckley" of course.


Here's a photo of the Beckley homestead with the "Mammoth Elm" on the right. The home was located north of the station, across the Mattabessett River (the river the train is likely crossing in the earlier picture).


Also from Bob's website is this excellent period map that puts everything in perspective. The arrow points to where the station is. Go north across the river and you can see where the Beckley homestead and the "Mammoth Elm" were. Looks like Beckleyville was quite the place at one time.

But near as I can tell, most all of this is gone now. Though I was able to trace where all this likely was on a map from today:


You can see some echoes of the past here. I like Google Maps since you can often find the old RR ROWs if you know where to look (and zoom in far enough). On this map, you can barely make out the ROW coming up from the bottom and paralleling the river on its left. It curves into Wethersfield Rd and follow White Oak Dr. Other "ghosts" include the Beckley name, still hanging around in the area: Wethersfield Rd becomes Beckley Road as it goes south. And off Wethersfield Rd, just north of the river and near where the old homestead (and "Mammoth Elm") was, you can see Beckley Mill Road. Compare this map to the earlier map if you get lost.

I wonder what ever happened to the Beckleys. The old station - there, but dilapidated as recently as 1997 - is gone now.

More ghosts of the past. And more archaeology. It's amazing what you can see when you really look. And fortunately there are folks like BobB who've taken the time to assemble great information and share it with all of us. Be sure to check out his website if you have an interest in ANY New Haven Railroad related station - no matter how obscure. Most of what I know about Beckleys came from there.

Wordless Wednesday #53


Monday, January 26, 2015

Ghosts of East Berlin

Prompted by a comment on my last post, here are some additional recent (c.2005-2014) photos of the Berlin Branch north of the stone culvert ghost.

I first discovered this branch line when I first started commuting to Hartford via I-91. If you're heading northbound and look east just as you cross the Mattabassett River (just before the Cromwell exit), you'll see this ghost - provided there are no leaves on the trees, and preferably when there's a bit of ghostly snow cover on the ground...

Berlin Branch bridge crossing the Mattabessett River, Cromwell, looking east (railroad south).
I took advantage of an early dismissal from work, Christmas Eve 2005, to hike down and get a closer look:

North is to the right
Though I got very close, I decided it unwise to cross. However, this view confirms that Micro Engineering knows how to do a bridge kit properly:

Looking southbound
Following the line further north - well, you can't really follow it since it's been mostly obliterated just north of this bridge by the interstate and surrounding businesses - but Sebethe Drive in Cromwell follows the old ROW. At the end, you'll see the next bridge over the Mattabessett:

Looking north into East Berlin. Note old station building in the far distance. The old RR bridge carries a public utility ROW today.
So close, but yet so far. There's no quick way to go that final couple hundred yards by car, so you have to backtrack and go the LOOONG way around to get to the other side of the river. But when you do, you can see the old station/freighthouse and what's left of the old Berlin Iron Bridge Company:

Looking south - station in the center distance, remaining buildings of the old Berlin Iron Bridge Co. (what used to be their forge shop, but were tenements by the late 1920s). 
The Berlin Iron Bridge Co. (nee American Bridge Company - see more info here) used to be one of the largest employers in the area with a huge manufacturing complex that occupied most of this area. Unfortunately, by the late 1920s, most of the buildings were gone.

Closer view of the old freighthouse/station, looking south/southwest

Closer view of the remaining Berlin Iron Bridge Co. factory buildings

Looking east - remaining buildings on right (bottom photo c.2005) and what the area looked like in 1920. Comparison photos courtesy John Wallace.
I'm not sure how much of all this I'll be able to include on my layout, but I'm hoping at least to have the short plate girder bridge & freighthouse/station. I'll try to cram in the remaining factory buildings, but by 1947 they're just tenement houses (and would land just about in my aisle). More critical to operations is the old Stanley Chemical plant (StanChem) that was a major paint producer in 1947. You can see what remains of that operation here:

Stanley Chemical, or what remains of it. View looking north. Old Berlin Iron Bridge Co. buildings are off my right shoulder, freighthouse/station is behind me.
And, last but not least, one remaining ghost - a reminder of the primary business in this little valley for many years - a surviving example of a patented Berlin Iron Bridge:

Looking downriver, the railroad bridge is behind me. Near as I can tell from the Sanborn maps of the area, this abandoned bridge used to be the main road/access to the factory complex from the Cromwell side of the river.
I hope you enjoyed these "Ghosts of East Berlin" - and special thanks to commenter GeorgeR for inspiring this post. I hope to do a more detailed treatment of the area as I get more into modeling it, but it's little industrial archaeological field trips like these that really fire the imagination and provide so much fodder for prototype model railroading. And it's posts like these that are some of the most fun to share with you.


Sunday, January 25, 2015

East Berlin Service

(I'm majorly bummed I couldn't attend the huge Springfield show this year - turns out I got the "Springfield Flu" a bit early - and just in time to knock me out of commission for the weekend. If you made it, I hope you had enough fun for both of us!)

My recent progress on the Berlin Branch prompted some discussion the last time the guys were over. I'd mentioned that adding the branch could provide some interesting work for the Air Line Local - crews would be able to operate from one corner of the basement (Air Line Staging) all the way to the opposite corner of the basement (E. Berlin) and in two different rooms. To refresh your memory of the track layout, click here.

Problem is, the Air Line Local didn't serve East Berlin - at least not during the year I model (1947). As JohnW pointed out, the Air Line Local's typical steam power - J-1 class Mikados and R-1 class Mountains - were timetable restricted from the Berlin Branch, and, in fact, could only operate on the old Berlin Main track in Middletown yard in order to drop off cars. Furthermore, the branch was Shoreline territory, not Midland territory like the Air Line.

John's recollection made perfect sense. From what little I know about the branch in the late 1940s, it was in very poor shape - speed restricted to 10mph in addition to being motive power restricted. Heh - no way could I even imagine a 2-8-2 going up that line, much less a 4-8-2!

But I knew I'd read somewhere that the Air Line Local served the Berlin Branch at some point. Then it hit me - I'd actually come across this information while doing a post last June, and mentioned it - albeit in passing - toward the end of that post.

So what's the story? The answer depends on what year you're talking about.

According to the Freight Symbol Book for April, 1949 (as well as the Package Car Schedules book), Hartford Division Local Service Train #12 (the Air Line Local) serviced E. Berlin on Tuesdays/Thursdays/Saturdays.  Keep in mind that by April 1949, both the Air Line Local and Valley Local were dieselized. According to the NHRR Engine Assignment Book I have for April 24, 1949, the Valley Local had a DEY-3 (Alco S-1, probably #0947) and the Air Line Local had a DEY-5 (Alco S-2, probably #0606). (see this post for further information on the lines' motive power)

I don't have any information regarding what restrictions, if any, there were on the Berlin branch relative to diesel locomotives. But my guess is that an S-2 was a LOT less heavy and hard on track than either a J-1 or an R-1.

I still have some gaps in my Freight Symbol Book collection, so I can't figure out whether the Valley Local ever served E. Berlin again after 1949.  But for what it's worth, it looks like by 1952 E. Berlin isn't served at all by either local, at least not according to the Symbol Book I have for that year.

So the bottom line is that I can plausibly - and most likely prototypically - have the Air Line Local serve East Berlin as I'd hoped. I'll just have to be sure my ops session is set in "1949" rather than 1947 and I'll need to change from steam locos to diesel.

Now if somebody would just come out with the proper New Haven-style Alco cab . . .

(special thanks to John Wallace for prompting this post)

Thursday, January 22, 2015

Backdrop-Backing into Berlin

This is a story of how easy it is to get, um, "sidetracked" when working on your model railroad. Fortunately, those diversions are usually pretty fun - if not always highly productive. But this time was different . . .

I found myself with a little extra time while helping the Missus redo a bathroom closet. Heh - you can do a lot of things while literally waiting for paint to dry! So I decided to tackle the backdrop in Wethersfield. First step: Create "depth" on the plain sky blue masonite by misting on some flat white paint near the bottom, feathering it into the blue as you go up.


Ah! But before I could do that, I had to redo a section of backdrop - specifically, the "north" end. It's way too "in, "abrupt, and sharply curved. Good for access, lousy for mounting a Hartford skyline photo.


So, out came the vinyl. I figured I could make a much flatter backdrop in that area behind the bridge and it would be a much better base for any photo backdrop I'd want to add. As you can see, I had started mocking it up and was just about ready to glue the first end when it occurred to me - how would I install the rest of the Berlin branch? (you can see the roadbed for it on the right there) Once that vinyl's in, it'd be near impossible.


So, out came the vinyl (from where it had been clamped) so I could install some track for the Berlin branch. But about where the 3' section of flex track ended is where the Mattabassett River is supposed to be. "Why not go ahead and cut out the subroadbed for the bridge?" I asked myself.


Why not, indeed. As I may have mentioned before, benchwork and tracklaying are the things I enjoy most - so far at least, and probably because I've had so much practice (may layouts seldom get beyond the benchwork/trackwork stage).

I eyeballed the location of the bridge, measured the bridge I'd be using (a 50' through girder) and cut the plywood accordingly. I may have cut the gap a bit short, but it's always easier to cut more than to try and add back.


Next step was to add bracing for what would become the river base. After giving a lot of thought to how high the bridge would be relative to the river (and fortunately having a prototype photo of the area to help), I settled on 1.5" - be sure to take the thickness of the subroadbed and riverbase into account.


This is an overhead view of the additional bracing. You can see that I installed a cleat right onto the back of the fascia, to have something to attach the end of the riverbed to. Clamps and a level are your friend - it's especially important to keep the plywood riverbed level since you'll be pouring resin on it at some point.


Here's the riverbed installed, along with additional roadbed glued down and tacked. I also had marked where the "shore" should be cut on the fascia and used my saber saw to cut it out (note the "oops" that can easily be filled in later).


I decided after the river bed was installed that I wanted to taper the track subroadbed (note the difference between the photo above to the preceding photo). I figured doing so would help with scenicking later. So out came the river bed (the saber saw blade wouldn't clear it), I tapered the subroadbed, and reinstalled the river bed.

So the backdrop still isn't done, I still need to install the additional vinyl first, but I might, just might be able to have the track & industries in E. Berlin by the next operating session. I suspect the additional operating interest will be more noticeable than the still-just-blue backdrop.

Distractions don't always have to detract from what you're doing. Sometimes these little diversions - or, as in this case the not-so-little diversions - can really get your productive juices going and you end up making progress in a way you didn't expect and may not have even been ready for. And when "distractions" come like that, ride them for all they're worth. It's all progress and usually a lot of fun too!