Showing posts with label Articles. Show all posts

Friday, December 8, 2023

Friday Fun: Another Trackside Photo!

A couple days ago, my friend Bob Murphy sent me this surprise - a photo I took of a couple of New Haven Railroad RS-3s <ahem> DERS-2c's on his beautiful layout will be a Trackside Photo in the January Issue of Model Railroader!

This will about wrap up what has been an unexpected - but really wonderful - convergence of a bunch of things I've been working on for a while, submitted a long time ago, and coincidentally almost all of which have hit the press these past couple of months.

Mostly for the benefit of my mom who asked :^) here's a list of everything I've had published since October:

Still to come are an article in the January RMC on how I detailed & weathered a Walthers SW1 to replicate B&M #1109 (why a B&M SW1 on a New Haven branchline? Well, mostly because it happened...), and - coming full circle back to the SW-1200 - I'll have a feature article in the next issue of the NHRHTA's Shoreliner magazine on the prototype New Haven RR DEY-7 class switcher (aka EMD SW-1200).

I hope nobody thinks I'm boasting - I just think it is really cool that all this has come together like this. And anybody that knows me knows that I too easily let the joy of my accomplishments get overshadowed quickly by my obsession to figure out how to do more and better. After the output of these past couple of months, what can I possibly do for an encore? No way can I keep up this pace...

So I'll try to just enjoy it for now - and hope you'll share in the joy. Without you and your encouragement to keep writing and documenting my progress here, these articles would never have happened. And for that I sincerely thank you.

Here's hoping you and yours are having a wonderful holiday season - and that you're able to get to some modeling this weekend!


Thursday, October 19, 2023

November RMC & Upcoming Articles


Seems like it's feast or famine on the Valley Line lately - and lately it's been more feast! At least when it comes to the hobby press. . .

Yesterday, I posted a link to the October issue of Model Railroad Hobbyist's Running Extra that includes my article on installing an ESU PowerPack in a Rapido SW-1200 and just today I discovered that RMC has posted an excerpt of the article I did in their November issue on building Jim Sacco's Esso service station. Click here or on the image above to see it.

I also have upcoming articles for the NHRHTA's Shoreliner magazine (going into detail on the prototype New Haven SW-1200s, Class DEY-7) and another one likely in January for Railroad Model Craftsman (on how I modeled B&M SW1 #1109). And while not an article, the December issue of Model Railroader is supposed to include my first-ever Trackside Photo.

So stay tuned! Lots going on and everything coming together at once, it seems. I just have no idea what I'm going to do for an encore %^) At the very least, I plan to have more posts posting here - and hope you'll enjoy following along.

Monday, May 9, 2022

Modeling Monday: RMC Article & Cromwell Backdrop

With all the hubbub at work and end of session (finally!), I totally forgot to post here that I have an article in this month's Railroad Model Craftsman! (though, admittedly, I did post about it over at the Valley Local Facebook Group last week)


And this weekend - with some color help from the Missus - I finally got around to finishing that transition between road and backdrop.


Also this weekend, in addition to starting work in Cromwell (roads, sidewalks, building placement, and such), I used this article as a guide to starting the backdrop . . . 

Long time readers will recognize the photo I started with: 
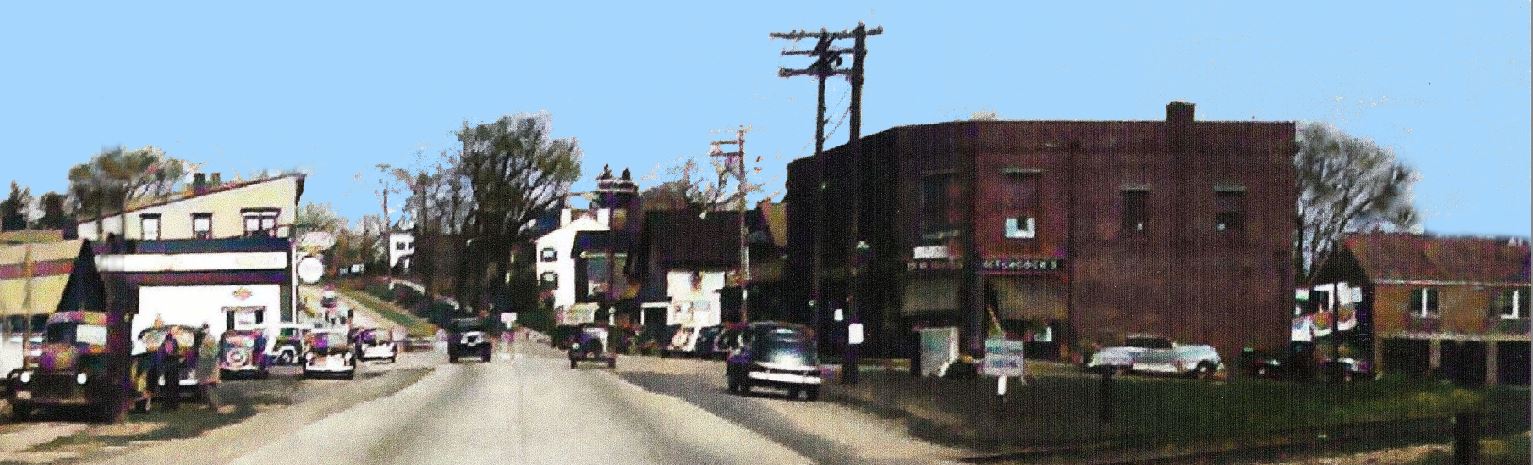
Source: Dodd Research Center, University of Connecticut, via Robert J. Belletzkie. Max Miller Collection.

This is the Middlesex Turnpike in Cromwell, looking north across the Valley Line. Though the quality/resolution of the photo itself isn't great, it's shot from the perfect vantage point for use on my layout - and it even has the proper-era vehicles.

The main problem is - it's a black & white photo.

No problem though (see RMC article above - and go here if you need a copy :^), I used an online colorizer (in this case, MyHeritage) to make it suitable for photo backdrop use:

These colorizers are super quick and easy to use. Now for the real work. . .

First step was to bring the photo into PhotoShop Elements and crop it (can't have the Valley Line in the background and foreground both!


Cropping was easy enough, but I had a LOT of photo editing to do. Here's a short list of what I wanted to do, from left to right:
  • Remove right edge of diner
  • Remove sparse trees, and fill in others
  • Remove light pole
  • Remove power lines
  • Remove white flag pole
  • Remove black sign and reconstruct rear fender of white car
  • Remove crossing sign pole & sign
  • Fill sky with "sky color" to match paint color on my masonite backdrop
Here's the result (as always, you can click on the image for a larger view:


Using the hill on the right (view block between Cromwell and Dividend) and the buildings on the left as the "bookends", I determined I'd need this section of backdrop to be 24" wide and 6" high. You can barely make out two people in the Cromwell photo, so I scaled the photo so that they'd be about 5/8" tall (instead of a typical HO scale height of 3/4", to account for the fact that the scene is in the distance).

So here's where things currently stand... the "canvas" is 6"x24" & filled with my "sky color" and the rescaled photo is in place. I determined its exact location by noting where my foreground road centerline hit the backdrop and then locating the road centerline of the photo at that same location.

After obsessing for, literally, years over the backdrop at Wethersfield (that's Jordan Lane in Wethersfield in the RMC article), I'm psyched that I'm not getting bogged down with the Cromwell backdrop. In fact, once I fill in to the right and left of the main photo (likely with trees), it'll be ready for printing and installation (click here the process I use).

In the meantime, I have plenty to keep me busy in Cromwell - including getting back to the roads, sidewalks, and structures... and of course, scenery. I'll be sure and post my progress here - and hope that you'll provide some helpful feedback/suggestions in the comments below. . .

Until next time!

Friday, July 17, 2020

Friday Fun: MRH & NMRA-X Presentation

Happy Friday! Just a quick post to highlight a couple of fun things for this week's edition of Friday Fun!

First, my buddy Dean (way over in Calgary, Alberta, Canada(!)) gave me a heads up that The Valley Local was mentioned in the latest issue of Model Railroad Hobbyist magazine. I've had a few articles published over at MRH, and I occasionally post on their forum as well.

MRH July 2020, p. 28
They have a section in their magazine where they pick from the forum and my "Backed Up at the Backdrop" post got featured. Of course, since you follow this blog, you pretty much saw this already here - but it's cool to see it in MRH too!

And I definitely want to mention again that the NMRA-X is running its virtual national convention all this week. In fact, tomorrow (Saturday 7/18) is the last day - and I'll be presenting at High Noon!


Each of the days of the convention has a theme, and tomorrow's theme is model railroad operations. As it happens, I'll be doing a presentation on how I do ops on the Valley Line. I hope you'll have a chance to tune in, but if you can't cuz you're mowing the grass or washing the car, don't worry. This clinic - like all of the NMRA-X presentations - will be recorded and available for later viewing at your convenience.

So whether you're able to tune in live (when you can ask questions which hopefully I can answer :^) or if you choose to watch later, I hope you'll get a good sense of prototype operations. Even better if you have some information or tips that will help me refine my approach.

No matter what you're doing this weekend, whether down in the basement, in the train room, or sitting in your favorite chair, I hope it includes some time enjoying this great hobby. And maybe I'll "see" you sometime tomorrow!

Friday, September 6, 2019

Friday Fun: New MRH Article!


As I mentioned a couple of weeks ago, the September issue of Model Railroad Hobbyist (which just posted today) has my article on how to superdetail a factory painted Proto 1000 RS-2. It's in the "Running Extra" portion of the magazine, which costs $2.99, but also includes a great articles by Jack Burgess and Jim Six. Even if you're not into the New Haven's RS-2s (class DERS-2b), those two articles alone are more than worth the 3 bucks.

I hope you'll check it out - and if you do, be sure to leave some (hopefully positive) feedback!

Friday, August 23, 2019

Friday Fun: DERS-2b in September MRH!

I was at a NHRHTA volunteer appreciation picnic last Sunday and visiting with fellow member John Kasey, who had sent me lots of modeling information for the New Haven's Alco RS-1s and 2s (classes DERS-1b & DERS-2b). I asked him if I ever sent him photos of the finished models, and when he said I hadn't, I got on my phone and into my cloud photo storage to show him.

He enjoyed seeing the pics, but about half-way through as I was describing some of the details I'd added, he mentioned offhand: "You know, I could just wait and see it in next month's Model Railroad Hobbyist magazine."

What?!

I knew I'd submitted the article, but - although I'd downloaded the August issue - I hadn't gotten to the back page yet . . .

Color me surprised - or, rather, blush red. %^)

This will be my third major article for MRH (posts about the first article here and the second article here) and I'm especially lucky to be sharing a little bit of space with one of my idols in the hobby: Jack Burgess. His Yosemite Valley RR layout was one of the first - if not the first - "strict prototype" model railroads I ever came across. And it really set the hook in me to try and do something similar with the New Haven.... "someday."

Thankfully, in this case "someday" did eventually come & I've been working on the Valley Line for some time now - and needed some additional motive power for the Airline Local. Which is where DERS-2b #0510 comes in.

So be sure to check out next month's MRH for the story behind the engine - and, more importantly, how I went about superdetailing a factory-painted locomotive to match the prototype.

At least I know JohnK will be checking it out!

Tuesday, April 2, 2019

Trains of Thought Tuesday

Long-time readers may recall that an essay by Tony Koester - describing a photograph by Kent Cochrane - was one of the primary inspirations for my modeling the Valley Line. The photo showed the southbound Valley Local, shot from "model railroader's perspective," entering Middletown. But it was Tony's prose that really brought the photo to life. Click here for that story.

The reason I mention this now is to provide just one example of how big a fan I am of Tony's long-running "Trains of Thought" column in Model Railroader magazine. He has a way of putting into words some of the more cerebral aspects of our hobby and, whether you agree with his perspectives or not, he never fails to make you think. I don't know exactly when he first started the column, but I can guarantee you that I've read & enjoyed every one. Heh - I've even attempted a (an?) homage to his idea on my website.

So imagine my surprise when I got the latest (May) issue of Model Railroader.


  As is my custom, I always start reading from the back - where "Trains of Thought" appears.


And there was a photo of Old Saybrook - from my layout! Even better, he relayed a conversation that he and I had a while ago talking about the so-called "debate" between Prototype Modeling & Freelancing (Spoiler Alert: There isn't as much difference as you think). Seeing my name in Model Railroader was a real treat, but seeing it in "Trains of Thought" was especially cool.

If you don't get MR, I hope you'll at least get this copy - even better if you chime in with YOUR train of thought on the topic of "Compromise vs. Opportunities." Whether you fancy yourself a freelancer or a "true" prototype modeler, there's lots here to mull over - and you might be surprised to discover that you're probably a little bit of both.

Monday, November 5, 2018

Monday Motivation and Modeling: MRH Ratings & Rt. 15 Overpass Progress

First off, I want to say a quick but HUGE THANK YOU for all of you that took the time to rate my latest article in Model Railroad Hobbyist Magazine!
With your help, it was the top-rated article in last month's issue - and the You-Tube video has over 4,900 views (and those aren't all from me clicking). Talk about about a HUGE shot of motivation - so thank you so much! This is all still very new to me, but I'm glad if I've been able to convince even a few folks to try something new in the hobby and make some more progress. Certainly makes it much more fun!

Speaking of progress, when we last left the Rt. 15 Overpass Project, I'd just extended the right abutment a bit to fit better against the wall. After that dried, I finished up the details and started painting! Here are some photos of the progress . . .

Next step was to figure out the exact shape/size of the roadway, using cheap cardstock.

Also needed to add supports for said roadway. I used hot glue to attach the 1/4" square styrene to the Strathmore.

After lots of cutting/fitting, I had my template for cutting the styrene roadway.

Roadway in place, awaiting final details (parapet & sidewalk).

The State of Affairs at this point - just starting to sand the concrete pier bases.

Cutting up said bases from .060" styrene scrap to squares that "look right" under the pier shoes.

A few quick passes on the sanding block angles off the top edge to make it look like a support pad.
All the bases done and attached to tape for painting.

To raise the abutments to match the height of the bridge on its supporting bases, I cut out some more .060" styrene as a base.
 
Bases done.

I attached the bases with hot glue, but wouldn't recommend it. Considering the long runs of glue, some of the glue had started to cool & harden before I could attach the base (even though I used my extra hot gun). Consequently, I wasn't able to get the base as tight to the bottom of the abutment as I wanted. I'd try Walther's Goo or WeldBond next time.

Everything mocked up all ready for painting.

Based on a post from Kathy Millatt, I tried some Rustoleum "Desert Bisque" texture paint. She recommends it for concrete roads, so I thought it'd work for the abutments. It actually seems to have some fine grade sand in it so, while it might be great for roads (and I'll certainly try it for that), I thought it was a bit too textured for the abutments.

Another view - note the texture on the left.
I also considered a non-descript light gray for the base color, but it looked too blue to my eye. I finally settled on - wait for it! - "Concrete" color from Floquil. Fortunately, my friend Pete had a small spray can of it left that he let me use.

So with the concrete color choice out of the way, it was time to mask off the girders to paint the concrete bridge and abutments.

I used a combination of tape and paper to cover all the girders & supports, and here's everything painted and drying.


Unfortunately, as I was removing the paper, I ended up breaking off three of the delicate vertical supports - despite my being careful and having added some bracing, I guess they're still pretty delicate.

Fortunately, they all broke at the brittle ACC glue joints, so fixing them was just a matter of sanding off the old glue and regluing.


So that's where things stand - literally - for now while I get some other non-modeling stuff done and choose a color for the girders. I was just going to use a rattle can of flat black, but I think that might just make them disappear. I do plan to highlight them with some weathering so all wouldn't be lost. But I'm now - based on a suggestion from Bill - considering Model Masters "Aircraft Interior Black." Apparently, it's a little lighter - though not as light as "Grimy Black." I'll see if the local shop has any. If not, I have some Grimy Black on-hand and may just end up using that.

As always, I hope that you'll chime in if you have any suggestions or recommendations on anything I'm doing here. With the layout done up through benchwork, trackwork, and wiring (and a bunch of successful ops sessions under my belt), I'm blazing new-for-me ground with structures & scenery. So stay tuned for my mishaps and - hopefully - some successes.