Showing posts with label Layout Design. Show all posts

Monday, April 20, 2015

Could vs. Should

Today's Lesson: Don't Let the Supporting Actors Steal the Show

- or else you may end up like Bette Davis in All About Eve. More likely though, if you're a model railroader, you may find yourself losing sight of your main focus as you try to accommodate Just One More Train/Industry/Track, etc. In my case, the possibility of including some prototypically-run mainline trains in addition to my 4 local freights just about derailed everything.

My original plan was just to include the town of Old Saybrook insofar as it would anchor the south end of the Valley Line. Most of the mainline tracks would be for show only, with the only active track being the one the Shoreline local would use to branch off the mainline onto the wye to head north on the Valley line. But then I figured, "why not use some space on either side of the Saybrook Scene for some loops to provide some 'generic' mainline running?

That quickly (de?)evolved to a desire to run the mainline trains prototypically. Click here for the start of that journey and click here for where it all ended up. Long story short: I could run the mainline trains prototypically by having eastbound trains going behind the Saybrook backdrop and behind a wall (which would become totally inaccessible), but should I do that - especially when doing so could not only produce a maintenance/access nightmare but actually pinch my Saybrook scene? The main reason I put such a big hole in the wall opened up the proscenium was to highlight Old Saybrook, and now the supporting actors (i.e. the mainline trains) were starting to take over and compromise that goal.

So, after asking folks to weigh in on my problem (and many thanks to those of you that did), I've decided to go back to the drawing board - literally - and refocus my priorities on what's most important in this area (in order of priority):
  • Ability of the westbound Shoreline local to come from "New London" (offscene staging) and take the east leg of the Saybrook wye to head up the Valley Line;
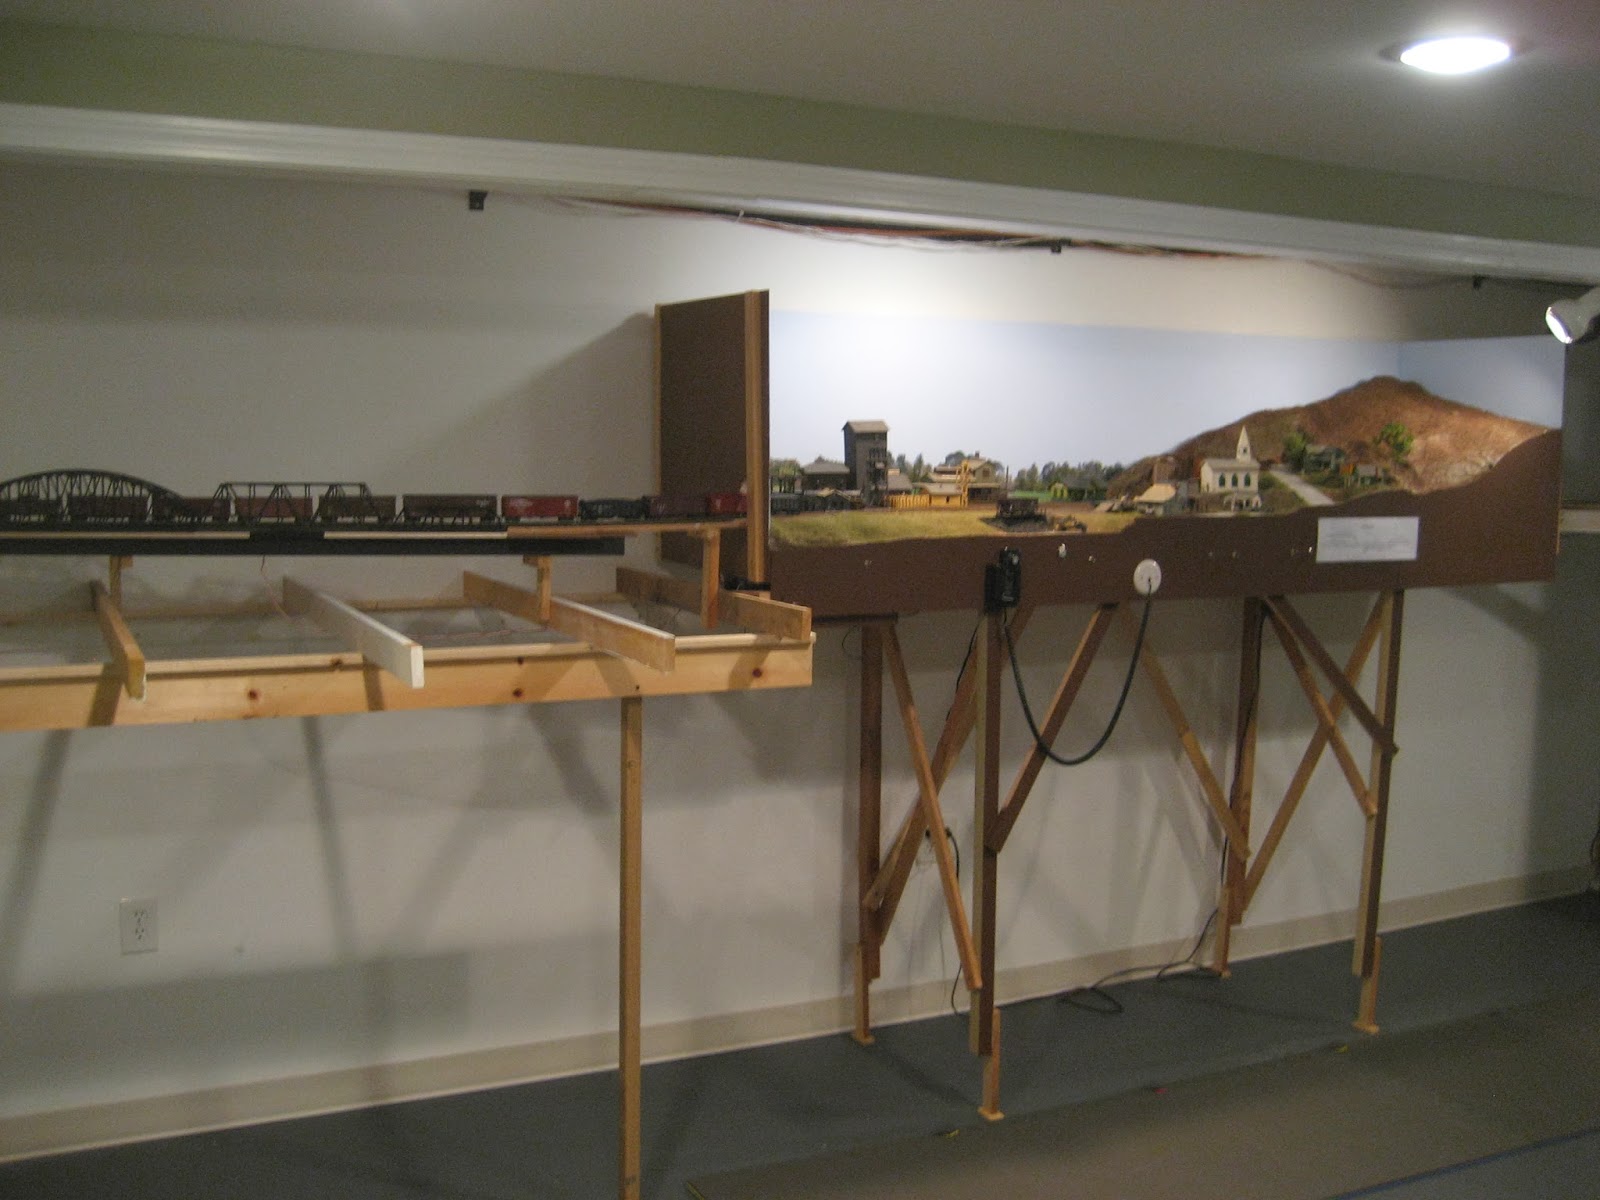
  • Old Saybrook station scene as accurate as possible - including the "balloon track" behind the station, freight house, team track, and coal dealer;
  • Ability of eastbound Shoreline local to come from "New Haven" and take the west leg of the wye to head up the Valley Line;
  • Hidden staging for the Air Line Local;
  • Mainline trains heading in the prototypically correct direction.
It was those last three bullets that became such a problem, requiring all that hidden & inaccessible track. After further reflection - caused in no small part by those weighing in with their concerns - I remembered that:
  • the eastbound Shoreline local doesn't go up the Valley Line in 1947, only the westbound one does;
  • hidden staging for the Air Line Local - while nice - would cost more in effort/problems than it's worth. I can live with the train being staged "online" at the start of the session;
  • And most importantly, and in keeping with our Lesson above, mainline trains could should remain supporting actors only - just "generic Shoreline trains" there only to provide "busy background" for the locals switching Old Saybrook.
The new trackplan no longer involves over 10 feet of double-decked, hidden, and mostly inaccessible track (yay!) - it's now essentially back to what I'd originally envisioned: a dogbone with reversing loops at each end and a large staging yard at the New London/Boston end. The main compromise, other than losing hidden Air Line staging, is that eastbound trains will have to go through the Saybrook scene westbound first. I can live with that - especially now that I've fully vetted the alternative.

But wait! There's More! If (and that's a big IF) I decide I really-must-absolutely-have west-end staging sometime in the future, I discovered that I can add a 3-4 track shelf in front of the "Somerset" Air Line module. It's not ideal, it wouldn't be super easy to do, and would make the Somerset module a bit more cumbersome to operate (which are all reasons I'm not just installing it now), but it is a possibility should I find it Absolutely Necessary sometime in the future.

So, I have a good plan for going forward, and a contingency plan should I need it someday. And the proof is in the doing: I started cutting the first plywood last night and tracklaying will should be starting by next week!

All in all, I'm very happy with such a well-thought-out approach. And that is due primarily to those folks that allowed me to bounce my ideas around and mull them over with me. Despite the minor (now, to my mind) compromises, I think this end of the railroad will be a lot of fun to operate and - even better - it'll provide the only place on my layout for continuous running when I just want to see trains rolling (or during layout tours). Best of all, if god forbid something goes wrong with the tracks or trains, I'll be able to get to them easily and fix the problems. And that should insure that the layout continues to be fun to operate for years to come.

Friday, March 27, 2015

Saybrook & Staging Mockup

Now that the benchwork for Old Saybrook and staging is done, I next have to figure out where to put the subroadbed - and before I do that, I have to figure out where the track goes. Templates and mockups are the key to this step . . .


Here's an initial view to orient you. You'll recall from a previous post that this is looking into the old bike shop area. This is where the staging yard and turnback loop will be and - bonus - it's all hidden (yet totally accessible) once the door is shut. The mainline will head "east" (lower right to upper left of the photo) along the tangent side of the turnouts to the turnback track (mocked up with plywood at the end in the distance). The turnout templates show the throat of the staging yard - 6 tracks for 6 mainline trains (AirLine & Valley Locals are staged elsewhere).


This is the view from the other direction, looking "west" toward Old Saybrook. The clever part of the design is that left hand turnout right before the gap in the foam. It allows trains to head toward the turnout in the far back left (you can barely make it out sitting on top of that 1x3 sticking out of the wall), go behind Saybrook's backdrop and - via another turnback curve in the module room - head "east" through the Saybrook scene. The turnouts beyond that "cutoff" turnout allow the single track to split into the 3-track main that will dominate the Saybrook scene. There's a 4-track main on the prototype, but that would take just a little too much real estate. I think a 3 track main will convey the scene effectively enough.


If we walk through the door, here's what you'll see - Old Saybrook: 3-track main mocked up, including turnouts for the "loop track" (long double-ended siding which goes behind the station), freight house, and the turnout for the east leg of the wye. The hole in the wall just past the yellow measuring tape is where the Shoreline comes in from the west - and there's a LH turnout there for the west leg of the wye, as well as a RH turnout for the west end of the loop track. The hole in the wall in the far back corner is where the hidden mainline supply/return track will go, with the looooong Air Line staging track above it.


Continuing our walk "west" through the next doorway into the module room, you see immediately on your left the other turnback curve for the mainline, with 2 turnouts to split the single-track into the 3 mainline tracks at Saybrook. The hole through the backdrop at the end of the Air Line module is where the Air Line track will punch through, continue across the top of the loop, and through the next wall to go behind the Saybrook backdrop. I'm actually pretty excited about this area since I plan to have the mainline hidden under scenery, and the scenery will depict a typical farm-y scene along the Air Line through Middlefield, CT. It'll likely be the only scene that'll be prototypically accurate for the Air Line.


And this is the same scene taken from the other perspective. The mainline punches through the left hole-in-the-wall to head east into Saybrook, and punches through the right hole to go behind Saybrook and return to staging. I'll likely have to extend that hole a bit higher to accommodate the Air Line, which will go through above the mainline. You can barely make out the end of the module on the right.


One of the critical pinch points I discovered when mocking things up is how the AirLine would cross over the mainline. While it's not a problem at this point (pictured above) since I'll be using regular plywood subroadbed on risers, it'll be critical to get it right as the two tracks go through the wall. It's a little over 3 feet between one hole-in-the-wall and the other, so the tracks will have to span that distance. The best way I've found to do that is to mount the the subroadbed directly to an L-girder made up of 1x2s - but that L-girder restricts clearance below the subroadbed. So this photo shows that I'll have just enough to get one highly-supported track over the other.

Next step is to go to the lumber yard for more materials (mostly plywood) and - even more exciting! - I get to order a ton of track! With any luck - and some productive work sessions - the New Haven Railroad's Shoreline through Old Saybrook, including "New London/Boston, New Haven/New York" will be up and running soon!

Thursday, March 26, 2015

A Few Words About Wordless Wednesday #61

Farm just west of the town of "Mill Hollow" on the Air Line
Long time readers know that my model of the New Haven's "Air Line" from New Haven to Middletown is not prototypical. Since my focus is on The Valley Local (natch), the Air Line Local is a supporting player only. It has just as much work as its counterpart, but no attempt is made to model the line itself accurately.

This is primarily - if not exclusively - because the line is made up of two 2x8' modules I built a few years back using structures and materials salvaged from a couple of 1970s/80s era 4x8' layouts I inherited from a dear friend in Vermont. I'd intended these modules to be nothing more than practice - a way of getting a leg up in the hobby and getting something "finished" as quickly as possible. Having the structures already done and many of the details already available, I had only to lay track and do scenery - and the photo above shows my first attempt at doing scenery.

Actually, even that's cheating just a little - the farm yard, including the buildings and people, from the barn down to the stone wall, was lifted in its entirety from the old layout and blended in here with new scenery I did in the foreground. Symptomatic of the weight of those two 4x8s (and one of the reasons I decided to scrap them), just this little scene alone weighs 10-15 pounds(!) Plaster and actual rock aren't light.

Having even a small area "done" - or at least to a level of completion - gives me something to enjoy while the rest of the layout languishes in benchwork and plywood. But as soon as BillS & Co. can visit again, I hope to get at least a few scenes of scenery done on the Valley Line too. Stay tuned!

Sunday, March 22, 2015

Starting Staging

What started in Saybrook has continued and the layout is expanding again. I won't go into all the whys and wherefores of staging - just suffice it to say that it's A Very Good Idea. In order to support the illusion that our trains are actually coming from "Somewhere" and are going to "Somewhere Else" you need to have a staging area. It can be as little as one track, or as large as many multi-track yards, but they're most effective if hidden.

To get even a rough idea of what you may need for staging capacity, start with how many trains you plan to operate during a typical session. On my layout, I'll eventually have 4 locals operating:
  1. The Valley Local (naturally) which operates from "Hartford"  to Middletown and East Haddam;
  2. The Air Line Local which operates from "New Haven" to Middletown;
  3. PDX-1 which operates from "New Haven" to Old Saybrook; and
  4. PDX-2 which operates from "New London" to Old Saybook and up to East Haddam.
In addition to these 4 locals - which are the main actors of the session - there are, um, 71 trains(?!) that go through Old Saybrook during a typical day in 1947 (click here for the details), but fortunately, I only "have" to model four of them (click here for how/why):
  1. The Pilgrim (e/b 1:17p)
  2. The 42nd Street Express (w/b 1:32p)
  3. The Bostonian (e/b 2:07p)
  4. Through freight FGB-2 (e/b 2:30p)
These 4 mainline trains are just supporting characters, going through the Old Saybrook scene from "west" to "east" or vice-versa.

Now, as you can see, there are a few towns that are in quotes - that means they're not actually on the layout. And of course "west" and "east" are in quotes too. So how can I operate prototypically without having the required towns - Hartford, New Haven, New London, and even New York and Boston?

That's the job of staging.

On my layout, "Hartford" staging is relatively easy - it's essentially just one-track within the Middletown yard, hidden behind the Wethersfield backdrop when the session starts. But what of "New London," "New Haven," "New York," and "Boston?" Well, opening up the wall for Old Saybrook was only the beginning of that answer. For the rest of the answer, see the following photos . . .


This is how things looked when I started. I've used this photo before to show the "before" position of the door, but here it's to show how the bike shop area looked with all my racing stuff (I moved things so fast, I forgot to get a better "before" photo of this area).


This is the shop area with all the bike race stuff moved - and you can barely make out a mockup of the return loop in plywood on the floor in the far corner. And note that by this time, the door's been moved 10" to the left and the benchwork for Old Saybrook is in.


A Black & Decker Workmate is an ideal tool for constructing the L-girders: 1x3 web with a 1x2 glued & screwed to the top.


Compare this shot to the one above - L-girder benchwork goes quickly (though help from friend Dick and my dad helped things go even quicker)


And here's the new staging area just about done. Note plastic sheet stapled to the ceiling joists in order to cut down on raining dust and such. It's no use having the rest of the basement nicely finished if all your cars & engines pick up all sorts of dirt while in staging and track it around the layout (heh - "track it around" - get it?). I also move the lighting to be in line with the layout.


And here's what it looks like as of now - just about ready for the plywood subroadbed, cork, and track. I still don't know yet exactly how many staging tracks I need, but this area of the basement is by far the most suited for staging, so I just built out to the maximum footprint I could. Since I plan on having a return/reverse loop here, trains from this one staging area can head "through" Old Saybrook either eastbound or westbound depending on which route they take at the main switch. And, best of all, it's totally hidden once you shut the door - so if you're sitting in Saybrook, the trains you see could plausibly be coming from "points west" (New York, New Haven) or "points east" (New London, Boston).

I still have a few logistical things to work out with regard to the actual trackplan in staging and Old Saybrook (especially the length of hidden mainline that will go behind the Saybrook backdrop), but I'm pretty pleased with how this is working out. My staging capacity here is by no means unlimited, but it will certainly give me enough to convey the impression I'm looking for - especially considering the limited number of trains I need to run.

If you haven't considered staging in your plans, I strongly recommend you reconsider. It's space well spent.

Monday, July 7, 2014

Quick reminder about the website

While blogs are a great way to get content posted quickly and easily, actual websites tend to provide a much more permanent record - though they are a bit more difficult to keep up to date.  Those of you that access my blog directly (through http://blog.thevalleylocal.net) may not know that I have a website dedicated to the Valley Line as well at http://www.thevalleylocal.net .  That's where I "archive" the information that I've distilled and want to be sure and keep, posts that require more permanence, etc.


Perhaps most importantly, the website makes it easy to access this more permanent material - and it's also where you'll find a (rough) trackplan and layout tour.


So if you haven't already, be sure to browse around the website.  The "About" link is much more detailed than what Blogger provides and - better than that - you can get ready access to the most important info about the railroad as it evolves from blog postings to archived articles.

Tuesday, December 17, 2013

Prototype Modeling with No Photos: Ballantine Beer Distributors

Possible basis of a sign - John Wallace Collection
Prototype modelers by definition model buildings, scenes & equipment that actually exist - or existed.  Problem is, the further back in history you go the harder it is to find information/photos/etc.

Now that I have a couple successful operating sessions under my belt, I thought I'd turn my attention to creating some authentic scenes for the trains to travel through.  Starting at the north end of the railroad, the first stop is P. Ballantine & Sons beer distributors & Wethersfield Lumber Company, both in the vicinity of Jordan Lane in Wethersfield.

Problem is, there are ABSOLUTELY NO photos of either Ballantine's or Wethersfield Lumber. I'm still looking, but I don't have much hope. So what's a prototype modeler to do?  Just freelance (in a limited way, admittedly, but still...)?  Well, maybe that won't be necessary.  This post will introduce how I'm handling the problem...

First stop, check out the Sanborn map of the area.  If you're a prototype modeler, you probably already have maps of the area that you used to help plan your track.  These cool maps not only show track arrangements though, they show at least the footprint of the buildings too.

Here's the Sanborn map of the Jordan Lane area of Wethersfield:

North is to your right.  Ballantines is northwest of the Jordan Lane grade crossing.  Wethersfield Lumber Co. is to the southwest.  I've penciled in a few prototype dimensions.  Click to see the small print.
I'm not sure why there is no siding shown at Ballantine's - maybe it wasn't put in yet when the map was produced; maybe it had just been removed; maybe it's just an oversight.  But I know from multiple sources that Ballantine's was, in fact, served by the railroad in 1947 - and the loading dock that's shown on the east side of the building shows the likely location of the siding (despite a fuzzy aerial photo that seemed to indicate the siding curved to the west side of the bulding).

In addition to the Sanborn map, I also have the benefit of John Wallace's personal recollections of the area during the era I'm modeling.  And also fortunately, John's memory is as sharp as a tempered steel blade...  So when I asked him if he remembered at all what Ballantine's looked like, here's what he emailed me:


Ballantine's Beer Distributors - Sketch by John Wallace
Notice where the siding is - right where expected, along the loading dock on the east side of the building.  Followup questions elicited some additional information:  It was of brick construction, the loading platform was covered and the freight doors were spaced to match boxcar doors.  The platform and building were 3 cars long and the siding was a total of 5 cars long.  There was also a track bumper at the end of the siding.  All the windows were on the south side (Jordan Ln), where the office was.  There were no windows on the east or north side (the west side will face the backdrop).

Ok, with a rough idea of how the prototype building looked, how large was it?  Again, the Sanborn map helps, providing the building's footprint.  You first have to figure out the scale of the drawing, which - due to zooming/enlarging - may actually be different than what the scale rule on the drawing itself.  Once you determine a dimension in prototype feet, it's then fairly easy to convert to model (actual) inches using a standard scale ruler alongside a regular ruler (or, for HO scale, you divide the prototype measurement by 87 and convert the resulting decimal to inches)

If you zoom into the Sanborn map image above, you'll see that the prototype Ballantine building measured 58.3' x 83.3' and the loading platform was 116.6' long.  So modeled full-size, without selective compression, the model would measure 8" x 11.5" and the loading platform would be 16" long.

Incidentally, a 40' boxcar is a good standard of measurement - especially in HO scale, where a 40' boxcar is about 6 actual inches long.  So the Ballantine siding, if modeled full size, would be about 30" long (5 cars).  The siding I have is 3 cars long (about 18").


When I went to measure my space, I got a few nasty surprises:

1) Since the prototype terrain here is relatively flat, my backdrop is WAY (about 3") too high, which will require including an unprototypical slope unless it's fixed.  Lesson: Unless you're modeling mountainous terrain, the bottom of the backdrop should always be at least even with subroadbed level. Not sure yet what - if anything - I'm going to do about this.

2) To save material, I tailored my plywood subroadbed to support track only & should have extended it to support anticipated buildings as well.  Lesson: You may not know ahead of time where buildings will be, but your plan should at least show where "signature" buildings/towns are and you should provide nice flat support for such areas.  I figured I could create a flat area at the scenery stage with my cardboard webbing.  That may not be as easy as I thought - especially in this case when I'm trying hard to avoid too much of a slope.

3) According to the measurement above, there may not be enough room for Silas Deane Hwy between the building and the backdrop, especially if the building is modeled full-size.

Since the building might end up against the backdrop anyway, I tried a mock-up that curved the siding from the main in order to gain more seperation, with the result below:

 
Initially, I liked the look of this, so grabbed an old building to enhance the mock-up:


It's starting to look like an actual scene now (and that's pretty exciting). Unfortunatley, with the high backdrop (and resulting steep slope imagined behind the building), it doesn't look much like Wethersfield. Concern about such facts is one of the things that seperates a prototype modeler from a freelancer. A freelancer would be fine keeping such a nice scene as-is. Me? I've got to make it look as close to my prototype as I can.

So, setting the "slope problem" aside for the moment, I remeasured to see how the prototype building might fit with the more-curved siding:
 
The prototype building would be too deep, even if placed right against the backdrop.

The loading platform would fit, even if modeled full size.
While I was measuring building footprints, I figured I'd get a quick view of how Wethersfield Lumber Co. (WLCo) might fit.  Looking at the Sanborn map, there were a number of buildings associated with Wethersfield Lumber, but the largest was the lumber shed at the end of the siding.  In HO scale, it would be 21" long...
 
Uh oh.
Um, yeah.  Not going to model the lumber shed full-size then.  Selective compression by like 70%?  Looks like it.

Once I got over my initial shock & depression re WLCo., I decided to see if I had a more-appropriate building on-hand for Ballantine's.  Here's what I found:

2 stories, brick, roof overhang over loading doors.
Looks pretty good to me.  Seeing how it would fit was only a matter of taping the inside corners of the walls and setting it up:


Notice I've moved the siding back toward the main to provide some space for Silas Deane Hwy. (and a hopefully more-gradual slope) between the building and the backdrop.  The above shot shows the building mocked-up, unmodified.

Here's the same building with two walls butted end-to-end along the Jordan Lane (south) side to make a more-imposing industry:


Cool loading docks too!  Incidentally, another lesson (or thing for me to keep in mind for the future): Have as many of your buildings/bridges/loading docks/etc built beforehand as possible. This certainly makes it easier to mockup things and see what you really have to work with.  It's not always practical, but if you don't have a layout yet, your hobby time would be well spent building stuff ahead of time.
 
So, this is where the Ballantine's Beer Distributors scene is currently.  It's clear I'm going to have to compress things.  Is the building (especially the unmodified/smaller version) large enough to justify rail service (two cars' worth)?  And if I decide to move the turnout north and thereby lengthen the siding for more cars, I'd have to make the building even larger.  Any recommendations?  I look forward to hearing/reading what you think.
 
Next, I think I'll try my hand at some scenery - at least some scenery support (cardboard webbing) - and see whether that slope/backdrop problem is as bad as I fear it may be...

Thursday, December 12, 2013

HO Scale Modeling with N Scale Imagination

And I thought I was so clever...

I've been pretty proud of myself that I've been able to model the New Haven Railroad's CT Valley Line just about "perfectly" from Wethersfield to Middletown.  By "perfectly" I mean I've included on my layout almost every single turnout the prototype had.  Sure, I've had to compress the linear feet/miles of running track so those turnouts are much closer together, but they're all there.  So I have a prototypically accurate railroad.

Right?

Not quite.  Not yet, anyway.

It looks like I've made the rookie mistake of allowing my imagination to write checks my space can't cash. In other words, I've assumed everything will fit - and in my mind's eye, it will.  Folks building their first layout usually make this mistake at the track planning stage.  They look at the space they have and they imagine the layout they're going to put in that space.  Unfortunately, they usually imagine that MUCH more can fit in the space than actually can. They imagine 30 car freight trains running comfortably along a 10 foot wall - forgetting that, in HO scale at least, the cars alone will take up 15 feet - and that's not counting the engine(s) and caboose!

Well, *I* wasn't going to fall in THAT trap.  No, not me.  Sure, I didn't plan my layout in the traditional sense, using drafting paper or even track planning software.  I took what I think is a better approach: I did my track planning full-size, on the floor:


This is where Middletown would end up.  Once I discovered that a train would fit - and look "right" - I knew my layout concept would work.  Fitting Middletown was my biggest challenge; now that that was "solved" I'd just work out from there.

So for the past months, I've been pretty smug & self-satisfied happy with how the layout has turned out. Since I followed the prototype track arrangements so well, the layout has operated - not surprisingly - just like the prototype. But a true model railroad - especially one you want to use as a time machine of sorts - includes much more than just track.  It has to include buildings & scenery too....

Pieter was over for Train Time Tuesday last week and (shame on me) I didn't have anything really pressing or ready to work on.  So I used him as a sounding board to explore "next steps" in my layout construction which, now that the track is down and the ops sessions have gone so well, are buildings & scenery - specifically in Wethersfield.

Every time I imagine Wethersfield, I envision the Ballantine's beer distributor, Wethersfield Lumber, the station, Gra-Rock Bottling, Valley Coal.  Everything fits - in my mind.  Unfortunately, it looks like I've made the same old rookie mistake - just at a later point in the layout construction process.  I'm modeling in HO scale, but my imaginary buildings - the ones that all fit "no problem" on my layout - are apparently N scale or, worse, Z scale.

I did a pretty good job of planning the track layout, but my lack of planning for structures and scenery is becoming painfully apparent now.  I've never gotten a layout past the benchwork & track stage.  I wonder if this "N scale thinking" is one of the reasons why.  Usually, once I discover that my imagination is so constrained by my space, I become frustrated and start over.

Well, I've come too far to rip everything out and start over.  The track plan itself is sound, as attested by the successful & prototypical operating sessions.  And even if I did rip everything out and redid it, I can't imagine doing it much differently, considering my space and what all I want to include.  I guess I could eliminate Cromwell, but that doesn't get me much.  I could move Middletown yard further south and thereby expand it, but my problem isn't too little track - it's too little space for the buildings/structures/industries I need.

So since I can't retreat, I must advance - full speed ahead.  I'll have to develop some good selective-compression skills pretty quickly and start getting better - much better - at what I consider the real "art" of model railroading: the ability to capture the essence of a prototype scene, it's essential elements, when you have only a fraction of the space in which to do it.

If the result of my effort conveys the prototype faithfully enough so that people recognize it for what it's supposed to be, then I know I'll have succeeded.  Otherwise, like any other rookie, I'll just have to "try, try again" until I get it right.

Tuesday, November 5, 2013

Layout Tour WrapUp - The "AirLine"

(This is the 4th & final part of the tour - Part 1 is here, Part 2 is here, and Part 3 is here)

While the main focus of this project is the line from Hartford to Middletown (and eventually to Old Saybrook), the main "interchange" on the line was with the Air Line in Middletown.  On the prototype, the Air Line went from New Haven to Colchester, crossing the Valley Line at grade in Middletown before crossing over the Connecticut River.  Any cars destined for Valley Line towns from New Haven were dropped off by the Air Line Local and returns were picked up, so it's critical to Valley Line operations that at least part of the Air Line be included in my model.

You can see on the following map where the Air Line came in to Middletown:


Valley Line south to north (left to right), Air Line west to east (top to bottom)
The Air Line local would come into town, leave most of its train on the main, continue with its interchange cars southeast on the quad track, and then back into Middletown yard (off the map to the right).  After dropping off its cars, the locomotive would return to its train and continue east to Colchester.  On the way back, it would pick up New Haven bound cars by reversing the process and running around in the yard.

On my model, the "Air Line" is such in name only and functions only as a way to have active, prototypical interchange and to provide operators another local freight to operate.  The line itself ends at the CT river, so all Air Line locals are "turns" to Middletown & back.  But otherwise, I can replicate the prototype operations (just about) perfectly.

The railroad itself is a different matter, being totally freelanced on two seperate 2x8 modules:

Somerset module ("New Haven" staging off the left end)

Mill Hollow module - track to Middletown continues off the right & through the wall
Here's a recap of the trackplans for each of the towns/modules
The trackplan is totally freelanced and so are the towns & buildings, but the idea is to convey "generic New England" as much as possible.  The story of these modules merits its own post, but suffice it to say that all the buildings were salvaged from the 4x8 layout of an old friend who passed on.  The 4x8 was an operational nightmare (all brass snap-track, almost none of which worked) and I built the modules to have a better track plan and preserve his handiwork.  Bonus: the modules allow you to really get up close to what he built (just about all of the buildings have full interior detail).  He was definitely more of a craftsman modeler than an operator.

Somerset engine facility
Operationally, the Air Line Local starts in "New Haven" (a staging track off the left of the Somerset module).  If I want the job to extend a little longer, I stage the train itself on the staging track, but leave the engine in the engine service area.  Operators will then have to fully hostle their engine before they pick up their train and start their main work of the day.  There are a few industries to be switched, including a box factory, team track and coal company.  Interestingly, the engine service facility must also be served with company cars (coal & sand inbound; cinders & empty cars outbound).
"Portal Farm" at west end of Mill Hollow module - tunnel to the right
Once the local finishes its work in Somerset, it continues to Mill Hollow through a tunnel (and over a liftout that connects the two modules) and comes out just past a farm on the hilltop (seen/scene above).

West end of Mill Hollow - tunnel in the distance.
There's one main industrial track in Mill Hollow, but the industries have more car spotting locations than the track capacity available.  So switching in Mill Hollow sometimes requires the local to setout a car on the siding so it can be switched on the return trip.


Overview of "downtown" Mill Hollow.  Track continues off-module to the right and to Middletown.  Note Form 19 orders to be picked up by the local and track layout mounted on the fascia.
Once the local finishes in Mill Hollow, it continues to Middletown for interchange.
While it would be great to model the Air Line prototypically (and someday, I may), for now the modules are a great stand-in.  They contain the only really "completed" area of the railroad, and though all the structures are inherited, all the scenery is my doing (and my first attempt at scenery).  The modules not only provide a nice reminder of my friend's modeling legacy, but also the fact that, no matter your prototypical aspirations, model railroading is essentially a fun, creative activity - or at least it should be.  We should never get SO tied up in replicating the prototype that we forget that we are essentially creating a miniature world over which we have total control.  And that's pretty neat.
And that concludes our tour of the layout, at least as it currently exists.  As you can see in the overall trackplan, I will eventually continue my prototype modeling south from Middletown through East Haddam, Deep River, Essex and Old Saybrook.  But what I have already will keep me busy for now - and I still have to get to my punchlist of to-do items created by my sea trial ops session.
My first "official" operating session is in just a little over a week, so I need to get crackin'!

Thursday, October 31, 2013

Layout Tour - Middletown

(This is the 3rd part of the tour - Part 1 is here, and Part 2 is here)

After leaving "Hartford" (staging, actually in Middletown behind the backdrop) and heading south through Wethersfield, Rocky Hill, Dividend & Cromwell, The Valley Local finally reaches Middletown - epicenter of railroading in the Connecticut River Valley.

Two mainlines cross here (well, they're both branchlines, but you get the idea): the Air Line comes up from New Haven and crosses the Valley Line at grade before heading over the Connecticut River to Portland & Colchester.  In earlier days, it went all the way to Boston and - appropriate for the season - was the route of the famous Ghost Train, an all-whitewashed limited passenger train between New York and Boston that ran for only a few years in the 1890s.

A third line came into Middletown from Berlin (see yesterday's "ghost post"), but by 1947 that line had been cut back to East Berlin to serve some brickyards and a paint factory.  However, the "Berlin line" - or at least its right-of-way - was even more useful as the location of the Middletown yard and the interchange between the Air Line local and the Valley local.

With all the local industries, not to mention the interchange, Middletown was still a busy place in the late 1940s and there was still a lot of track spread out over a fairly large area (at least by CT Valley standards).  Consequently, Middletown was where I had to make the most compromises.

Let's see how I did...

As you come into Middletown from the north, you pass the entrance to Middletown yard before you cross over Hartford Avenue (Bridge Street) and the Air Line diamond.  See the Sanborn maps below:

Cromwell is to the right (north), Berlin branch heads off the north end of the yard, mainline crosses Hartford Ave. on an overpass (lower left).  Incidentally, the train in my first "Wordless Wednesday" was southbound at Miller Street, which you see in the lower right area of the map.
Industries here include Meech & Stoddard feed & grain (at the top center), bulk track (off that track to the right) and the 2-track freight house (just "down" (east) of Meech & Stoddard).  There's even a scale track since carloads of bricks came through here off the Berlin line.  Middletown yard was actually two yards - there was another double-ended yard to the north of the one you see above - but I could only fit in one, so I chose to model the "south" yard - the one with the most diverse stuff going on.

This map is just to the left of the previous map - see Hartford Ave at upper right.  This map is from 1924.  By 1947, the only tracks left are the two mainlines and the quadrant track.  The passing & other sidings and all the track down by the river are gone by the end of the 1930s.
I should have mentioned this earlier, but hopefully it's become apparent by now: all of the Sanborn maps are oriented so the "aisle" (where you'd be standing) is at the bottom.

So here's my treatment of Middletown yard:

Schematic showing all the modeled track.

And here it is IRL (in real life) - Cromwell off to the right, AirLine/Valley diamond & quadrant track to the left.  Rightmost cars on Airline interchange track; cars at center of photo are spotted at the freighthouse.  Meech & Stoddard will be behind the freighthouse along the wall; bulk track will be "north" (right" of there).
This area is, by far, the most compressed area of the whole layout - but I think, given the space I had to work with, it came out pretty well.  All the "representative" tracks are included in some fashion and (maybe not so) surprisingly, it operates much like the prototype.  I say "much like" since most of the switching/classifying of cars was done by the Valley local in the "north" yard, which I couldn't include.  But as long as the Valley local is doing its switching from the "north" end of the yard I do have, it's out of the way when the Air Line local gets in.  All in all, it works very well.

Continuing south of the diamond, you get to the siding for the Davis lumber yard:

Davis Lumber is that siding heading "up" ("southwest") off the main.  Again, this map is from 1924 - the passing track and the "east" siding are gone by 1947.
 Turning 90 degrees left of the previous photo, this is what you see:

Diamond at right, Davis Lumber siding further away at center, curve past Middletown Packing in the far distance.  Turnback track along wall will be hidden under Middletown and continue under the yard and into the other room to East Haddam.

And here's a closer view of Davis Lumber (the building is just a stand-in)
If there's a second-most-compressed area, it's the area from the diamond to Davis Lumber.  On the prototype, it's about 1/2-3/4 mile; on my layout, it's about 2 feet.

BUT - and here's the key: <begin sidebar>
Like Middletown yard, despite the compression, it still operates like the prototype.  That's really the point of the compression being selective (i.e. "selective compression," at the risk of being obvious :^).  All the main (i.e. operationally critical) prototype elements are included; the fact that they aren't as far apart as on the prototype doesn't matter operationally.  Aesthetically, yeah, you don't want to crowd things any more than absolutely necessary.  That wouldn't look right.  But if it works operationally, then you should be fine.  The more space you have to space things out is just gravy.

This whole idea of "selective compression" has implications for choosing one's era as well.  I hope to flesh this out in a future post, so just a quick example for now.  Check out the Sanborn map above and note the long passing siding.  That was necessary up to the 1930s to accomodate passenger trains.  By WWII, the siding is gone.  So, I didn't have to include it in my 1947 version of Middletown.  Good thing - that sucker would have eaten up GOBS of space (at least a train length).  But in 1947, you don't miss it.  In fact, it's more prototypical NOT to have it.

Selective compression also has implications for how & what you operate.  I'm operating two local freights.  I have no passenger trains.  True to prototype, I'm using TT/TO, but trains don't have to "meet" or pass each other - not on these branchlines; not in 1947.  So the relative lack of linear run between/within towns doesn't matter operationally.  As long as it doesn't look wrong, it's fine.  And, fortunately, this area of the world is fairly compressed in real life - an added bonus! <end sidebar ;^)>

Finally, after a sweeping eastward curve along the river, we get to the south end of town where you'll find Middletown Packing Co.  Here it is on the Sanborn map:


Map from 1924 - first two facing point sidings from right on west (south) side of main gone by 1947.  Facing point siding further south on east (north) side of main also gone.  Only track remaining in '47 is siding for Middletown Packing itself.
The northern-most siding that had been removed by '47 had served a coal dump facility.  The siding in the center there (also removed) had curved sharply to the west (south) to serve the side of the buildings there when they had been Middletown Plating Co.  All that remained by 1947 was the short siding serving Middletown Packing at the lower left.

Here's how this area looks on the layout:

 
In what's become a theme, especially wrt Middletown, there's a little compression going on here too, and tracks that were there in 1924 (Sanborn map) aren't around in 1947.  So, operationally, this area works fine too.
 
However, you may be wondering how these facing point sidings (Davis lumber, Middletown Packing) are served, there being no run-around track.  Well, recall that there IS a run-around track, back north in Middletown yard.  The Valley Local would have to put cars on the locomotive's pilot before serving the industries at the south end of town.  Turns out, that's exactly how the real thing operated.  How cool is that?


Middletown, looking "north" from Middletown Packing back toward the diamond and yard.  Mainline south to East Haddam goes along wall and under yard to other room.
Wow - if you've read this far, congratulations/condolences!  Hopefully I won't have many long posts like this - they're tough on writer and reader alike - but as you can see, even a severely-compressed Middletown uses up a lot of space, in the blogpost as well as in the model(!).

As I get to fleshing things out with scenery and buildings, I'll revisit each town in more detail going over what was there - especially industry-wise - and how I'm modeling it.  There'll also be prototype photos where possible.  Unfortunately, despite my access to some of the most comprehensive Valley Line collections extant, there are still industries and areas for which I have no photos at all (e.g. no photos of Davis lumber; no good photos of Meech & Stoddard, still looking for photos of Wethersfield Lumber and Ballantines).  That's where hopefully some of you will come in and rescue me.  If you have - or know where I can get - Valley line related pics, please let me know.  As I continue this project, those priceless pics will be SO VERY MUCH appreciated!
 
So that's it for the "pure prototype" portion of the model railroad - and that's it for this room.  Next up - the "other" room and the (freelanced) Air Line!

Tuesday, October 29, 2013

Layout Tour - Rocky Hill, Dividend, Cromwell

(This is the 2nd part of the tour - Part 1 is here)

Rocky Hill is the next town south from Wethersfield.  As you 'round the curve heading southbound, this is what you would have seen Back In The Day:

Rocky Hill looking south - CT river to the left, freight house at center, station past that in the distance.
Here's what you see as you 'round the curve on my layout:

No buildings yet, but the cars are spotted where the freight house will be.  The station will be just beyond.
Here's the Sanborn map:

Rocky Hill - North is to the right.
Rocky Hill was another place where I'd made the mistake of building my trackwork based on the Sanborn Map.  Like all of these maps, this one dated from the 1920s - when there was still passenger service.  Consequently, I had a nice long passing siding.  But John Wallace recalled a crossover in the middle of the siding that allowed for bulk track service from the southwest part of the siding, and house track service from the northeast part of the siding.  Yes, as you may have guessed, that meant that the "main" actually was always routed through the crossover - northwest to southeast.  So, out came the track, in went two more Micro-Engineering turnouts.  But no regrets - it became evident pretty quickly that operations would work much more prototypically with the more prototypical arrangement (well, duh!)

Foreground boxcars on house track, crossover just beyond, Dividend in distance (those cars spotted at Billings & Spencer)
Next operations area south is a place called "Dividend."  Actually part of Rocky Hill, this area was the location of the largest customer on the line - Hartford Rayon.  Here's the Sanborn map, but as you'll see, it wasn't really all that helpful:

Dividend - north to the right.  Hartford Rayon main plant to the south of Belamose Ave.  Old Billings & Spencer building (used as rayon warehouse in 1947) to the north of Belamose Ave.  Switchback not shown on this early map.


Dividend, looking southwest.  Cars are on the old Billings & Spencer tail track.  You can see the switchback in the distance.
As you can see, if I followed the circa 1924 Sanborn map, my track layout would be all wrong for 1947.  John described the switchback operations at Dividend in his Shoreliner article and confirmed this layout when he saw it in person.  During WW2, there was a bulk oil distributor further north on the tailtrack.  But that business went back to barges after the war.  To the left (south) end, you see the "tank" track curving off to the southeast.  On the prototype, there was another track there and you can (barely?) see that I have a loose turnout placed there to see if I can fit it in.
Overview of Dividend/Rocky Hill looking north
Next stop south of Dividend/Rocky Hill is the small hamlet of Cromwell.  Here's what it looks like on the Sanborn:

Station in center - note Main Street (aka Middlesex Turnpike).  Coal Co. not shown, but would be at end of siding.
And here's what it looks like on the layout:

Great (and lucky) photo mockup of Main Street crossing looking north, and in my era!  Siding on the left - station will be between siding and mainline.
There's not much to Cromwell - just a siding/house track and Lee & Sons Coal Co. will be at the end of the siding.  The coolest thing will be if I can replicate Main Street fairly faithfully based on that great photo - especially the diner with the octagon windows!


Lastly (for now anyway), here's another shot of Cromwell showing the siding and the track in the background going through the backdrop.  See the "inset" on the trackplan for the track arrangement back there, but suffice it to say that there are two tracks - the closer one is the line from "Hartford" staging (i.e. Middletown) to Wethersfield.  The further line next to the wall goes from Middletown to East Berlin (not yet modeled).  If you saw yesterday's post on Wethersfield, the train you see here is the same one that was heading "northbound under the Rt. 15 overpass."

All in all, I like how the Rocky Hill/Dividend/Cromwell section came out.  I didn't have to make any significant compromises, other than compressing the linear run.  But even on the prototype, these towns are pretty close together.  And, thankfully, the prototype operations are such that you don't end up having too much - or usually any - of the rest of your train in a different town than your loco when you're switching.  With the backdrop dividing the scenes so effectively, you still get a real sense of "going somewhere" when you're operating.  Given my space limitations, that's pretty much the best I could hope for.

So we've made it so far from Wethersfield to Cromwell.  Next stop, Middletown....