Thursday, May 30, 2019

Thursday Word(less) Wednesday #266

(sorry for being tardy - late night at work %^)

Evocative of the Valley Local, and the look to which my layout aspires - but can't quite get to yet.
Everything about this scene, from the composition, to the scenery, to the photo backdrop, and - bonus! - the haze at the horizon, is just about perfect.
FB photo of Steve Goaring's Illinois Terminal RR

Sunday, May 26, 2019

Mortal Mortar Monday

I can't believe it's been over a month since I (finally) started painting the buildings at East Berlin (click here for the start of the saga). But this time, my hiatus isn't due to procrastination, but to lack-of-time. Well, lack of big blocks of time where I can work my way into painting some more.

Fortunately, despite my busy time at work, I've been able to get little 15 minute chunks of progress in. As proof, folks following The Valley Local group on Facebook have seen the "Morning Progress" photos which are becoming somewhat regular. Seems the time I make before I go to work is the only free time I have lately.

But when I can, I've been confronting my latest challenge - painting effective mortar lines. It's been about 4 1/2 years ago (yikes!) since I last did a brick building (Ballantine's Beer Distributor) and that came out pretty well. Fortunately, I documented what I did (in this blog post) and tried to follow the same technique - just using a wash of PollyS MILW gray, thinned 5:1. Unfortunately, this time the brick didn't turn out as nice - at least not so far...


I didn't have any more of the PollyS gray on-hand, so I picked out a bottle of craft paint that looked pretty close - in this case, Apple Barrel's Granite Gray. I put 5ml in the cup.


I then filled up the cup to the 30ml mark with some acrylic thinner (made up from a formula Joe Fugate introduced in his acrylic painting book).


Figuring the station is the least-prototypical (i.e. important) of the buildings I'm doing in the area, I practiced with them first. I brushed on the wash and then wiped it off. Didn't come out so good...


I tried moistening my finger to get the white off the brick faces, and that helped a bit, but still not great.


I even tried a pencil eraser. Looking a little better but still not the look I'm trying to achieve.

So I moved on to some other wall sections, trying the same techniques.


Looks a little better. Maybe I should have used a glossy based brick color. Maybe the wash is getting into the flat finish and making it hard to get off the brick faces?


Finally, instead of brushing the wash across the whole wall, I tried just flowing it into the mortar lines themselves, relying on capillary action. That came out much nicer - but still got on the faces of some of the bricks.


So out came the pencil eraser again. This looks the best so far and if I can't figure out a better technique, this may be where I settle. Maybe the mortar color is too bright/white...

Let me know if you think I'm doing something wrong here and/or if you have any additional suggestions/techniques to try. At least I seem to be heading in the right direction - the last wall I did is definitely better than the first one - but still not looking quite right.

Whattaya think?

Friday, May 24, 2019

A Quick Update....

Just a week-and-a-half to go before Crazy Time at work starts to calm down. In the meantime, I've converted my before-work rides & runs to Layout Time! Of course, it helps that the weather's been lousy just about every morning. It's much nicer to have a cup of coffee in the basement rather than toughing it out in the rain. . .

So lately, I've been doing a little tinkering on a Mogul and have started to experiment with backdrops in East Berlin.


During my last ops session, a couple of nagging issues with the #343 came bubbling up to the surface and got it added to the punch list. The rear coupler was too low, the tender didn't track well, and the engine would bog down at turnouts.

The issue with the coupler was two-fold: 1) I'm using a whisker-spring KD rather than the more traditional coupler (with the separate centering spring), and 2) the coupler box itself was tilted on its mount. Both issues together caused the coupler to sag significantly.


I addressed both issues simultaneously by adding a strip of styrene under ("on top of" - when the engine is upright) the back of the coupler box. It over-tilted the box slightly the other way, but that offset the slack/slop there is when using a whisker KD in the standard KD coupler box.


Problem #1 solved!

Next, I turned my attention to the tender . . .


The tender trucks on this particular model are rigid on one side and free-pivoting on the other side.

My track is pretty decent (if I don't say so myself), but it seemed even not-so-bad track was giving this tender fits - especially on curves.


The solution turned out to be pretty simple - though it did take some care to execute. I just turned one of the trucks around so that the opposite sideframes would be rigid/free pivoting. Of course, the finicky part was removing the wheels on the truck I turned and replacing them so that the insulated side was still on the engineer's side - just like the other truck.

Problem #2 solved!

Problem #3 is turning out to be a bit more of a problem. Turns out, the main driver wheelset on this locomotive is ever so slightly tight in gauge. That's not so bad, except when it encounters a Micro-Engineering turnout which is ever so slightly out of gauge. The combination of the two issues causes the locomotive to bog down noticeably in the frog.

So, since I am NOT going to regauge the driving wheels (way too much trouble for as little out of gauge that they are), I've started filing out the frogs & guardrails of the ME turnouts. My first experiment proved promising - just have to finish that and the do another 73 turnouts(!)

If they're out of gauge, might as well fix them . . .

But before getting too far along on that tedious job, 
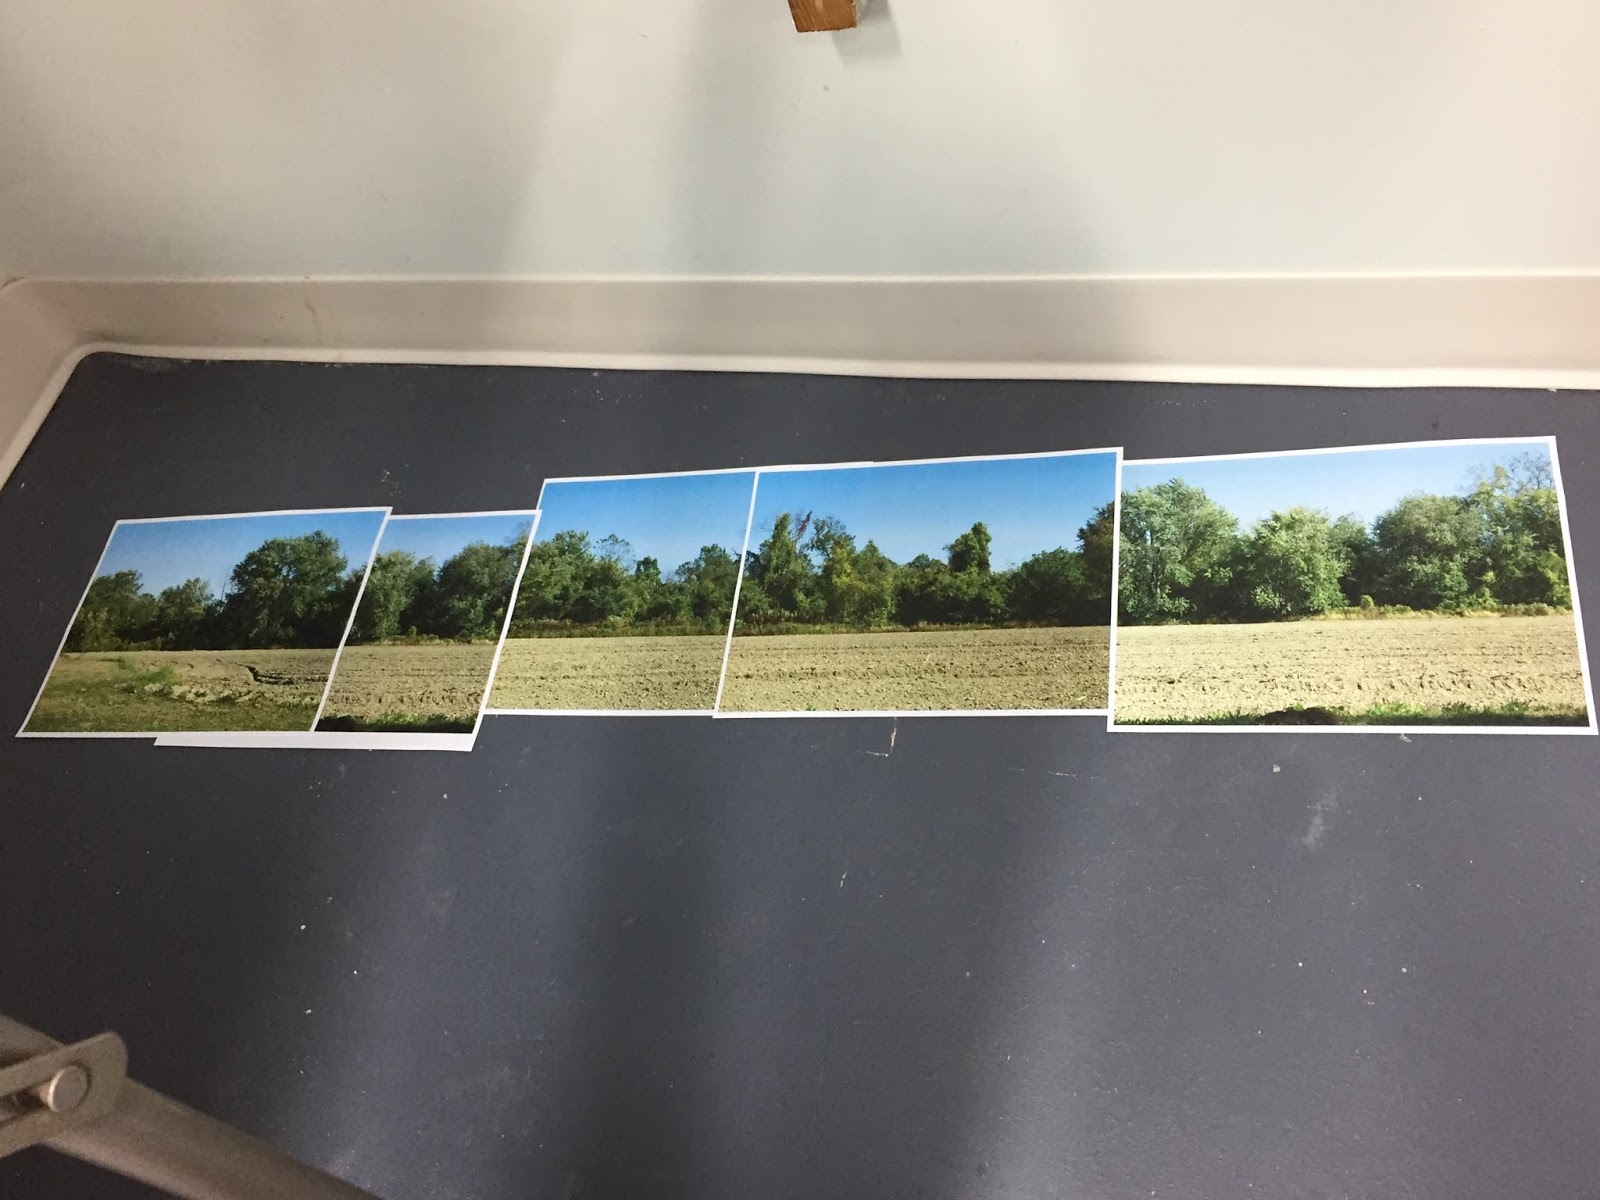
Bill came over and we started playing a bit with photo backdrops. I started by doing some mocking up on the floor:


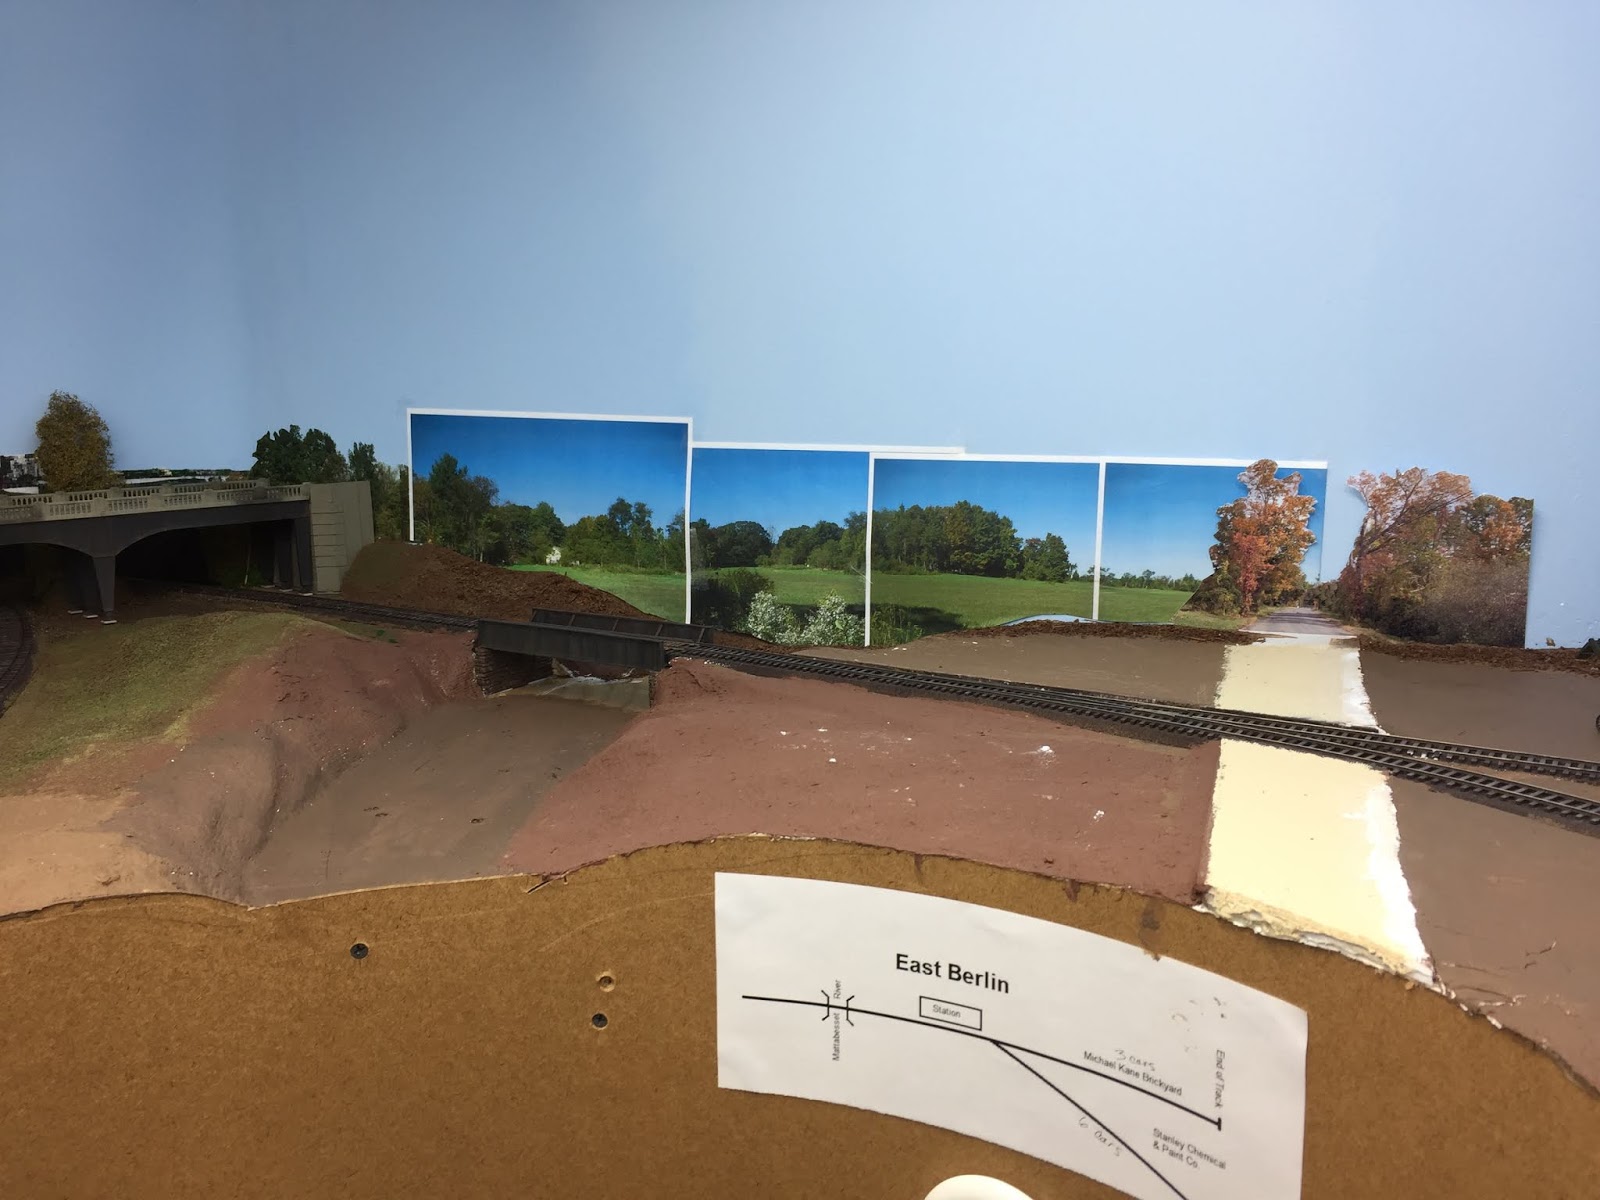
Then started mocking up a bit in East Berlin . . .


It's really amazing what a difference a photo backdrop makes - especially in photos! Really provides realistic depth to unrealistically shallow scenes.

So that's it for now. I've actually made a bit more progress lately than these photos would lead you to believe, so I have lots more to report. Hopefully the upcoming 3 day weekend break will allow me some time to get caught up. In the meantime, if you're a member of "The Valley Local" Facebook group, you've already seen some of what's been going on more recently. And if you're not a member, all you have to do is go there and ask to join to get more frequent updates.

Until next time, here's hoping you and yours have a wonderful weekend with your families!

Tuesday, May 14, 2019

A Few Words About Wordless Wednesday #263

You may have noticed a lull in activity hereabouts. Yup, it's that time of year again at work. It's super busy, but at least it's predictable. Part of it's charm. #sarcasm

But stay tuned - there are some additions to share. If you're a member of the Valley Local Facebook Group (which you should definitely join if you can), you've already gotten a little preview...

ANYhoo..... Turns out I got a helping hand on today's content, in the form of a guest post from . . . well, read on . . .
* * * * *
I was somewhat surprised by Chris’s Wordless Wednesday photo. I sent
him a comment asking if I was disqualified from the “contest” of
naming the location in the image.

The reason? It was a photo I had taken, back in 1978 if I recall
correctly. I was at first unable to think how Chris had ended up with
the image, but then remembered that I’d had him scan the slide for a
presentation I did a year or two ago about the yard in Willimantic (a
video of that presentation is on line here). Chris responded that all
scanned images go into a folder on the Photo Library PC and are
randomly selected for his screen saver. He had probably seen the image
pop up and, having forgotten it’s origin, had taken a screen capture and
posted it to find out if anyone knew the area depicted.

Long winded way to get to the point: the image shows the Willimantic,
Connecticut yard from the foot bridge looking East. The two story
building to the left is the former New Haven RR Bridge and Building
department engineering office, now demolished. To the right side of
the image is a Central Vermont section house built to the hip roof
Grand Trunk design, also now long gone. The track closest to the B&B
office is the former New Haven line to Boston via Putnam, CT - at the time

of the photo owned but no longer used by Providence and Worcester. The
right hand bridge and tracks are still Central Vermont when the picture was
taken on a gloomy November afternoon. Today the tracks in town are all
owned by Genesee and Wyoming subsidiaries P&W and New England Central.

Pieter Roos

Thursday, May 2, 2019

Chimney Repair

After my Friday Fail, I received a lot of great feedback on how to salvage things. Some of the best suggestions - including using this "fail" as an opportunity to develop a new method of weathering (call it "zip taping" or somesuch...) - I finally decided that most of those ideas would tend to bog me down. I really appreciate folks weighing in, but in the end I just decided to reshoot it and keep moving forward.

This time, I masked the top of the concrete/stone base with Tamiya tape, then regular masking tape, then newspaper, as you see in the above pic.

Chimney all ready for respraying

Resprayed. Total time to this point, maybe 10-15 minutes, tops.


Unfortunately, as you can see, even the Tamiya tape peeled up some of the underlying paint. Based on the feedback I got, this is due to one - or all - of the following:

  • Failure to clean the parts to remove any mold release
  • Failure to do a primer coat
  • Failure to wait long enough for the paint to well and truly cure
No worries though. Even stupidity such as this can be corrected...


I decanted a little bit of the spray paint into a bottle cap . . .


and then used a business card (no adhesive!) as a mask to allow me to touch up the paint with a small brush.

Should have taken this pic closer (click to enlarge), but hopefully you can tell that it's all nice and uniform now. No chips!


And here's the painted - though not yet finished - chimney. I still need to paint the cap the same color as the base, not to mention spraying some black inside (which I probably should have done first).

After adding mortar lines to the brick (likely subject of my next post, since I'm in the process of experimenting with different techniques), I may opt to Dullcote it to seal it well before doing any weathering.

Be sure to let me know if any upcoming pitfalls occur to you!