Showing posts with label Backdrop. Show all posts

Saturday, March 25, 2023

Continuing Progress at Essex: Concrete Pad & Backdrop

Persistence in my quest to catch up on this here blog is paying off . . . With this progress post, I'm now only one week behind(!) Thanks much for the encouragement to keep up with the blog - it's a bit more work than the FB group, but here I can post more detail, info, and pics - and I own the content.

So without further ado, here's what I was up to last Saturday . . .

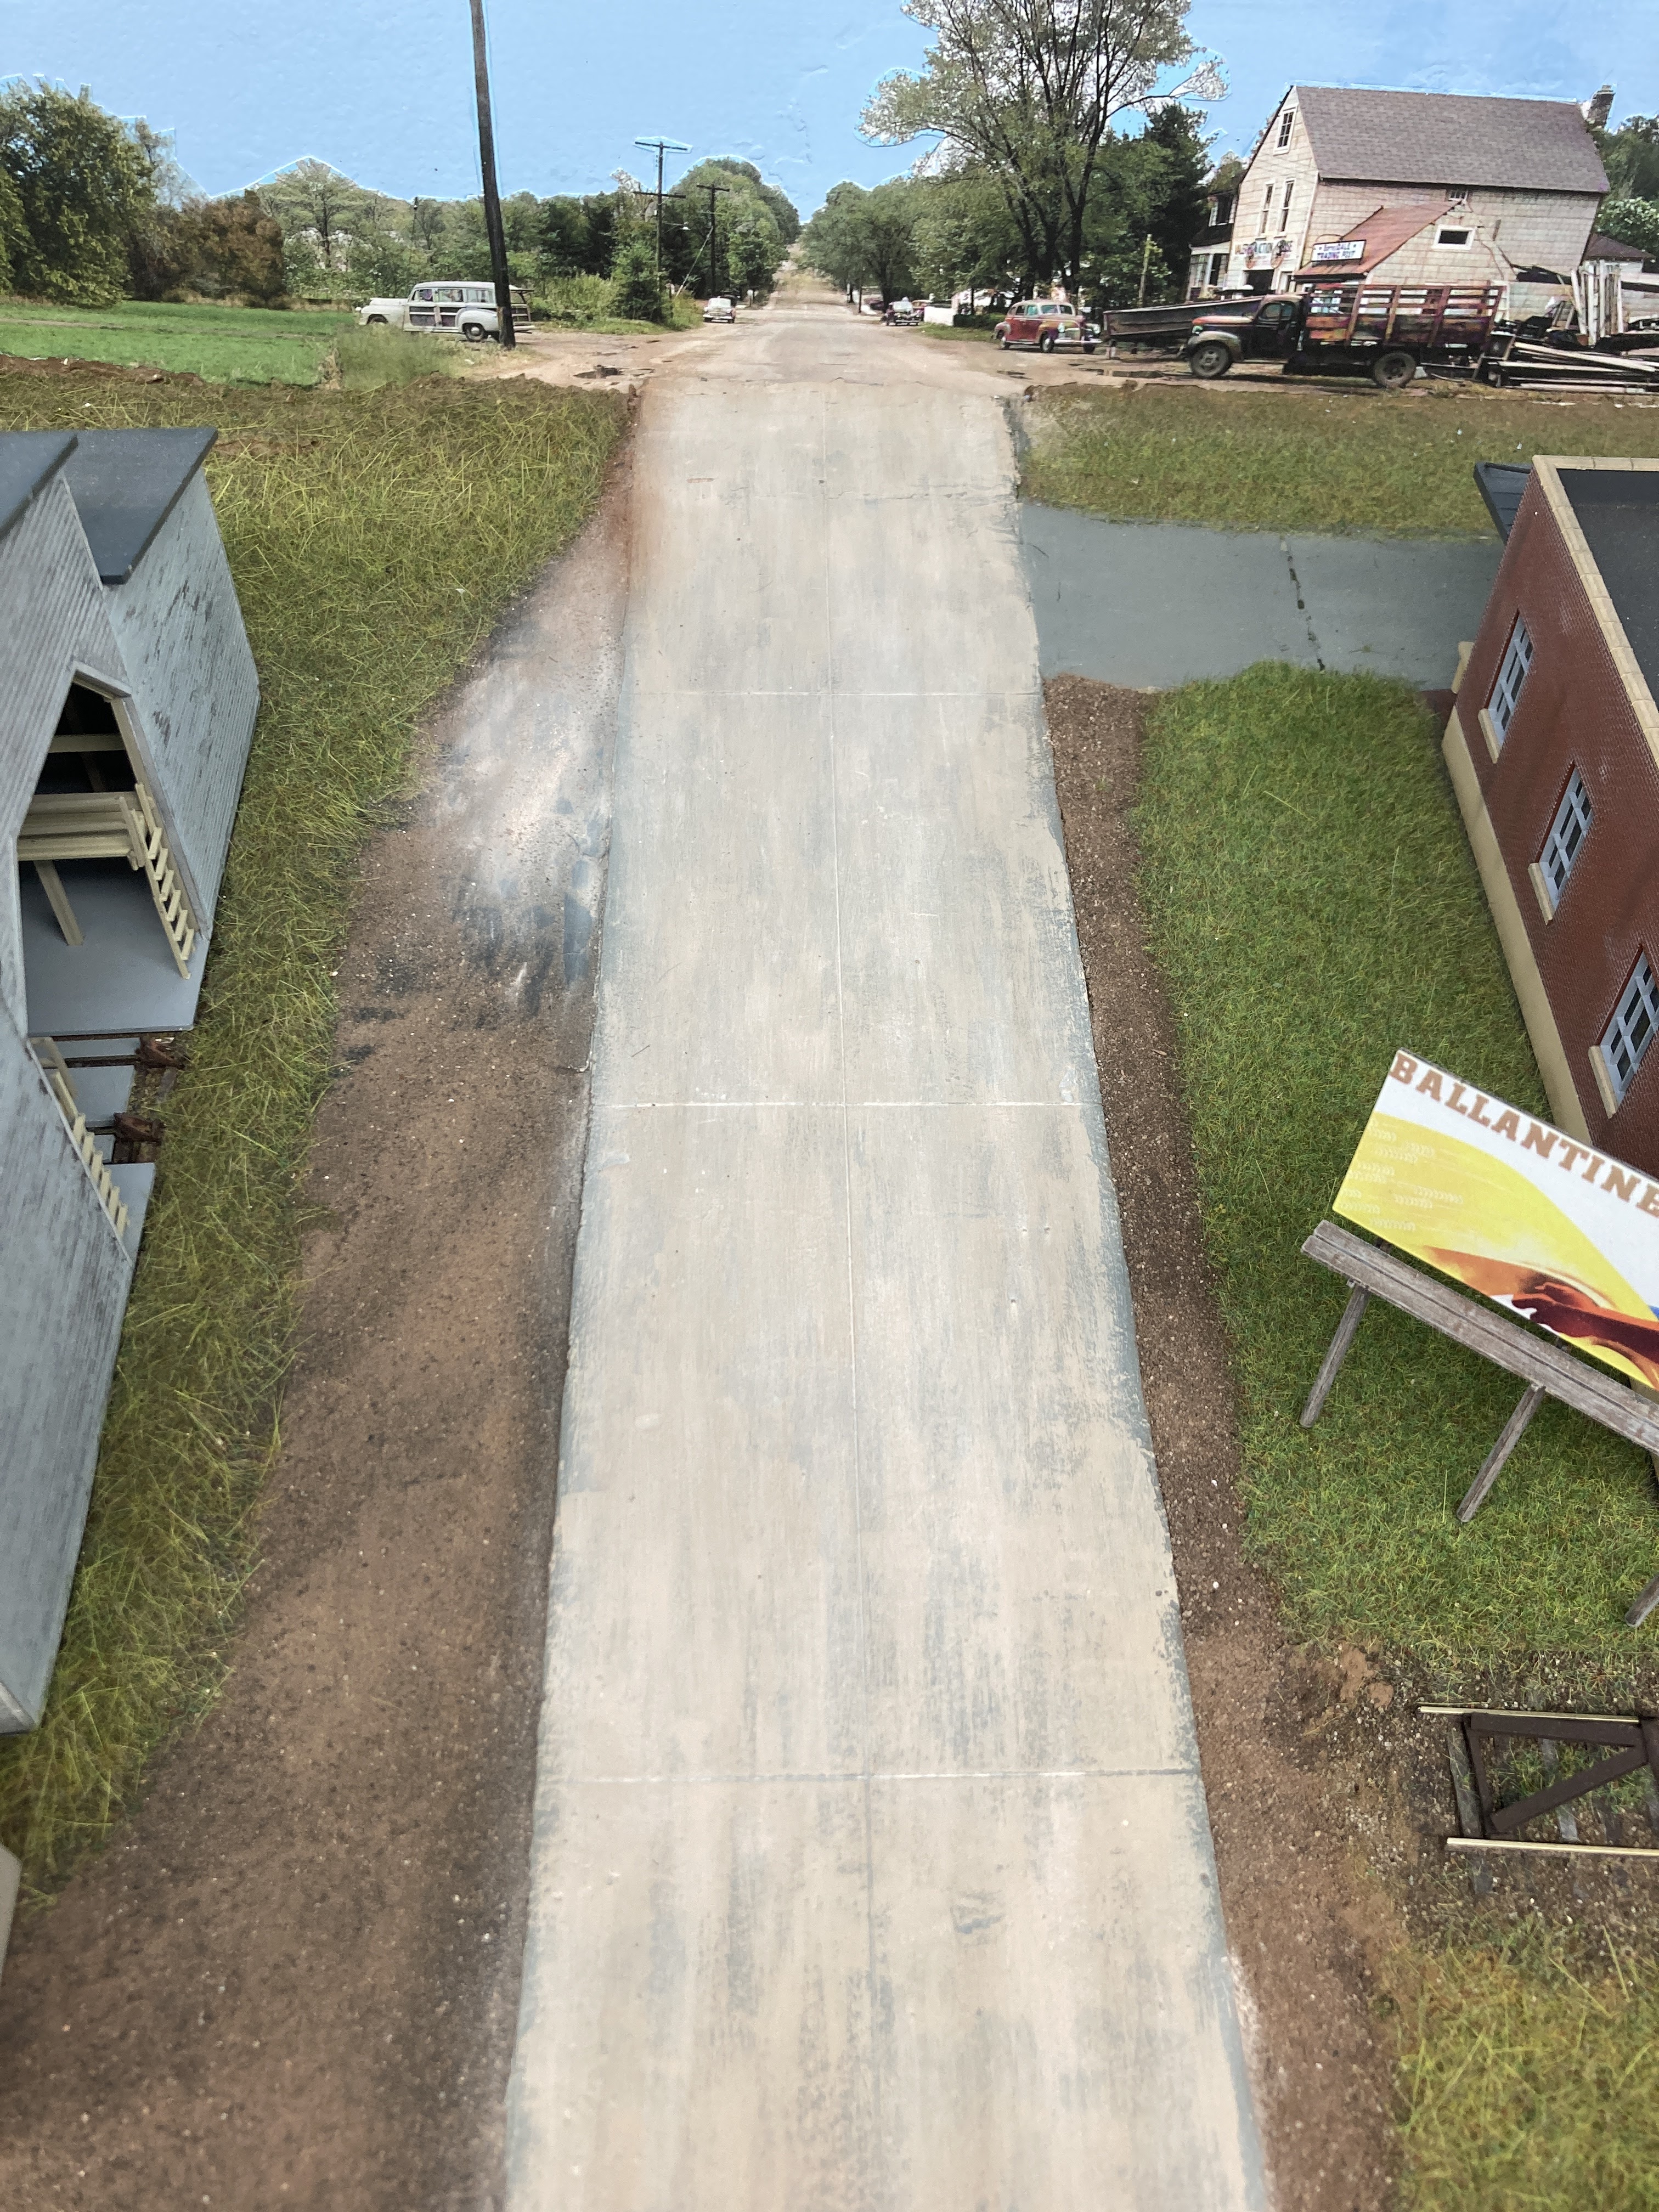
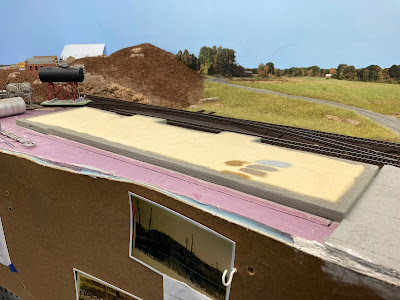
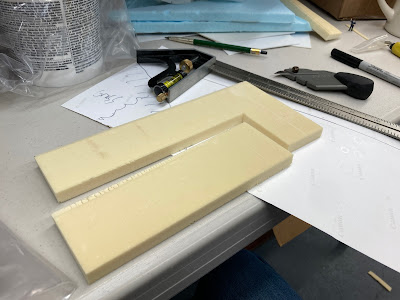
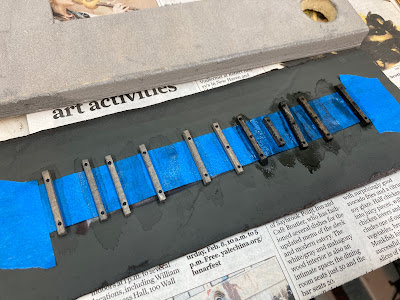
Concrete Pad at Dickinson Witch Hazel


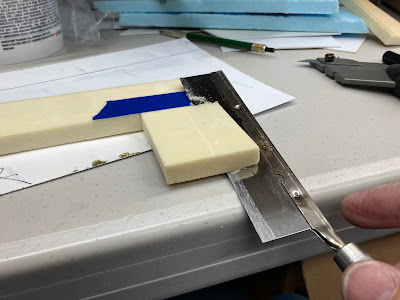
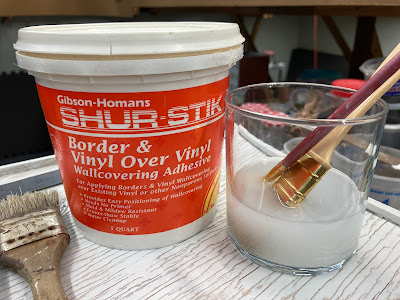
I used the same technique I used for the grade crossings on this concrete pad. The main part of the pad itself is foamcore with the paper peeled off (Pro Tip: Use the $2.99 foamcore from Hobby Lobby - the paper will peel off in large sheets without leaving bits of paper on the foam) and painted with gray craft paint. The track is Micro Engineering Code 70, already painted with a base coat of Rustoleum Earth Brown camo paint. I didn't bother weathering the ties since they'd be covered by "concrete." The guardrails are also Code 70 - same height is important to keep the "concrete" all level. I used Xuron rail nippers to cut the guardrails to length, used needlenose pliers to bend the ends, and used my fingers to give the rails a slight curve to match the track. Then I used thick CA (my go-to brand lately is the Loctite pictured above) to glue the guardrails onto the ties, snug up against the tieplates/spikes.


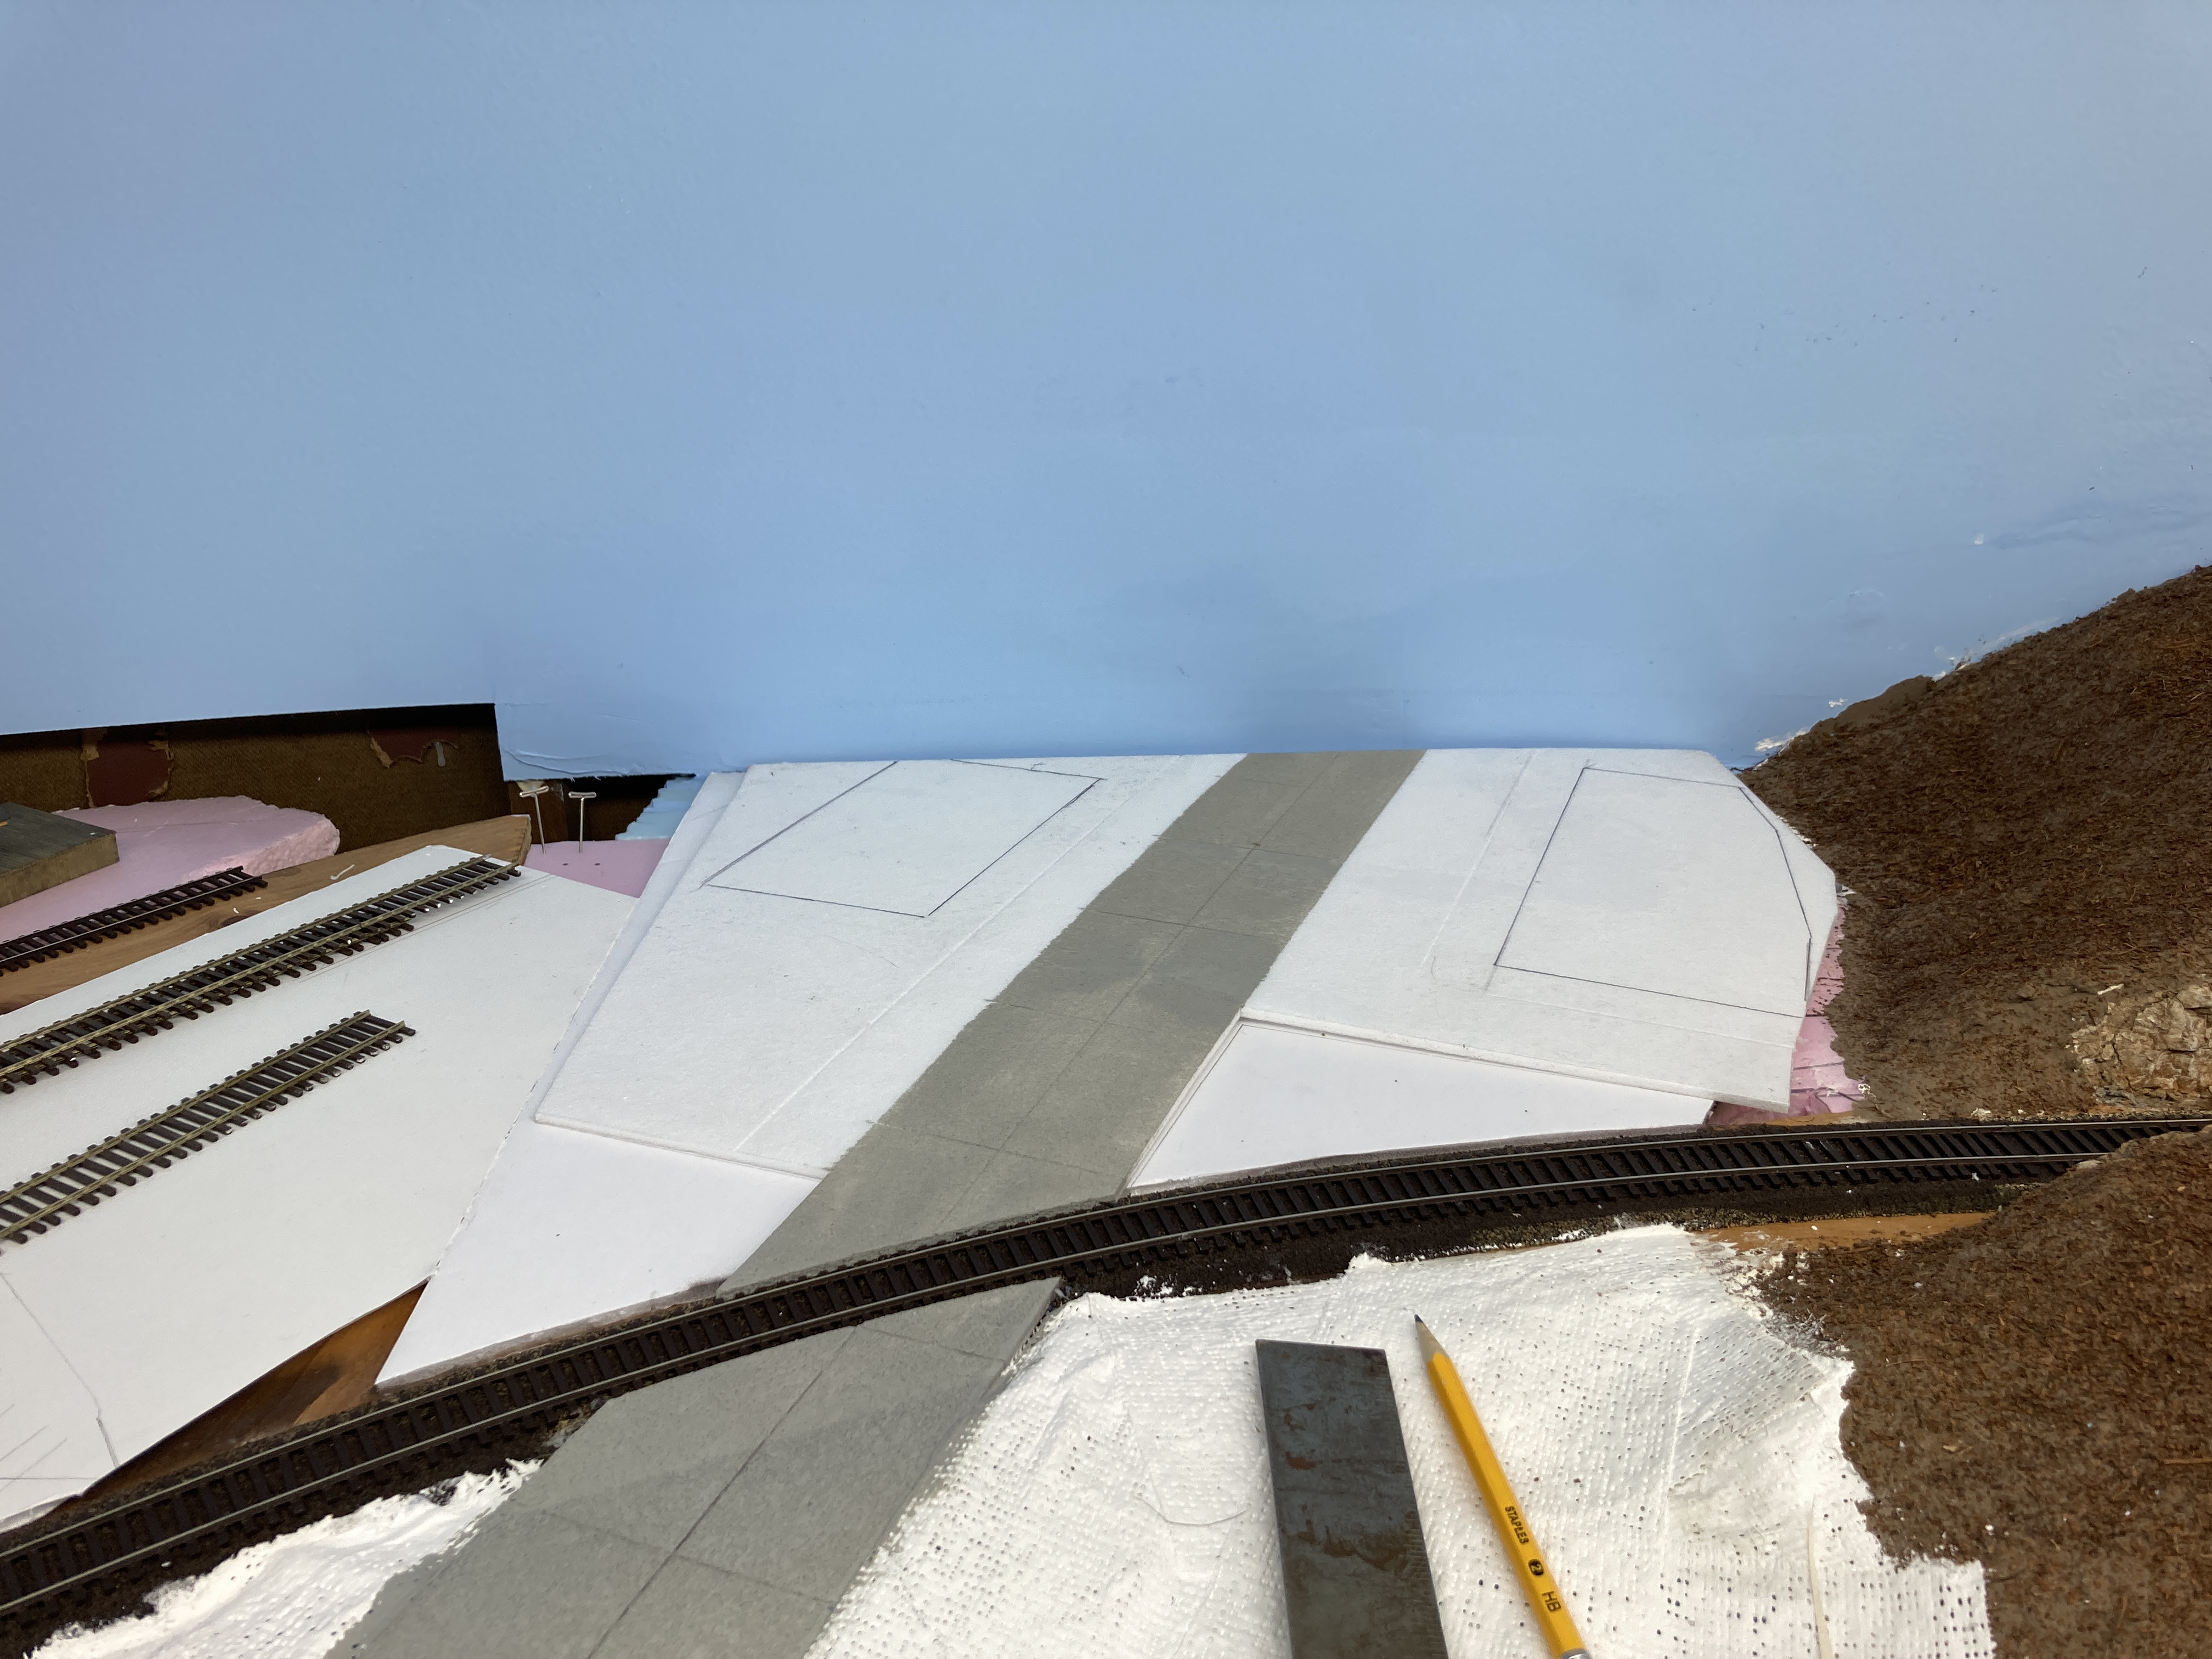
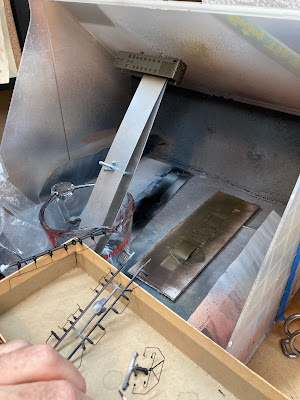
Next, I used the Tamiya 3mm curve-able tape (pictured in the previous post) to mask the flangeways and painters tape to mask off the surrounding area to protect it from the spackle.


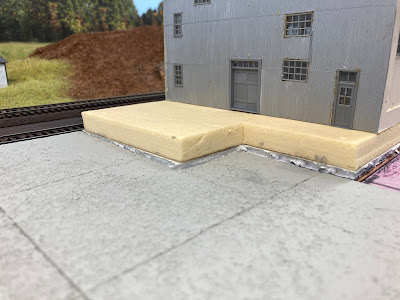
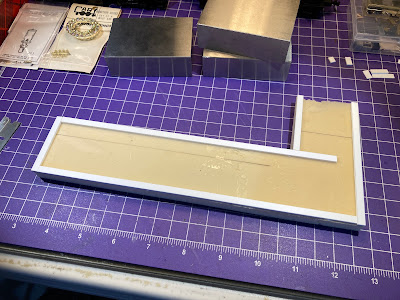
I then spread on the spackle using a piece of dense foam to spread it. I would have used a putty knife, but I discovered that the foamcore is ever so slightly thicker than the ME Code 70 track is tall. So, to blend the difference without a visible step, I used something more flexible than a metal putty knife to spread the spackle.


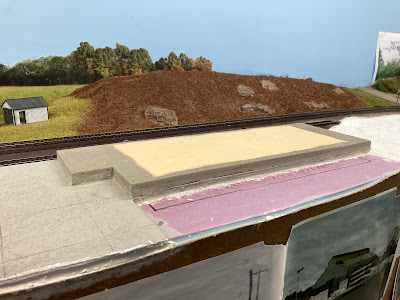
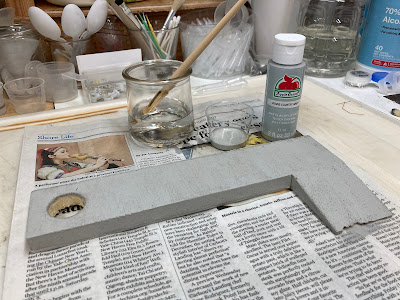
As with the grade crossings, I needed a second coat to smooth it out better after the first coat had dried and shrunk.


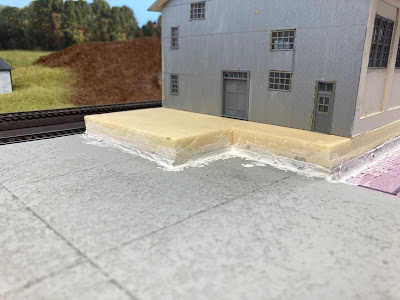
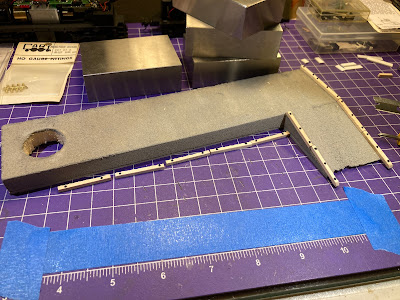
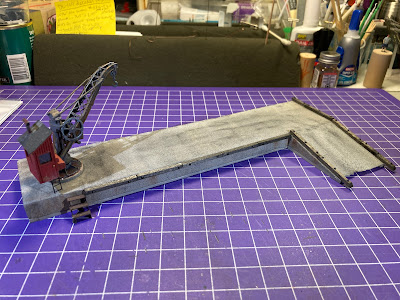
The Big Reveal is always fun - here, I've removed the Tamiya tape to uncover the flangeways. Oh So Satisfying


And here's the final result after removing the painter's tape. I still need to paint the spackle/concrete to match, but I decided I was done here for now...

Essex Backdrop

I used the same basic process (outlined here) that I've used elsewhere on the layout (click here and scroll down). Additional details can be found in the hyperlinks, but here's a quick overview:


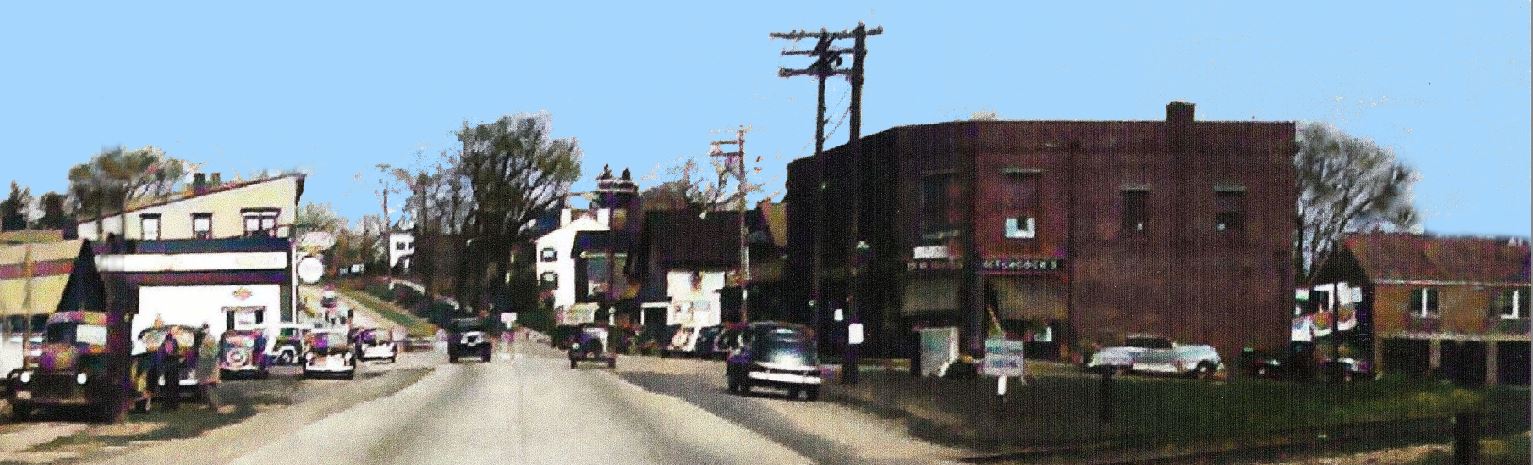
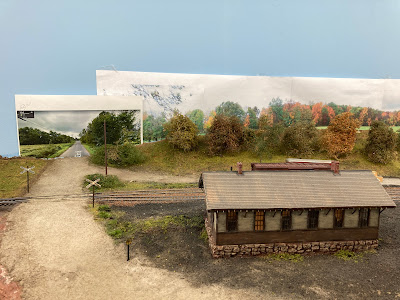
The process starts with gathering together the photos I've taken of the area modeled - or, if I don't have or couldn't get any, then shots that "look like" they may have been taken in the area - and Photoshop them together. In this case, I had to add a couple of roads to match the two roads in the Essex station area I'm modeling. Fortunately, I was able to get an actual shot looking northbound on Plains Road to include the "Yellow Label" store (part of the Dickinson complex - click on the photo above for a larger view - the store is there in the trees on the right).

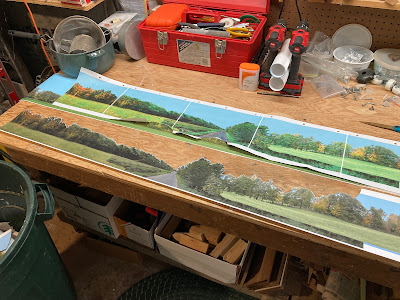
Next, I print out a mockup on regular copy paper to finalize overall look and position. Once I'm happy with that, I save the .psd file to a .pdf banner file. I take the pdf to my local Staples store to have them print it out on their indoor polypropylene banner paper. This particular backdrop was almost 15' long, so I divided it into two sections and had it printed one section on top of the other. The whole backdrop you see above was about $34.00


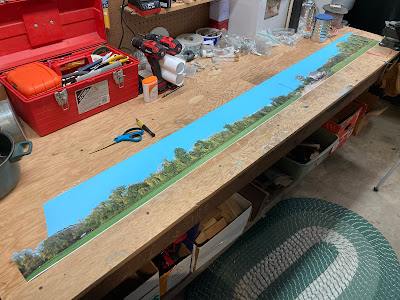
Other than the Photoshop work, the most time-consuming part of the process is trimming along the tops of the trees to remove the sky. Pro Tip: be sure and match the sky color on your backdrop image to the paint color you use on your masonite (or preferred backdrop support). That way any top "border" left after trimming will just about disappear. In the photo above, I've finished all the trimming (incidentally, while hanging out with the AML Wednesday night chat group) and it's ready to mount.


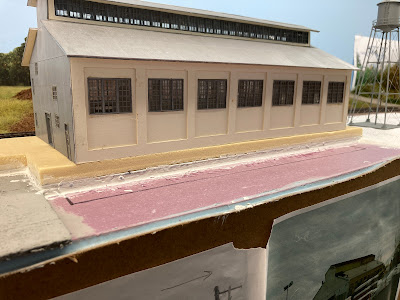
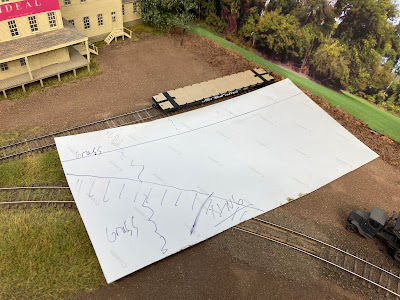
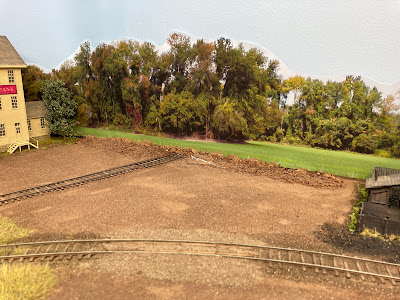
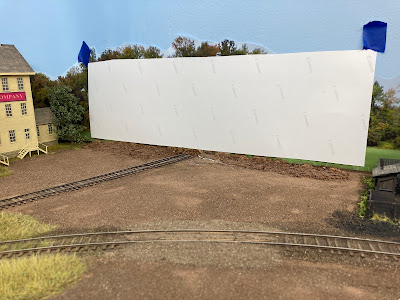
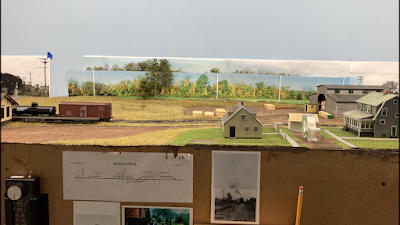
So here's what we're starting with... Just plain blue masonite. That's Middlesex Turnpike (Rt. 154) heading toward the backdrop, and you can see the Dickinson concrete pad/foundation and coal dump there on the right.


And looking the other way... that's Plains Road (Rt. 153) on the right. The Yellow Label store will be on the backdrop there on the left side of the road. In order to make vertical positioning easier, I cut a gap between the horizontal layout base and vertical backdrop. The backdrop photo will slide down into that gap.


I use wallpaper/border adhesive to attach the backdrop to the masonite and I have some water on-hand to wipe off any adhesive that oozes out (though I try not to let that happen).


The positioning process involves scooting the backdrop down into the gap/slot and making sure it's level and at the right height. In the past (and as you see above), I've marked where the top of the backdrop falls with tape - since that would show me the maximum height to apply the glue. But in my case, the tape ended up taking some of the sky blue paint with it when I removed it.

So now, instead of bothering to mark where the top of the backdrop falls, I just apply adhesive to the lower part of the masonite, staying well below where I know the top of the backdrop will be, attach the bottom part of the backdrop, then apply more adhesive to the top part/back of the backdrop itself and finish attaching it, smoothing it as I go. If any adhesive oozes out of the top, I wipe it off with a rag or paper towel dipped in the water.


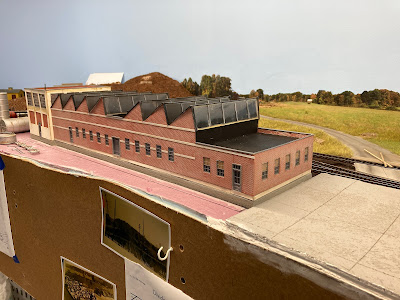
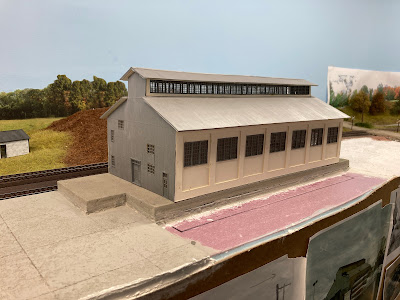
I'd planned ahead for 1) the backdrop being in two pieces given its long length, and 2) the seam between the two pieces being behind the big Dickinson warehouse where it wouldn't be seen. That turned out to be an even better idea than I'd planned since - despite my best efforts/planning - the two sections didn't match height-wise (likely due to how I had to position them at the roads). There was also a lot more overlap than I'd expected, so I ended up having to trim the end off of one side. But again, you don't see any of this behind the warehouse.


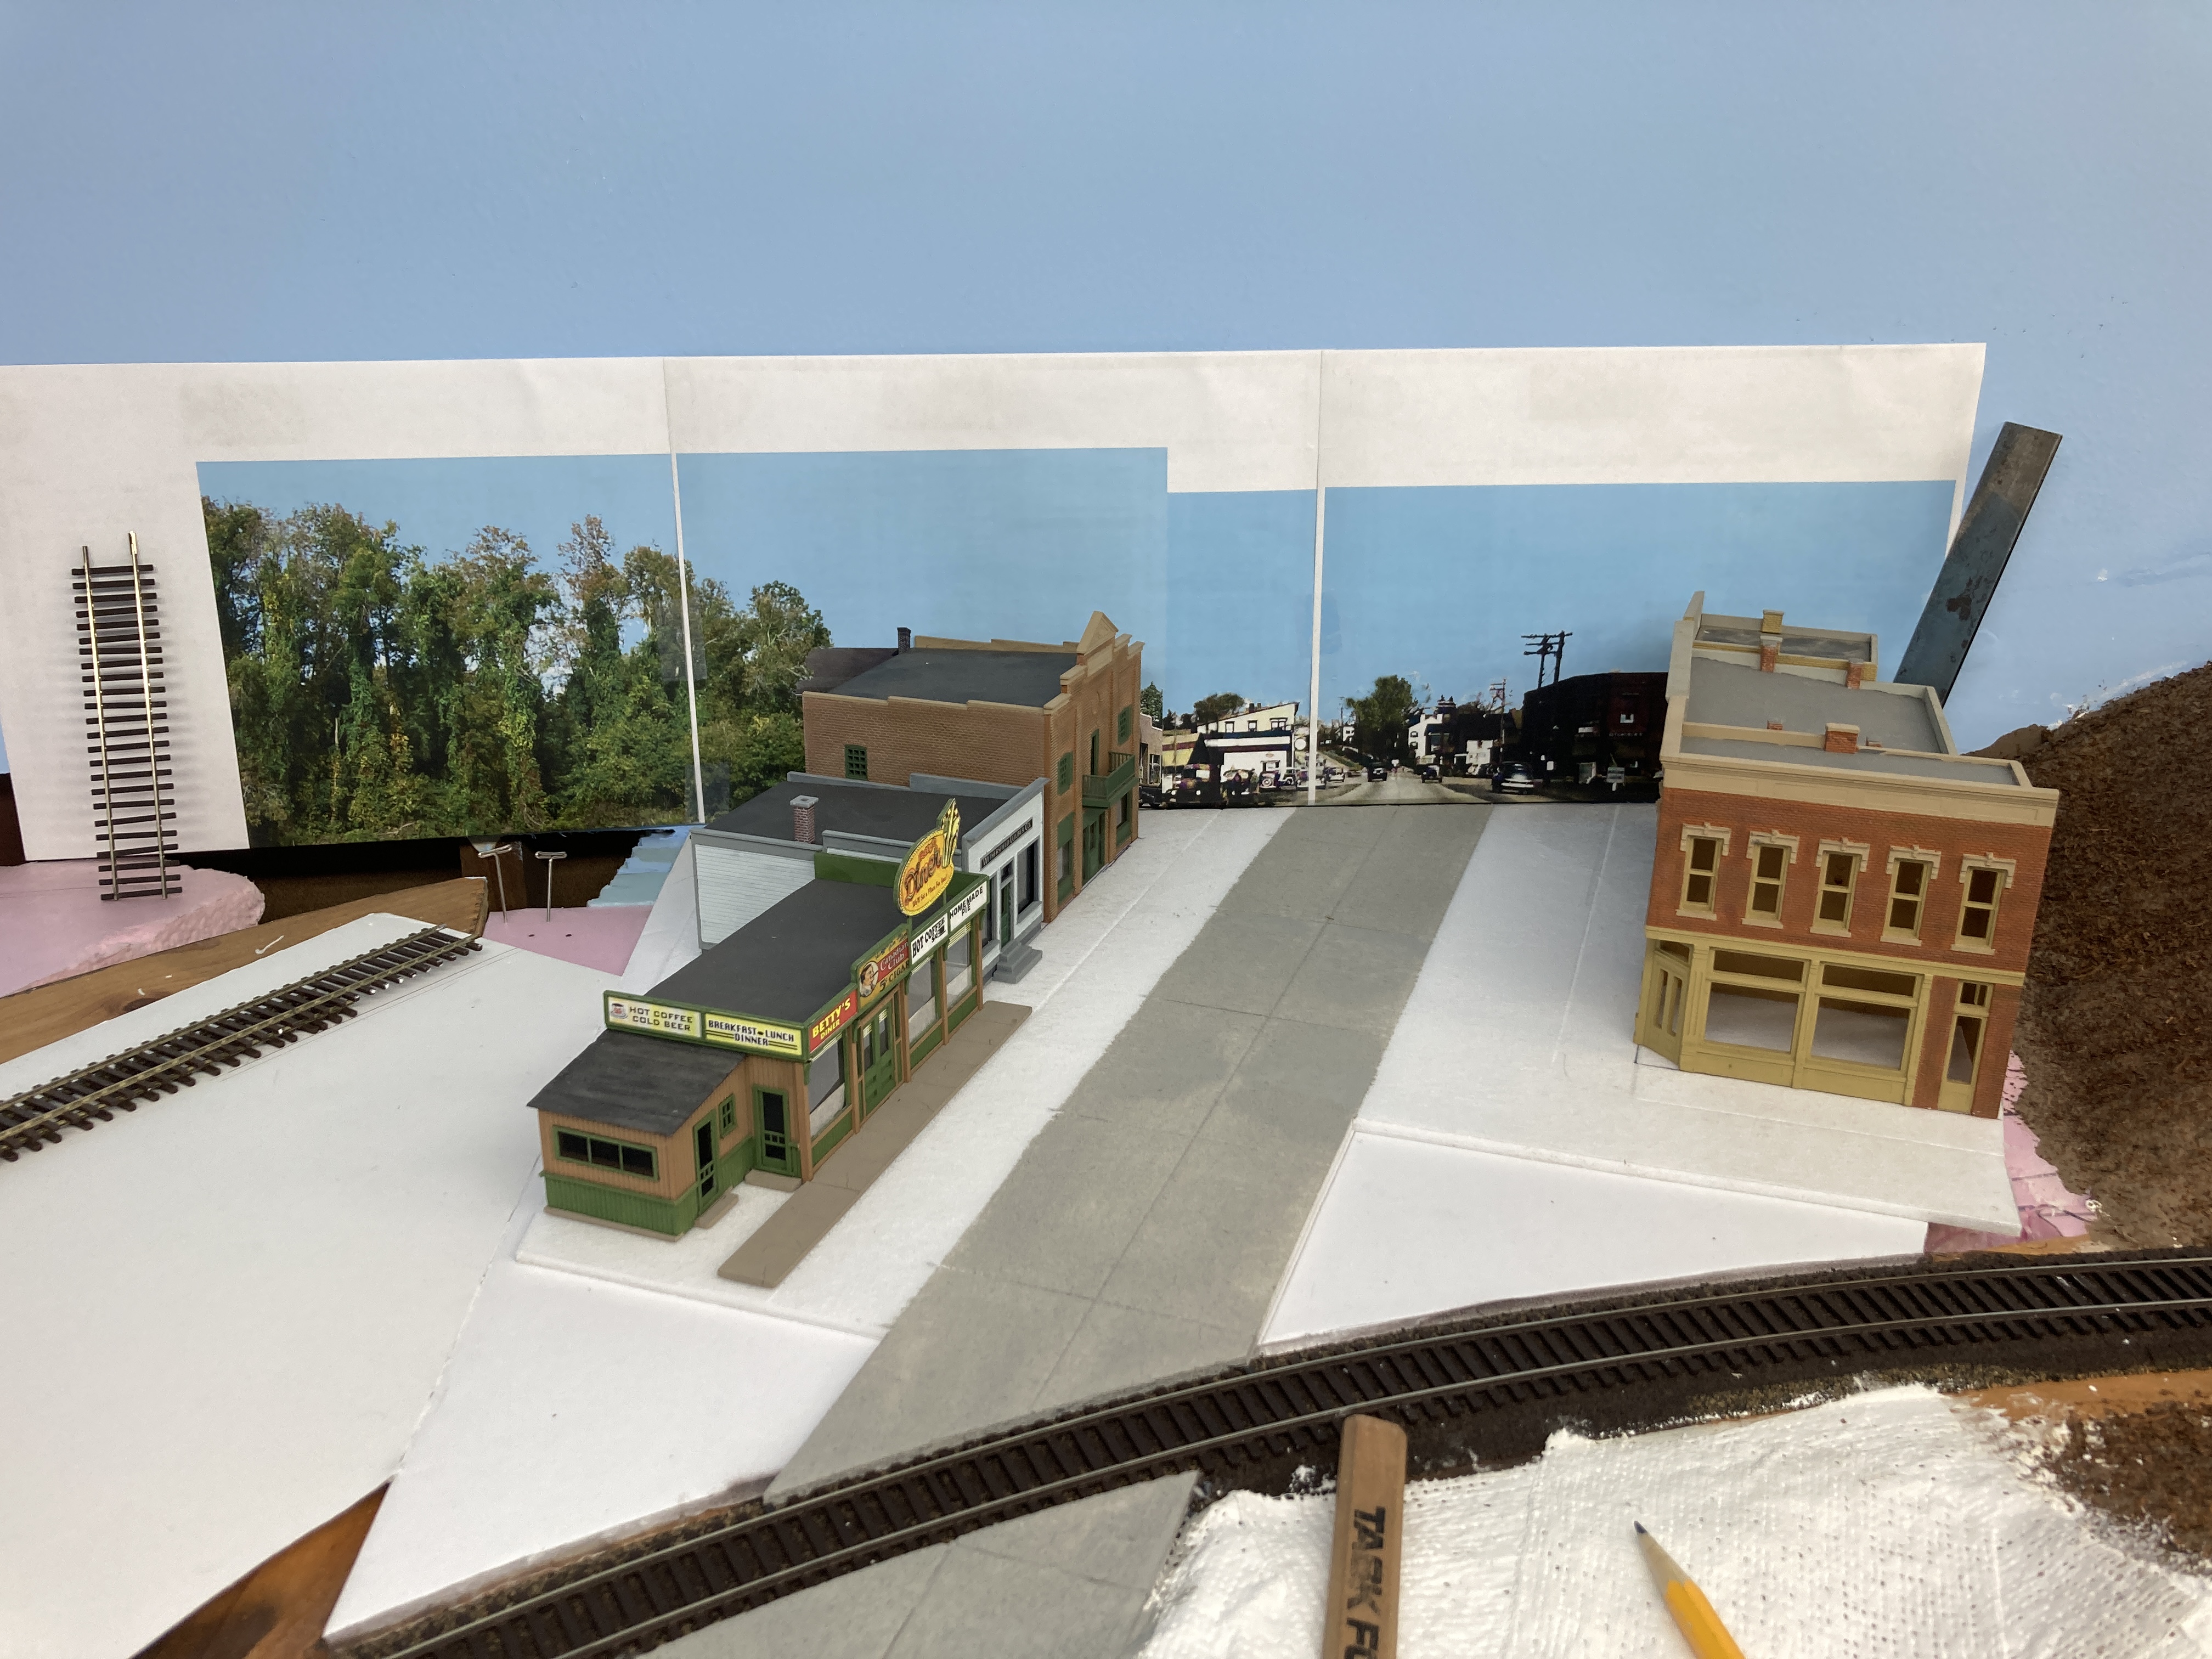
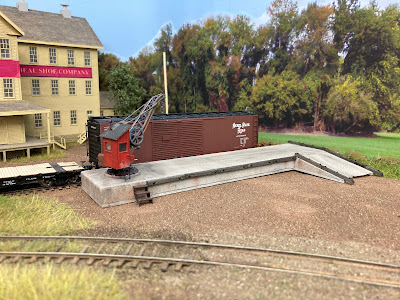
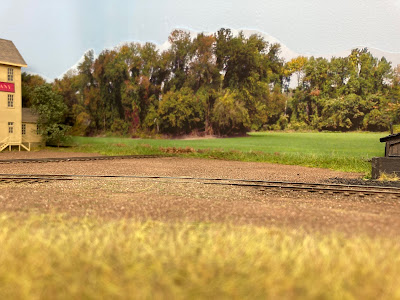
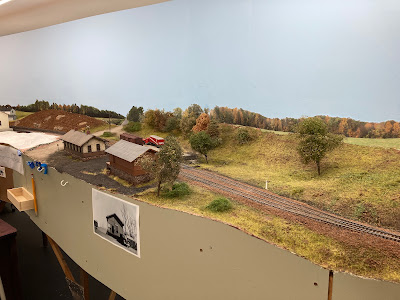
And here's the payoff for all the work... What a difference a backdrop makes! Compare this to the "before" photo above for the full effect. I especially like how the road ended up blending into the backdrop. But, speaking of blending, I have a lot of work left to do to blend the foreground scenery into the backdrop...


And here's the "south" end of the Essex station scene. Click on the image for a larger view to be able to see the Yellow Label store down Plains Road.

I don't think I'm alone in lamenting about how little progress I make on the layout - Real Life has a way of interfering. But one of the unexpected benefits of taking the time to document and recount my progress here is being reminded of how much I'm actually accomplishing.

Of course, the prospect of getting feedback and encouragement from you all is another great reason to post here as well as on FB. And of course, keeping a (b)log my techniques helps me keep track of what's worked in the past - and what hasn't. You've hopefully noticed the hyperlinks to past posts I pepper throughout for reference - I find those especially helpful and hope you do too.

While I'd hoped to be "done" with scenery in Essex by now, I decided to take a break to get some more terraforming done north of Essex to East Haddam. I'll be tackling that in the next post . . .


Wednesday, May 18, 2022

Wordy Wednesday: (Lots of) Progress Report

There's definitely an inverse proportion of layout progress to blog posts. You wouldn't think that would be so, but it's certainly true in my case. The more progress I'm making, the less time I have (or want to take) to blog about it. Facebook actually makes it easier to put off blogging, since I can post quick updates to my Valley Local group page (and get pretty instant feedback too).

So the lack of posts doesn't necessary mean lack of progress - and in this case, it's been just the opposite. Here's a (hopefully) brief rundown of activity since my last progress report:

Wethersfield Backdrop @Jordan Lane
I mentioned in passing that Deb (aka The Missus) had helped me with some color choice for blending the foreground road with the background road at Jordan Lane. Here's how I went about it...

I should have taken a "before" photo, but here it is in progress... The foreground is what the entire road looked like (and as documented in this post - included a *fail* for using actual concrete). It was WAY too different from the color of the background road. So I got a craft paint color that matched the "overall" color of the background road and applied it with a 1/4" wide brush, not worrying about (and actually embracing) the variation that resulted.


I then blended it all in with a slightly lighter color of Pan Pastel.

Lastly, I used black PanPastel to add "oil marks" down the middle of the lanes, even carrying them up slightly onto the backdrop. I think you'll agree the road looks MUCH better now than how it started out!

Continuing Cromwell
I realize now that I never did a post starting Cromwell, so just by way of a quick overview...

I used foamcore (with the paper peeled off) for Main Street (aka Middlesex Turnpike), and a combo of cardboard strip lattice and plaster cloth for the subterrain. Then I started playing with structure placement, guided by my embryonic Cromwell backdrop.

For the sidewalks, I decided to try these laser-cut MDF ones that I got for Christmas.

I laid the structures out on top of chip board that was the same thickness as the sidewalks (about 1/16"). These cutouts would form the base/foundation for the structures and raise them up even with the walks.

Alternately, I made a sidewalk/structure base combo out of foamcore (again, with the paper removed) for the station. After scribing in the lines, I painted this "concrete" with Apple Barrel Country Grey.

The road "north" of the tracks, as well as the subbase for the town structures, was cut from one large piece of foamcore. Like with all my foamcore, I remove the paper to reveal nice texture for concrete roads - it's also impervious to water (no warping) and is easy to scribe. Here, after scribing in the expansion joints, I've masked off the road for painting.

Main Street and town subbase in place, with structure base outlines marked in.

Mine is a very slow, iterative process - especially when it comes to structure placement and backdrop positioning.

But all this time pays off when you get the result that looks "right" to your eye - like this.

One of my biggest challenges is actually committing - whether it's gluing down structures, or sending a photo-shopped background image to be printed. But at some point, you have to "Just Do It" or be paralyzed by over-analysis. Here's the final Cromwell backdrop. It won't stand the scrutiny of eagle-eyes, but should work fine as a background for the main activity up front.

Once I got the final background print, I realized that the road color was a little off. So I repainted it to better match and I glued down the foam core (brushed on full strength white glue), glued on the structure bases, and weighed everything down. 

Once that was all dry, I masked off where the sidewalks would go, applied some craft paint for color and adhesion, and sifted on fine dirt in the parking areas (per prototype photos).

The paint I used as a base for the dirt was Apple Barrel Pewter Gray, to match the undertone in the shoulders/parking areas of the background photo. I sifted the dirt on using a tea strainer.

While that was all drying, I used Folk Art "Barn Wood" to paint the sidewalks.

Taping them down kept them still while I used a 1/4" brush to paint the top and curbs. I didn't worry too much about brush strokes - you won't see them from the aisle and whatever your eye happens to pick up will perceive them as texture. At least that's true to my eye. YMMV.

And here's where things stand in Cromwell at the moment. I used the rest of my old Ground Goop to fill in behind the structures and fill the "triangle" between the road and tracks, and added fine ground foam (WS Burnt Grass and Green Blend) as a base for future static grass. I even used my new WS Static King for the first time to apply some grass between the buildings and the backdrop. But as you can see, I still haven't committed to gluing the backdrop in place (I really don't know what I'm waiting for). Ditto the sidewalks. BTW - note the track, how uniform it looks (shot with rattle-can Rustoleum Camo Earth Brown).

For a little diversion, I decided to finish off the grade crossing in Dividend. The gray you see is all foam core (without paper). I've filled in with DAP Vinyl Spackle.

Turns out, the spackle is really smooth and has none of the "concrete" looking texture of the foam core. But colored right it doesn't look too obvious (though I'll be looking for an alternative patching material - may try plaster). The spackle was first painted with the same base color as the road, then weathered with PanPastels. Did the same with the large parking/truck area (including oil/grease drips under where the engines of the loading trucks would be).

Remember the uniform-looking ties? Well, I spent a fun evening (truly!) listening to a couple of podcasts and drybrushing ties. Click here & scroll down for details on the process I use. IMO, the results are VERY much worth it!

So there you have it - progress over the course of a few weeknights and a weekend. It's still glacially slow, IMO, but at least I continue to move forward.

But now, I have some "honey-do" items that The Missus has been kind enough to let me postpone while I recover from legislative session. It's getting warmer though, and those projects can't be put off any longer. They're all outdoor projects, so don't be surprised if I pray for a little rain now and then! >:^)

Until next time - hope to see you back in Cromwell soon!


Monday, May 9, 2022

Modeling Monday: RMC Article & Cromwell Backdrop

With all the hubbub at work and end of session (finally!), I totally forgot to post here that I have an article in this month's Railroad Model Craftsman! (though, admittedly, I did post about it over at the Valley Local Facebook Group last week)


And this weekend - with some color help from the Missus - I finally got around to finishing that transition between road and backdrop.


Also this weekend, in addition to starting work in Cromwell (roads, sidewalks, building placement, and such), I used this article as a guide to starting the backdrop . . . 

Long time readers will recognize the photo I started with: 
Source: Dodd Research Center, University of Connecticut, via Robert J. Belletzkie. Max Miller Collection.

This is the Middlesex Turnpike in Cromwell, looking north across the Valley Line. Though the quality/resolution of the photo itself isn't great, it's shot from the perfect vantage point for use on my layout - and it even has the proper-era vehicles.

The main problem is - it's a black & white photo.

No problem though (see RMC article above - and go here if you need a copy :^), I used an online colorizer (in this case, MyHeritage) to make it suitable for photo backdrop use:

These colorizers are super quick and easy to use. Now for the real work. . .

First step was to bring the photo into PhotoShop Elements and crop it (can't have the Valley Line in the background and foreground both!


Cropping was easy enough, but I had a LOT of photo editing to do. Here's a short list of what I wanted to do, from left to right:
  • Remove right edge of diner
  • Remove sparse trees, and fill in others
  • Remove light pole
  • Remove power lines
  • Remove white flag pole
  • Remove black sign and reconstruct rear fender of white car
  • Remove crossing sign pole & sign
  • Fill sky with "sky color" to match paint color on my masonite backdrop
Here's the result (as always, you can click on the image for a larger view:


Using the hill on the right (view block between Cromwell and Dividend) and the buildings on the left as the "bookends", I determined I'd need this section of backdrop to be 24" wide and 6" high. You can barely make out two people in the Cromwell photo, so I scaled the photo so that they'd be about 5/8" tall (instead of a typical HO scale height of 3/4", to account for the fact that the scene is in the distance).

So here's where things currently stand... the "canvas" is 6"x24" & filled with my "sky color" and the rescaled photo is in place. I determined its exact location by noting where my foreground road centerline hit the backdrop and then locating the road centerline of the photo at that same location.

After obsessing for, literally, years over the backdrop at Wethersfield (that's Jordan Lane in Wethersfield in the RMC article), I'm psyched that I'm not getting bogged down with the Cromwell backdrop. In fact, once I fill in to the right and left of the main photo (likely with trees), it'll be ready for printing and installation (click here the process I use).

In the meantime, I have plenty to keep me busy in Cromwell - including getting back to the roads, sidewalks, and structures... and of course, scenery. I'll be sure and post my progress here - and hope that you'll provide some helpful feedback/suggestions in the comments below. . .

Until next time!

Sunday, January 30, 2022

January Update & Feedback Solicitation

Taking a cue from my "accomplishments & goals" post at the beginning of the month - and figuring this will be a great way to hold myself accountable & give me a huge dose of motivation - here's what I have to report as progress during this most modeling season of modeling season months . . .

In short, I:

  • Painted my first HO scale figure
  • Painted the foundations at Hartford Rayon
  • Airbrushed/painted my 2nd-ever locomotive (1st since 1987(!) - and first loco decal job
  • Scratchbuilt a concrete loading dock
  • Fixed the foreground to background transition in East Berlin
  • Started - and finished! - the backdrop in Rocky Hill
  • Made significant progress on the Wethersfield backdrop (though some feedback would be welcome)
All but the figure painting were/are on my "2022 goals" list, so I'm starting the new year with a LOT of wind in my sails (and with the added motivation that Busy Time at Work starts Feb. 9 . . .)

Li'l Lionel


Folks over at the Valley Local Facebook Group (if you're on FB, be sure to join!) know about Lionel Strang's A Modeler's Life Podcast and his support of the Princess Margaret Hospital. This year, in addition to his fundraising walk, Bernard Hellen over at MiniPrints decided to offer this 3D scan of Lionel as an additional incentive to donors. Mike Budde even provided "Modeler's Life" decals to go on his shirt! The figure comes unpainted, and this was my first-ever attempt at figure painting. I think it came out pretty good - even the decal! By the way, this is 1/87th scale. He's glued to a wine cork for ease of handling - and that's my finger on the left. Talk about teeny tiny!

As soon as I shoot him with some Dullcoat to seal him, he'll come unglued and start riding the Valley Line!

Hartford Rayon Foundations

You may recall that this foundation needed to be raised on the aisle-side and leveled - and this resulted.

So I troweled on some spackle prior to painting it . . .


. . . and then chose a craft paint that would look the most like concrete - you can see the different sample swatches.

Since this foam soaked up paint like a sponge, I decided to paint only around the bottom of the structure.

And here's the result! Still need to add stairways and such . . .

. . . but I'm happy with how it came out. Turns out, this scrap foam insulation board from James Mayo has been a revelation! It has great texture for making concrete structures (as you'll see below) and it's super cheap! For more info, check out my original post on doing these foundations.

Airbrushing DEY-5 #0604

The first time I airbrushed a locomotive was about 35 years ago(!), and back then it was an Atlas S-2 (for more on that story, click here). What you see above is my second ever attempt at airbrushing a locomotive. And guess what? It's an Atlas S-2. Talk about coming full circle!

I'm pretty happy with how it's coming out though - especially with a custom NHRR-specific cab from NE Model Works. This will be DEY-5 #0604 - the power on PDX-2 which operates on the south end of the Valley Line.
(click here decaling details)

Concrete Loading Dock

To get the right size - and to avoid having to go back & forth so often between site and workbench - I made a quick template of the area.

I started with more foam board scrap and rough dimensions from the site and other loading docks.


To cut the ramp, I marked the top edge with tape and used a razor saw at an angle.

The dock was a little lower than a freight car floor, so I used some strip styrene to raise it up a bit. Aleen's Quick Grab Tacky Glue worked great for this.

Next, I painted it with my go-to color of craft paint for concrete color. The hole on the left will accommodate a crane I got from Dave Messer.

Making the dock itself was really easy, but it looked pretty plain. So I added some "RR ties" and nut-bolt-washer castings for guard rails and bumping posts.

I "creosoted" the ties with, I think, 4-5 washes of India ink and alcohol.

And weathered the dock with a variety of powders & chalks - black, rust, brown.

And here it is in place at East Berlin. I still need to "plant" it with some ground goop, weeds, and grass. Its primary purpose is to provide a way to load pallets of bricks from local brickyards, but as a team track ("bulk track" on the New Haven) I can ship/receive just about anything - especially with that cool crane!

East Berlin Scenery Fix

Before planting the dock though, I wanted to fix something that's been bugging me for a while here - namely, that "berm" of ground up leaves & twigs at the bottom of the backdrop. I think the thinking here was that that would be a forest floor and I'd have lots of trees planted there. But that's not how the scene has evolved.

So I decided to try and "bring the backdrop grass forward" and do my best to disguise the transition from foreground to backdrop. First though, I needed to protect the backdrop . . .

. . . then I spread on some glue . . .

. . . added a paper towel "mask" - purposefully staggering the edge . . .

. . . . and added static grass, trying my best to match the backdrop color. It's not perfect, but I think you'll agree it's an improvement!

Rocky Hill Backdrop
Long time readers know that I have a love/hate relationship when it comes to backdrops. I love the fact that they're "instant scenery" - but hate the work that they require. I take all my own backdrop photos in the area I'm modeling (being lucky to live near my prototype) and stitch them together using Photoshop Elements.  It seems I can never quite get the photo(s) I want/need and even my stripped-down version of Photoshop has a bit of a learning curve.  But I for some reason this month I really got the bit in my teeth to tackle the backdrops in Rocky Hill and even (gasp!) Wethersfield . . .

The Rocky Hill backdrop had stalled at the road. I just couldn't figure out how to do it - especially since I didn't have a suitable photo (despite having literally dozens of photos of roads-going-off-into-the-distance). Fortunately, Google Street View came to the rescue here. It's not the actual prototype road, but the view isn't TOO far off from what I imagine that road to have looked like in the late 1940s. So I printed it out and mocked it up.

My photo backdrop mockups are just printed out on copy paper - I'm only interested in size/scale & positioning at this point. I haven't found a way to print a banner in PSE, so I save the file as a PDF and print it using Adobe Acrobat. It's easy to align all the sheets of paper using a floorboard as a straightedge.

My final step before final printing at Staples (click here for more details of my process), is to select the sky and change it to the color of blue I use to paint my masonite. That ensures that any border above the tree tops/limbs isn't as noticeable. Above, you can see the mockup and the final print (which I've started to trim).

To attach the photo backdrop to the masonite, I first make sure I can slide it down between the scenery and the masonite - even cutting a slot in the scenery if necessary. Alternatively, you could trim the bottom of the photo to fit, but that doesn't allow you to move the print up/down for final positioning. Once the backdrop is in final position, I tape it to hold it in place, then - starting at one end - I peel it back from the top and brush on some wallpaper adhesive using a 1" brush. I smooth it out, being careful not to squeeze glue out the top of the print (if you do, just use a damp cloth to wipe it off). Once I've gone down the whole length of the photo, I go back and touch up any small areas at the top of the print with another application of adhesive, this time using a 1/4" brush.
(more details here)


And here it is in place. . .

I still have road blending to do, as well as scenery. but it sure looks better than the plain blue masonite. And it's done!

Wethersfield Backdrop
Ah yes - the notorious "Wethersfield backdrop" - the bane of the Valley Line's north end for years. I've mentioned before what a mental roadblock it's been since I know how the area is "supposed" to look during my era, and there's no way I can figure out how to replicate that. Well, not and have any time to do anything else in the hobby . . .

So I've finally decided to avoid making the perfect the enemy of the good and take an "impressionist" approach. No, not that - but just doing a backdrop that gives the impression of what I want to convey: Fairly flat former farmland, with a bit of autumn trees. Bonus if the terrain tilts up a bit toward the west (away from you & the aisle). Bigger bonus if the roads-into-the-backdrop look at least plausible for the area - and era. So I decided to experiment in earnest. . .

I went through a comprehensive process of trying different photos/panoramas, printing them out, and mocking them up. It's an iterative process of importing photos into PSE, stitching them together, using various tools to resize & blend them together, then doing a test print & fit on the layout.

Once you have something that works, you print it as a banner & start the painstaking process of trimming the sky. This photo is 7.25 feet long and took me over an hour and a half to trim.

This is the longest print I've trimmed so far. Thankfully, on this particular day, I had the AML crew to keep me company (via Zoom on the iPad/tripod)

One thing that looked great in the photos - but I'm not sure it's going to work on the backdrop - is this telephone pole. In hindsight, I think I would photoshop it out. But I'll live with it and see . . .

The last thing I did today was tape up the Wethersfield backdrop. It's quite a milestone to have gotten this far with it - finally. But it's not giving up without a fight . . . there's still a bit of obsessing left to do . . .

I can't figure out exactly where to place the backdrop vertically. To compare, I've taken 4 photos from the viewpoint of an HO scale figure. What do you think? (as always, you can click on the image to enlarge it)


While I can make persuasive arguments for/against any one of these positions (heh - welcome to the inner world of the obsessive. And I'm a lawyer on top of that. Pity me), I haven't decided which looks best and/or which one would provide the best basis for further blending/disguising with bushes, trees, and colors. For reference, the truck in the photo is the tiniest bit undersized from HO (an HO scale truck is in front of it).

I'm not too worried about the difference in color between the foreground & background roads - I'm confident I can deal with that. Also, with regard to the shoulders: if needed, I can either disguise/blend them with shrubbery or modify the existing scenery to "pull them forward" into the 3D scene.

I guess the main thing is to figure out what looks best from this perspective (considering future model photography) - while freely acknowledging that that might not look the best to viewers standing in the aisle (and over 100 scale feet above the scene).

Heh - unlike Rocky Hill, it's clear I can't call the Wethersfield backdrop done yet, but I sure have made some significant progress on it! And once I figure out final positioning, it's just a matter of gluing it to the masonite . . . and creating the REST of the backdrop south (left) to Goff Brook.

Thankfully, I'm still in "backdrop mode" - and I don't want to forget (again) all the Photoshop tools I've learned - so I'll keep at it until it's DONE!

<><><><><><><><><><><><><><><>
If you've made it this far, thanks for hanging in there! Like I said, I'm going to try and do at least weekly updates so I (and you) don't have to suffer through marathon posts. But I like to keep track of my progress - if nothing else, doing so reminds me not only that I have actually accomplished something on the layout but also spurs me on to accomplish even more.

Here's hoping you're able to take advantage of these winter weeks and make some progress on your projects as well. And if you do, be sure to let us know in the comments below!