Showing posts with label Scenery. Show all posts

Wednesday, November 27, 2024

In Lieu of Wordless Wednesday: Throwback Thursday Eve - On Giving Thanks and Making Trees


I think that I shall never see
A poem lovely as a tree.

A tree whose hungry mouth is prest
Against the earth’s sweet flowing breast;

A tree that looks at God all day,
And lifts her leafy arms to pray;

A tree that may in Summer wear
A nest of robins in her hair;

Upon whose bosom snow has lain;
Who intimately lives with rain.

Poems are made by fools like me,
But only God can make a tree.

You've likely heard - and perhaps even participated - in the debate of whether model railroading is art. But have you ever thought of it as worship or contemplation?

After being sick the past couple of weeks, I woke up recently feeling much better and noticed the beautiful sunrise from my back deck. The mood was enhanced by some nice seasonal music playing in the background (do yourself a favor and check out this song in particular). I couldn't help but try and capture it in the photograph above and the scene reminded me of the poem by Joyce Kilmer - " . . . only God can make a tree."


I think any time we engage in any creative endeavor, whether it be music, painting, dance, sculpture, or any of the arts - any time we create something for the purity of it itself - we are affirming our innate humanness and participating with God in Creation. While we can never be God, I believe our creative endeavors are reflections of the Imago Dei in our lives.

In this respect, our attempts at creating miniature worlds are echoes of our true identity as humans. We are born creators and while our attempts can never be any more than a mere reflections of the real world, I believe that the process of creating that world can itself be a contemplative exercise, affirming our humanity and providing an oasis in the midst of troubling times.

Is it any wonder, then, that a creative hobby can be so calming and restorative? And I think doing it can sometimes be an act of thanksgiving, thanking our Creator for the privilege of being able to participate in creation, in even a small way.

I've spent the past couple of Sunday afternoons dipping my toe in the deep end of this pool, trying my best to make some trees . . .

I started with armatures from Scenic Express, separating them into separate "trees" and spray painting them a medium gray color. When I was young, I always colored trees brown - but, turns out, they're often mostly shades of gray.

While the instructions recommend soaking the armatures in matte medium, I'm following the path many others have taken and am using hairspray (the cheapest, firmest hold you can get) to affix the "leaves" (various colors of flocking) to the armatures. I heavily spray the armature, then sprinkle the flocking over an old pie pan, which I then use to pour the excess flocking back into the container it came from.

It's a slow process - it took me an entire afternoon to do the trees you see above - but hopefully I'll get faster with practice.

But the results are definitely worth the time.

That's another thing I'm learning as I do more scenery on the layout: the time it takes often results in a better product, and the process itself can put you in a better, calmer, more contemplative frame of mind.

This Thanksgiving season, I hope you'll have a little extra time to spend working on your layouts - or doing whatever hobby you're in the mood for. And if you do, I hope you'll reflect on how blessed we are that, no matter what our level of skill or ability, we're able to create something that can bring us joy and maybe even a little peace.


From our home to yours, we wish you, your families and friends, a blessed Thanksgiving and holiday season.

(While this post was first published Thanksgiving, 2022 I think it fitting to repost in keeping with the spirit of the season, and to remind me to keep things in their proper perspective, being truly grateful for all my many blessings despite all that's going on in the world around us. I hope it helps you too during these difficult times.)

Thursday, November 23, 2023

Throwback Thursday: On Giving Thanks & Making Trees


I think that I shall never see
A poem lovely as a tree.

A tree whose hungry mouth is prest
Against the earth’s sweet flowing breast;

A tree that looks at God all day,
And lifts her leafy arms to pray;

A tree that may in Summer wear
A nest of robins in her hair;

Upon whose bosom snow has lain;
Who intimately lives with rain.

Poems are made by fools like me,
But only God can make a tree.

You've likely heard - and perhaps even participated - in the debate of whether model railroading is art. But have you ever thought of it as worship or contemplation?

After being sick all this past week, and almost missing Thanksgiving entirely, I woke up this morning feeling much better and noticed the beautiful sunrise from my back deck. The mood was enhanced by some nice seasonal music playing in the background (do yourself a favor and check out this song in particular). I couldn't help but try and capture it in the photograph above and the scene reminded me of the poem by Joyce Kilmer - " . . . only God can make a tree."


I think any time we engage in any creative endeavor, whether it be music, painting, dance, sculpture, or any of the arts - any time we create something for the purity of it itself - we are affirming our innate humanness and participating with God in Creation. While we can never be God, I believe our creative endeavors are reflections of the Imago Dei in our lives.

In this respect, our attempts at creating miniature worlds are echoes of our true identity as humans. We are born creators and while our attempts can never be any more than a mere reflections of the real world, I believe that the process of creating that world can itself be a contemplative exercise, affirming our humanity and providing an oasis in the midst of troubling times.

Is it any wonder, then, that a creative hobby can be so calming and restorative? And I think doing it can sometimes be an act of thanksgiving, thanking our Creator for the privilege of being able to participate in creation, in even a small way.

I've spent the past couple of Sunday afternoons dipping my toe in the deep end of this pool, trying my best to make some trees . . .

I started with armatures from Scenic Express, separating them into separate "trees" and spray painting them a medium gray color. When I was young, I always colored trees brown - but, turns out, they're often mostly shades of gray.

While the instructions recommend soaking the armatures in matte medium, I'm following the path many others have taken and am using hairspray (the cheapest, firmest hold you can get) to affix the "leaves" (various colors of flocking) to the armatures. I heavily spray the armature, then sprinkle the flocking over an old pie pan, which I then use to pour the excess flocking back into the container it came from.

It's a slow process - it took me an entire afternoon to do the trees you see above - but hopefully I'll get faster with practice.

But the results are definitely worth the time.

That's another thing I'm learning as I do more scenery on the layout: the time it takes often results in a better product, and the process itself can put you in a better, calmer, more contemplative frame of mind.

This Thanksgiving season, I hope you'll have a little extra time to spend working on your layouts - or doing whatever hobby you're in the mood for. And if you do, I hope you'll reflect on how blessed we are that, no matter what our level of skill or ability, we're able to create something that can bring us joy and maybe even a little peace.


From our home to yours, we wish you, your families and friends, a blessed Thanksgiving and holiday season.

(While this post was first published Thanksgiving, 2022 I think it fitting to repost in keeping with the spirit of the season, and to remind me to keep things in their proper perspective, being truly grateful for all my many blessings despite all that's going on in the world around us. I hope it helps you too during these difficult times.)

Friday, September 22, 2023

Starting Scenery in Deep River

In keeping with my "new approach" to blogging, here's a quick/short post on how I do my base layer of scenery (along with a couple of "oopsies"), using my latest effort in Deep River as an example.

Steps 1 & 2: Unfortunately, I don't have a photo of the 1st step. Instead of brushing on white glue as I typically do over a base that's been previously painted, I painted on a thick coat of my brown dirt paint in the areas that are going to be lots for parking/etc. and a thick coat of black paint for the main road area (like this). The photo above shows the 2nd step - a layer of fine dirt sifted all over the wet paint areas.

Step 3: Once that dried overnight, I reclaimed the dirt (even though it's "dirt cheap" it's still nice dirt to salvage!) by brushing it into piles and using an index card as a "dust pan" to collect it.

Brushing up the dirt not only leaves what's adhered to the layout, but also reveals variations in tone revealed by the underlying paint.

Close up of Depot Road (tar & dirt)

Step 4: Figuring grass typically goes over dirt, I added the base layer of vegetation next. I first brushed on straight white glue and then sifted on various colors of fine ground foam all over - Earth, Earth Blend, Green Blend, and - mostly - Burnt Grass. I also used Yellow fine turf sparingly as an accent color.

Step 5: I misted everything heavily with "wet" water from a fine mist sprayer. I used to use alcohol, but found that it tended to screw up my fine mist sprayers over time. So far, I haven't had this problem with the water/soap mix. And - bonus! - I think the water, since it takes longer to dry, gives the glue more time to wick up into the foam, which is what I want.

Step 6: You'll see areas where the water & glue saturated the foam a little too much. I just sprinkled more foam over those areas and let it all dry.

Step 0
It was at this point that I realized I'd gotten ahead of myself.
If you're going to weather the ties, weather your ties before dirt & ground foam!
This is especially important if you plan to apply your dirt over sidings.
So "Step 0" - the step I'll do first next time, before "Step 1" above - "Weather Ties."
 
Here's my tie weathering arsenal all laid out - various colors of gray and light brown craft paints, a palette, a cup of water (was well as a cup of coffee!), and an old small brush. Click here (and scroll down) for the details on this process, but to summarize it in a word: "Drybrushing".

As alluded to above, it's difficult - if not impossible - to get a good effect on track that's already ballasted, or on sidings that are already embedded in dirt. I could try, but I'd probably get paint on the dirt as well as the ties. So I'll leave these sidings alone and see if I actually notice the difference in the long run. The main line above though IS weathered, and you can certainly notice the difference there. But it was a pain to have to keep brushing/picking off ground from from the ties. Much better to weather the ties first.

And I even had to go back "south" of Deep River, past Old Deep River Road . . .

. . . and just about into Essex to weather the ties, after the base scenery had long been done here. Thankfully, I'd been able to get almost all of the fine ground foam off the ties first.

So there you have it - and I have a quick reference for next time I need to do base scenery. If you're at all like me, you have a really hard time getting started - especially on scenery. But hopefully you'll see (and I'll remind myself) how easy it really is to get started. And the results are HUGE!! There's no mistaking these areas for being "finished" - but BOY! - they certainly look better than just plain brown areas (or, worse, foam board or plywood areas!) and it immediately gives your layout a "more finished" look.

So get out an old paintbrush, some white glue, some dirt and fine ground foam, and have at it! But be sure and remember to paint and weather your track first!

Mill Hollow shows my first efforts at "finished" scenery, with just ground foam. Other than adding some polyfiber bushes though, this is only what I would consider "base" scenery nowadays. 

Monday, September 18, 2023

A New Approach to Blogging... And An Update (Fascia Painting, Scenery, and Repair)

At the risk of repeating myself, it's axiomatic that there's an inverse relationship between layout progress and blogging about the layout. Unless you're not doing either, which I hope isn't the case . . .

Well, it certainly hasn't been the case here on the Valley Line - I just can't believe it's been literally over two months since I posted an actual layout update. In my defense, we had a wonderful visit with my parents and a trip to Cape May during that time, not to mention trying to wring out as much as possible of the last weeks of summer, including a spectacular stargazing cruise.

And sure, I've uploaded quick little posts showing that I chased the modern-day Valley Local, started track weathering in Saybrook, and even did some rocks around Old Deep River Road and mocked-up a photo backdrop in the Deep River scene, but progress updates per se (not to mention posts about other things, op sessions, and such) have been harder for me to get around to posting.

So, instead of just blowing them off, I've decided to take the same approach to blogging as I have to the layout itself - tackle them one little bit at a time. If this new approach works, you can expect more frequent - but shorter - posts here at The Valley Local (though not as short as the "Wordless Wednesdays" I've limited myself to lately...).

#DoOneThing
At the risk of stepping on the toes of my good friend Tom Jacobs with his #AnHourADay, sometimes I don't even have an hour to spare - but if I can just #DoOneThing, progress will add up over time, a little bit at a time.

So, in preparation for an upcoming layout open house, I figured the biggest bang for my time would be to paint some fascia and put down some ground foam and I broke each of those projects down to smaller tasks I could do relatively quickly. . .

Fascia Painting
One of the selling points of model railroading to the Missus (not, to be fair, that she needed any convincing) is that so many of the skills you develop building a layout are transferrable to working on the house. Suffice it to say, I've become really good at patching/topping, and painting...

To wit - here are some "before" photos of the fascia:

Shailerville Bridge area

Somerset section and staging yard

I forgot to take a "before" photo of the Mill Hollow section, but here it is as the first of the "during" photos.


The process is pretty straightforward: I sanded down all the rough areas, spread lightweight spackle over the holes and gaps, and sanded smooth once dry. I repeated the process 2-3 times in order to get as smooth a base for painting as possible. I then rolled-on a primer coat of latex Kilz2, and a top coat of my agonizingly-chosen fascia color.

And here are the "after" photos - quite an improvement!

Shailerville Bridge

Somerset

Staging yard box

Mill Hollow section

Base Scenery
Eagle eyes might have noticed that the end of the peninsula in the foreground of the photo above has been transformed a bit. Yes - I've been confronting my scenery phobia by "just doing one thing" with regard to scenery, "just" doing a base coat of ground foam - and it's amazing what a difference it makes!

After a few fits and starts (one of the downsides of waiting too long between scenery sessions is that you have to relearn so much), I've settled on the following process for base scenery:

Step 1: Paint full-strength white glue over the area - in this case, dry brown ground goop (Sculptamold colored with latex paint color matched to the dirt I use).

Step 2: Sprinkle on a variety of different colors of fine ground foam, meant to represent the "thatch" below the static grass which will come later. In my case, I use the different Woodland Scenic colors in the above photo, using "Burnt Grass" the most.

Step 3: Dampen the foam with a mist of "wet" water and drizzle on diluted white glue to fix in place. One of the problems I had was that the foam ended up drying much darker than it went on. You can see the contrast between the glued/dried area and some dry foam I just added.

I actually came up with two solutions to this persistent problem:
1) I sprayed cheap hairspray as an adhesive and sprinkled new/dry foam on top of that; and
2) After wetting the foam as in step 3 above, I just added more ground foam on top of the wettest areas.

I'm happy to say, both approaches work fine. And - at the end of the day - as so many folks have reminded me: "It's scenery - you really can't mess it up!"

Speaking of messing up though, I realized almost too late that I should deal with the roads before adding the ground foam. Here, I used my tried-and-true technique for making "tar and dirt" roads by applying a thick coat of black paint and sifting dirt on top. Click here for more details about this process.

And here are the "finish" pics of the end of the peninsula. LONG way to go yet, but certainly gives it a base level of "finish" and it's much better than plain brown foam or Sculptamold!


"Fixing" Scenery - a.k.a. Scenery Over Scenery
I'm learning that effective scenery has a LOT to do with layering - texture over texture. The more layers and textures, the better your scenery will look.

But it's also true that you can apply more scenery over previously applied scenery to change the look or to repair an area that's bothering you.

Case in point: This "hole" in the scenery at Shailerville Bridge:

I don't remember whether the fascia was added before or after the scenery here, but I wanted to fill in this hole behind the bridge abutment and the gap behind the fascia. I'd already painted the fascia here (see earlier in this post :^) so first step was to mask it off to protect it.

Another view of the hole/gap. I suppose I could have passed it off as erosion - or just cut the fascia down to match, but the solution ended up being easy peasy.

First - just like the prototype would - I backfilled the area with "fill" - in this case, some of my handy dandy ground goop.

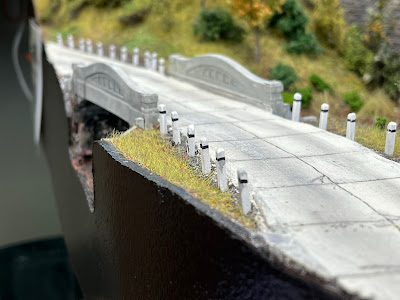
Next, I daubed some white glue on the area between the fascia and the poles and added some static grass.  By the way, the Woodland Scenics Static King is the BOMB - especially when used with the AC adaptor.

While the goop was still wet, I blew on some dirt using a folded index card to help direct it.

And here's the result - MUCH nicer, I think.

Of course, this is only a meager attempt to gild the lily - BillS is responsible for all the rest of this amazing scene. But hey, I filled in the hole! And painted the fascia . . .

I've made some additional progress on the layout since these photos were taken, but - in order to stay true to my new approach - I'll stop for now and will post more soon.

In the meantime, thank you for your patience with my spotty posting. In addition to more-frequent posts, there are some cool new developments coming in the next few weeks/months. So I hope you're able to stay on board The Valley Local - having you along for the ride makes this journey even more fun!


Monday, July 17, 2023

Painting Sculptamold, Filling Trenches, Coloring Rocks

As I mentioned in my last post, I've been striking a different balance between pre-work workouts and pre-work scenery work. For better or for worse, the scenery has been winning more often than the exercise.

So while my waistline may not be showing any positive effects of my current pre-work routine, the layout is certainly showing some signs of progress. Emulating my friend Tom Jacobs, "An Hour a Day" keeps the layout moving forward. Here's the latest since last time...

I added some skimcoats of plain ol' Sculptamold over top of the "popcorn"-effect ground goop fail to even things out a bit.

Once dry, I painted it all with my "dirt" colored paint (custom color matched to dirt I found/sifted from the area - turns out it's Behr "Davenport Tan" Go figure...)

One of the benefits of having "too much" layout (and, depending on your perspective, the downside of same), is that there's always something to do. So, while waiting for all the Sculptamold and paint to dry from Old Deep River Road north to East Haddam, I decided to turn my attention to Old Saybrook.

Now, the Saybrook Scene has been about 80% complete for years, with only the Route 1 overpass to be done, as well as finishing the backdrop. The overpass is being constructed by friend DickO, and I'm not quite ready to do the backdrop yet. So I figured I'd FINALLY (after 5 years?!) choose a ballast and get the ballasting done in the area.

But first, I needed to do some more minor terraforming - by which I mean . . .

Filling Trenches Between Tracks


When I first laid track through this area, I just laid it on cork roadbed placed side-by-side. But that results in a trench between tracks and - as you can see in the photo above - there are no such trenches on the prototype.


So I got the "bright" idea of filling in the trenches with a pouring of plaster - figuring it'd fill in nicely, find its own level, and level everything out.


Well, the "bright" idea turned out not to be so bright. Not only was the plaster-filled pitcher hard to maneuver around buildings and such, making it difficult to pour *just* in the trenches without pouring on the track too (I should have at least masked the track!), but in many places the plaster cured "proud" of the trench - where I had trenches before, now I had a BERM of all things!! So, as you can see above, I'm using a chisel to bring it back down . . . ugh.

Now, what I should have done, was either:

1) filled in the trench with play sand, leveled out and glued like ballast (as friends Seth and Bill suggested over at the Valley Local FB group), or
2) not worried about it and just filled the trenches with ballast during the regular ballasting (as friend Randy suggested, also over at the FB group).

This has definitely become a sad example of being penny wise (trying to save ballast) and pound foolish (having to spend so much time trying to salvage it).  Ah well, lesson learned - and a lesson worth sharing if it saves even one of you from making the same mistake!

Rock Casting & Coloring

If you were paying attention last week, you'll likely find the pic below familiar...


That's a LOT of rock castings! Thanks to Pete and Bob for loaning additional molds so I could cast a variety of different rocks which, as New England's most famous "crop," I need a LOT of . . .

I also wanted to have enough castings on-hand to try some different coloring techniques . . .


If you click on the image above, you can see the results. I think they came out pretty good but probably need at least a bit of drybrushing before placing them on the layout. And then, once on the layout, they'll need some vegetation (lichens, etc) added so really "plant" them in.

While I experimented with different coloring techniques, I ended up settling on a variation of the technique that worked so well for me last time. The results aren't as predictable or as repeatable as I'd like, but I suppose the inevitable variation is closer to nature than my left-brained preference would dictate. You can click here for the 3-step method I've used before - the only change these days being that I tend to "leopard spot" the color more than just brush it on as I describe in that post.

And to see how I did it recently (literally, just this past weekend), I created a quick (15 minute), impromptu (one take and done), video which you can click on below . . .


Let me know if you use this technique and/or if you have a technique that's worked well for you.

In the meantime, I'm going to get back to chiseling plaster berms in Saybrook and hopefully making more layout progress this week . . . or maybe I'll just go for a bike ride instead :^)