For many of us, having Labor Day Weekend in our rear-view mirror means that "Model Railroad Season" is upon us - that period of time, roughly Labor Day to Memorial Day, during which we spend the most time doing our hobby.
But if it's been a while since you've been down to the basement (or wherever your layout room is located), you may have a small sense of dread as you contemplate all you have to do. It's frustrating how persistent certain themes are in our hobby, and one of the most common is that sense of being overwhelmed by the prospect of building - or continuing to build/finish - a model railroad.
Even though I've been at this project for a while, and have had a lot of fun doing it along the way, I'm not immune from those feelings - and they tend to crop up at the least opportune times. So, for this "Throwback Thursday" I'm posting a little reminder - a post I posted a while back and which I go back to any time I'm feeling like I've bitten off more than I can chew. It's a nice reminder that you can even eat a whole elephant, provided you do it one small bit at a time. . .
If you could use a little encouragement as we enter hobby season, click here and enjoy! (incidentally, you'll notice that it looks like I hit this mood about every two years, but I'm about a month early for 2018 . . .%^)
And for additional perspectives from the MRH Forum, click here.

Showing posts with label Mistakes. Show all posts
Showing posts with label Mistakes. Show all posts
Thursday, September 13, 2018
Wednesday, August 8, 2018
Friday, January 12, 2018
The 20% Difference - Goff Brook Trouble Solved!
20% humidity, that is.
Based on a suggestion over at the Model Railroad Hobbyist blog, I got a "Breathe Easy" humidifier from WalMart on my way home from work last night, set it up under Goff Brook, and left it on for 24 hours. And Did Nothing Else. That's all I did. Behold!


I guess increasing the humidity from 15% to 35% (or, rather, allowing the the air to get so dry in the first place) really does make a difference. Not that I doubted any of the feedback I got, but it's amazing how profound the difference is.


I guess increasing the humidity from 15% to 35% (or, rather, allowing the the air to get so dry in the first place) really does make a difference. Not that I doubted any of the feedback I got, but it's amazing how profound the difference is.
Now the only downside is that I won't know whether any expansion gaps I cut will have made any difference. Looking back on it, I might have been better off cutting the gaps first and seeing if the rail would shift back into place before doing anything with the humidity.
But based on Joe Fugate's "Chester Principle" (belt and suspenders) as well as feedback from others, I'll probably go ahead and cut the gaps anyway. That should certainly prevent anything like this from happening in the future. And, having seen how the rest of the layout copes with "worst case/humidity scenario" now, I'm pretty confident it should all be ok.
Sunday, January 7, 2018
Trouble at Goff Brook
Looks like the line is going to be out-of-service for a while in the vicinity of Goff Brook . . .


I'm a little surprised I'm still getting this sort of problem since the layout (and the associated benchwork, etc.) has been in place for many years/winters now. But here you have it - apparently, the wood benchwork/subroadbed has shrunk and caused the track to lift where it isn't secured. The humidity in the basement is typically around 50-65% during most of the year, but as of today it's just below 15%. I don't want to have to get a humidifier down there, but may not be able to avoid it. . .
For now though, I guess I'll get out the Dremel and cut-off disk and gap the rails in the area - but it's mostly curved track (heh, horizontally not just vertically, as above %^) and I don't want to risk introducing any lateral kinks. And, of course, any gapping will likely require additional feeders to be installed.

And it's not only Goff Brook. Just a little north, near Valley Coal, this turnout is lifting as well. Heh - not gluing down the turnouts seemed like a smart idea at the time. Now I think - not so much.
Until I figure out how best to fix these problems, the track will continue to be OOS. That'll likely undermine the possibility of having a January ops session, but on the other hand that's one of the benefits of having a fairly large layout, made up of multiple branches: I could just operate on the other lines with a smaller number of folks.
The prototype had to deal with similar problems, so I'm not going to stress out about it too much. If you have any great suggestions on getting the track back in service asap I'd love to hear them :^)
Friday, November 24, 2017
Friday Fail - New Scenery Over Old
It's strange how the Model Railroad Muse behaves sometimes. I've gone for months (if not years) avoiding certain aspects of the hobby - scenery and airbrushing in particular - and then, AllOfASudden, The Muse strikes and I can't imagine doing anything else. That explains a bit why I jumped into scenery a bit last Sunday (I'll cover yesterday's airbrushing in another post). But sometimes jumping into the deep end of the pool isn't always the best way to get started.
Case in point: the team/bulk track at Somerset. I'd done the first pass of scenery in this area 8 years ago (almost to the day, as I discovered), but I hadn't ballasted/covered any of the track.
So - 8 yrs later - I figured I'd start finishing this area by "ballasting" (actually, adding dirt to) the siding/bulk/team track. Unfortunately, it turned out that I didn't have quite enough of the dirt material I needed, but I put down what I had left, soaked the area with 70% alcohol and then added 1:1 white glue:
Unfortunately, it looks like that may have been a mistake. I should have done all the scenery at the same time 8 years ago, because the previous scenery and "new" scenery ain't matching...
I took the photo above this morning, 3 days after soaking/gluing the area. It doesn't look like it, but it's actually all dry. But it obviously doesn't match - it's like I added a great big watermark to the area(!). What did I do wrong??
Lesson learned - do all scenery in an area at the same time, or else risk that it will "weather" differently and you won't be able to match it in the future.
So now the question is - What do I do about it? Any suggestions?
Case in point: the team/bulk track at Somerset. I'd done the first pass of scenery in this area 8 years ago (almost to the day, as I discovered), but I hadn't ballasted/covered any of the track.
 |
| Somerset - 11/27/2009 |
 |
| Tuesday, 11/21/17 |
 |
| Friday, 11/24/17 |
Lesson learned - do all scenery in an area at the same time, or else risk that it will "weather" differently and you won't be able to match it in the future.
So now the question is - What do I do about it? Any suggestions?
- If I had more of the dirt (which actually matched the old stuff in color and texture), I'd cover the dark area and just leave it loose without soaking/gluing it.
- I could try going over the dark area with PanPastels/chalk to try and match the color of the surrounding area (at least the texture is the same), but I think that'd look just as obvious - I won't be able to match the subtle gradations of color of the prior scenery.
- Alternatively I could go over the entire dirt area around the siding with some pastels/chalk to try and at least blend it all together.
- Last resort - I could spread some glue over the entire dirt area and add static grass.
That last idea would certainly kickstart my static grass practice, but talk about jumping in the deep end of the pool! I'm afraid that just might make things worse. Problem is - I don't know what I don't know - and certainly don't have the experience to know what to expect from these different options.
So I'm asking for any suggestions/advice on how best to proceed. What would you do?
Tuesday, October 18, 2016
"Too Much" - Two Years Later
I just realized that this past Sunday, October 16, marks exactly two years since I had a minor meltdown crisis in the hobby. I was about to give it up - I'd gotten in over my head and felt overwhelmed by the scope of the project I'd started. I thought I'd taken on way too much.
This feeling of being overextended in the hobby is pretty common and is fueling the popularity of starting small(er) and building layouts that are actually achievable. Admittedly, setting realistic goals based on your available resources of time, money, and help is critical to avoiding the indigestion of biting off more than you can chew. But what if you find yourself already in the middle of a large layout project?
Thankfully, I came out of the other side of that long tunnel and actually managed to expand the layout (actually, almost doubled the size), thanks toa little a lot of pushing help from my friends. But I had to go through a bit of a mental process before proceeding. If any of this sounds familiar to you, and you're considering giving up, I hope you find this (re)post encouraging.
(originally posted 10/16/2014)
I have a confession to make. I considered giving up the hobby recently. Now, lest you think me fickle, let me explain. My story might help if you've had the same feelings at some point.
So, I've stepped back from the ledge of layout oblivion and have, hopefully, rediscovered some of the motivation I've lost. I've taken a deep breath, reminded myself that this is supposed to be a hobby, and am focusing on doing smaller sections - and smaller projects - one at a time.
A couple of other things have helped as well:
This feeling of being overextended in the hobby is pretty common and is fueling the popularity of starting small(er) and building layouts that are actually achievable. Admittedly, setting realistic goals based on your available resources of time, money, and help is critical to avoiding the indigestion of biting off more than you can chew. But what if you find yourself already in the middle of a large layout project?
Thankfully, I came out of the other side of that long tunnel and actually managed to expand the layout (actually, almost doubled the size), thanks to
(originally posted 10/16/2014)
I have a confession to make. I considered giving up the hobby recently. Now, lest you think me fickle, let me explain. My story might help if you've had the same feelings at some point.
After making lots of progress over the summer, I found that I'd hit a roadblock unlike others I've confronted before. Like many layout builders, I've had to work through a variety of obstacles, but this was different. I started getting this growing sense of dread just about every time I'd think of going into the basement. There was just Too Much. Too Much to do, Too Much to build, Too Much to plaster & paint. Just. Too. Much. Instead of being fun, the layout started feeling a lot like a second job.
Some folks embrace this - Tony Koester comes to mind - explicitly stating that you have to have the mind of a project manager in order to stay disciplined, on task, on budget, and on time, or else you'll never finish. This of course makes lots of sense considering the magnitude of the project he's taken on. But size of project is relative. Depending on the level of detail you want, for example, even a relatively small layout can become overwhelming. Either way, building a layout starts feeling a lot like work and you'd rather model from the armchair - or worse, watch TV - than go back to the basement.
Most folks - especially model railroaders - believe you can never have enough. You never have enough space, rolling stock, engines, etc. So whenever you can, you buy, Buy, BUY and if you're blessed with a large space - especially a basement - You Must Fill It with all the layout you can. Sound familiar?
But this is a grave mistake. You end up with Too Much - a basement full of benchwork, but no scenery; shelves full of kits, but never enough time to build them all; grandiose plans, but little enthusiasm or energy to seeing them through to completion. And the hobby press sometimes - perhaps unwittingly - adds to the discouragement by highlighting impossibly large, beautifully finished layouts.
Is it any wonder that, in trying to figure out how to convert one's growing pile of stuff to the masterpiece in one's mind, so many of us throw up our hands in frustration and begin looking longingly at the armchair?
That's where I've been lately, but I think I'm finally starting to come out of the funk. I just wish I'd paid attention to all the advice out there to start small, build modules, or - most drastic of all - do a "chainsaw layout." But while it's too late to start over - and yes, I've considered it - I can change my mindset about what I have. I can treat each town on my layout as its own module, and concentrate on that. That'd certainly be less overwhelming than feeling like I have to build, scenic, and "structurize" all the way from Hartford to Middletown all at once and right away.
You can even eat an elephant if you do it just one small bite at a time.
You can even eat an elephant if you do it just one small bite at a time.
So, I've stepped back from the ledge of layout oblivion and have, hopefully, rediscovered some of the motivation I've lost. I've taken a deep breath, reminded myself that this is supposed to be a hobby, and am focusing on doing smaller sections - and smaller projects - one at a time.
A couple of other things have helped as well:
- Seeing some layouts on Facebook and such that are more "accessible" - by which I mean, are in a state where I find myself thinking "hey, I could do that" rather than "OMG - I could never do that!"
- Discovering some new photos of and information on the line I'm modeling, thus rekindling some of the passion for why I started this project in the first place (bonus: this can be one benefit of taking a sabbatical as an "armchair model railroader")
- And, perhaps most important, calling on a few friends to help me out. Too often we consider ourselves "lone wolf" modelers when sometimes - if not often - what we really need is the benefit of another set of eyes, another perspective, and - yes - another pair of hands helping out. I've been the beneficiary of this sort of help & support in the past; I just have to remember to tap into that whenever I'm feeling in a funk. Actually, that's pretty good advice for life generally. And with the internet and social networks, even the most remote of modelers can avoid being a lone wolf.
While you might sometimes find yourself under the burden of too much stuff to do on your layout, one thing you can truly never have too much of is the camaraderie, help, and support of your fellow model railroaders. Thanks to the readers & commenters on this blog - as well as to others who share their experience on their blogs, FB, etc. - for being such a big part of that network.
So stay tuned for more progress on The Valley Line - it may be a little slower, but it will hopefully be a lot more sure.
Thursday, November 12, 2015
All Sorts of Badness: Control Panels, LEDs, and Wasps
I looked forward to a recent evening alone to wire up my control panel, but things went very bad very fast . . .
Fist of all, the good news: the control panel came out beautifully . . .

Here it is just-about-completed, with holes drilled for all the toggles and LED indicator lights (and even some of the LED bulbs installed). It's a masonite board attached with a piano hinge to a 1x3 frame and plywood base. It even has cabinet magnets! Pretty jazzy, if I don't say so myself.Someday maybe I'll go into how I built it in a future post, but for now enjoy the pic above. Because I'm afraid I'm going to have to tear it apart.
Here's the problem: I figured the 1x8" masonite I had on-hand would be too flimsy & flexy for the 12.25" x 30.5" size panel I needed. So I got "clever" and got myself a 2' x 4' piece of 1/4" masonite.
MUCH more sturdy.
Veterans may see where this is going . . .
I got my first inkling something was wrong when the LEDs wouldn't quite snap into the cool LED bulb clips I'd bought. "No problem" I thought, stuipidly. "They'll just be a nice press fit."
But then, I had an awful thought - maybe the masonite was actually too thick(!) I quickly grabbed a spare toggle switch and test fit it into one of the 38 holes I'd drilled . . .

You can just barely see the threads poking through. And, no, that isn't enough for the locknut to even get a bite. Thanks for asking.
Here's what it's SUPPOSED to look like . . .

You guessed it - that's a piece of 1/8" masonite, just as the Control Panel Gods (must have) intended.
So, my question (though I'm afraid I might know the answer already): Do I really just have to suck it up and redo the panel using 1/8" masonite or is there some way I can salvage what I have? Please - if you've ever put off leaving a comment or contacting me and you have some helpful advice to share, please get in touch!
Next, I figured it best to step away from theabyss control panel for the time being and try a test wiring of my LEDs and turnout motors.
Yeah, I'm stupid that way.
You may recall that I'm using the MicroMark Switch Tender motors and really like them. But I think I may have uncovered a critical shortcoming.
I decided to use this video as a guide . . .

Fist of all, the good news: the control panel came out beautifully . . .

Here it is just-about-completed, with holes drilled for all the toggles and LED indicator lights (and even some of the LED bulbs installed). It's a masonite board attached with a piano hinge to a 1x3 frame and plywood base. It even has cabinet magnets! Pretty jazzy, if I don't say so myself.
Here's the problem: I figured the 1x8" masonite I had on-hand would be too flimsy & flexy for the 12.25" x 30.5" size panel I needed. So I got "clever" and got myself a 2' x 4' piece of 1/4" masonite.
MUCH more sturdy.
Veterans may see where this is going . . .
I got my first inkling something was wrong when the LEDs wouldn't quite snap into the cool LED bulb clips I'd bought. "No problem" I thought, stuipidly. "They'll just be a nice press fit."
But then, I had an awful thought - maybe the masonite was actually too thick(!) I quickly grabbed a spare toggle switch and test fit it into one of the 38 holes I'd drilled . . .

You can just barely see the threads poking through. And, no, that isn't enough for the locknut to even get a bite. Thanks for asking.
Here's what it's SUPPOSED to look like . . .

You guessed it - that's a piece of 1/8" masonite, just as the Control Panel Gods (must have) intended.
So, my question (though I'm afraid I might know the answer already): Do I really just have to suck it up and redo the panel using 1/8" masonite or is there some way I can salvage what I have? Please - if you've ever put off leaving a comment or contacting me and you have some helpful advice to share, please get in touch!
Next, I figured it best to step away from the
Yeah, I'm stupid that way.
You may recall that I'm using the MicroMark Switch Tender motors and really like them. But I think I may have uncovered a critical shortcoming.
I decided to use this video as a guide . . .
to wire these LEDs . ..

to the toggles and MicroMark machines. My plan was to have the LEDs indicate on the control panel which way the turnout is thrown. The video makes it look pretty easy and straightforward, but he seems to be using different LEDs and - perhaps most critically - he's using a Tortoise switch machine rather than the MicroMark.
So, I wired up a spare toggle and LEDs per the video's instruction, and - sure enough - the two LEDs would light alternately depending one which way the toggle was thrown.
But when I connected everything to the MicroMark machine, the machine would work (yay!), but the LEDs would no longer work (booo!). And I'm at a total loss as to why(?!)
And if all this wasn't enough, when I went downstairs to test all this, I noticed a strong mildew-y smell. I looked all over the floor - no water - and there's been none down there for years now (thankfully) and I didn't notice the smell before. Then I heard a buzzing . . . Flying overhead was a wasp. And I'm highly allergic to wasps.
So I hightailed it back upstairs and called it quits, figuring this was the 3rd of three strikes against model railroading for the year month week day at least.
ANY help/tips/suggestions/guidance you can offer about the control panel or the LED/switch motor wiring would be MUCHMUCHMUCH appreciated.
As for the wasp, I'll call my exterminator. Heh - maybe he's actually a mud dauber. That might explain the mildew smell. Otherwise, like the rest of the evening's work, I'm at a loss.
Tuesday, September 1, 2015
Fixing the West End Loop
You may recall that I made the mistake of cutting electrical gaps on a curve. With a temporary fix of reinforcing spikes, the resulting kink ended up ok for the open house - no derailments - but now that I'm getting close to covering over that west end loop with a 2nd level of track and scenery, it's time to do a permanent fix.
Here's how things looked:
As is often the case, ruminating about what to do - or, worse, doing something quick hoping it'll be permanent - usually takes more time than just doing the job right. I'd considered just soldering the rails in place - filling the gaps with solder and smoothing things out. Or at least doing the best I could.
But while things are still at this stage, I quickly concluded that I should just rip this out and start over. There's no ballast, no scenery, and the track isn't even glued down - it's just nailed. So removal wouldn't be that big a deal in the grand scheme of things.
Lesson learned: don't be afraid to redo something if it needs to be redone. And the sooner you do it, the sooner it's (re)done!
The first thing I needed to do to get started was detach the feeders. Fortunately, I've recently changed my process of connecting feeders to bus wires - using 18ga pigtails IDC'd to the bus, and wire-nutted to the 20ga feeders. Thus:

While it would have been easy enough to cut the feeders from the bus, I'd have to reattach them using additional IDCs. This way, I only have to twist off to disconnect and twist back on to reconnect.
 Once the feeders were disconnected, untwisted, and hanging down loosely....

I could easily lift the track (well, once I removed the track nails).

You can see here the result of straightening out the curve - the inside rail is much shorter. No problem, since I wanted to install a new piece of flextrack, I just needed to snip the rails even. It's important to solder flextrack together straight and then curve it. Makes for a smoother curve. Don't try to solder on the curve - you'll probably kink.

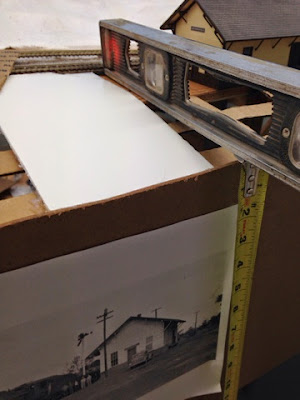
Once the new flextrack was added, I needed to solder it nice and level. As you can see, the track hanging out in midair would droop too much, so I supported it with some cardstock and a yardstick.

Here's how things looked:
 |
| Even with reinforcing spikes/nails, it ain't pretty |
 |
| And it looked even worse when I removed the spikes/nails. Clearly, the rails were under quite a bit of tension. |
But while things are still at this stage, I quickly concluded that I should just rip this out and start over. There's no ballast, no scenery, and the track isn't even glued down - it's just nailed. So removal wouldn't be that big a deal in the grand scheme of things.
Lesson learned: don't be afraid to redo something if it needs to be redone. And the sooner you do it, the sooner it's (re)done!
The first thing I needed to do to get started was detach the feeders. Fortunately, I've recently changed my process of connecting feeders to bus wires - using 18ga pigtails IDC'd to the bus, and wire-nutted to the 20ga feeders. Thus:

While it would have been easy enough to cut the feeders from the bus, I'd have to reattach them using additional IDCs. This way, I only have to twist off to disconnect and twist back on to reconnect.


I could easily lift the track (well, once I removed the track nails).

You can see here the result of straightening out the curve - the inside rail is much shorter. No problem, since I wanted to install a new piece of flextrack, I just needed to snip the rails even. It's important to solder flextrack together straight and then curve it. Makes for a smoother curve. Don't try to solder on the curve - you'll probably kink.

Once the new flextrack was added, I needed to solder it nice and level. As you can see, the track hanging out in midair would droop too much, so I supported it with some cardstock and a yardstick.

Once you solder the track together, nail it in place and repeat the process until you get around the curve. Or, as in my case, you get near a turnout that's already installed and you need to figure out a good - and kink-free - way of attaching everything.
So the above pic is where things stand until I figure out how best to reattach to the turnout. And good thing I stopped at this point - I'd forgotten I wanted to add a turnout to the curve in order to branch off into another small staging yard. But it turns out a #6 won't just drop in easily on a 24" radius curve, so I'll need to give this some more thought before proceeding.
No worries though - fixing that kink was a must-do anyway and the swing music playing on the iPad helped set the proper mood, making for a very enjoyable & relaxing way to spend the evening. And isn't that what this hobby is supposed to be about?
Monday, July 20, 2015
Great Idea (not!)
So, I thought it would be bright idea to cut my gaps in the curves on both ends of the dog bone in order to isolate the reversing section and make it as long as possible.

I just succeeded in ruining that curve and will have to redo it. Turns out cutting gaps on curves will introduce a kink in the curve.
So much for soldering the track to make it flow smoothly.
Don't make this mistake - learn from my stupidity. >:^)
Sunday, June 28, 2015
Look what I found

Yup - that's a pile of nice, brand-spankin'-new 1x3s. They were hidden behind the plywood & cardboard under the Old Saybrook section of the layout.
And I had literally just cut open the (now-extra) bundle I bought just about 30 minutes before discovering this pile.
So I guess the take-away is to try and keep better track of my materials. Not hiding them behind other things would be a great start.
At least now I don't have to worry about running out of 1x3s. Heck, I might even have enough to start another expansion...
Sunday, March 29, 2015
Oops!!
They say you should measure twice and cut once. Well, I measured twice and apparently cut twice.
Rookie mistake…

At least there's some good news – I have an arm full of 1x3s now that I didn't have before since I ripped them from old lumber. And the 4' x 8' sheet of Masonite that's been stored in the garage for weeks now finally got cut into two 2x8s for backdrops (it was that ripcut that resulted in the sawhorse cut).
Ah well - at least benchwork building can continue!
Ah well - at least benchwork building can continue!
Thursday, October 16, 2014
Too Much
I have a confession to make. I considered giving up the hobby recently. Now, lest you think me fickle, let me explain. My story might help if you've had the same feelings at some point.
So, I've stepped back from the ledge of layout oblivion and have, hopefully, rediscovered some of the motivation I've lost. I've taken a deep breath, reminded myself that this is supposed to be a hobby, and am focusing on doing smaller sections - and smaller projects - one at a time.
A couple of other things have helped as well:
After making lots of progress over the summer, I found that I'd hit a roadblock unlike others I've confronted before. Like many layout builders, I've had to work through a variety of obstacles, but this was different. I started getting this growing sense of dread just about every time I'd think of going into the basement. There was just Too Much. Too Much to do, Too Much to build, Too Much to plaster & paint. Just. Too. Much. Instead of being fun, the layout started feeling a lot like a second job.
Some folks embrace this - Tony Koester comes to mind - explicitly stating that you have to have the mind of a project manager in order to stay disciplined, on task, on budget, and on time, or else you'll never finish. This of course makes lots of sense considering the magnitude of the project he's taken on. But size of project is relative. Depending on the level of detail you want, for example, even a relatively small layout can become overwhelming. Either way, building a layout starts feeling a lot like work and you'd rather model from the armchair - or worse, watch TV - than go back to the basement.
Most folks - especially model railroaders - believe you can never have enough. You never have enough space, rolling stock, engines, etc. So whenever you can, you buy, Buy, BUY and if you're blessed with a large space - especially a basement - You Must Fill It with all the layout you can. Sound familiar?
But this is a grave mistake. You end up with Too Much - a basement full of benchwork, but no scenery; shelves full of kits, but never enough time to build them all; grandiose plans, but little enthusiasm or energy to seeing them through to completion. And the hobby press sometimes - perhaps unwittingly - adds to the discouragement by highlighting impossibly large, beautifully finished layouts.
Is it any wonder that, in trying to figure out how to convert one's growing pile of stuff to the masterpiece in one's mind, so many of us throw up our hands in frustration and begin looking longingly at the armchair?
That's where I've been lately, but I think I'm finally starting to come out of the funk. I just wish I'd paid attention to all the advice out there to start small, build modules, or - most drastic of all - do a "chainsaw layout." But while it's too late to start over - and yes, I've considered it - I can change my mindset about what I have. I can treat each town on my layout as its own module, and concentrate on that. That'd certainly be less overwhelming than feeling like I have to build, scenic, and "structurize" all the way from Hartford to Middletown all at once and right away.
You can even eat an elephant if you do it just one small bite at a time.
You can even eat an elephant if you do it just one small bite at a time.
So, I've stepped back from the ledge of layout oblivion and have, hopefully, rediscovered some of the motivation I've lost. I've taken a deep breath, reminded myself that this is supposed to be a hobby, and am focusing on doing smaller sections - and smaller projects - one at a time.
A couple of other things have helped as well:
- Seeing some layouts on Facebook and such that are more "accessible" - by which I mean, are in a state where I find myself thinking "hey, I could do that" rather than "OMG - I could never do that!"
- Discovering some new photos of and information on the line I'm modeling, thus rekindling some of the passion for why I started this project in the first place (bonus: this can be one benefit of taking a sabbatical as an "armchair model railroader")
- And, perhaps most important, calling on a few friends to help me out. Too often we consider ourselves "lone wolf" modelers when sometimes - if not often - what we really need is the benefit of another set of eyes, another perspective, and - yes - another pair of hands helping out. I've been the beneficiary of this sort of help & support in the past; I just have to remember to tap into that whenever I'm feeling in a funk. Actually, that's pretty good advice for life generally. And with the internet and social networks, even the most remote of modelers can avoid being a lone wolf.
While you might sometimes find yourself under the burden of too much stuff to do on your layout, one thing you can truly never have too much of is the camaraderie, help, and support of your fellow model railroaders. Thanks to the readers & commenters on this blog - as well as to others who share their experience on their blogs, FB, etc. - for being such a big part of that network.
So stay tuned for more progress on The Valley Line - it may be a little slower, but it will hopefully be a lot more sure.
Monday, September 22, 2014
Backdropping
Once I finally decided to bite the bullet and "do-over" my backdrop, I discovered that the actual logistics weren't as complicated as expected.
At least not so far.
When we last left this project, I'd gotten as far as attaching the first backdrop backer board. Since I didn't get all of the backer glued on before company started arriving that evening, my revised timetable was to get the rest of it done Friday after work so that I could put up the extension Saturday morning, then tape/spackle the seam Saturday evening, and paint Sunday morning. It almost worked out that way...
I have meetings after work every night this week and plans for all day Saturday, so the earliest I'm likely to get back to this is next Sunday(?!). But that's ok - as long as I'm making some progress, it's better than the no progress that usually happens (progress that usually doesn't happen?).
But I hope to have my next operating session sometime in October, so I gotta ramp things up get Wethersfield back to at least what it looked like before I started thisbackdrop dropping backdropping project. And if there's anything that motivates progress, it's the prospect of an upcoming operating session...
At least not so far.
When we last left this project, I'd gotten as far as attaching the first backdrop backer board. Since I didn't get all of the backer glued on before company started arriving that evening, my revised timetable was to get the rest of it done Friday after work so that I could put up the extension Saturday morning, then tape/spackle the seam Saturday evening, and paint Sunday morning. It almost worked out that way...
 |
| Here's a closeup of the first section of backdrop backer board, showing the detail at one of the backdrop supports. Note the offset backer to the backdrop backer board (all these Bs are getting ridiculous!) to create a nice flush mounting surface. As I described before, the backer board itself is glued to the back of the existing backdrop, acting as a splice between the existing backdrop and the extension.. |
 |
| Here's how thing looked Friday night - all the backdrop backer is now in and drying. Still on timetable at this point. |
 |
| Saturday morning, I removed all the clamps from the backer, confirmed that all was secure, scraped off any excess glue that would prevent the extension from mounting flush, and then applied glue to the back of the extension. NOTE TO SELF: if I ever have to do this again, I'll smooth out the glue. Leaving it like this created a lot of mess when I turned the extension vertical to mount it, and a bunch of the glue squeezed out and dripped on the floor. Glad I put down dropcloths! |
 |
| All clamped up & drying. The jaw depth of the clamps was barely enough to be sure I was able to clamp to the backer board itself - deeper jawed clamps would have been better. I lucked out. |
 |
| And here's how it looked at the end of Saturday morning. Unfortunately, that's how it still looks. We (I) got distracted by other things later that day and then had family over all day/night Sunday. So I'll try to get to taping next chance I get. That piece of scrap on the left there is my attempt to "extend" the clamping ability of my clamp a bit. I think it worked pretty well. Hope it didn't end up getting stuck with glue. |
But I hope to have my next operating session sometime in October, so I gotta ramp things up get Wethersfield back to at least what it looked like before I started this
Friday, September 19, 2014
The Do Over (An Antidote to Analysis & Progress Paralysis)
One of the biggest reasons folks never get started on a project is that they're afraid of not doing it "right." Consequently, they seldom even try. This "analysis paralysis" can afflict model railroads at all sorts of stages of development - from before birth (when a layout never gets started) to any point during its life. But when layout progress stops because you think you've gone too far down the wrong path, you may be suffering from a related affliction: "progress paralysis."
In either case, the remedy is the same: raising your comfort level with Doing It Over. Yes, the "Do Over" is something with which experienced model railroaders are all too familiar. They've come to realize that the only thing worse than doing something over is never doing it at all - and the regular progress of their layouts is testimony to their approach. Even one step back is progress if you eventually wind up with two steps forward. And you'll often get three or more steps forward if you've learned something new as a result.
Now, I don't consider myself an "experienced model railroader," having for far too long been content with armchair daydreaming (and my recent RR library weeding/reorganizing hasn't helped), but this layout project is teaching me - sometimes harshly - that I've got to get really comfortable with doing things over (or at least considering that possibility more often) if I'm going to be happy with the outcome.
Case in point: the backdrop in Wethersfield.
If you were reading this blog back in early June, you'll recall that I've been very dissatisfied with the backdrop. Long story short, it's too high - there's anywhere from 2-4" difference between the bottom of the backdrop and the top of the subroadbed. Making up that difference with terrain requires a slope from the track to the bottom of the backdrop and while there is slight slope east to west on the prototype (as the topography moves west from the Connecticut River), it's not nearly as steep as I'd need. Consequently, I extended the backdrop at the north end of Wethersfield where the prototype is the flattest.
But the more I research Wethersfield, the flatter I realize that it is and the more problematic the backdrop becomes. This problem became a major affliction once I started adding mockup structures - things just didn't look right, so I didn't want to continue to add mockups, and I didn't know what else to do, so layout progress stopped dead.
So, not having the backdrop extend down far enough (or failing to install it low enough in the first place) has been a big mistake and an enduring frustration. BUT! At least I have a backdrop, and a layout to have a backdrop on. I've started down this layout-building path and to continue forward I have to get over this affliction. So, I reach into the model railroad medicine cabinet and reach for a healthy dose of "Do Over."
Here's what I've done so far . . .
 |
| The easiest thing to do would be to unscrew the backdrop supports and drop it - but, as you can see, it's all nicely joined in to the wall. I don't want to have to redo all that. |
 |
| Wethersfield, looking south. Here's how things looked when I started - you can see the flat area to the right (north) and the previously extended portion of the backdrop. |
 |
| Wethersfield, looking south. This shows the difference in elevation. Prototype photos show the area as pretty flat. What really drove this home to me was that Valley Coal needs to go in this spot - and that whole area's supposed to be flat. And to be anywhere near prototype size, Valley Coal will have to right to the backdrop. |
 |
| Since I'd be removing the plastercloth, I figured there'd be a mess - so first order of business was to put down dropcloths. |
 |
| I used hot glue to attach the cardboard strips to the backdrop and plywood, so a putty knife was all I needed. Attaching the strips to the back side of the backdrop made the strips more difficult to remove, but was necessary in my attempt to keep the slope as low as possible. |
 |
| Here's the Church Street area where I used some foam board, which will stay. To get the slope here, I used a combination of cardboard strips and wadded up newspapers. |
 |
| What have I done?! |
 |
| Once everything was removed, I needed my backdrop extension and a backdrop, um, "backing." |
 |
| The backdrop backing will give me something to glue the backdrop extension to, so the seam doesn't just "float." The backing needs to go behind the current backdrop in order to act as a "splice" between the original backdrop and the extension. One problem with this is the backdrop support - I can't tuck the backing in. |
 |
| So I split the backing at this point and added some scrap wood for - heh - backing for the backing. I want to create a flush surface to attach the extension to. |
 |
| And here's where things are as of now - first section of backing all glued and clamped. Next step will be to install the backing to the left of the support - then I'll be able to install a long one-piece extension across it all. |
All of this took only a couple of hours, but I think I know it's going to be time very well spent in the long run. Pay attention when you have a problem nagging you. If that nagging persists, it could be a sign of a deep-seated affliction that won't leave. In extreme cases, it could evolve into full-blown progress paralysis. Be willing to do what it takes to address the problem, even if it means going back and doing it over again. Your layout will be much better off as a result.
Monday, June 23, 2014
3/4hr for 3/4"
Well, after all of the agonizing and wondering whether or not to try and change it, modifying the topography in Wethersfield ended up taking less than an hour total.
After this experience, I'd encourage you to make any changes sooner rather than later to things that are bugging you. It may - and likely will - be much easier to do than you think and you'll be happier in the long run.
Incidentally, I'm really happy with the traditional L-girder benchwork and masonite backdrop/fascia. It's certainly not innovative, this benchwork system has been around for probably 40-50 years, but I discover more and more how versatile it is - especially when you need to change things.
And as Trevor commented, it was more than well worth it – at least I think it's a huge improvement.
Check out the photos:
Check out the photos:
 |
| I started by lowering the background hill and hot-gluing in a backer so I'd have something to attach the new gap-filling plaster cloth to. |
 |
| Another view, looking "north" |
 |
| Then I clamped the fascia to hold it in place, removed the screws, raised the fascia (more than 3/4" as it turned out), and re-clamped, as here |
 |
| The raised, and now level, area around Fernwood Street (south of Jordan Lane w/a Ballantines mockup in the background) |
 |
| View looking "south" at Wethersfield station (from Fernwood St) |
 |
| And the "money shot" - the primary reason for doing what turned out to be a simple fix - to level out the station area to make it more prototypical |
 |
| Compared to what it looked like.... well, if you know anything at all about the prototype, there really is no comparison . |
Incidentally, I'm really happy with the traditional L-girder benchwork and masonite backdrop/fascia. It's certainly not innovative, this benchwork system has been around for probably 40-50 years, but I discover more and more how versatile it is - especially when you need to change things.
Saturday, June 21, 2014
When 3/4" makes a difference
I've been obsessing a little about the terrain and topography in Wethersfield - how, because of the way I constructed things, there is a slope where there shouldn't be a slope. Wethersfield is generally pretty flat but my layout – at least so far – isn't so flat.
This is primarily because of the way my backdrop and fascia turned out. As you can see in my previous post here.
But when I went to measure I discovered it's "only" 3/4" off:

Now that may not seem like a lot, and in the pictures perhaps you don't really get the full effect. But in this photograph you'll see what I mean:

This is a really iconic scene for Wethersfield and in fact for much of the layout. So I really want it to be as correct as possible.
This is primarily because of the way my backdrop and fascia turned out. As you can see in my previous post here.
But when I went to measure I discovered it's "only" 3/4" off:


Now that may not seem like a lot, and in the pictures perhaps you don't really get the full effect. But in this photograph you'll see what I mean:

That's quite a slope - especially when you compare it to the prototype here:
 |
| (apologies for the picture of a picture but this is just a quick drive-by post) |
So, I'm contemplating redoing the fascia somehow and after discussing things with Randy and Roman last Thursday I am seriously considering just laminating another piece of fascia over top of this one and bringing things up to level.
Fortunately, with benchwork you only have to do things once and you want them to be done right. Well, I guess you only need to do things twice(!) but then at least I should be really done and I think it will look a lot better.
Stay tuned to see how it turns out!
Subscribe to:
Posts (Atom)