Showing posts with label Tips. Show all posts

Tuesday, March 26, 2024

This is getting a little ridiculous - and a Tuesday Tip

My last actual update was way back on January 18 - before the big Springfield/Amherst show. Since then, all I've posted have been photos - and even those haven't been posted so often. I've missed more than a few Wordless Wednesdays along the way.

Unfortunately for this blog, the Valley Local Facebook group is much easier to post to. And even that has suffered these past couple of months due to a variety of things including the before and aftermath of the Springfield show, coming down with COVID, the start of my legislative session, helping a friend dismantle his layout, and having the basement flood. But not all of you are on Facebook, so you haven't seen any of those updates.

As for the layout, I have managed to do some more scenery in Saybrook - including installation of some walkways, finally finished the Sunset Diner in Cromwell - including a sign, and I ripped out and redid the scenery at Camp Bethel.

The last post in pictures showed all that, as well as the mocking up I'm doing in Middletown, and some photos of Pete's layout demolition. That last post is from over a month ago. For the last two weekends since then, I've been dealing with the basement flood and cleanup. Fortunately, the layout wasn't damaged.

I guess all this is by way of some excuse explanation for why the blog has suffered. I just don't have the time right now to keep up with it as regularly as I'd like. And what time I do have, I'd rather spend working on the layout rather than writing about it. Hopefully this'll change for the better when my time frees up after May 8 . . .

In the meantime, I will try to post here when I can share something quick and especially helpful - like window glazing. . .


I discovered a building I'd received some time ago from Bill Maguire had some windows that needed "glass." They're really nicely done windows - with top and bottom sashes on different planes, like the prototype. So, instead of cutting two little pieces of clear styrene really precisely per window (otherwise there would have been a gap between the "glass" and the lower sash), I decided to use some Microscale Micro Kristal Klear for glazing. I applied it with a toothpick around the edges of each opening, and then "pulled" it across the opening to basically create a bubble that covered the opening.

Then I set them aside to dry, face up. . . 


That ended up being a HUGE fail since the glazing oozed down to the work surface, essentially gluing the windows to the bench. Fortunately, I realized my mistake in time to pull up the windows and redo the glazing.

This time, I had them dry face down . . .


I'm pretty pleased with how they came out - especially when compared to the time it would have taken to cut up 12 little squares of styrene. If the sashes were on the same plane, I could have just gotten by with one large piece of styrene - not precision cut to fit - per window. But this process is quick enough.

If you try this technique, here are some Pro Tips:
  • Use the point of a toothpick to apply with some precision.
  • Apply to the back so you don't get any (or only little) material on the front.
  • Don't be bashful about the amount of material you use, just don't use so much you goop it all over the window. The material does shrink a bit when drying, so you need enough to be able to "pull" it over the entire opening.
  • Let the windows dry face down and/or on wax paper so they don't stick to the surface you're drying them on.
As they say, your mileage may vary, but I like this technique enough that I plan to use it in the future - unless/until I find some pre-cut microscope glass that'll fit :^)

Let me know if you try out the Kristal Klear and what you think about it.

And thanks also for sticking around. Unlike Facebook, I have no idea how many folks actually read the blog anymore, so it's good to know that you're out there.

In the meantime, I hope to make some more progress on the layout - and hope to have more time to share it with you here!

Till later...


Tuesday, January 11, 2022

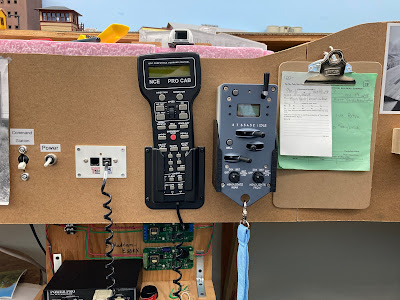
Tuesday Tip: ProtoThrottle Holder Mod

I ended 2021 by finally getting down to the basement and picking some low-hanging fruit. The first thing that I decided to tackle was to modify the throttle holder for my ProtoThrottle.

You see, I'd attached the "love handle" in a location on the back of the throttle that I found comfortable - but unfortunately, it wasn't until the adhesive was firmly secured that I realized that the throttle wouldn't seat all the way in the holder. UGH!

No worries though - I figured I'd make short work of modifying the holder to accommodate the throttle & handle.

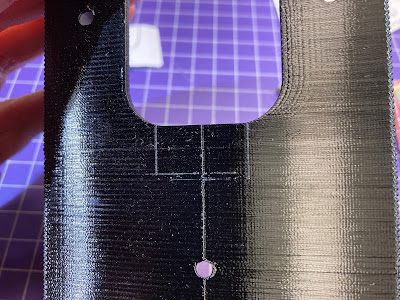
First step was to figure out how much material I'd have to remove. This was easily determined by seeing how much further the throttle would have to go down if it was firmly seated. The handle is7/8" wide and there was a gap of 1/2" between the throttle and the bottom of the holder.

So I marked off those dimensions . . .

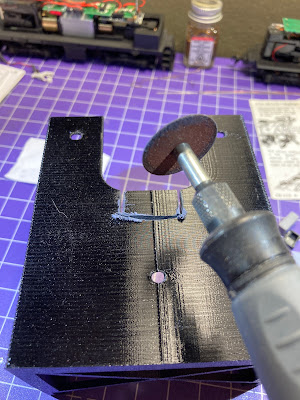
. . . and used a cut-off disk in my Dremel to make three quick, straight cuts.

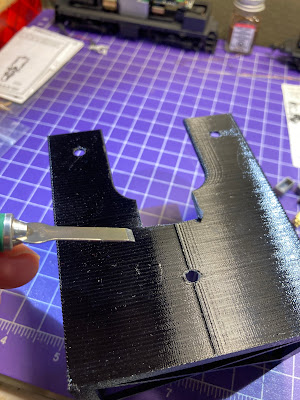
The cutting created some melted plastic around the cuts themselves, which I trimmed off with a chisel blade in my X-Acto knife.


Then it was just a matter of filing down the corners to make things look a bit nicer.

Here's the finished product, with the throttle firmly seated and the handle adequately accommodated.

Since the holder was finally finished, there was no longer any reason to hold off on installing it. Unfortunately, it didn't come with any mounting screws but I had some suitable ones on-hand (would've been more suitable if they'd been black though).

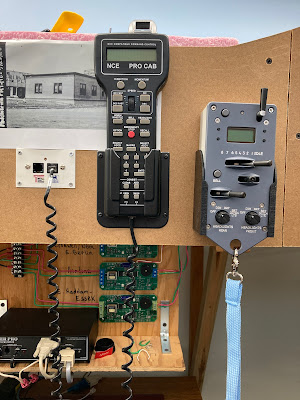
And here it is in place along with the other electronics under Middletown.

After a few days, I realized two things: 1) I'd mounted the throttle a bit too low on the fascia and figured it'd look better up higher. So I moved it. . .


and 2) I could probably have saved all this effort by just moving the "love handle" about 1/2" further up on the back of the throttle.


Ah well - at least this little project got me back in the basement after a long hiatus and kicked off the Winter 2022 modeling season. I suppose motivation sometimes arrives in mysterious fashion.


Monday, January 18, 2021

Tuesday Tip: Rock Coloring 1-2-3

How many of you have hit a roadblock in this hobby, coming face to face with a task that needed to be done and you didn't have the confidence or skill to confront it head on and Just Do It? For some, it's benchwork - and they never even start a layout, contenting themselves with being "armchair modelers" and dreaming about "someday" when they'll build a layout - as if reading Just One More Article will magically endow them with the tools & skills they need. Heck, the same thing can be said about so many aspects of the hobby, whether it's electrical work, trackwork, structure building, or - in my case - scenery.

But if I've resolved anything for this hobby in the New Year, it's to confront this obstacle head on. I've been lucky enough to have some early success - and even luckier to have friends that have helped me along the way (e.g. less than 1/2 of the finished scenery on the layout was actually done by me). Having others help you - or actually do the work for you - while wonderful, does little to nothing to help you build YOUR skill and proficiency.

You just have to do it yourself - and try, try again if at first you don't succeed.

Fortunately, I'm here to share one of the rare times when a seemingly-insurmountable scenery obstacle actually turned out to be No Big Deal. 

I'm talking about rock coloring.

Before yesterday, I'd never colored any rock castings & the only ones on the layout were done by others. But modeling a line set in Southern New England pretty much guarantees that I have to figure out how to do rocks at some point. So, now that I'm working in Dividend and will be modeling a railroad cut through a hill, it was high time to figure out how to do it.

Bare castings

I'd made some rock castings some months ago - a pretty easy process, all things considered - but they'd sat for months in the glaring white of new plaster. So, figuring I had a bunch of "extras" to practice on, I did some quick research in my extensive library of scenery books and got to it.

The same castings, now colored

In the process I discovered a technique for coloring rocks that's ridiculously simple and produces rocks that look very similar to what I see along my RR ROW everyday. I've only been coloring rocks for 2 days, so I'm certainly no expert - but I hope by sharing this super-easy technique that you'll be encouraged to try coloring some rocks too. It really is as easy as 1-2-3.

The same castings once all dry

But first, you'll need some materials.

  • 3 Colors of Acrylic Craft Paint
    • I used Raw Sienna, Raw Umber, and Black ($.50 ea at Walmart)
  • Water
    • Regular tap water is fine
  • Brush
    • I used a 1/4" wide cheap china brush
  • Small Dixie Cups
    • Bonus if they're plastic, so you don't have to worry about them getting soggy
  • Medicine dosage cup
    • Optional - I have plenty on-hand and the measurement markings are handy
  • Stirring stick
Preparation

  • Measure out 1 tablespoon of water, and pour it into one of your cups.
    • Put 20 drops of Raw Sienna in the cup and mix it by stirring thoroughly
  • Measure out another tablespoon of water, and pour it into your second cup.
    • Put 20 drops of Raw Umber in the cup and mix it by stirring thoroughly.
  • Measure out a final tablespoon of water, and pour it into your final cup.
    • Put 7 drops of Black in the cup and mix it by stirring thoroughly.
Here's what you should have when you're done - 3 cups of very thin paint which we'll use to "wash" over the rock casting:


Coloring - Easy as 1-2-3

Here's the rock casting I started with - all nice and white plaster, but doesn't look like a rock.

Step 1 - Brush on Raw Sienna

Literally, just dip your brush in the cup of Raw Sienna wash and brush it all over the casting. If you get any pooled wash, just wipe your brush off on a paper towel and use the brush to daub up the puddle. When you're done, the casting will look like this:


Before you go to the next step, you need to let the casting dry. Acrylics dry relatively fast, but if you're impatient like me, you can use your wife's a hairdryer you bought just for such things to blow dry the casting much faster. Here it is once it's all dry:


Step 2 - Brush on Raw Umber

Yup - same "technique" - just dip your brush in the cup of Raw Umber wash and brush it all over the casting, using your brush to daub up any pooling as I described above. Here's the casting right after applying the Raw Umber wash:


And here it is after blow-drying:


Step 3 - Brush on Black

Can you guess what comes next? RIGHT! Just dip your brush in the cup of Black wash and brush it all over the casting, daubing up any pooling. The black really makes things start to pop. Here it is semi-wet:


And - voila! - here it is after blow-drying:


That is really all there is to it! Compare this "rock" to the stark-white plaster casting we started with. There's really no comparison. All of the variations of color really bring out the texture and make it look authentic. And, interestingly, different castings also take the colors a bit differently (as does different types and ages of plaster, apparently).

All that's left to do on this rock to is to weather it (if desired), maybe do some drybrushing to create more highlights, add some "mosses" and other vegetation (ground foam, etc), and - of course - place it on the layout. . . probably somewhere near the front, where such a wonderful bit of modeling can be seen and enjoyed.

I'm almost embarrassed to admit how long I'd put off coloring rocks - you can bet I would've tried it sooner if I'd realized it'd be this easy to do. Of course, this is just one technique - there are certainly others out there and you can play around with different colors to suit the locale you're modeling.

I hope seeing how crazy easy rock coloring is will encourage you to try it for yourself. And if you do, I hope you'll let us know and share your results with us in the comments below.

Happy Modeling & Rock On!*


*sorry - you didn't really think I could resist, did you?

Tuesday, July 7, 2020

Tuesday Tips

Some tips I learned or remembered during the past week's layout work:

  • Be sure the bottom of your backdrop is level or below your subroadbed height (unless you're modeling a mountainous area, I supposed), or else you may have to engage in some "backdropping."
  • Don't forget to install headblocks at your turnouts before painting your track (and definitely before doing scenery or ballast).
  • Make sure the foundations on your structures are tall enough so that the bottom of your freight doors are at the same height as a boxcar floor.
  • Use a respirator and/or open windows and run fans if you're painting track with aerosol spray paint. And be sure you don't spray so much that the pilot light on your furnace ignites the fumes and blows up your house (though you'll have a clean slate for your next layout, you probably won't be in any condition to actually build it).
  • If you get stuck on something while working on the layout (I dunno, for example, obsessing over how to do a particular backdrop), move on to something else. No matter how small your layout, there's always something "else" you can do.
  • Don't be afraid to redo something if you're not happy with it.
I'll probably forget a few of these (again) myself in the future, but hopefully writing them down here will help me remember them.

What are your favorite tips? What's been especially helpful to you lately to remember? Be sure to let us know in the comments!

Tuesday, May 5, 2020

Tuesday Tip: Razor Blades, Organizers, Tweezers, and Toothpicks

A couple of Christmases ago(!), I got some stacks of lumber to help detail my Wethersfield Lumber Company scene. Well, actually, they weren't stacks yet - they were in kit form. Ugh. Noch gives you enough material to do eight stacks of lumber in four different configurations. But you have to put them together.

Here's what you get in the box:


Looked a bit intimidating to me at first, but the key to success - other than being methodical and taking your time (and taking a break from it if it becomes too monotonous) - is to get back to basics:

  • Use a razor blade to remove the laser-cut parts from the carrier sheet
  • Use an organizer to keep all the like parts together and separate from one another (bonus if you label the compartments with the part numbers, or at least organize them in the order they'll be used)
  • Use a comfortable pair of tweezers to handle the parts
  • Use a toothpick to apply very small amounts of wood glue


Believe it or not, when you have the right tools, a nice area to work, and a little bit of patience, assembly actually becomes - dare I say it? - fun! It definitely helped to do this over a couple of evenings and not try to do them all in one sitting. It also helped to listen to some favorite model railroad podcasts along the way.

And before you know it, you'll be done and have some very nicely detailed lumber stacks for your layout!


Now I just gotta finish Wethersfield Lumber so I can have someplace to put these!

Tuesday, April 28, 2020

Tuesday Tip: Craft Paint Substitutes

I've mentioned before how much I like using craft paints for my modeling. They're a LOT less expensive than typical model paints ($.50-$1 for a 2 oz bottle, versus $3-4 for a .5 oz bottle) and you can usually find colors that are close to the model railroad colors we're familiar with (Click here for an alternative to grimy black). And before you get all technical about model paints being "finer," that may be so - but I've even airbrushed craft paints with no problem (click here for more on that).

So when I needed some "concrete" paint recently and realized that my bottle of Badger Model Flex "Concrete Gray" had dried up, The Missus helped me find an acceptable alternative - Folk Art "Barn Wood" #936.


Of course, YMMV, but the point is to give craft paints try. I wouldn't necessarily use them to paint my prized brass steam engines, but for most applications in our hobby, they're perfectly fine. And your wallet will thank you.

Tuesday, April 21, 2020

Tuesday Tips: Attending a Worldwide Virtual Convention & the Best Static Grass Glue?


If you follow the The Valley Local on Facebook (click here), you've already heard me mention a very cool event coming up this weekend! It's a Worldwide Virtual Convention hosted by the National Model Railroad Association - a full 24 hours of LIVE clinics and layout tours. And all you have to do to "attend" is to join the NMRA Facebook Group (click here) since they'll be hosting the live stream.

Joining the FB Group is free. All the convention will cost you is some sleep. Here's a list of list of all the events (click on the image for a larger view):

Image may contain: text

BION, I've tried to get them to shorten the longest title on the page . . . %^)

Hope you can join us - and if you do, let us know!

Now, on to today's tip . . .

One of the most frustrating things about using static grass is its tendency to just lay down and not do its job. It has only one job - and that's to stand nice and upright and, you know, look like "grass."

There are of course a few critical items that will help static grass perform its job: 1) a good static grass applicator, 2) a light mist of water to help conduct electricity, and 3) a vacuum to pull the grass vertically. But the 4th critical component is the glue you're using to stick the grass to your layout.

Facebook definitely has its drawbacks, but one of the things it's great for is following your favorite modelers and while checking out Mike Rose's latest efforts, he mentioned that one of the reasons his static grass comes out so nice is the type of glue he uses.

So, of course, I had to get some and try it out:

This is the stuff - Elmer's Carpenter's Wood Glue MAX

Here's what it looks like out of the bottle - it has some distinctive "specks" in it and it's definitely a bit thicker than the white glue I've been using.

If you're worried about the color, this is what it looks like when it's dry.
Don't let the color fool you - the key is to apply it and spread it as thinly as you can. And just do a small area at a time: apply/spread glue with a brush, spray a light mist of water for conductivity, put in your grounding pin, and sprinkle the grass on with your applicator. After waiting just a couple minutes or so, go over it with your vacuum - just close enough to "pull" the strands straight up, but not close enough to pull the strands out of the glue.

When you're done, it should look like this:


I'm always interested in learning how folks do their static grass. Different techniques may yield different results. And if there's anything that I'm discovering is important in making scenery effective, it's variation. So be sure to share your experience and tips in the comments!

Tuesday, April 14, 2020

Tuesday Tip: Wet Water

With the recent focus on layout progress during the past few weeks, I've failed to pass along a few tips I've gathered along the way. So be sure to check in over the next few Tuesdays for "Tuesday Tips" (actually, check in every day - easy if you subscribe to the blog by entering your email under the "Receive New Posts Automatically" spot in the upper left area of the page... just sayin' :^)

For this week, let's talk about how to make water just a bit, um, "wetter" . . .

If you've been in a hobby for any amount of time, you've probably heard of something strange called "wet" water. All it is is regular water with something added to break water's natural surface tension. When you spray it onto your scenery and scenery base prior to adding glue, the glue will flow much better. In fact, if you haven't broken the surface tension, the glue will just tend to bead up and never penetrate your scenery.

Luke Towan gives a great explanation about all this in this video. It's well worth the 3.5 minutes to watch it, but if you want just his formula for making "wet" water, here's a screenshot.


You may have heard about making wet water by "just adding a few drops of detergent" - well, now you have an actual formula you can follow for great results every time. Thanks Luke!

Tuesday, March 31, 2020

Tuesday Tip: Making Styrene Look Like Wood

I know there are a lot of different techniques out there for making styrene look like wood, but this is one I got from a video by Brett Wiley over at HO Scale Customs. I came across the video by accident, but the end product looked good and at under 9 minutes it was worth the time to watch.

I had a plastic station house base that had simulated wood walkways, so once The Missus confirmed that I had paints on-hand that were "close enough" to what Brett used (being a little colorblind, I often rely on her eyes), I decided to give this technique a try.

I'm glad I did - it took some time, but the technique was quick to learn and, best of all, the walkways looked like weathered wood when I was done.

You can follow along in the photos:

I started by spray painting a flat black base coat, then masked off the walkways. I used 6(!) different colors to get the effect. As always, you can click on the photos to get a larger view - and, in this case, the names of the colors. I used all Apple Barrel craft paints that cost $.50/2oz bottle at Wal-Mart & arranged them here left to right in order of use.
The colors Brett Wiley used are listed at the end of this post.

The first color - "Melted Chocolate" - gets brushed on pretty evenly, though you should let some of the black show through. This is one time when brush streaks are ok.

***Important: When you're done with a color, be sure it's dry before you apply the next color or else you risk just blending colors together rather than having them look distinct. I used The Missus' blow dryer between each color. YMMV (Your Missus May Vary)

For the rest of the colors, you use a drybrush technique. Dip your brush in the paint, then wipe it off on a paper towel so that only a tiny bit of paint remains on the brush. To make sure I don't have too much paint on the brush, I'll sometimes do a stroke or two on the masking tape to be sure. I drybrushed the second color - "Chestnut" - in the pic above.
(and in the background, you can see the well-used paper towel)

The next color was drybrushed "Khaki". At this point, with a lighter color, the walkways started to look a bit more like wood.

The next color - again, drybrushed - was "Territorial Beige"

Then I drybrushed "Elephant Gray" (the grays really started making the wood look weathered)

Finally, I applied "Country Gray" - again with the drybrush.

And here's the final result! Whattaya think?
It was nice to have a "practice" piece to work on - especially one that already had "wood grain" cast in. Of course, if you're using plain styrene you'll need to scribe your own boards and grain. There are other videos out there that show you how to do that.

And, speaking of videos, if you want to see how Brett did it - as well as the different colors he used, but sure to click here to check out his video. And if you do, tell him The Valley Local blog sent you :^)

I hope you'll try out this technique and that it works as well for you as it did for me. I look forward to using it on a bunch of Central Valley wood fences I have to do (which, in fact, was what Brett used in his video).

I also used this technique to make the wood in a barn craftsman kit look like old weathered wood. But since it was my first time doing it, I'd forgotten to use the blow dryer between colors and ended up blending a few. It still came out ok (I'll post the build soon), but I won't make that mistake again.

So that's your Tuesday Tip! If you do try this out and find it helpful, I hope you'll let us know in the comments.
* * * 
Just for reference, here are the paints that Brett Wiley used in his video:
  • Americana Bittersweet Chocolate
  • Folk Art Honeycomb 942
  • Folk Art Steel Gray 2561E
  • Craftsmart Dark Taupe
  • Craftsmart Light Taupe
  • Folk Art Boulder 4624
He also used a #5 round course brush

Tuesday, February 11, 2020

Tuesday Tip - Best Ever Roofing Material?

Every once in a while you come across a way of doing something that is so perfect and so obvious you think - "Now, why didn't I think of that?!" Well, that happened to me a few days ago when my buddy Randy suggested I try using medical tape for roofing material.

I'd been hemming and hawing about what to use on a few little garages I'm building, and even went so far as to do one with some old Campbell shingles I had lying around. But I didn't want to do THAT again if I could avoid it (no matter how great it looks - more on that later...). Besides, a little ol' garage in the late '40s would probably have simple rolled tarpaper roofing. I'd considered strips of paper, paper towel, or masking tape to simulate it - but Randy's suggestion was a game changer.


The stuff he uses is 3M paper medical tape. I took the pic above at my local Walmart, but you can get it at Amazon too (what can't you get from Amazon?)


I also had on-hand some paper medical tape left over from my crashing racing days. Here's a comparison of the two:


Randy's tape is on the left (he'd given me some to try) and my tape's on the right. I really like his better - it has a more pronounced texture and it's thinner. But I suppose I could use the other in a pinch (or if I wanted a slightly different look).


Since it's "tape" it has an adhesive backing, but Randy also uses Aleene's Tacky Glue to make sure it stays. It seemed sticky enough to me as-is, so I just applied it straight to the roof.  This was after I'd narrowed the tape by cutting it into 42" wide strips (in HO scale). The tape is actually 1" wide, and cutting it in half length-wise gives you strips just a bit over 3.5 feet wide in HO.


I started at the bottom edge of the roof and overlapped strips, working my way toward the top. I then added a 1' wide strip at the top for a peak cap which would "hang" 6 inches down each side. Next time, I'll overlap the strips to be a bit more even.


Once that's done, you can paint the tape with regular acrylics, or whatever else you like. Randy uses a rattle can of Rustoleum black primer. I just brushed on my "grimy black" craft paint (at $.50/ bottle, it's a bargain).

I painted the other roof - which was just the cardstock that came with the kit - with the same paint for comparison. Even with no weathering yet, I think you'll agree that the roof with the medical tape came out MUCH better (as always, you can click on the photo for a closer view). I can't wait to hit this with some chalks and PanPastels - I think the texture will really stand out and grab the colors.

So that's a little tip, by way of my buddy Randy, and just a quick glance into what I've been working on lately. Hope to have a more about these garages posted soon. In the meantime, I hope you'll try using medical tape for tarpaper roofing - and if you do, let us know!