
Well, looks like I do. The iPhone photos I take for this blog - while nice enough - don't really cut it when it comes to trying to get a photo published. Go figure %^)
Soooo..... I've gotten back into things a bit by doing some research and trying to catch up. I'd purchased a second-hand Nikon Coolpix P4 a few years back, but having a "camera" in my pocket, I wasn't motivated to learn much about it. But during my research, I heard about an old article by Brooks Stover in the 2011 issue of Great Model Railroads where there was supposedly a sidebar about taking layout photos with a point and shoot digital camera. Thankfully, one of my friends had that issue and let me see the sidebar (thanks again Pieter!)
What a find! Turns out, Mr. Stover used a Nikon Coolpix P4 to shoot all the photos that were published in the article - AND his sidebar described a cool, homemade tripod he fashioned to get the camera in close to his models and still hold it level and steady.
Allofasudden, I had all the motivation I needed to learn how to get the same results from my P4. But first, I decided to make the tripod.
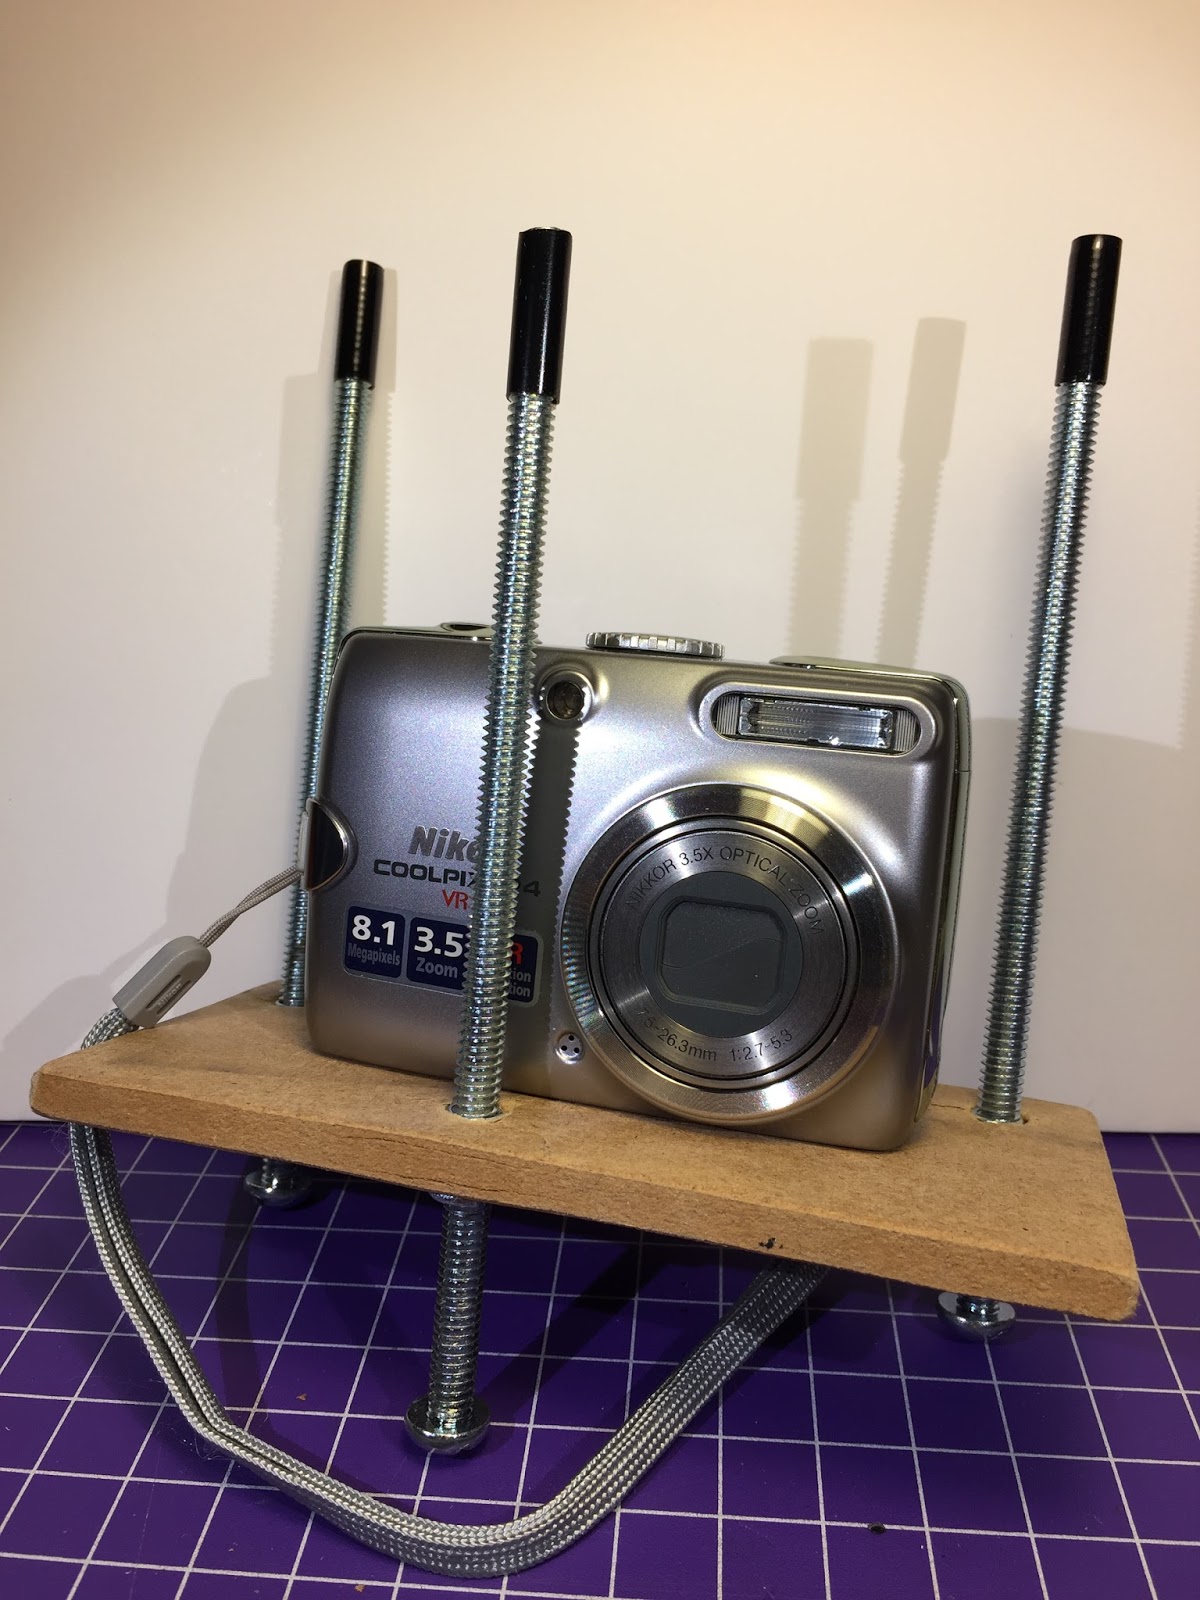
- One 1/4" piece of masonite, cut to 2.5" x 5.5" (or whatever size will accommodate your camera)
- Three 6" long 1/4"x20 carriage bolts (you can get by with shorter if your terrain is flat-ish)
- Three pieces of 1/4" heat shrink tubing, cut to 3/4" long

- Three 1/4" tall T-nuts, threaded for 1/4"x20
- One 1/4"x20 thumscrew, 1/4" long
- One 1/4" washer
Construction is pretty straightforward:
- Cut the masonite to size
- Center your camera on the masonite
- Eyeball where to locate the 3 carriage bolts. Mark & drill 5/16" holes
- With the camera centered, lift it up slightly at the front and mark where you see the tripod mount hole; do the same from the side, to give you the location for the tripod mount hole. Mark & drill a 5/16" hole
- Use a file/rasp to round all the edges/corners of the masonite and clean up the holes
- Press the T-nuts into the holes, place the masonite on top of a scrap piece of wood and hammer them in (I made the mistake of putting the masonite right on the concrete basement floor "for a good, solid backing" and promptly trashed the threads when they got banged into the floor)
- Thread the carriage bolts through the T-nuts; "screw on" the heat shrink tubing for "grips" (it'll thread on - no need to heat it)
- Add the washer to the thumbscrew, push it through the tripod hole and screw it into the camera to attach it to the masonite (the washer is necessary to keep the thumscrew from bottoming out in the camera's tripod mount hole)
It took almost as long to type all that out as it did to actually built the tripod. When you're done, you'll be able to use your camera like this:

Many of us have placed our camera phones and small P&S cameras right on the layout to get unique and more-realistic shots - that's the main advantage they have over full-size DSLR cameras. But in order to keep the camera perfectly still while taking those shots, you need to use the self-timer on your camera (or a Bluetooth/wireless shutter release), and if your camera has to rest on uneven terrain, you have to use a tripod - and this particular design is fully adjustable and not much larger than the camera itself.

Now that I've figured out the "stability" part of taking a good shot, I still need to work on lighting & white balance. I have LOTS of light on the layout - but they're all "daylight" fluorescents. Great for seeing car numbers, not so great for photography.

And they're all up above the layout, of course, which can create aggravating shadows. But using a "bounce fill card" (aka a sheet of white paper) brightens up some of the shadows, at least.

I've got a lot to learn and a long way to go, but after lots (and lots) of trial and error, I finally got what I think is a pretty decent shot of the Goff Brook Farmhouse. Of course, the background (wall, door) will have to be Photoshopped out, but the foreground looks pretty good. What do you think? Any and all constructive criticism wanted and welcome!
Shot Particulars:
- Nikon Coolpix P4
- Aperture Priority, stopped down to the smallest available, f7.6
- 1/9th sec
- ISO 50, 8 megapixel, "Fine" setting (highest quality options available)
- Macro setting, auto focused
- 3264x2448 pixels; 300dpi
- Auto White Balance (layout lights only, no flash)
- Exposure Bias -0.3 step
No comments:
Post a Comment