The resulting, unsightly, gap needs to be addressed, so the barn needs a foundation.
To prep the site, I marked the barn's footprint . . .
And then scraped away the grass - or at least as much as I could.
I also created a template for the foundation by tracing the base of the barn onto some scrap paper, which I then cut out.
To make the foundation I needed, I used some stone wall molds I had on-hand.
I also used a couple of my favorite mixing pitchers - favorite since Anchor Hocking was the main sponsor of one of my favorite old-time radio shows ("Anchor Hocking - The Most Famous Name in Glass")
I mixed some plaster, according to the instructions. I put the water in the larger pitcher since you have to add the plaster to the water.
Add the plaster slowly and then let it sit a bit. I forgot to let it sit and proceeded right to stirring/mixing. But I lucked out - it worked fine.
Pour the plaster into the mold slowly, filling all the corners but not overflowing. Once the mold is filled, tap on the table to encourage any bubbles to rise to the top and pop. Pro Tip: Don't do what I did and fill the molds to the very top - and slightly overflowing. That creates flash you'll just have to break off later - and the walls just have to be thick enough not to break.
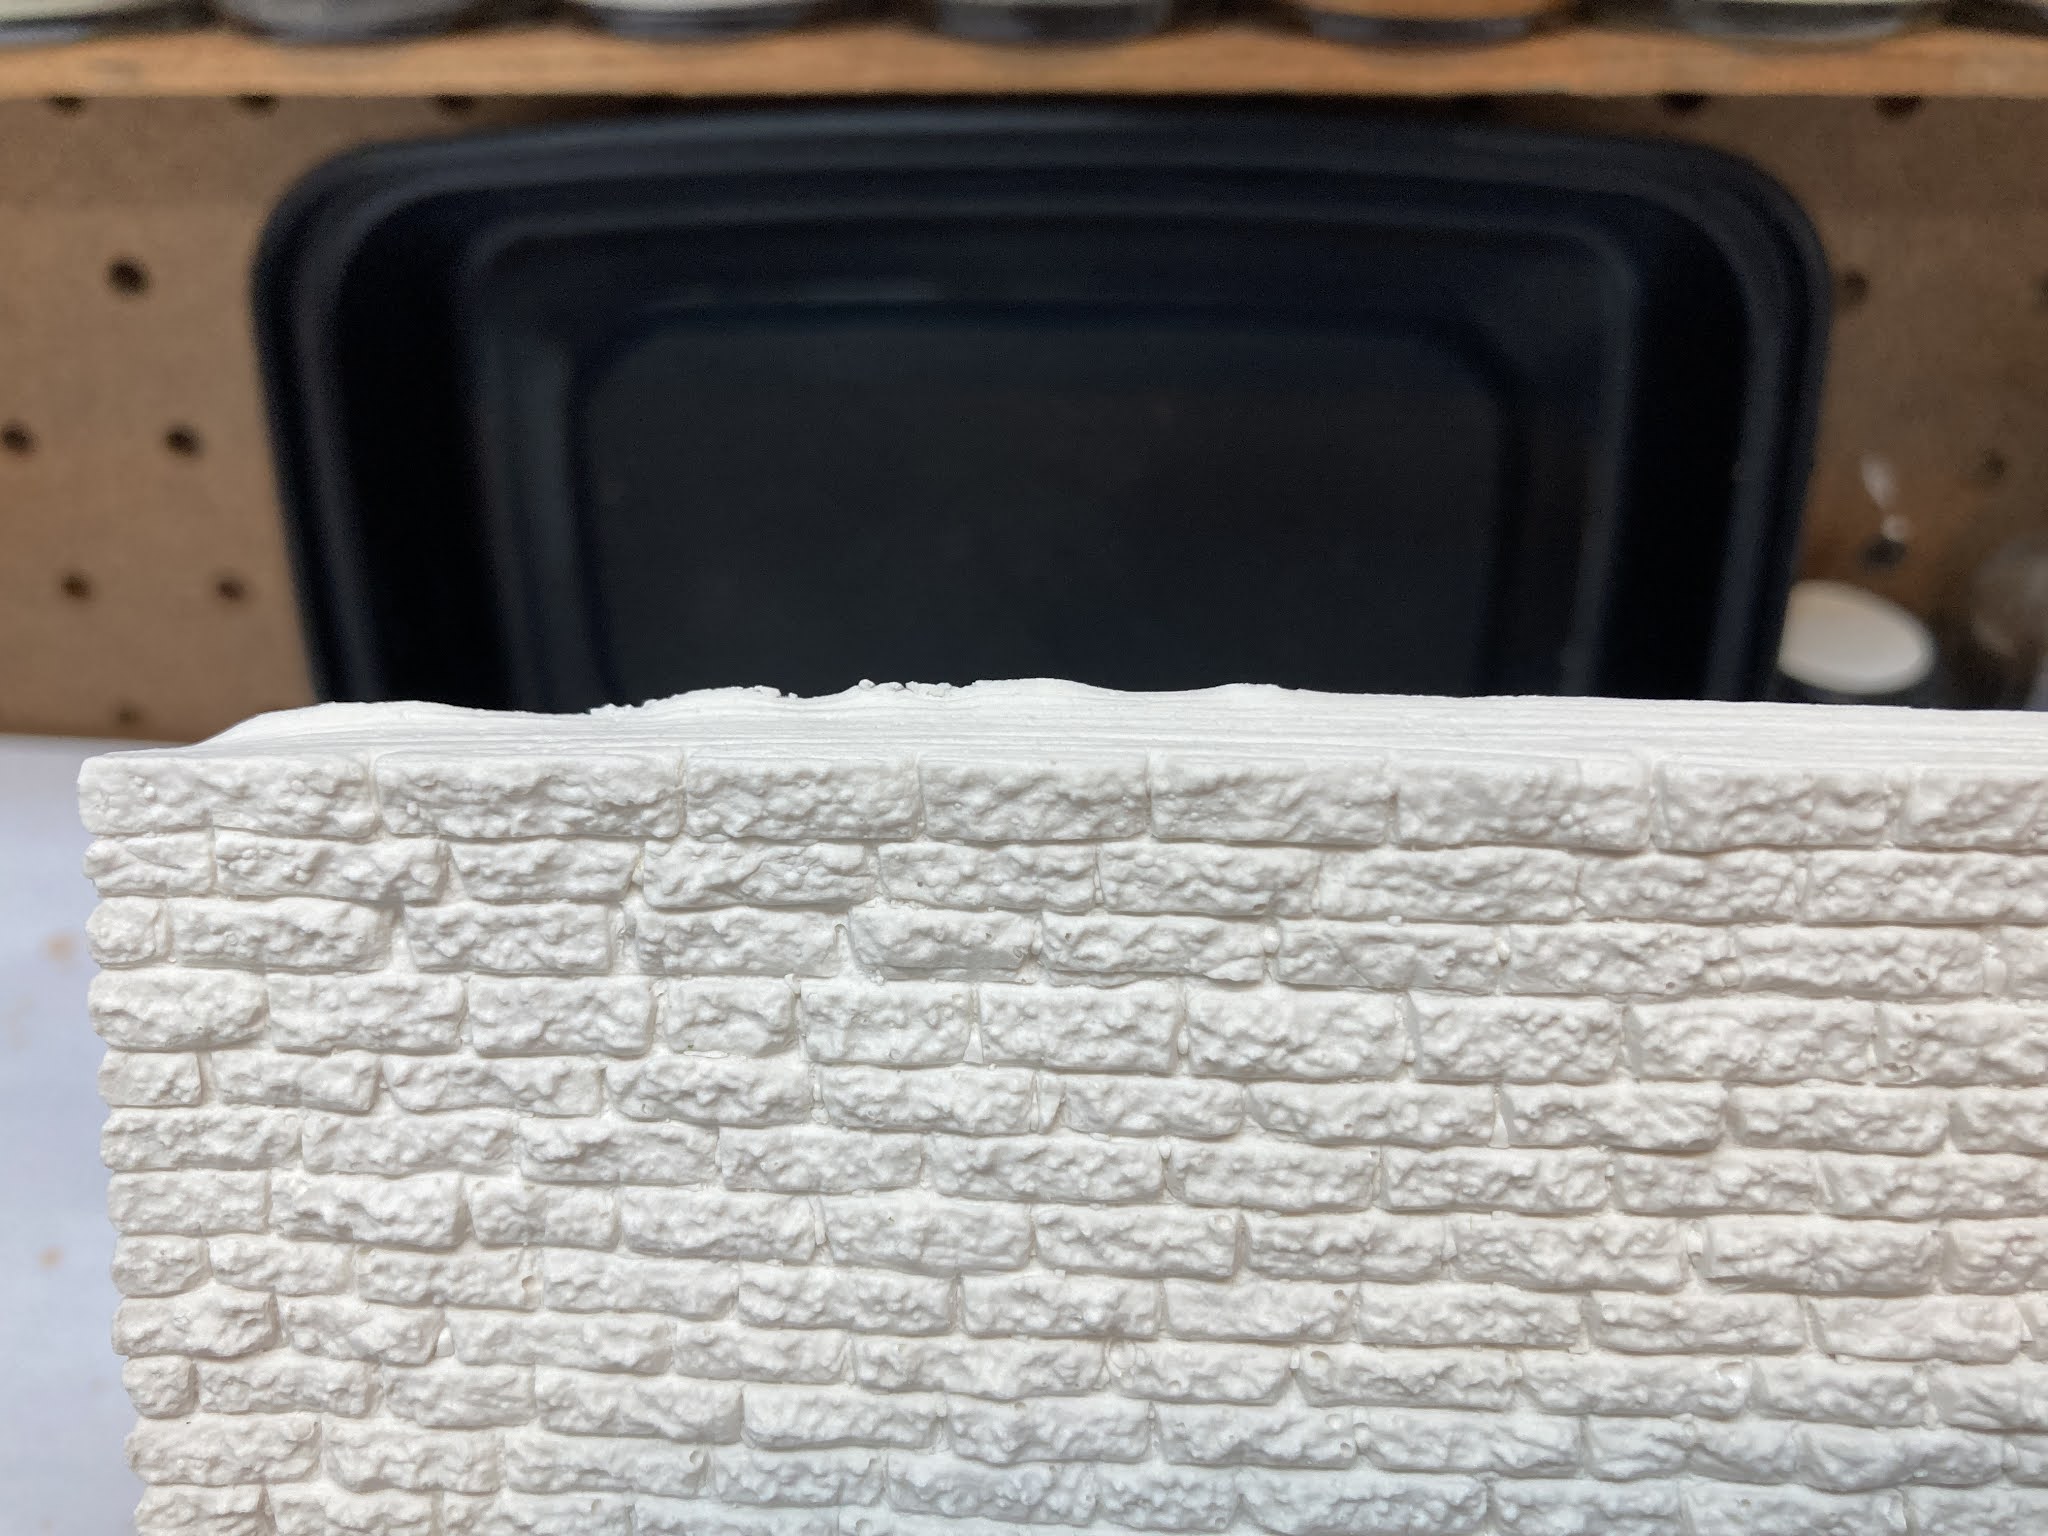
After breaking off the "flash" around the edges . . .
. . . you just have to sand the edges smooth and straight.
Obviously, this is a casting of a full, large wall. But we don't need much for a small foundation under the barn. So I just cut off two courses of stone. This is a slow process - and one that will probably dull your blade :^(
And the plaster is brittle, so be careful not to force things - or else you may break the casting :^(
Once I had enough run of material, it was time to cut the sections to fit. This is where the template comes in handy. I first cut one end at a 45 degree angle . . .
. . . then use the template to mark the outer end of the other angle.
I'd cut the first angle using a guide line I made using a protractor. Then I remembered (duh!) that I had this handy miter box.
Unfortunately, I didn't heed my own advice, forced things a bit, and broke the piece.
Fortunately, though, plain ol' white clue is the perfect adhesive for plaster - especially if the ends mate perfectly.
While white glue is perfect for joints that mate perfectly, I found that gap-filling ACC is great for joints that aren't so perfect. And no clamping required!
You may have noticed in the pics that I kept track of which ends joined together, as well as what side of each piece was the "top." I'd intended to assemble this upside down in order to keep the top edges all flat & flush with one another. But I somehow managed to forget.
So the next thing I have to do is sand or file the top to mill it down all nice and level. Otherwise, there'll be a gap between the barn and the foundation - which would kinda defeat the whole purpose of adding a foundation to begin with!
That's where things stand at the moment. Certainly not much left to do - just level then color. But I've been distracted by the backdrop in Dividend lately - and backdrops generally. . .
So, as things typically happen lately, I got distracted by work/life and am only just now getting around to sharing the result of the castings I poured over a week ago. And this time, I actually had enough room on my iPhone to shoot a proper video. Well - I don't know how "proper" but at least it didn't get cut off this time. . .
I'll never become a YouTuber, but let me know if you've been enjoying the videos and/or finding them helpful. If a picture is worth a thousand words, a video's gotta be worth even more. And it saves a lot of typing :^) And - bonus! - you actually get to see in kinda-real-time how things are working (or not - that's the joy of a "live" video).
But this is a blog after all, so here are some detail shots of the castings that I got. I don't know if I had beginner's luck or not, but I think they came out really well.
Unfortunately, there must have been some bubbling along a few of the girder edges though. You can see above what look like "chips" that broke off. Nope - that's how the casting came out. Should be a relatively simple matter of filling them in with either putty or strip styrene. I'll letcha know (or I might not even bother, since these will literally be painted black and put under a bridge back next to the backdrop...)
Speaking of bubbles...
Remember that beginner's luck I mentioned? Well, it wore off a bit with the second pour I did. My main mistake here was not overfilling the mold with the resin pour. As a result a lot of air - and thus, bubbles - got trapped under the acetate. Even WORSE - I tried to fix things by lifting the acetate up and smoothing the bubbles out. Big Mistake - that really just made things worse and created more bubbles. I would have been better off just placing the acetate,leaving it alone, and seeing what I ended up with, come what may.
Note to self: Always overfill the mold.
The beginner's luck didn't totally leave though, cuz the castings ended up ok. Yeah, there are a lot of voids, but they're either on the back (where they won't be seen) or actually in the casting (where they really won't be seen - especially after they're painted).
So, as I mentioned on the video, turns out I really only need two sets of girders in addition to the masters in order to have enough for the Rt. 15 overpass. But for that plan to work, I needed to be able to free the masters . . .
If you can remember waaaaay back when I first started this a couple weeks ago, I mentioned that I used some Aileen's to glue the masters onto the base of the foamcore box. Well, while it did take a bit more time than I expected, a soak in water did eventually allow me to carefully peel them off.
And there wasn't even any residue! Certainly no damage to the masters, which of course is awesome. I'll be sure to wash all the pieces thoroughly before painting though.
And that's it! At least for now, my resin casting efforts are going to take a back seat while I focus on some other things. Busy days at work will be ending in a few weeks and I've been immersed in shopping for a new car (mine just turned 180k and the Missus' car just turn 245k!). Unfortunately, my FIL is still in the hospital, but doing ok all things considered. It's just a long road. Thanks for your continued thoughts and prayers.
Before I do anything else though, I really REALLY need to clean up this mess %^)
****************
Thanks to all of you that attended the NMRA Nutmeg Division meeting yesterday and hung around for my presentation on Operating the Valley Line. You were a great audience and I got some good feedback that'll help me improve it for the upcoming NEPROTO Meet. Hope to see you there!
Ok, that was a little bit of a fail. That's what I get for not making sure that there's enough room on the phone for an actual helpful-length video. Since I don't want to leave you in SUSPENSE! suffice it to say that I was able to get the rubber mold out of the foamcore box. And here's what I had:
Not too bad - but I still got some seepage of rubber underneath the masters, despite running a bead of glue around the perimeter of each part. Next time, I'll make sure that the glue seeps out just a little around the edges - that should seal things nicely.
But that's next time. For now, I had some trimming to do. And, after trying even a sharp x-acto, I came up with the perfect solution - sprue nippers! As you can see above, they're straight and flush-cut ting. Just what I needed to go around trim off the extra rubber "flash."
Compare this photo with the "before" shot above, and I think you'll agree that the nippers worked great.
As before, I mixed the Parts A & B in equal measures together, then slowly poured into the mold doing my best to avoid bubbles. And - important (as I discovered later) - be sure to "overfill" the mold slightly.
Next, cover with acetate or plate glass/plexiglass to keep the backs of the castings flat. As you can see, a few bubbles resulted. I'm not sure yet how to avoid that and decided they didn't matter since they'd be on the back of the castings anyway.
Lastly, weigh it all down. I think that'll help a bit with the bubbles but we'll see.
It turned out that I ended up mixing a bit more resin than I needed and it had actually started to cure ever so slightly in the mixing cup. So I did an experiment and quickly poured the rest of it all into the gondola load mold I'd made before. Just a quick & dirty pour - and I didn't even bother with acetate or a weight.
And this is what you end up with (above). A very non-flat surface that's not only very uneven, but slightly humped. No matter though. Because: test.
This comparison shows you the difference the acetate/weight will make. Sure, the casting on the left has no bubble voids, but the casting on the right doesn't require lots of sanding to get everything flat and flush (though you may want to putty the holes - not really necessary on a gondola load).
So now I'll wait overnight to see how my *important* (i.e. "not test") castings come out. Since I've done a bit of practice, I've become much less intimidated by the whole casting process. At least I've cleared a lot of the fog for myself and removed some of the mystery. Hopefully that bodes well for what I hope will be some really nice girder pieces for the Rt. 15 overpass in Wethersfield.
Well, after doing a test run using an old scrap load as a master (click here, here, and here for details on the steps involved), I decided it was finally time to tackle the overpass.
I started with Mike's Shapeways parts as masters, which I'd primed last October(!). Here I'm trying to arrange them as efficiently as possible for the mold. I determined that about 8.5" across and 4.5" front to back would make a good footprint/base.
So I measured that all out on a piece of foamcore, cut out the base and then cut the sides at about 5/8" high. This would account for the thickness of the base (I glued the sides to the edges of the base rather than on top as I did before), the thickness of the parts, and still allow a 1/8-1/4" of rubber on top to cover everything adequately. In addition to hot gluing the sides to the edge of the base and to each other, I also ran a bead of glue inside each joint to ensure that the box was water rubber tight.
Next, instead of using hot glue, I decided to use quick drying Aleen's Tacky Glue to attach the parts to the base of the box. To (try and) ensure that no rubber would seep underneath the parts, I ran a bead of glue around the entire perimeter of each part to, hopefully, form a nice seal/barrier. I'm not too concerned about messing up the nice masters, since the Aleen's should just soak off with water. I guess we'll see.
After letting the glue cure for 4 hours or so, it was time to mix and pour the rubber. Here are the quick steps (but be sure to click here for a detailed post):
Make sure the mold box is level in all directions
Use rubber gloves
(this time I didn't apply any mold release)
Pour rubber mold material Part A into one cup and an equal portion of Part B in another cup
Mix together in a larger, clear cup (so you can see that it's mixed thoroughly)
Mix gently to reduce the number of bubbles
Let the mixture sit to allow as many bubbles as possible to come to the surface (this material has a 10 minute work time from mix to pour)
Pour the rubber into the mold from high up (12" +/-) if possible so you have a small, thin stream (again, to reduce bubbles), starting in one corner and covering the entire master. If you aren't comfortable pouring from that high - or if you can't maintain a steady stream - you can pour closer, just keep it flowing so as to reduce bubbles.
While I've enjoyed doing the videos, I wanted to try a new way to document these steps:
I set up my iPhone on a tripod and got a Bluetooth shutter release so I could take hands-free pictures during the process.
Here's the rubber mold material from the Micro-Mark resin casting starter set. Put some of Part A in one cup and an equal amount of Part B in another cup.
Then mix the two cups of material together in a third, clear cup. Be sure to scrape out all the material from each cup.
Then mix the two parts by slowly stirring them together. The clear cup helps you see how thoroughly you're mixing.
When it gets all thoroughly mixed together, you're ready to pour. Well, almost. Set the cup down and tap on the sides for a minute or so to encourage any bubbles to surface so they'll pop. Then pour.
This step is both the most fun - since it's cool to see it coming out of the cup and into the mold box - but also the most harrowing - since you're covering up, in this case, over $40 worth of parts with liquid rubber. Start in one corner . . .
and work your way around . . .
and all throughout the mold box, covering everything with hopefully enough material. You can see that I had extra cups waiting on standby in case I had to mix up more rubber quickly! You have about 7 minutes from mixing to pouring.
Use your stirrer to scrape out all the material - might as well be sure and use it all up!
The final step, like with the rubber in the cup, is to tap on either side of the mold box to encourage the bubbles to surface. And just because I have this handy-dandy camera & shutter release setup, I decided to do a video of this complicated process . . .
Tapping releases the bubbles and blowing across the surface helps them pop faster.
And here's what you end up with with your done - a nice, smooth swath of rubber. Whether it made a good mold or not remains to be seen. Until next time . . .