Friday, August 29, 2014

Research Resources: Hurricane Damage Photos

Prototype modelers have to become pretty adept at research and some of the common resources I've found that help me include Sanborn Fire Insurance Maps (for industry footprints, track layout), city directories (industry types/names), newspapers (events, often a photo resource).  Connecticut residents can access digital versions of Sanborn Maps and the Hartford Courant with a CT State Library Card.  Here's a link to the state library's database page where you can find more information about these resources.

Of course, I've also mentioned how valuable aerial photos are to prototype research - and I've used those extensively. Apropos the last two days' posts on Wethersfield Lumber Co., these aerial photos haven't been all that helpful. They show the buildings from above, but the photos are shot straight down - so all you really get is the footprint of the building. The lack of photos for Wethersfield Lumber (as well as other industries I want to model) has been a continuing source of frustration.

Well, the Blogoverse once again has come to the rescue, in the form of "Haksaw." He submitted a comment to yesterday's blog post pointing me in the direction of photos of damage from the 1938 Hurricane. I knew about UCONN's and the state library's aerial photo resources - and thought I'd mined them pretty thoroughly - but I'd never run across these!  They're aerial photos, but with a HUGE difference - instead of being shot straight down, they're taken at an angle (click here for an example) and from this perspective you can at least get some idea of what things actually looked like.

The Great New England Hurricane of 1938 (aka The Long Island Express, or more appropriately for a New Haven RR blog, The Yankee Clipper) was second only to Superstorm Sandy in property damage, but remains the deadliest hurricane to ever hit the region. Come September 21st, it will have been 76 years since it made landfall. In the days that followed, these photographs were taken to get some sense of the devastation. Fortunately, up around Wethersfield where I'm looking, the most apparent damage is flood damage. The buildings are still intact.

Including Wethersfield Lumber Company.


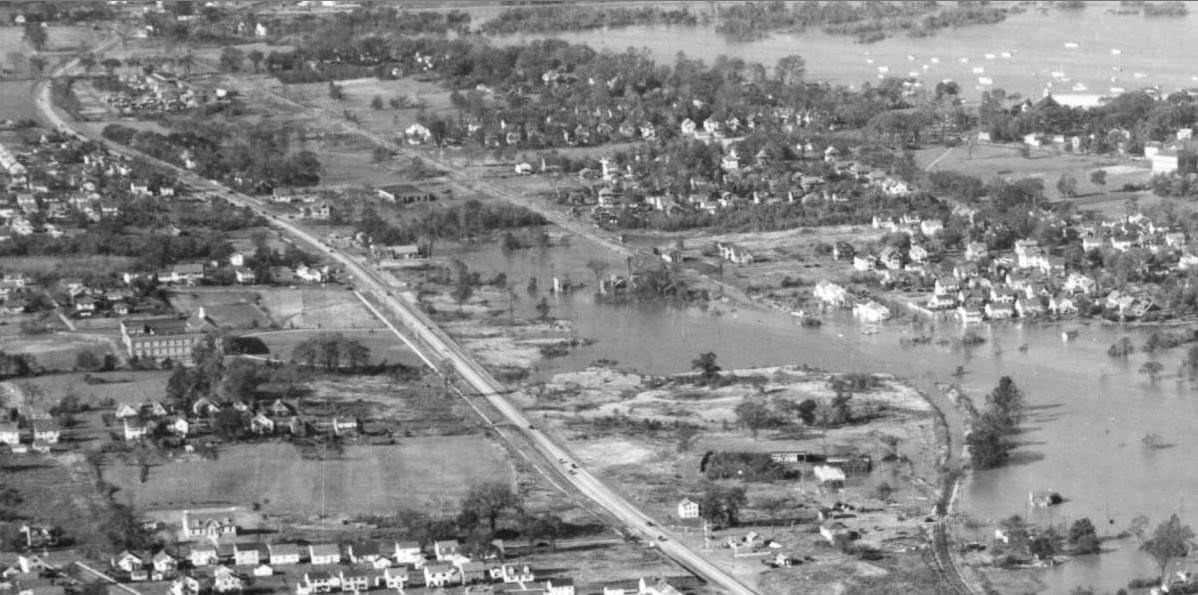
Above is an overview of Wethersfield ("photograph #00026" that Haksaw referred to in his comment). You're looking north and the diagonal line is the Silas Deane Hwy. Waaaay off in the distance, in the upper left hand corner, is the City of Hartford. Note the Traveler's (insurance co.) Tower - and also note how much LARGER it is than anything else in town (a bit of a metaphor, that). Of course, the main thing that strikes you is the flooding of the Connecticut river as a result of the hurricane. And the fact that there are few trees, and everything is so flat.

(BTW, as with all pics posted on the blog, you can click on them to get a larger view)


As we zoom in, you can see what is essentially the Wethersfield side of my main peninsula. You can just make out the railroad curving from near the lower right corner, going under water(!) the re-emerging to head straight north (and toward the upper left corner). In that upper left corner?  Wethersfield Lumber Co. (unforunately, Ballantine's Beer Distributors wouldn't be built across the street until the next year). Follow the railroad line back south and (barely) make out the Wethersfield station and Gra-Rock at Church Street (near the center of the photo), and then further south, inside that curve of the railroad track, you'll see Valley Coal.

That is an absolutely amazing view for this prototype modeler!


But we were focusing (literally and figuratively) on Wethersfield Lumber.  Here it is! Again, you can just make out the fact that the main lumber shed is the type that the track runs into (confirming the Sanborn map view), and check out all those lumber piles (that would later burn :^(


And, here it is at maximum zoom. The only problem with these photos - and most photos of the era, unfortunately - is that they aren't very high resolution.  So you can only zoom in so far before things go all blurry. But this is FAR more visual information than I've had on Wethersfield Lumber to date - and is certainly enough for me to get started on modeling it, with at least some confidence that it'll be pretty darn close to accurate.

I'm sure I've said it before, and I'm sure you've heard it said more eloquently elsewhere, but one of the pure joys of prototype modeling (and sometimes it's biggest frustration) is the research you have to do to make sure you're models are just right. And the process of searching for and, if you're lucky, actually finding that information is pretty darn close to time travel in my book. The Eureka! moments like these that happen totally outweigh any frustrations or limitations you might feel when following a prototype closely.

Thanks Haksaw for turning me on to this resource. It's certainly given me a great start to modeling the lumber company. Unfortunately, seeing this area being even flatter than I expected, I may end up having to rip out some cardboard lattice and plaster cloth.  All in the time of Prototype Fidelity, of course!

Thursday, August 28, 2014

A Few Words About Wordless Wednesday #32


This somewhat disturbing photo (though still neat, given the cars - and that it's in color) is the only known photograph of the Wethersfield Lumber Company (other than a newspaper photo of the fire, taken at night, that shows nothing really - other than fire). The first alarms sounded Friday night, May 20, 1955 - so this photograph was probably taken the next day. The fire was still burning. You can read more about it here.

Not to diminish the tragedy, but from a prototype modeler's perspective this photo is pretty frustrating. I really want to include the lumber company in my model of Wethersfield, but other than this photo, I have no idea what it looked like. And I'd rather not just model stacks and stacks of lumber.

One helpful sort suggested I change my modeling era from October, 1947 to June, 1955 - and just have a pile of ashes and a recently-decommissioned siding. Clever but, um, no.

Until I can find some other photo, I'm going to have to take my best guess based on the footprints on the Sanborn maps. That'll be ok for now and - bonus - if somebody tells me I'm wrong, that's ok. I'll just ask them to give me some evidence that I'm wrong. Of course, a photo would suffice.

In the meantime, if you or someone you know has any photos of the area around Jordan Lane and Silas Deane Highway in Wethersfield, CT, I'd sure like to see them. As it turns out, my other Holy Grail is any photo of the Ballantine's beer distribution warehouse - which was located right across the street from Wethersfield Lumber.

Heh - it'd be so much easier if I was a model railroader rather than a railroad modeler!

Tuesday, August 26, 2014

Middletown Tower: Roof, Windows, Painting

Have you ever been hijacked? Hopefully, not in the usual, scary, sense - but have you ever had your plans hijacked?

After a wonderful (and rare) day of railfanning Friday, I'd planned to get the Middletown Tower done (or just about) Saturday afternoon, and do some airbrushing on some other projects. The Missus and I had a few errands to run that morning, and I'd been planning on getting another dehumidifier for a while anyway, so while we were out I got one.

That ended up being a very good idea. When we got home, I decided to empty dehumidifier #1 so I could start it and the new one at the same time (and see which one would collect more water). I've just been dumping the water outside, but for some reason this time decided to dump it in our sump hole back in the oil tank room. As I did, I noticed that the floor was already wet . . . then I looked around and noticed the walls were wet(!)... then I looked some more and realized that a pipe was spurting water up near the floorboards. ARGH! It had already soaked the wall sills and insulation on top of the foundation - in fact, the water was even dripping outside from underneath the clapboards!

So, already-long-story short - I turned off the supply to that pipe (fortunately, it's only the pipe going to the outside spigots), got out my wet vac and some box fans - and my handy dandy new dehumidifier. Vacuumed what I could, and put the fans onto the rest. As of this morning, everything is nicely dried out - thankfully. Next thing is to get that pipe fixed.

But I didn't get to much modeling - that plan had been thoroughly hijacked.

I have a very supportive Missus though, and she wouldn't let me end what turned out to be a crappy day without at least a little fun. So she helped me pick out some paint and I got to work on the tower for an hour or so.


The other night, I got a little impatient and glued on the roof - telling myself that it was "necessary to hold everything square." Only slightly true: I actually wanted to see how it would look. Unfortunately, I'd forgotten to put in the window glazing first. So what should have been a very easy job became a bit less easy. Not quite like building a ship in a bottle. Let's just say I'll never put a roof on a structure before making sure interiors and glazing are done first.

The photo above shows the tower with the roof & glazing installed and everything ready for painting. We chose colors that I had on-hand that were close enough, if not a perfect match: Floquil Foundation for the walls and TruColor Oxide Brown for the trim. A couple of old contact lens packages for pallets, eye dropper to get paint from bottles to pallets, and trim pieces secured to wax paper by scotch tape.


While I have many different varieties of brushes, I decided to use a microbrush to paint since I've found they're not as apt to leave streaks - and you can get really close to the trim without accidentally painting it. Any unevenness you see in the wall above is the result of the white styrene showing through - but there's no streaking. Actually, I think the effect is pretty nice. The color isn't a perfect match, but I've decided to go ahead and over-paint the original color on the original wall sections - especially because, it turns out, that that color is no "color" at all, but just the original molded plastic color. So the walls will all match when I'm done. The TruColor paint I used on the trim dries glossy, so I'll have to apply some DullCoat before adding the trim to the structure.

That's where things sit as of now. I have to paint the original wall sections and add the trim, and then put the structure back on its foundation and shorten the staircase. Then it's just a matter of adding the tower to the layout - but since Middletown is still plywood-only, I may go ahead and scenic the area around the diamond so the tower will have a nice scene to be seen in.

Not bad for an hour's work on Saturday night. Certainly redeemed the day, at least a little. And also fortunately, Sunday was much better. Not only did I catch the Amtrak Exhibit Train going by my house, but I got to go to a picnic with a lot of other folks from the New Haven Railroad historical society (NHRHTA). I even came home with an authentic NHRR shanty stove to heat our photo library/railroad den during the winter months. But I'll post a pic and write up on that some other time.

All in all, not too bad a weekend - despite the hijacking!

Monday, August 25, 2014

On the Valley Line Today - Amtrak Farewell

Got home just in time to catch the Amtrak Exhibit Train crossing my street on its way to leaving Valley Line rails (thanks to Roman for the heads up that the train headed south early!).

Still in awe at how LARGE this equipment looks compared to what usually is on this line (when anything at all ventures this far south).  And it sounds different too - lots of my neighbors came out to see what all the commotion was about.

Enjoy the video!


Friday, August 22, 2014

On the Valley Line - Today pt2 (Steam Pulls Diesel)

As promised, some additional videos/pics of today's special up the Valley Line:

Valley Railroad #3025 waiting south of Plains Road Crossing, Essex.

#3025 waiting to bring Amtrak Exhibit Train northbound into Essex Station
And, for your viewing pleasure, here are a couple of videos of the train actually pulling in.  Love that stack talk!


On the Valley Line - Today

I've mentioned before that the Valley Line actually goes right across my street, but the only regular traffic this section ever really sees are the "Saybrook Specials" (first weekend of summer months) and the occasional "HOTT" ("Hand on the Throttle") trains.  Well, today, we saw what's probably the largest equipment to come over the line in quite some time.  Check it out:


I also got what I thought was going to be a really nice still photo, but my shutter speed lagged a bit too long:

Amtree.  Oh well

I had better luck down at the Saybrook Wye.  Here it is coming up the east leg.


Crossing Mill Rock Road, just north of the wye.

At Bokum Road, Essex.


Stopped - for the time being - at the Valley RR's south yard.
I'd taken my "good" camera (instead of using my iPhone, as I usually do) and the fact that I hardly use it made things a bit stressful as I tried to fiddle with settings (and shutter delay). But it was still cool to see such LARGE mainline equipment go up the Valley Line - and practically right past my house.

Stay tuned - I'll post some additional shots later, including, maybe, the 3025 pulling this train into the Essex station....

Wednesday, August 20, 2014

Middletown Tower: Walls Done, Trim to Come

Made some more progress on my "scrapbuilding" project tonight . . .

First new wall glued in. You can see the horizontal braces which place the wall in the same plane as the original kit wall, and the vertical braces/splices which glue to them and hold everything together.

Another view. The width of the front wall goes from one corner of the original wall to the other. The side walls will fit inboard of the front wall.

I decided to add some inside-corner braces for added strength. I would usually use 1/8" or 1/4" square strip, but there wasn't enough room given the length of the horizontal braces (I didn't think that far ahead), so I used .060" instead, two of which are sitting on there on the cutting pad ready to install.

Installed corner brace. I've become fan of the Model Masters cement - it's thicker than the Tenax and includes a needlepoint applicator.  So it's easy to just put a fine bead on on a part and add it to the model.  It sets up fairly quickly too - though not as quickly as Tenax. I use Tenax when I can clamp the part in place first and then flow it into the joint. I couldn't clamp these corner braces though.
All three new walls glued up and done.

And here's how it looks as of tonight.  Almost there!
Next step will be to have the Missus help me come up with some colors to match the "original" wall & trim color (BION I'm colorblind, so the help is most welcome - and needed!). Then it's just a matter of painting the walls & trim and then gluing the trim to the walls.  Oh, and I have to reattach the roof and add "glass" to the windows. I haven't decided yet whether I'll add an interior - but since it's October on my layout, maybe the steam heat will fog up the windows a bit...

I hope you're enjoying this (re)build - it's really putting me in the mood to do some more structures.  Which is good, since I need a lot of structures on the layout - or at least mockups - to determine the final placement of my sidings & such, and to make sure my crews will still be able to operate effectively with the new "obstructions."

But one thing's for sure - this little cut-down tower isn't going to obstruct much of anything!

Wordless Wednesday #31


Monday, August 18, 2014

More Middletown Tower: 15 minutes really IS long enough

After yesterday's work think session, and even though I realized that progress doesn't always have to be measured in what you actually accomplish, I still regretted not having gotten anything tangible done. You hear and read a lot about how you should always have a variety of projects ready to work on, so you can always accomplish something. Well, I admit I'm not all that good about following that advice. I don't have "10 minute", "20 minute", and "30 minute" project trays like I read about some super-organized folks having. But if you, like me, have something in progress most - if not all - of the time, you just might be able to move the ball forward, even if only a little bit.

So last night, after the guys went home, I had the missus join me in the hobby room/den, put on an old-time radio show for us to listen to, and sat down at the workbench while she read her book. Here's what I accomplished:

I cut up some braces/splices from .060x.188" styrene and cemented two of them to one of the end walls. You can see the two sides of the end wall at the bottom of the pic. Those strips on the inside of the new clapboard will provide stiffness and additional attachment points.
I may have mentioned it before, but in order to determine where exactly the new end wall sections must fall in order to accommodate the trim piece and still meet up properly in the corner, I had to glue another original side on.  The Right Clamp makes short work of this. But this project has also made it clear that I need to get myself another Right Clamp. It'll just make things easier.
Yup - that's all I did last night. Just about 15 minutes' worth of work. It takes a long time for glue joints to set up and cure properly - and that could easily happen overnight. But to glue those joints only takes a few minutes.

Tonight presented a different challenge: I got home late from an after-work meeting. I was tired, brain dead, and only wanted to flip through a magazine (RMC) or watch some (TrainMasters)TV. You know the drill as well as I do. But, building on last night's lesson, I figured "I could at least glue on a couple more splices." It turned out not to be quite that straightforward, but - again - I spent only about 15 minutes (actually +/- 17 mins, not that I was timing it or anything...)

As suspected, once I got the original walls mocked-up/glued-together, I discovered the new endwalls will need to be even narrower than expected. The new styrene is just placed here for illustration - note that the corner joint on the original wall has both a flat surface and a 45 degree angle. This is one of the pitfalls of "scrapbuilding." As always, you can click on the image to enlarge it.

This is where the new styrene wall will have to be glued. Note the overhang to the right, which will have to be trimmed. But even more importantly, note the remaining 45 degree angle to the left. I can't move the new wall any further left to close that gap since it would "walk up" the angle and come too far forward (proud?) of the original wall. Fortunately, it looks like the proposed 1x6 (scale) trim will cover that gap.

And I did get around to cutting yet more braces/splices (love my Chopper!) and gluing them in. You can see all the components here, including the strip of trim at the bottom there.
Yes, it's true. I can attest to the fact that all you need is 15 minutes to make some progress on one of your model railroad projects - provided you've got something ready to go. Don't make the mistake - as I so often do - of thinking you always have to have a huge block of time to accomplish anything. As you know - or will certainly discover - those huge blocks of time are far too rare to count on for regular progress. But these little bits of time - 15 minutes here, 5 minutes there, 20 minutes some other time - will all add up in the long run. And, best of all, they'll result in much more progress than you thought possible.

Progress does not always equal Accomplishment

I should be frustrated about yesterday's work session, but I'm not. Roman & Pieter came over for the afternoon and I had a long punch list of to-do items we could go through. I still have it. Nothing's crossed off.

Having a variety of to-do items is nice since then, hopefully, there's always something that folks are interested in doing. Unfortunately, other than some super-simple items which really didn't merit our combined effort (like "snip coupler pins off engine #3304" "change bell ring rate"), the remaining items all seemed to require something that I didn't have ready - either in terms of supplies or thought.

Lack of supplies is the more frustrating. I should have enough on-hand in order to accomplish the listed task. Like paint. I need to pre-paint some structure parts before assembly, and I didn't have the right paint in stock. So one of the things Pieter and I did was go to the store and get some paint. But we didn't paint anything.

Lack of thought - well, that's a little frustrating. It's frustrating to realize you didn't think through the implications of a certain approach and as a result you're stymied. But trying to avoid "lack of thought" all too often leads most of us - me, certainly - into Analysis Paralysis. You end up going to the basement and spending all your time staring at the layout. Thinking, but not doing.

But I've found one of the antidotes to this: Having somebody else over to help you think through things. With another perspective, and another suitcase of experience to offer, having a friend or friends over to stare at the layout with you will - more often than not - aid your thinking, and keep you from falling into the Analysis Paralysis trap.

Roman worked on some photo backdrop ideas (another source of frustration, which I'll discuss - perhaps - in a future post), but he and Pieter helped most by helping me think through some things: structure choice & placement, road additions, industry siding modifications, and - yes - backdrop options.

The fact that we didn't "accomplish" anything during the time we were together is really beside the point. We were able to get together for a dedicated block of time to discuss the layout, its future, what we want to accomplish, different approaches. Those kinds of discussions are extremely valuable, and help move the ball further. Even decisions about what not to do are, in their own way, "progress."

So thank you Pieter and Roman for coming over yesterday. I know we didn't accomplish much, but as far as I'm concerned, we made a lot of progress. And that's always the result of a good work session.

(that all said - I promise to make up a bucket of Ground Goop for the next work session.... ;^)

Sunday, August 17, 2014

On the Valley Line Today. . . in 1949


"RAIL ACTIVITY INCREASED BY DERAILMENT
Two Long Freight Trains Pass Through Town During Day

Rocky Hill - Early Wednesday morning (August 17, 1949) a 50-car freight train drawn by two diesel engines passed through Rocky Hill as a result of the derailment of a freight train at Bolton. Traffic had to be rerouted through Middletown and Rocky Hill to Hartford for the Boston to Hartford run. A second train equally as long, but drawn by only one engine, went through Rocky Hill shortly before noon. The unusual activity on the line caused considerable comment as only three trains a week with few cars pass through the town normally.

Station Agent James W. Whitty announced that effective September 1, the freight office hours will be changed from 8:30 a.m. to 5:30 p.m. Monday through Saturday to 8 a.m. to 5 p.m Monday through Friday."

And that's the News on the Valley Line, August 17, 1949

(Makes me wonder whether the trains left the Midland in Willimantic and came down the Air Line to Middletown.  If they did, they would have had to back down that sharp quadrant track at the diamond to then be able to go north through Rocky Hill to Hartford.  Wow!  Though I suppose they could have gone down the Norwich & Worcester to New London, then west to Old Saybrook and then north.  Either way, it was quite a detour!)

(Special thanks to Bob Belletzkie for the article - and if you want to know ANYthing about stations on the New Haven Railroad, RUN don't walk to his website at http://www.tylercitystation.info/)

Saturday, August 16, 2014

Middletown Tower Project: "Scrapbuilding" Walls

Looks like progress on my Middletown tower project is on about a once-per-month schedule - not quite as "quick & dirty" as I expected.  But now that "Mockup Structures" has floated to the top of my to-do list for my next operating session, this project is back on the front burner.  Click here for the previous installment on this project - and continue reading for the progress that I made tonight.

After cutting the walls down to closer-to-prototype height, and removing the wall sections that had unneeded doors & windows (see this post), it was time to "backfill" with reconstructed walls of clapboard styrene. 
I got a total length of the clapboard needed by setting the walls side-by-side and then used a square and ruler to score and snap the pieces.
Cuttin' up
While the score & snap method is certainly fast, and using a right angle ensures the wall is square in one plane, the cut doesn't always result in a square edge.  A NWSL True Sander (1st time using this Christmas present!) squares the cuts up nicely.
The clapboard sheet styrene is thinner than the thickness of the original walls, and I wanted to brace new to old, so I decided to thicken the clapboard walls with some strip styrene.  To determine how thick those strips should be, I needed to measure the thickness of the original walls, including trim.  While doing this, I also measured the width of the trim so I could match it on the new walls.
I kept track of all the measurements on a Post-It.  Clapboard thickness is .035" and I'm using a scale 1x6 (.011x.066) for trim.  Adding the new trim (.011) to the new clapboard (.035) results in a thickness of .046".  The thickness of the original wall, including the thickness of its trim, is .069".  So the thickness of the styrene strip backers need to be .023" (.069-.046).
I used scale 2x8s for the backers/braces.  At .022" thick, that's close enough to .023" for me. Using Tenax 7r liquid cement with a microbrush made this step go quickly. The braces that will strengthen the joint between the old and new walls will be glued perpendicularly to these backer/braces.
Final step for the evening was to go ahead and glue two of the original walls together using a Right Clamp. While this step seems a bit out of sequence, I think having at least one corner done will help me determine where/how the new clapboard/trim corners should go together.
Since I wanted this joint to set up fully, I decided to leave it overnight - and call it a night. I hope you're enjoying this blow-by-blow account. I'm not sure whether this project would be considered kitbashing or scratchbuilding. I "re-kitted" a tower, essentially making it scrap, and have then been building it back up using those "scrapped" parts and some new styrene.  Hmmm.... maybe I'll just call this process "scrapbox building" or - better yet - "scrapbuilding." :^)

Roman and Pieter are coming over for a work session tomorrow, so I hope to have some more layout progress to post in a day or two - so stay tuned!


Friday, August 15, 2014

Research Resources: Aerial Photos

After seeing my post on Time Travel with Maps, RichS reminded me in a comment to that post of another resource - www.historicaerials.com.  This is an amazing website that has gathered together many - if not all - online resources for aerial photos from across the country and, better yet for the historic prototype modeler, from different eras.

For what I'm interested in - Connecticut specifically - you can also go to the University of Connecticut (UCONN).  They have aerial photos for different years for most places in Connecticut and most of them are available (as .tif or pdf files) through the UCONN Map & Geographic Information Center (MAGIC) website: http://magic.lib.uconn.edu/ . This link should bring you to a page where all the online Aerial Photograph collections are listed: http://magic.lib.uconn.edu/connecticut_data.html#indexes.

For example, if you choose the 1934 aerials, if you click on Map Preview this will bring up a search box where you can search by address: http://magic.lib.uconn.edu/mash_up/1934_aerial_index.html . Once you've found your area, click on the red flag. One of the options will be to download a file.

For more about Connecticut's aerial photos go to http://www.ctstatelibrary.org/topics/aerial-photos.

But beware: it is SOOOOOO very easy to get "lost" back in time when visiting these sites and lose tons of modeling time. Ask me how I know. But it is really just so cool to take a virtual fly over of the countryside as it was 70 years ago. At least in Connecticut's case, you discover very quickly how few trees there were (it was still very agricultural back then). But even more interesting - and frightening until you realize what happened - is seeing the photos of railroad lines with two trains on the same track heading toward each other! Thankfully, that's just the result of two photos that were taken on separate days overlapping each other. But the first time I saw it, I was pretty shocked!

I hope you'll enjoy these resources and will get some good modeling information from them.  And thanks again to RichS for reminding me of where to find them!

Thursday, August 14, 2014

A Few Words on Wordless Wednesday #30


This is not the Valley Local.  It's PDX-2, the New London-Cedar Hill (Shoreline) local at Rocky Neck (East Lyme, CT).  The date & photographer are unknown, though I suspect the photographer may be Kent Cochrane and the date is likely c. 1947. I include the photo here since PDX-2 during this time served the lower end of the Valley Line, swung off the Shoreline at Old Saybrook and headed up the Valley through Essex & Deep River to interchange cars with the Valley Local at East Haddam.

K-1d #363 is doing the honors on what looks like a beautiful summer day, hauling a relatively short - but interesting - train of 6(?) cars.  First car is a reefer of some sort, then a wagontop boxcar, outside-braced boxcar, looks like 2 gondolas, unknown boxcar (PRR X-29?) and caboose - most likely an NE-4 wood caboose (which was built on a shorty boxcar frame in the late 1920s).

Looks like the fireman is dutifully facing forward, as you'd expect. But just a minute ago he probably took advantage of the fact that he was on the outside of the curve (and thus couldn't see much ahead anyway), and on the correct side of the locomotive to check out all the pretty girls on the beach.  You see, Rocky Neck was (and is) a very popular state park with a beautiful beach - and the beach is just out of sight beneath the overpass.

Even if PDX-2 didn't figure in my layout's operating scheme, this would still be a great train to model.  Heck, this could be a great scene to model, given the distinctive overpass in the background and the beautifully manicured double-track Shoreline mainline (are you paying attention PeteL?). If you don't mind the overpass splitting the scene, you could even model the beach - and the bathing beauties, if you were so inclined (though good luck finding period-appropriate figures). It also wouldn't be too difficult to just have the overpass on the left end of the scene and focus your attention on the beach - just like our attentive fireman.

It's photos like these that make prototype modeling (and the time travel that it makes possible) so compelling. Unfortunately, there won't be any room on my layout for any part of this particular scene, but the train itself will definitely play a significant role on the Valley Line.

Tuesday, August 12, 2014

Tuesday Tip: Time Travel with Maps

If you're a prototype modeler, you probably enjoy finding where old photographs of your railroad were taken. If you're lucky and the trees haven't encroached too much, you may even be able to replicate the scene. If you're really good, you can then morph between the two photos and see the old view morph into the new view and vice-versa (click here to see how Bill Schneider did this to great effect).

Well, today I discovered a way to do that with maps.  We prototype modelers rely heavily on maps to show us where our ROW went, what tracks were there, the buildings, etc.  But depending on what era you model, things could have - and probably did - change dramatically over the years.  If you want to see how, run - do not walk - over to the USGS's Historical Topographic Map Explorer. There you can enter the location you're interested in, click on the map of the location when it pops up, and the software will give you a timeline across the bottom with links to all the maps available for that location, plotted on the timeline by date and scale.

I'm familiar with parachuting into old maps online, but now that I've started playing with this new tool, it's really fun to toggle back and forth between today and "the past."  Bonus: the older your prototype and the earlier it was abandoned, the more fun it is.

So go check it out - but if after seeing the old maps you discover you did something wrong with your trackwork or building placement, don't blame me!

Friday, August 8, 2014

Spreadsheets & Switchlists: It's How I Roll (my trains)

Clearance Card, Train Order, Switchlist
How do you operate your railroad once you have the track down and the trains running? There are a number of different ways to operate your railroad beyond "just watching the trains go by" and if you're trying to stay true to a specific prototype railroad, there's only one right answer to how you operate your model railroad: "However the prototype operated."

On my railroad - and as far as I can tell, on my prototype - there three essential items of paperwork each local freight crew receives to operate their train:

  • Clearance Card Form A - gives you authority to move your train and tells you what train orders you have.
  • Train Order Form 19 - tells you how/where you're authorized to move your train and what, if any, meets you may have with other trains.
  • Switchlist - tells you what cars are in your train, including road name, car number, and destination.

Unlike on the prototype where their use is required, Clearance Cards and Train Orders aren't actually necessary on our model railroads - but having them certainly heightens authenticity and reminds you that you're operating a train according to the Rules.  But you have to know what to do with the cars in your train. That's where the switchlist comes in.

When a freight train leaves the yard, the conductor has a list of all the cars in his train.  This initial list - also called a "wheel report" - tells the conductor where all those cars are destined.  As the train arrives at each town, the conductor already knows if he has any cars in his train destined for industries in that town.  But he doesn't know what, if any, cars he needs to pick up in that town.  So, he checks with the freight agent for that town and the agent gives him a switchlist that tells him what cars need to be picked up and where they're destined.

This is why the agent (aka Agent-Operator or A-O) is so important. If you don't have someone to actually perform the agent's task of writing up switchlists (and depending on how many towns/industries you have, it could be a lot of work), you could simulate the agent's position by following prototype practice for when an agent wasn't on duty: put the switchlist in a box located at the station (or on the fascia at the town).  I went into a bit more detail about the A-O's job here.

On most model railroads, the A-O's job is usually simulated with bill boxes at each town and in the typical setup, those boxes hold car cards & waybills which contain instructions on what to do with the cars. The cards are flipped between operating session to simulate orders for cars and shipments of commodities. 

While many folks use this 4-cycle waybill/car card system, that doesn't seem very authentic to me. The freight cars always go the same four places in the same order that the waybill cards are flipped. It makes railroading seem more like a card game than actually responding to customer requests. And I find the cards annoying to carry around and difficult to manage without putting them on the layout for sorting and such.

But without car cards & waybills, how does the A-O know what to put on the switchlist?  That's where the Spreadsheet comes in.

Randy discovered an Excel spreadsheet developed by Mike Rose that simulates customer requests by "ordering" cars to be delivered to different industries & spotting locations, telling you what cars need to be picked up, and what cars to leave alone. It does this by calculating the probability of a particular car type being delivered to a customer or a loaded car that's ready to be picked up. See pic below.

Columns L-R are: Industry, Car Type, Frequency, Occupied?, PickUp, Deliver, Notes
Detailed directions on how to use the spreadsheet can be found here, and it was developed primarily for switching layouts. But I've used it for my railroad for a few sessions now and have been very satisfied with how it generates traffic for local freights - even multiple trains on two different lines. I suspect it could be further adapted for even more trains, but this is how I use it:

  1. For the first session, you'll need to place cars at your industries in a way that makes sense to you, based on commodity (car type) and where it came from (car roadname) (e.g. flatcars at lumber companies, hoppers at coal companies, etc).  But for subsequent sessions, all you'll need to do is go around and indicate on the spreadsheet where cars actually are (what spots are currently occupied). Time required: unknown for initial session, about 5-10 minutes of walking around your layout with your iPad, smartphone, or laptop for subsequent sessions.
  2. The "Deliver" column tells you what cars have to be in your train (or, in my case "trains"). I populate my trains with the types of cars indicated in the "Deliver" column.  While I could just pick any boxcar from my stash to fulfill the "deliver boxcar" request, I choose roadnames of railroads that would most likely have delivered to this particular industry.  For example, on the spreadsheet above, I need to deliver a boxcar to Wethersfield Lumber.  I imagine (and if I had enough research, I could actually know) that Wethersfield Lumber most often got its lumber from Canada.  So I'd put a boxcar from a Canadian railroad in my train to be delivered.
  3. Generally speaking, on my layout I'll populate the Valley Local with the cars that are destined for Valley Line customers, and populate the Air Line Local with the cars that are to be delivered to customers on the Air Line. To make things interesting though, I'll often put some cars on the Valley Local which are destined for Air Line customers and (as was actually true for deliveries of Pennsylvania anthracite to Valley Coal in Wethersfield, for example) will put cars on the Air Line Local that are destined for customers on the Valley Line.  Since I'm benevolent when playing the role of yardmaster, I'll put these "transfer" cars at the end of the train since they'll be swapped in Middletown - the meeting and turn-around point for both locals. Time required for steps 2 & 3: about 20-30 mins.
  4. Next, I'll write up a "wheel report" for each train on a switchlist form that tells the conductor what cars are in his train, and where those cars go.  This bit of paperwork is clipped to the Clearance Card and Train Orders and given to the conductor of each train at the start of the session. Time required: approx 15-20 mins.
  5. Lastly, I'll write up a switchlist for each town.  This will tell the conductor what cars he needs to pick up, from what industries, and where they are going.  If I have an actual A-O, he can do this during the session - he only needs to be sure the switchlist is ready to give to the crew when they arrive in town. If I don't have anybody working the A-O job, I'll need to prepare these lists ahead of time and leave them at each town - either in a bill box or, until I have bill boxes, clipped to the fascia at the town. Time required: varies depending on traffic.
And that's "it" - seems like a lot, but I can tell you from experience that it sounds much more difficult & involved than it actually is. And when the session is over, you don't have to audit anything or worry about whether your crews kept good track of their car cards/waybills and/or delivered the cars properly - your cars are already set up for the next session.

IMO this system does a better job of simulating the "organic" nature of freight traffic - and, just like the prototype, gives the A-O his pile of work to do. The A-O takes the customer requests generated by the spreadsheet, assigns cars to trains depending on where the cars are going, and writes up switchlists to tell the crews what cars to deliver/pull while working out on the line.

Best of all, if you have a lot of cars and dread having to create car cards for all of them and waybills too, this system will get you up-and-running much faster.  It'll mean some work during (if not before) each operating session, but if you - or a friend - is willing to act as the A-O you've just added another "job" to your railroad. There's no pre-session car setup required, and you don't have to worry that your previous session "screwed up the railroad" by delivering cars to the wrong places.  You just have to go around and indicate where cars actually are, print out the result, and write up your switchlist(s).

I'd be very interested to hear of anybody else using switchlists rather than CC&WB to operate their railroad. And if you use Mike Rose's spreadsheet to generate the traffic, I'd be especially interested to know how you went about tweaking  the "Excess Delivery Probability," "Leave Occupied Probability," and "Days/Week" fields.

I still have a lot to learn about operations and I've only used this spreadsheet/switchlist system for a few operating sessions, but I like it a lot so far.  Even better - if not even more importantly - my operators like it. They like not having to juggle & keep track of car cards & waybills and, while they may not always enjoy having to walk to the "station" to report to the agent, they appreciate the authenticity of the task. It probably helps that I also "on sheet" them each time they report and indicate the (fast) time on their paperwork as I deliver it to them.  This all contributes to a heightened sense of realism and, if I'm doing my job right, gives them at least a little glimpse of what it must have been like to operate a local freight train down the Connecticut River Valley in the late 1940s.

Monday, August 4, 2014

What's On My Workbench

I don't know about you, but I enjoy hearing about what others are doing in the hobby, what progress they're making on their layouts, what they're building, etc.  I suspect that may be true for you too and may be why you check in here from time to time. Problem is, blogging about modeling can sometimes be a zero-sum game: if you're modeling, you probably don't have much time to blog about it. If you're blogging, you're not modeling. And, of course, if you're not modeling, you'll eventually run out of blog fodder and chaos will ensue.

So, I decided to inaugurate a new - though occasional - feature, "What's On My Workbench" - where I'll just take a quick snapshot of, um, what's on my workbench, and give you a little description of what you're seeing & what I'm up to. For me, it'll provide a quick & easy way not only to document my efforts, but to share them with you. For you, I hope it inspires you to share your own progress photos - or get started so you actually have something on your workbench.


Hopefully, I'll be able to get a little fancier in the future with my arrows and such - but these posts are all about a quick snapshot, and "quick" is all you get when working with MS Paint. So, without any further ado...

  1. C&BT Shops carbodies for New Haven 33000 series steel boxcars. These are the cars I started while on vacation. Yeah, I'm still not done - but getting close. One of the kits was missing a ladder and a truck sideframe, the other was missing weights, the included wheels are godawful and must be replaced, etc. I'll go into the build in more detail in a later post, but suffice it to say that these will just be to fill out my roster a bit for now.
  2. C&BT Shops underbodies. The one on the left has weights I pilfered from my scrap box, affixed with silicone. Old silicone. Perhaps too old. Over 24 hrs and the silicone is still tacky...
  3. IMWX (Innovative Model Works) carbody of a New Haven 30000 series steel boxcar. The IMWX is a much nicer, more detailed kit - and the parts are as delicate as they are beautiful. I'm looking forward to this build, but first step is to remove the warp from the car sides. Strangely, they were bowed out rather than in, as usually happens. A pair of rubber bands will (hopefully) straighten things out.
  4. Another IMWX carbody, with the same warp but much less severe. Rubber bands would have been overkill, so I'm just pressing the sides in with some weight.
  5. IMWX car roof. Guess what? Warped. But, again, only slightly. I'm hoping a little weight - with the ends supported by matchsticks to allow a deeper counter-bend - will do the trick. Would you do anything different about the warping? I've heard about heating in an oven, but wasn't sure of the right temperature.
Those are the major items, though I still am working on modifying a New Haven I-4 tender into a clear vision version for my J-1 2-8-2. And I have to add some sideview mirrors to my MiniMetals Richfield tank truck I just got. Oh - and of course I still have to finish my (now not so) quick & dirty Middletown Tower. But otherwise, the rest of the photo just shows the usual flotsam & jetsam of the typical modeler's workbench.

So, to paraphrase a famous slogan: "What's on your workbench?"

Sunday, August 3, 2014

Modeling on vacation and/or in a small space

Well, I didn't get as much modeling accomplished while on vacation as I'd hoped.  No surprise, really. I'd taken an even dozen boxcar kits to build - enough for a full week of rainy days. But the weather turned out to be much nicer than predicted and, even with a just-about-ideal work space, it was hard not to spend some time outside. But I did get a couple of boxcars almost done.

So, in lieu of photos of actual progress, I'll share a few more photos of the space - and provide a couple of tips for what to be sure to pack if you actually are cooped up in the hotel room during your vacation this summer.

When we got to the inn, we had a choice of two rooms.  One had an end table, but the other had this nice desk. We chose the room with the desk.

And you can see why - those cubby (cubbie?) holes are the BOMB! If you have no space for a workshop, you can't do much better than get an old second-hand desk like this for your modeling. It'd look perfectly in-place in a nice living room - but see what you have when it's opened.  Yes, that's 12 boxcar kits there(!) You could store your kits in a box underneath and have plenty of room for your projects and tools.

Took just a few minutes to set up. The toolbox & cutting mat were in the box on the floor, but everything else was stored in the desk. Bonus that I was by a window, so I could look out and see what I was missing. Unfortunately, given the weather, the temptation to go outside proved too strong too often.

And here it is while actually doing the project. Tools that I'm using are in the kit box on the right, to keep them from going astray - or onto the floor.  Good lighting is a must. I brought my OptiVisor, but the bendy desk lamp was sufficient.

Despite bringing my whole box of tools, this is all I really ended up needing to put together intermediate boxcar kits from IMWX, Red Caboose, etc. All pretty self-explanatory, though the tool above the pin vise is a pair of sprue nippers I can't get along without.  The pin vise was for enlarging holes for grabs and such. I apply glue with the microbrush in the center (white handle). I had forgotten to bring silicone caulk to affix car weights.
While I didn't end up getting much modeling done, I was certainly prepared if vacation weather had taken a turn for the worse. As it was, if I'd been cooped up in the room for a whole week, I probably wouldn't have been able to build all I took with me. But it's always best to be prepared for the worst - in this case, even bad weather would have turned out for the best.

Have any of you taken your hobby on vacation? If so, what - if anything - did you do differently?

Now that I'm back home, I'm going to finish those two boxcars at least. And I have a growing punch list of items to do on the layout that came up during the last operating session. I also have some more-detailed reports of that ops session to get written up and posted. So, plenty to do.

Hope you're all having a great summer and able to get some modeling done!