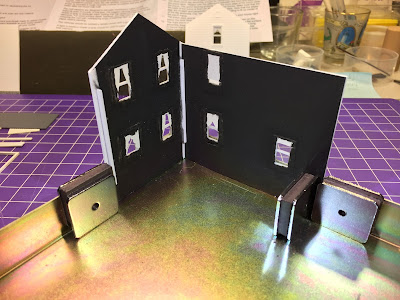
You may recall that I discovered that my window masking had been a bit of a fail. I'd spray painted the backs of the walls flat black to keep light from coming through the walls, but needed to mask the molded-in window frames to keep the overspray off of them. Unfortunately, the photo above shows what happened.
After vacillating a bit, I decided try and fix this problem now, rather than regret it later. It was just a matter of brushing on some more flat black paint with a soft brush, being careful not to get it on the window glass (which, of course, is now installed).
Not perfect, but MUCH better, I think. NEXT time, I'll mask the windows, and then use a sharp blade to trim the masking tape to just cover the window itself. Then I'll use the spray paint. Lesson learned.
You'd think after all that, I'd finally be ready for construction. You'd be almost right. Most of the parts were still on the sprues for ease of handling, but now they had to be removed. I used a variety of tools to do this: Sprue nippers and side-cutting pliers for where the nippers couldn't reach. Then I needed to clean off any remaining parting lines and sprue points with a variety of files, sanding sticks, and my favorite chisel.
With the parts freed from the sprues, I used my mill file to ensure that all wall mating surfaces were perfectly straight and flat.
For bracing, the instructions call for adding a piece of the supplied strip styrene "1/16 from the edge of the wall and parallel to it." Turns out, the strip styrene they supply is about 1/16" thick, so I just set two of them side by side on the wall, and put the wall perpendicular to a piece of plate glass. That way I ensured that if the "gap" piece was flush with the edge of the wall, the "glued" piece would be perfectly parallel and the right distance from the edge. A couple daubs of Tenax applied with a microbrush tacked it in place. I then removed the "gap" piece and applied Tenax all around the brace.
Repeat the process for the other side of the end wall, both sides of the other end wall, and the side walls of the lean-to addition.
Next I used a very-handy magnetic gluing jig to true up the walls to 90 degrees and hold them in place while I applied more Tenax.
Do one corner at a time, repeating the process for the other corner.
And that's where things stand as of last night. I really thought I'd be further along, but an appointment yesterday went MUCH longer than expected. Thankfully, I think now that all the hard prep work is done, the rest of assembly should go pretty quickly.


WHY THE HECK ARE YOU MILLING THE BOTTOM FACES???!!! WE'RE STICKING THEM INTO THE GOOP!!! ;>)
ReplyDeleteUm, cuz I'm OCD? I like using the mill file? I won't do it again. I promise %^)
DeleteChris,
ReplyDeleteLoving the whole "Goff Brook" saga! Thanks for sharing all the steps with us here!
Hey Tim and thanks for stopping by! Glad you're enjoying the build - I was worried that going into so much detail might get mundane, so I'm glad to know you appreciate my sharing each of the steps. Look forward to more coming!
Delete