Tuesday, July 31, 2018

ProtoModeling Fun: Photo Forensics

If you're reading this blog, you're probably a model railroader. But what about being a "railroad modeler?" What's so attractive about modeling a prototype railroad and becoming a prototype modeler? I suspect, for most, the chance to build a time-machine of sorts is the strongest attraction. For others, it's the challenge of recreating a real-world scene in miniature, including all the research and detective work required.

As you may have guessed, for me it's a combination of all those things. I could sit and stare at some old railroad photographs for hours, noticing all the details and thinking of ways I can recreate the world captured in that photo. One of my favorite photos - and the one that provided the strongest inspiration to model the Valley Line - was a shot of the southbound Valley Local taken by Kent Cochrane from the Arrigoni Bridge in Middletown, May 1947.


This shot was actually the subject of my very first "Wordless Wednesday", and I talked about it some more in a subsequent post (and here, and here). I'm not alone in my admiration either. None other than Tony Koester "unpacked" this photo in the May, 1980 issue of Railroad Model Craftsman. His power of observation and his ability to convey the essence of the scene through his writing really puts you right there as the local pulls into town. I highly recommend you read his essay - it's the sort of thing that could inspire many a modeler. The fact that he (unwittingly, preceding my interest by about 30 years) wrote about a scene from my chosen prototype is a huge bonus.

It's all very right-brained and evocative. What he didn't do is provide much in the way of prototype information. As an admitted left-brainer (just look at my layout - the wiring and track is great. The scenery is mostly done by others...) and prototype modeler, I see a hopper. And wonder how to model it.

Thus the journey begins . . .

The NYC hopper right behind the engine is a 908000-909499 series 39' 3 bay steel self clearing hopper, #908255 to be exact.  These cars were built in 1923 with shallow type middle hoppers but later rebuilt with sawtooth hoppers when shopped for repairs (increasing capacity by 10 cu. ft.).  Originally numbered 425000-426499, they were renumbered into the 908000 series when rebuilt.  The original configuration lasted until 1948.  The rebuilds started in 1936 and lasted until 1961.

And according to my buddy Randy, these were USRA triple hoppers, lot 466-H. The rebuilding replaced the center clamshell hopper with a sawtooth hopper. There were originally about 20,000 of these cars owned by the NYC and the P&LE.

Here's a photo showing the hopper as-built:


And a plan showing the differences:


Some additional research revealed that Westerfield makes both the as-built and rebuilt versions.  The rebuilt version is the one I need - kit #2153.

Ok, admittedly, all that information isn't quite as enjoyable to read as Tony's piece. But if you want to model the Valley Local - at least as it appeared in the spring of 1947 - you're gonna want to include a NYC hopper. And if you want it to be prototypically correct, well, now you know what you need.

All I need now are "a half-dozen or so freight cars" to model the rest of the train, but at least I can be pretty certain they're "more than likely bedecked in nothing more spectacular than standard boxcar red paint accented with weathered white lettering." Maybe not enough information to model from, but most definitely enough brain-candy to want to try.

And maybe that's part of what makes this hobby so fascinating and satisfying. To do it well, you really need both the right and left sides of your brain fully engaged. The technical side of modeling isn't as much fun without the evocative side to inspire your efforts.

Thanks to Kent Cochrane for taking that beautiful photo so long ago, thanks to Tony Koester for helping me see all the fine detail that's there to recreate, and thanks to Westerfield models for producing a kit for the first freight car in my own recreation of the Valley Local in HO scale.

Sunday, July 29, 2018

First Run! July 29, 1871

Yikes! I can't believe I almost let this day end without realizing that it's the 147th anniversary of the Very First Train on the Valley Line! Yup - that's 147 years ago today July 29, 1871 - the first Valley Local polished the rails.

I'm embarrassed that I wasn't able to put together a proper post, but that's ok - the fine folks over at ConnecticutHistory.org did it for me, as one of their "Today in History" listings. I've pasted it below for your convenience, but a link to the article on their site is here. Be sure to visit - there's LOTS of great stuff there.

Connecticut Valley Railroad’s First Train – Today in History: July 29

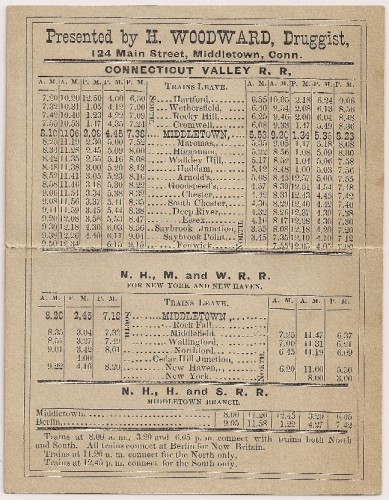
Connecticut Valley R. R. schedule
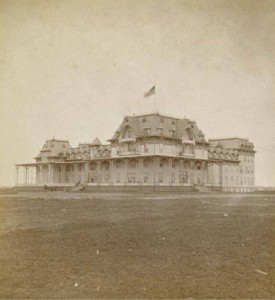
Fenwick Hall, Fenwick, Old Saybrook
Fenwick Hall, Fenwick, Old Saybrook – Connecticut Historical Society and Connecticut History Illustrated
On July 29, 1871, a ceremonial train ran along the new 44-mile single-line track built by the Connecticut Valley Railroad. James C. Walkely, the president of Charter Oak Life Insurance Company in Hartford, received a charter in 1868 from the State of Connecticut to build this independent railroad from Hartford to Old Saybrook. Built along the west bank of the Connecticut River, it competed with steamboat service by providing a quicker overland route to Long Island Sound and connections to the steamboats that ran regularly to New York. The daily schedule on the Connecticut Valley line in 1871 included four round-trip passenger trains and one train that combined passengers and freight, making 15 stops along the route, excluding Sundays. In 1872, the service was extended a half mile past Old Saybrook point over a trestle bridge to the village of Fenwick and Fenwick Hall, a resort hotel that had opened in 1871. Traveling from Hartford to Saybrook at the time took 2½ hours. Connecticut Valley Railroad was taken over in 1880 by the Hartford & Connecticut Railroad and eventually  leased to the New York, New Haven, & Hartford Railroad Company.

Friday, July 27, 2018

Friday Fun: Air Line in East Wallingford - Then & Now

While I focus on the New Haven's Valley Line along the Connecticut River, the Air Line - which intersects the Valley at Middletown, CT - figures fairly prominently as well. I don't model the Air Line as faithfully as the Valley (I've only modeled two fictional towns), but it's pretty close operationally in that the Air Line local provides the New Haven (Cedar Hill Yard) to Middletown traffic and swapping (interchange) with the Valley Local.

The Air Line itself, as the original & fastest route between New York and Boston until superceded in the late 19th century, is itself very interesting and modelgenic. Alas! - you can't model everything, but that doesn't mean you have to ignore the attraction of other lines.

Case in point: East Wallingford, CT. Typical of much of the traffic along the Air Line (and one of the reasons it assumed secondary status after the fast passenger trains left) is this little wayside local industry:
New Haven Local Freight (Air Line Local) at East Wallingford, looking southwest. Dick Otto collection
See what I mean? Isn't that a scene that just begs to be modeled? A couple of RS-3s, a local coal silo, and the boxcar is probably destined for the bulk track. This being farming country (in fact, if you panned left you'd see a major farm at trackside), my guess is that the boxcar either has feed, fertilizer or some other farm supplies. Since it looks empty, maybe it's being spotted there for loading. The Air Line main is at the far left, with the siding obvious in the weeds. The old station is in the far background, across the road. It looks like it's already been raised up on its new foundation (as it remains today).

And this here's a shot I took of the same location yesterday morning, looking back toward where the photographer of the photo above stood those many years ago:

East Wallingford, July 26, 2018, looking northeast. Chris Adams photo.
Different era, for sure, and not quire as "railroad-evocative" - but that's in the eye of the beholder (naturally, I prefer the older, more railroady look of 70+ yrs ago). As you can see, East Wallingford retains its modelgenic quality, but now for a modern-era modeler. Bulk track appears to be gone, as the covered hoppers are sitting on the old siding, now truncated at the road. But there's still a farm here - and farms in the surrounding area - so it's no surprise that feed of some sort(?) is being unloaded here for trucks to distribute around the area. This entire scene would make a quick and easy - not to mention operationally interesting - layout design element. And with the crossbucks, signal cabinet, and modern day conveyor, there's still enough "railroady" details to please the eye and scratch the model railroad itch.

Thanks to Dick Otto for unearthing and sharing the old photo. And thanks to anybody that saw me taking this picture for not calling the cops on me.

Hope you found this little "then & now" comparison inspirational - and, if so, I hope you'll let me know in the comments. Bonus if you share some of your own "then & now" inspirations!

Happy Friday & here's hoping you can get to some modeling this weekend!

Wednesday, July 25, 2018

Fun With Decoders: DL-109 Default Startup & Decoder Repair(! oh my!)

I mentioned a couple posts ago the critical role Alco's DL-109 (New Haven RR class DER-1) plays in Shoreline operations. What I didn't mention is an annoying habit they have of shutting down when they're acquired, at least when equipped with an ESU decoder.

But before I get into that, here's a quick tip:

Before you go buying something new like, say, a set of underset couplers, be sure you check your supplies first - even if you don't think you have what you need.

Why?


Yup - you guessed it. I went through all that rigmarole of not wanting to wait to get underset couplers for my DL-109s, then making a special trip to get them, and then trying them out not only to discover that they weren't going to work out after all but also that it turns out I already had some on-hand that I could have tried.

And worse - they were right in my coupler drawer(!)

Sure, they're #27s rather than #147s, but the only actual difference is that the 27s have the old centering spring and the 147s have the centering whiskers.

Ah well. Anybody need underset couplers? I have a bunch. Apparently.

And now for some DCC fun!

All of my DL-109s are equipped with ESU sound decoders. Not only do they have excellent motor control, but the sounds are very customizable, especially when using the Lokprogrammer. In fact, I've even programmed each decoder in each separate loco to have slightly different engine speeds/sounds so they haven't any chance of phasing together. Trust me - that's no small feat when each DL-109 has two different engines under its hood.

So, the sound in these engines is really amazing. But there's a problem. My Shoreline/mainline operations require a staging yard operator at each end of the line. When a train is ready to go through the Saybrook Scene - say, westbound from New London staging to New Haven staging - the New London operator calls the New Haven operator to tell him what engines are on the train that's going to him. The New Haven operator then acquires those engines to operate the train - "bringing" the train toward himself through Saybrook. I figured that's the best way to make sure the train noses into the correct staging track at its destination and stops safely.

But the acquiring is the problem. Every time the operator acquires the locomotives, the sound shuts down. It doesn't just turn off, but it goes through the whole (and very cool, under other circumstances) shut-down routine. Then the engines have to be "started up" again (another routine). All that takes time - which is none too plentiful on the Shoreline.

At the last operating session though, someone - I think Roman - came up with the solution: "Just change F8 to 'not F8'"

Huh?

Actually, all that means is that you're changing the default on the ESU decoder from "sound off by default when layout is powered on so you have to hit F8 to turn on the engine sound (i.e. "start the prime mover")" to "sound on by default when the layout is powered on" Since the sound is on by default, acquisition of the locomotive by a subsequent operator won't shut it down.

But it's a bit counter-intuitive. Reprogramming F8 to "not F8" is how you turn the sound on by default. Fortunately, this is all easy-peasy with the ESU Lokprogrammer . . .


First step is to go into the "Function mapping" section:


On that screen, go down to F8 (I'm assuming the decoder has its factory setting of F8 turning the prime mover on and off).


The factory setting for F8 is to be "On" as you see above. Just change it to "Off"


Note that F8 now says "not F8" and write the change to the decoder:


You may need to wait for firmware to update as well.


And that's it! No more annoying prime mover shut-down when my Shoreline operators acquire their power. Happy Day!

Well, so it was until I realized why one of my DLs decided not to work allofasudden...

I would get sound, but no movement. This unit had acted erratically before so I thought the decoder might need a reset and reload. That helped, but after a little bit the engine refuse to move at all  (though the sounds all still worked flawlessly).

When I removed the shell and checked out the decoder, what I'd feared was what I found . . .


The orange motor wire had broken off of the decoder. No wonder the engine wouldn't move!

After a LOT of hemming and hawing over how difficult - if not impossible - it would be to resolder such a tiny wire in such a tiny space (without frying, melting, or otherwise destroying the decoder in the process), I figured it was high time to tackle the job and not wait for when a more-experienced friend could help me out. I'd just done my first hardwire decoder install last fall, and that was soldering lots of wires to a harness. Not this:


Yeah - the orange wire had to be soldered to the third pad from the left. But I stripped the insulation back a bit, fluxed and tinned the wire, and then fluxed the pad as well as the tinned wire.

I really wished I had a smaller soldering tip, but I secured the decoder with self-clamping tweezers, used another pair of tweezers to hold the wire and used my remaining hand to get the iron in and out quick.

Thankfully, after sweating a few buckets, it all turned out well - as you can see above (I cleaned off the flux with denatured alcohol). I put everything back together and - Voila! - the engine runs again.

It's super satisfying to be confronted with a problem and figure out a way to solve it. And it's especially nice when your skills start developing to the point that you have to rely less and less on others.

I look forward to the day when I can say that about scenery. %^) In the meantime, I'll trade the skills I have with someone who needs them - and who hopefully has some expertise *I* need. That sort of collaboration is yet another reason this hobby is one of the world's best.

(mostly) Wordless Wednesday #225 - Luchini's Saybrook

My friend Pete is working on a layout depicting the New Haven's Shoreline between New Haven & Boston. Of course, that has to include Old Saybrook.

Here are a few quick grab shots of a local freight, presumably PDX-2, coming off the Valley Line onto the Shoreline using the east leg of the wye behind the Saybrook Tower on its way back to Fort Yard in New London. (btw, in case you're curious, yes Pete hand painted the very effective backdrop)

Enjoy this not-so-Wordless Wednesday!


Monday, July 23, 2018

Miscellaneous Monday: Register & Couplers

Thanks to Stanley and Roger for commenting on my paperwork post. I'm still trying to figure the best approach here, but in the meantime at least here's a copy of the prototype NHRR paperwork my form is based on:

Now, granted, I think this is a form used by station agents/tower operators to record passing trains (as Stanley described in his comment) and I modified it for use on my railroad. But it probably is overkill.
* * *
Thanks also to Dave who, while not posting a comment to the blog, did weigh in on the DL-109 coupler conversion - suggesting that I try using one of KD's underset couplers to raise the coupler height while saving me some work. While I'd mentioned in the post that I thought an underset coupler would look bad, I was too impatient to wait for one to be delivered, and it would probably end up too high anyway, I picked up a package of #147 couplers at Centerline Hobbies in Hyannis on my way home from vacation this weekend.

So at least I wouldn't have to wait for them.

Unfortunately, when I got them home I realized that I didn't get the "scale" head couplers but the old "standard" head (i.e. like the old No. 5s). The one consolation was that I made no mistake - KD doesn't even make a "scale" size underset coupler. In fact, they actually say so on their website:

We do not make "offset" scale head couplers only center set because an offset scale head coupler is simply too ugly.

I figured I'd go ahead and try the 147s anyway since, if they truly just dropped in as an easy replacement, it'd save me some drilling & tapping.


Turns out - they did end up too high. No worries. As they say in the scientific field: "A negative finding is still a finding." I did the experiment and it proved my initial hypothesis. Back to drilling, tapping, and installing a "proper" "scale" head coupler:

A little bit of work, but so much better


Thursday, July 19, 2018

Reducing Paperwork, Increasing Realism

Some of the feedback I receive from my crew is clearer than at other times...
While I strongly believe that operating realistically and prototypically requires proper paperwork (and I am, admittedly, still very much in the learning phase), this past session it became clear that I needed to try and whittle it down where possible. Perfect example - the Train Registers which I just instituted last fall. While originally conceived as a way to get a "real time" view of when trains got to particular locations and how many cars they had with them at particular points in time (both useful bits for tweaking/balancing the session), crews usually "forgot" to fill them out and probably thought they were "make work." But the real death blow for them was the one-two punch of their not being perfectly prototypical or all that necessary.

First off, while I do run TT/TO, only one train is on a particular line at any one time. So signing a register isn't really necessary - who are you telling? And also, it turns out on the Valley Line only Wethersfield, Middletown, East Haddam(?), Essex, and Old Saybrook were order stations - so I think those would be the only register locations (I'm not positive about East Haddam yet). And interestingly, Middletown, East Haddam, and Old Saybrook also happen to be the only places on my layout where trains exchange cars with each other. So the registers are prototypical at those stations - and also useful to let a subsequent train know you've been there.

And so I've eliminated the registers everywhere else, including at the staging yards (which will no doubt make Tom happy!)

Now, this reassessing the registers has prompted a reassessment of my paperwork generally. Here's a link to an overview of how I currently do may paperwork. And here's a link to a discussion between model railroaders and real railroaders, who also happen to be model railroaders too. That thread is particularly interesting in that it started as a CC&WB vs. Switchlist discussion, but then evolved into a more in-depth discussion of how the real railroads deal/dealt with paperwork and the best way to adapt those practices to a model railroad that you want to operate prototypically.

So I'm going to spend some time reviewing that thread and evaluating my ops in light of what's most prototypical and also adaptable to a model railroad. In the meantime, I hope you'll weigh in with how YOU replicate prototypical operations on your layouts and/or point me to some more good resources.