Thursday, January 22, 2015

A Few Words/Questions About Wordless Wednesday #52


Wordless Wednesdays typically - though not always - are scenes from either the Valley Line or the Air Line, preferably from around my chosen era. So yesterday's edition is a bit outside the norm. (and "Wordless Wednesdays" are typically, um, wordless which is why I'm doing this now rather than yesterday...)

I think the subject photo shows a train on what would become the Berlin Branch. If so, it's a "Valley Line" shot to the extent that this line was regularly serviced by the Valley Local during my era. In fact, it could also be an "Air Line" shot since the Air Line local would occasionally make the trip up to East Berlin too.

That's a pretty interesting trestle if nothing else.

So much for the "few words" - now for the "few questions:"

First off - can anybody tell for sure if this is the Berlin line? Any idea of the era? Or location?

To paraphrase the slogan of a non-reputable source: Inquiring Minds Want to Know

Monday, January 19, 2015

Wethersfield Lumber Co. - Weathered Walls

It's one thing to try and make styrene look like wood when it's mostly hidden - but what about when it's right there up front for everybody to see? Yup, it's finally time to figure out what I can do with the exterior walls for Wethersfield Lumber. I decided to try the technique outlined in this article. Follow along as I try it out. . .

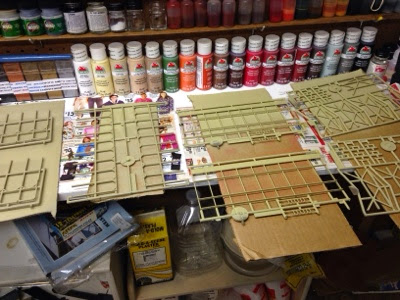
First step is to distress the styrene to give it some "wood grain." I used MicroMark's "distressing tool" - but I've used a small Dremel brush too. The article gives you some additional options to try as well. You can see how the wall on the right side was dulled by the wire brush. That's the "wood grain" - supposedly.

After I added the grain and dusted/brushed off any resulting fuzz, I brush-painted Kilz2 Latex Primer, thinned down to a milk-like consistency. I just put some primer in an empty jar, added distilled water, and shook it to mix. It brushes on ok, but I discovered quickly that I should have cleaned the parts first - things weren't covering evenly at all on the first part I primed - just beading up. So I scrubbed the remaining parts with 91% alcohol and things went a bit better. That is, until . . .

I realized that I hadn't painted the inside of the walls - they were still bare dark brown styrene(!) So, once the primer dried I flipped over the walls and shot the backs with my rattlecan of Rustoleum Camoflage paint.

After letting things dry overnight, I did the next step - adding a couple drops of black fabric dye to some water and brushing it on as a wash over the parts. You can see the effect in the top wall - the bottom wall has yet to be darkened.

You can vary the effect - if you want to lighten, brush on some more water. If you want to darken, brush on some more dye. While the top wall came out ok, I decided to experiment on the wall that will face the backdrop. You can see the effect of adding more dye on the bottom wall. This is how it looked right after applying - it'll dry much more subdued. I hope.
So far, this technique appears to work pretty well, but I wonder if it would have been better to spray on the primer to make things more even. I don't think so, since brushing on gives the finish some variety. It also doesn't look like any of my "wood grain" shows through - seems the primer filled it all in. The next step will be to add some raw umber and burnt sienna, as the article suggests, to suggest different levels of aging.

And here's the kicker: I'm considering sealing this "weathered" look with Dullcote and then brushing on some rubber cement, then airbrushing some gray paint, then "erasuring" some areas for a peeled paint look. This weathering will then show in spots.

Though it does seem a shame to hide most of it. What do you think?

Saturday, January 17, 2015

Painting Wethersfield Lumber Co.

One of the many nice things about this hobby is that there's always something different to do - so you can (usually) do whatever strikes your fancy.  Since I'm trying to get the Wethersfield section of the layout to a level of "done-ness" as soon as possible, I decided to take a break from building Ballantine's and start on the Wethersfield Lumber Co. I introduced the model I'm using here and I did a quick mockup of this building here. And below is the only photo I have to go on . . .


Not much, eh? That's the bad news. The good news is that I can pretty much do what I want as far as finishing. As long as the shed is the pass-through type, and has a dark-ish roof and light-ish walls, I'll be ok - though I'd love it if somebody could prove me wrong with a better photo.

When last we left this kit, I'd asked how to go about painting it - and I really appreciate all of you who took the time to weigh in. I took advantage of having my airbrush already full of Grimy Black when painting Ballantine's that I shot the roofs of Wethersfield Lumber too. I also took a gray rattle can and sprayed the "concrete" floor of the two sheds. Somehow, the windows ended up getting painted green but I don't remember how (?!)

So the next step was to paint all that interior bracing/rack detail. Unfortunately, a lot of it will be hidden or otherwise difficult to see since it'll be "inside" so - taking some advice from my Thursday Night Crew - I decided not to obsess and just "rattle can" it.


I did, however, decide to use my new MicroMark "distresser" to add some wood grain on the front-most parts. It went much quicker than I thought it might.


After making sure to remove any random flash, I separated the main parts for painting and headed down to the spraying room.

Earlier in the day, I'd found a small can of "weathered brown" from Floquil. Unfortunately, it'd "seized up" and I couldn't get it to spray. So I removed the nozzle and used some lacquer thinner to clean it out. It still wouldn't spray. So I cleaned a little more and also used a pipecleaner to clean down inside where the nozzle goes. It was still hard to push down.

So then I got what turned out to be a wonderful, awful idea - I took a bamboo skewer and pressed it down into the hole. . . .

And promptly shot "weathered brown" all over the place, including on my still-like-new black bracket light. Here's a tip: Don't use lacquer thinner to clean off a still-like-new black bracket light. It now looks like an old light with a grayish haze finish, but at least it still works. And, fortunately, so does the can of "weathered brown" spray paint.

So I started spraying, and things were going pretty well - until I ran out of paint. Yup - totally empty, not just "not working." But in an amazing turn of fate & coincidence, I had just that morning gone to the store to get some new lightbulbs and other odds & ends and wandered over to the paint section - where I bought a couple of different colors of Rustoleum "camoflage" paint.


And - miracle of miracles - it actually turned out to be a fairly close match (at least to my color-blind eyes) and dries dead flat. But I'm glad this is all in the interior...


The "weathered brown" Floquil is on the right and the Rustoleum camo' is on the left. Pretty good to my eye - and will be even better with some "dusting."

So that's where things stand now. I sprayed both sides of all the parts, so when everything's dry I should be able to start putting things together.

D'oh!! Actually, not. I still need to do something about the walls. And, since they'll be what you see the most, I'll be taking a bit more time to do things right. And I don't think I'll be using any rattle cans - especially since it looks like that paint filled up all the nice woodgrain detail I added to the bracing/racks.

Ah well, live and learn. Like I said before, this is a very varied hobby and you can always find something fun to do that suits your mood. Heh - maybe I'll go back to building Ballantine's. . . . or maybe start a freight car kit . . . or work on the backdrop . . . or  . . . or  . . . well, you get the idea.

Friday, January 16, 2015

Building Ballantine's Beer Distributor, Part 2

After continuing the walls around the perimeter of the base, the next step was to install the roof. All that entailed was pressing it in, down to the locating ridge/lip, and applying liquid cement to the joint from inside.

Next up were the loading dock roofs, which turned out to be more complicated than I thought. Be careful to leave as much material as possible on the bracing rods. Even being careful, mine were just a little short, which meant I had to lift the roof more up toward level than slanted. If I were to build this kit again, I'd probably use wire cut to fit.

There's no great way to do all this - ideally, you'd attach the 7 braces and roof to the building simultaneously. But going one step at a time, and waiting for the glue to set before moving to the next piece helps a lot. I applied the more viscous glue from the needlepoint applicator (ModelMaster) to the back edge of the dock roof and held it against the building until is set up. Then, one by one,  I dipped the top end of each brace into a pool of that same, thicker glue, stuck it in the hole on the building, let it set, then pulled the roof up to meet the bottom of the brace and applied Tenax with a microbrush to the underside of the roof where the brace entered.

Doing all this methodically takes time, but if you go too fast you risk things falling apart - literally. As it was, each loading dock roof took an evening's worth of work. But after two nights, they were done.


I took these photos once the "back" side of the building was done. This is the truck loading dock (as opposed to the trackside loading dock) and will face the backdrop. I figured this would be the side to "practice" on, but it actually came out pretty good. You can also see on the roof, toward the back on the knee wall, where the rooftop office would have been located. This gap won't be visible from the front of the building, but I'll probably fill it anyway.

Next steps are to paint the vents silver (should have done that before) and figure out what other details to add to the roof.

That's were you come in. I need some help/advice on what to add. It's October 1947, so no rooftop air conditioning units. So far, I expect to add some sort of rooftop stairway, to provide roof access from below, and some bathroom vents. The kit comes with a brick chimney, which I'll add as well. What else? It's pretty barren up there. . .

After the details are up there - including the sign - I'll add some fine-grain sand to provide roof texture. Of course, let me know if there's anything I'm forgetting - I'll be sure to keep you posted!

Sunday, January 11, 2015

Building Ballantine's Beer Distributor, Part 1

As the Valley Local heads south into Wethersfield, the first industry it encounters is the Ballantine's Beer Distributor.  Click here for an introduction to this industry on my layout, and click here for all the posts I've done about it so far (you can also click "Ballantine" on the Topics list).

I don't know of ANY photos of this building before it was demolished, and have only a sketch John Wallace did from memory:


And, thanks to Bill Shanaman, I also have a photo of one wall as it was being demolished:


Given these bits of information, I finally decided to use Walther's Grocery Warehouse (aka Miranda's Bananas) as a starting point. Here it is as it comes:

Actually, this photo shows it much more finished and painted nicely. It doesn't look like this right out of the box.
Strangely, the Walthers photo shows the truck loading dock side of the building (which will face the backdrop on my layout, but the track side is similar). If you imagine this building without the office on the roof, and red brick instead of stucco, and squint a bit while comparing to the sketch and prototype photo, you may agree it's a pretty good start. So let's get going!

First, I had to decide on colors and paint:
  • Brick would be red (Floquil Southern Freight Car Red)
  • Concrete would be Floquil Foundation
  • Windows/Doors - rattlecan gray
  • Roofs - PollyS Grimy Black
  • Base - rattlecan brown 
After painting the lower walls, but before painting the brick, I used a straight edge and X-Acto to remove the office "appendage" from the trackside wall.

Then I had to mask to paint the brick.

This was my First Ever masking job, so I did some research and many folks recommended Tamiya tape. I took my time lining things up, and it worked VERY well. I just used the (relatively) expensive Tamiya right where the paint separation would be - for any additional masking I just used regular inexpensive masking tape.

I was REALLY pleased with the results of the masking! No bleed or anything. Here I am just painting the concrete sills by hand.
I discovered very quickly that even an easy-to-build kit will take a LONG time if you do it right - and by "right" I mean painting and preparing the parts as much as possible before assembly. Sure, if I'd just put this structure together - believing "all parts molded in appropriate colors" - it'd just look like a plastic building. Investing extra time and effort before assembly makes a huge difference.

Next up - brick mortar lines:

In a previous post I asked for advice on how to do the brick mortar lines - and I really appreciate everybody who weighed in both in the comments and by email. As you can see above, I tried a number of techniques (using - primarily - the "extra" office walls for practice), but finally settled on a wash of PollyS MILW Gray, thinned 5:1. Of course, after I did this John mentioned that Ballantine's likely would have painted its brick walls red - including mortar - to comply with Wethersfield historical sensibilities(!)

But I'm pretty happy with how my gray wash worked and will likely use it in the future. (translation: I'm not undoing these cool mortar lines).
Like most of you, I do my hobby in fits and starts - all too often life hijacks modeling plans. So it was a while before I was able to get back to this project after the mortar lines were done. But, thankfully, today all the parts FINALLY got on the workbench for assembly ...
FINALLY starting construction!

I painted all the small parts on their sprues for easy handling, but to save construction time, I used my sprue nippers (which I highly recommend, btw) to remove them all and divide them up in separate compartments.

I wanted to remove the wall caps but they're similar enough I didn't want to confuse them - so I labeled them with a sharpie.
Windows & doors go in first. I used Tenax most of the time - applied with a microbrush - but used the thicker glue (in the needlepoint applicator) for the loading doors (the microbrush had a hard time getting to the joint)

Next is glass, applied with canopy glue- works like Elmer's white glue, dries totally clear.

While waiting for the windows to dry (recommended handling time is 3 hrs) I decided to assemble whatever else I could. Here's the sign. Clamp parts in place, then flow Tenax along the joints.

Although I didn't need the "roof-top office" I figured it might make a nice building in its own right - and I didn't need the spare parts for anything else - so I set it up in my gluing jig and, again, flowed Tenax along the joints. Here it is upside-down with the roof being attached.

FINALLY! Walls are going up!
From this point on, things go pretty quickly. Just be careful you make tight corners (make sure at least one of the gluing surfaces are paint-free and that all gluing surfaces are free of burrs). The kit comes with a base that helps line things up. Since I knew what side would face the backdrop, I planned to put that wall on last. That way any fudge-factor would be hidden from view. In between allowing joints/corners to dry, I added the roof-top vents and put together the chimney (note to self: paint vents gray/silver in the future).

Next up - finishing the walls, and adding the roof and loading docks, I'm not sure yet how I want to go about adding the loading dock roofs (they're at an angle and can't be clamped in place), and I discovered that removing that roof-top office wall may require some finessing (there's a gap in the wall top covers where it used to be).

But all in good time. Once the painting & wall prep was done, things went more quickly - but it still took me part of an afternoon & evening to get to this point. I'm really glad how it's turning out though. Hopefully I'll have it ready to go on the layout by next weekend - provided life doesn't get too much in the way...

Wintertime is the best time for modeling - so I hope you're able to get to your workbench too!