But be ruthless with yourself and don't underestimate the benefit of just fixing the problem. Turns out, knowing "you can always do it over" is one of the best antidotes to analysis paralysis. Just keep going - and if things don't turn out as you thought, go at it again.
I've been in this place a few times before, even having to lower the backdrop in Wethersfield (click here for that story). And here I am again - realizing that the cool static grass I applied next to some loading docks at "Tartan Textiles" (future home of Stanley Chemical), needed to come out.
Heh - it hardly had the chance to dry! Guess I'm starting to practice a little of what I preach. Thankfully, it wasn't as hard or as painful to fix as I'd feared...
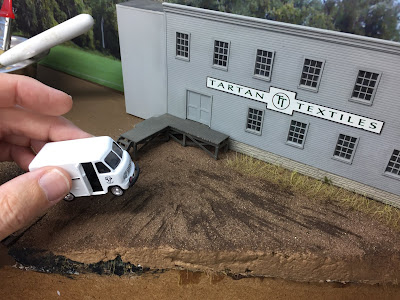
The first step to turning this grassy area into a loading area was to get a putty knife and scrape off the grass. Thankfully, the grass (cuz it's all "static-y") stays nice and close in little piles as you scrape it off the ground goop and you can collect it to reuse somewhere else. Little/no waste!
Believe it or not, this is how it looked after the grass was scraped off. Of course, you can still see the remnants/stubble.
Next, all this area was covered with my ground goop mixture, troweling it thicker toward the fascia to level out the lot (it's not that clear in the photo above, but the terrain dropped off here toward the aisle).
 |
| Note how much goop there is at the edge of the fascia - shows how much I had to build up the terrain to level it off. |
First step was to mark the footprint of the structure itself. I also made marks noting other places I'd add grass (see the curved pencil line on the ground, upper left).
Then I dropped a bead of thick Aleene's Tacky Glue along my pencil lines, and swirled it over the larger areas where I wanted grass to "grow." I then spread it with a brush dipped in water - brushing it toward the center of the building's footprint. This would ensure 1) that grass wouldn't go too far outside the outline of the building, and 2) it would go a bit under the foundations.
Then it was a matter of shaking on the grass. This time, I used shorter lengths (more 4-6mm rather than 8-10mm) and added more green to get the color closer to what's on the backdrop.
I went through the same process around the textile building, but here I experimented with a few "dots/blobs" of glue to simulate isolated clumps of weeds.
Grass applied and waiting a LONG time (at least overnight) for the thick glue to dry.
And here's what awaited me the next morning (after I vacuumed up the excess grass with my static-grass-dedicated hand vac).
Note the clump of grass/weeds there at the top left, and in the foreground near where the loading docks will go.
I think the grass does a much better job of "planting" the building than the goop did. Of course, I'll likely come back and add some individual clumps of weeds along the platform supports and such. But for now, I'm really liking how this is turning out. Note there's no grass in front of the side door nor by the bottom of the stairs. That was all planned ahead with my pencil marks.
Front view. Remember, you can always click on the photos to get a larger view.
And here's the loading dock area, looking much more like a loading dock area than a grassy field.
Again note the clumps of grass/weeds here and there - all the result of planning ahead of time with my pencil marks and glue application.
I especially like how the grass disguises the fact that not all of the platform supports actually touch the ground(! don't tell anyone....)
The next thing I should really do is try and apply some static grass between the rails and ties - but I'm worried I'm going to mess things up. Have any of you done that successfully? If so, help a brotha out and let me know how you did it. Exactly. With detailed step-by-step instructions. ;^)
Since I don't yet have the courage to try that myself, I figured I'd tackle something easy. Like pouring my first river.
Yeah. Right.
But at least I got started. Actually removed the bridge without damaging it, and troweled on - you guessed it - some ground goop to hide the plywood grain and cover the screw heads. Hopefully the surface texture won't be a problem. But if you think it will be, please let me know!
All in all, a pretty productive weekend. I may have to take a step back occasionally, but as long as I can get at least two steps forward here and there, actually getting some scenery on the layout makes it more than worthwhile.


No comments:
Post a Comment