

Wednesday, August 19, 2020

Monday, August 17, 2020
Motivated Modeling Monday - Work on the Dividend House Continues...
Hobby time last week was mostly occupied by storm cleanup. Fortunately, the town cleaned up the major trees and branches - which was good since I couldn't get my chainsaw started. Ended up I'd flooded it.
And it occurred to me that that's often a metaphor for the hobby. We often get so flooded with information and input that we fail to start. When that happens, you have to take things apart, dry them out, and clean them up.

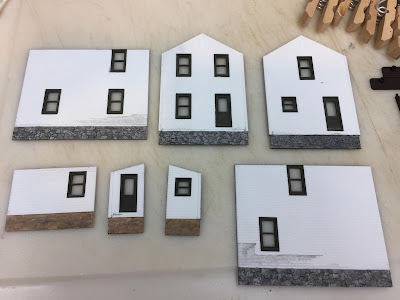
A clean workbench can be a great motivator - you just wanna take advantage of the great space to just work on something. So, since I'd gotten the walls of the Dividend house weathered, I figured I'd work some more on that. Here's where things started - all the weathered walls laid out . . .

Before assembling the walls though, I decided to add clear styrene "window glass" and curtains.

Window treatments are often overlooked, and they do take a bit of time to cut out and apply, but I think they really add to the overall "lived in" look of the model and imply there's something going on inside (even if you don't do an interior).

The window treatments are an old sheet of them I found in my scrapbox - which I then scanned and print out on a color printer as needed.

I also decided to add some Tichy shutters to the front wall to dress things up just a little. . .

Unlike the Goff Brook Farmhouse, in addition to the green window frames and shutters, I decided to narrow the front porch. These City Classics kits just beg for modification, so you might want to try this yourself.

I started by cutting down the porch supports to just two (down from three) and then used that to determine the porch width. I've dry fit the supports above and cut the porch down, allowing for an overhang similar to the "factory" end.

To allow room for a strip of styrene to finish off the cut end, I again used the porch support for a template to guide how much to cut back.

The proper size styrene strip is .040x.065 but the closest I had on-hand was .020x.066, so I just laminated two strips to get the proper thickness. Once all dry & cured, I'll file and fill as needed.

I cut down the roof support the same way I did the porch support (from 3 down to 2) and then used it to determine the width of the ledger board and front fascia trim board.

Here are the three pieces ready for assembly. First, I glued the fascia board to the front of the roof support. Then I needed to make sure the sides were nice and square before adding the side boards

This is where having a perfectly level workspace really pays off . . .

Once I could rest the assembly on its side, I was confident it was nice and square.

Next, I needed to add the side pieces. As you can see here, my steel blocks are a little too low to mock this up easily for gluing.

So, I just raised them the proper amount using stripwood. As you can see above, the side piece is now perfectly lined up and ready for gluing.
And that's where things currently stand. I don't even want to admit how long this all took, since there doesn't seem to be nearly the amount of progress I'd expect for the time I spent.
But another of the many lessons I'm learning from this project is that ANY progress - no matter how minor - is still SOME progress. It's much better to keep moving forward, even if the pace seems glacial sometimes. You may not get nearly the amount done think you should for the time you spend - but it's still LOTS more than you'd have done if you'd done nothing at all.
Seems pretty obvious, but I'm surprised how I have to keep relearning this lesson. And I don't think I'm alone.
So, I'll continue plugging along, listening to my podcasts, '40s music, and old-time radio shows and eventually I'll have some real progress to show. And I suspect the more I do, the faster I'll get.
Fingers crossed!
Thursday, August 13, 2020

Monday, August 10, 2020
Meh Modeling Monday: Weathering Walls on Three Different Houses
By way of a quick update since my last post, lots of nothing happened last week - other than a major storm, five days of power outage, no internet, and little modeling to report. I even missed posting a Wordless Wednesday for the week - and I don't think I've ever missed one of those during the almost 7 years of this 'ere blog.
Ah well. That's life. Fortunately, we have a generator that kept the fridge cold, the food saved, and the lights on. But it couldn't generate much motivation for modeling. I did get pretty good at timing the fueling, changing the oil, and (at least attempting) trying my hand at getting two chainsaws refurbished and started. Thankfully, the trees that came down on both sides of our house actually missed the house - but not the wires. And between the utility company and the town, they all got cleaned up. Good thing - the chainsaws are now at the repair shop.
I did however gin up enough enthusiasm to try some more weathering on the house I plan to put behind the tracks at Dividend, as well as on an outhouse and a doghouse. To wit:

The walls of the house had been spray painted white, but in the last post I described how the alcohol/ink foundation weathering had seeped under the masking tape. So, though I covered those mistakes with some more white paint, I decided to go ahead and brush paint white over the entire walls to give them an "uneven" effect. Then I drybrushed a variety of different grays to represent peeling/worn paint.

Click on the image for a closer view and let me know what you think. While I was at it, I also decided to use a similar technique (though this time I also added some raw and burnt sienna) on the outhouse. I think the house came out ok - but the outhouse? Meh - not really sure.

After a farmhouse and an outhouse, I decided to build & weather a dog house. I again used the same dry brushing technique, but I really think I'd do well to remember to use a hair dryer and dry each color thoroughly before drybrushing on the next color. Failing to do so tends to allow the different colors to actually blend together rather than being distinct as they should be. I think I got away with it though. The dog house came out halfway decent (though, admittedly, I need to be sure and "plant" it - it's just sitting on, rather than in, the grass for now).
Not much progress for a whole week - but given the circumstances, I'll take any progress as a success. Hope the coming week is more productive and I have more to report soon.
At least I hope to post a Wordless Wednesday this week!
Hope you and yours are doing well despite storms, pandemics, and heat waves. I can attest to the fact that the basement is a great place to be this time of year - whether to work on your layout or to wait out a hurricane - and it's the coolest place in the house!
Ah well. That's life. Fortunately, we have a generator that kept the fridge cold, the food saved, and the lights on. But it couldn't generate much motivation for modeling. I did get pretty good at timing the fueling, changing the oil, and (at least attempting) trying my hand at getting two chainsaws refurbished and started. Thankfully, the trees that came down on both sides of our house actually missed the house - but not the wires. And between the utility company and the town, they all got cleaned up. Good thing - the chainsaws are now at the repair shop.
I did however gin up enough enthusiasm to try some more weathering on the house I plan to put behind the tracks at Dividend, as well as on an outhouse and a doghouse. To wit:

The walls of the house had been spray painted white, but in the last post I described how the alcohol/ink foundation weathering had seeped under the masking tape. So, though I covered those mistakes with some more white paint, I decided to go ahead and brush paint white over the entire walls to give them an "uneven" effect. Then I drybrushed a variety of different grays to represent peeling/worn paint.

Click on the image for a closer view and let me know what you think. While I was at it, I also decided to use a similar technique (though this time I also added some raw and burnt sienna) on the outhouse. I think the house came out ok - but the outhouse? Meh - not really sure.

After a farmhouse and an outhouse, I decided to build & weather a dog house. I again used the same dry brushing technique, but I really think I'd do well to remember to use a hair dryer and dry each color thoroughly before drybrushing on the next color. Failing to do so tends to allow the different colors to actually blend together rather than being distinct as they should be. I think I got away with it though. The dog house came out halfway decent (though, admittedly, I need to be sure and "plant" it - it's just sitting on, rather than in, the grass for now).
Not much progress for a whole week - but given the circumstances, I'll take any progress as a success. Hope the coming week is more productive and I have more to report soon.
At least I hope to post a Wordless Wednesday this week!
Hope you and yours are doing well despite storms, pandemics, and heat waves. I can attest to the fact that the basement is a great place to be this time of year - whether to work on your layout or to wait out a hurricane - and it's the coolest place in the house!
Monday, August 3, 2020
Manic Modeling Monday
So after all the rabbit holes and navel gazing lately, I decided to do some more modeling - on a wide variety of things. . .
First off, I painted up some more (and, as it turns out, the last) of the whistle posts I got from my buddy ChrisZ. They're super cool since they not only have recessed "W"s just like the prototype, but also include the beveled corners. You can barely make them out in HO scale, but they're there - just like they should be.


The house has a stone foundation under the main house, and a concrete foundation under the addition. Having gotten acclimated to using multiple colors to get a better effect, I decided to use a couple of "concrete colors" and applied them using a leopard spotting technique.

I used that same leopard spotting technique using 4 different grays on the stone foundation . . .

. . . then I used my alcohol and india ink wash over all the foundations to tone down the spotting, blend everything together, and make the dividing lines pop.

Unfortunately, I must not have had the masking tape tight enough - or I used too much A&I - since it bled under. I figured I'd fix it with some more white paint later.

But first, I decided to give the window frames and doors a contrasting color of green to make this house a bit different from the other one. Jury's still out on whether it was faster to do all this masking & spray paint, rather than just painting it all with a brush. But I will attest to the fact that it was much less harrowing - and no steady hand required (so I could drink as much coffee as I wanted!)

Also, to give this house a different character, I decided to use some Tichy small shutters (p/n 8039). They're a perfect match for the size of the windows in this kit. Just put them on some masking tape to hold them . . .


Speaking of seepage - it was also time to touch up my earlier masking misfortune. Out came the white craft acrylic and a brush . . .

. . . and I just brushed right over it. I'm getting a LOT more patient with myself about not making things look perfect. And this certainly is anything but perfect. But it's a house literally right by the tracks and I also plan to weather it. So I don't think this'll end up looking all that bad - in fact, it may make it look just right.
Finally, I got around to planting the (formerly) white picket fence I put together and weathered. I used thick, gap filling CA to glue the sections to the arbor and glue the corner together. It's a pretty delicate fence and came out a bit bent, so it was critical that the mounting holes were straight. I drilled the holes with a 1/16" bit in my Dremel - the instructions suggested a 3/32, but I wanted a bit of play to make sure I could make the fence nice and straight during final positioning.
I filled the holes with Aleene's Quick Dry Tacky Glue and put the fence in. The extra play helped me get everything nice and straight, but I had to be a bit creative in bracing everything while the glue dried.

An old boxcar body (which I used to use for airbrush practice) fit the bill - and the plot - nicely. Actually looks kinda cool.

But the proof is in the positioning. Everything lined up nice and straight.

So that's all the modeling for the moment. I've gone back to the bench to work some more on my K-1 mogul - still vacillating between taking the time to dial-in the TCS decoder motor control vs. just using a Tsunami2. But I won't be doing any operating sessions any time soon, so there's really no hurry on that so I can take my time.
In the meantime, I'm enjoying doing more modeling and making more progress.
Until next time!

First off, I painted up some more (and, as it turns out, the last) of the whistle posts I got from my buddy ChrisZ. They're super cool since they not only have recessed "W"s just like the prototype, but also include the beveled corners. You can barely make them out in HO scale, but they're there - just like they should be.

And because of those recessed "W"s, they're actually pretty easy to paint. Just spray on white & once dry, use a fine tipped brush to put some black in the Ws. As you can see above, you don't need to be at all perfect . . .

. . . because once the black is dry (and craft acrylics dry very fast, especially in these small amounts), you then go back over the Ws with white paint, drybrushed on until the black "outside the lines" disappears - as you can see above.
Since I was in the paint shop anyway (and enjoying more podcasts) I decided to tackle the house I'll be putting behind the tracks at Dividend. I'd sprayed the walls white a couple of weeks ago (when I also introduced this project, toward the end of the post) so it was time to paint the foundations.

The house has a stone foundation under the main house, and a concrete foundation under the addition. Having gotten acclimated to using multiple colors to get a better effect, I decided to use a couple of "concrete colors" and applied them using a leopard spotting technique.

I used that same leopard spotting technique using 4 different grays on the stone foundation . . .

. . . then I used my alcohol and india ink wash over all the foundations to tone down the spotting, blend everything together, and make the dividing lines pop.

Unfortunately, I must not have had the masking tape tight enough - or I used too much A&I - since it bled under. I figured I'd fix it with some more white paint later.

But first, I decided to give the window frames and doors a contrasting color of green to make this house a bit different from the other one. Jury's still out on whether it was faster to do all this masking & spray paint, rather than just painting it all with a brush. But I will attest to the fact that it was much less harrowing - and no steady hand required (so I could drink as much coffee as I wanted!)

Also, to give this house a different character, I decided to use some Tichy small shutters (p/n 8039). They're a perfect match for the size of the windows in this kit. Just put them on some masking tape to hold them . . .

. . . then spray everything with Rustoleum Camouflage Deep Forest Green (p/n 279175).

It took a LOT more time to do the masking than the painting - but, again, very low stress provided you make the masking tape nice and tight. This time, I rubbed/embossed all the edges of the tape with the side of a toothpick to make sure nothing would seep under.

Speaking of seepage - it was also time to touch up my earlier masking misfortune. Out came the white craft acrylic and a brush . . .

. . . and I just brushed right over it. I'm getting a LOT more patient with myself about not making things look perfect. And this certainly is anything but perfect. But it's a house literally right by the tracks and I also plan to weather it. So I don't think this'll end up looking all that bad - in fact, it may make it look just right.
Finally, I got around to planting the (formerly) white picket fence I put together and weathered. I used thick, gap filling CA to glue the sections to the arbor and glue the corner together. It's a pretty delicate fence and came out a bit bent, so it was critical that the mounting holes were straight. I drilled the holes with a 1/16" bit in my Dremel - the instructions suggested a 3/32, but I wanted a bit of play to make sure I could make the fence nice and straight during final positioning.
I filled the holes with Aleene's Quick Dry Tacky Glue and put the fence in. The extra play helped me get everything nice and straight, but I had to be a bit creative in bracing everything while the glue dried.
 |
| I also dusted on some Woodland Scenics Burnt Grass Fine Turf to cover up the glue & holes. I vacuumed it up once everything dried. |

An old boxcar body (which I used to use for airbrush practice) fit the bill - and the plot - nicely. Actually looks kinda cool.

But the proof is in the positioning. Everything lined up nice and straight.

So that's all the modeling for the moment. I've gone back to the bench to work some more on my K-1 mogul - still vacillating between taking the time to dial-in the TCS decoder motor control vs. just using a Tsunami2. But I won't be doing any operating sessions any time soon, so there's really no hurry on that so I can take my time.
In the meantime, I'm enjoying doing more modeling and making more progress.
Until next time!

Thursday, July 30, 2020
Thoughtful Thursday: Is (prototype) Model Railroading Fun?

Ever since I picked up my first issue of Model Railroader (January, 1983), the motto "Model Railroading is Fun!" has been emblazoned somewhere at the top of the front cover. Model railroading is "The World's Greatest Hobby" (another motto) - and for good reason: Arguably no other hobby offers as diverse a range of opportunities to learn & practice different skills. From engineering/planning, to carpentry, electrical work & electronics, painting, sculpture, and of course modeling, model railroading really has it all.
It also has probably more than its fair share of rabbit holes to fall down. And one of the largest comes under the broad heading of "Research." We all know folks in the hobby that never get beyond the research stage (aka "armchair modelers") whether from genuine enjoyment and satisfaction, or as a result of "Analysis Paralysis." For some, research is an end in itself and all they care to do.
So-called "prototype modelers" are especially prone to falling down this rabbit hole. And, as an aspiring prototype modeler myself, I've fallen down it more times than I care to count. Most recently this past couple of weeks, while I tried to figure out a more prototypical way to operate my model of the New Haven Railroad's Connecticut Valley Line in the Autumn of 1948.
While immersed in that diversion, I got to thinking (always a scary prospect, especially for one prone to over thinking):
"Is Model Railroading actually 'Fun'?"
The answer to that question is (or at least should be) "yes." It's a hobby, after all, and if it's not fun then you're doing it wrong.
But that's "model railroading" - what about "railroad modeling" or, more specifically "prototype modeling."
Is prototype modeling "fun?" Is it supposed to be?
Think about someone who has a passion for restoring old houses or antique cars, or curating a museum, or producing a documentary. All those things are probably enjoyable to the folks doing them, and they're hopefully very satisfying endeavors. But are they actually "fun?" I don't know that we typically think of such folks as having fun doing what they're doing. They may love what they're doing and may be passionate about preservation, or research, or sharing knowledge. They're probably enthusiastic about it as well. But are they having fun?
What about prototype modelers - especially the "serious" ones (or those that aspire to be)?
"I don't operate my layout between operating sessions - it's replicating a real railroad and since the real railroad didn't operate without a purpose, neither will I."
"I'm not including that (track, structure, road, tree) - it wasn't on the prototype."
"I'm not going to use car cards to operate the layout - the prototype didn't, so neither am I."Sound familiar to anyone? %^) Certainly, if the intent of the prototype modeler is to create a simulation of the actual thing - an operating version of what is essentially a museum diorama - a documentary rather than a novel - then this sort of thinking becomes (hopefully) a bit more understandable to
But I don't know that I'd call it "fun" necessarily. "Satisfying" - "eductional" - "enriching" - "informative" - those are all words that come to mind first.
Lionel Strang illustrates the point from another perspective. He asks the question (roughly): "What type of movies do you remember most - that moved you the most - that you enjoyed the most? Were they documentaries or fiction?"
I think we can guess his answer. And I have to admit - as much as I enjoy historical research and documentaries - fiction is often more entertaining than fact. More "fun" you might say.
So I guess all these rough notes/thoughts essentially boil down to this: What is it you're trying to do with your project - be it a "model railroad" or a "railroad model"? What's your intent? What story are you trying to tell? Is it fiction, "based on true events" (as some of the movies say)? Is it total fantasy and 100% a product of your own imagination? Is it an impression of the past, or a photograph?
And perhaps the most important question: "What do you enjoy most?"
"Having fun" is a great answer - especially when it comes to a hobby.
"Recreating a time and place" is also a great answer, but be prepared that it may not be as much "fun" as it is satisfying and enriching.
I've thought for a long time that I was firmly planted on the "prototype" end of the spectrum, but I have to admit that it has its downside (producing long, navel-gazing blog posts being one of them, apparently). I don't want to have to admit how much time I've
And I have to admit, while there have been many instances of joy in the discovery of a missing puzzle piece in my prototype research, some of the most fun I've had in the hobby lately has been working on the "fictional" modules or completing a freelance scene using a friend's structures instead of faithfully following the prototype at East Berlin, CT.
To a certain extent, we're all prototype modelers - and we're all freelance modelers. If nothing else, the freelancers have to use prototype railroad equipment, and the prototypers have to use selective compression to varying degrees.
And if we're all "proto-freelancers" (and not being paid by a museum to faithfully and perfectly produce a prototype scene), then we're probably free to pick whatever point on the spectrum that we enjoy most.
I, for one, won't be moving the needle too far over toward "freelance" any time soon, but I will take a break from trying to reproduce prototype paperwork and do some more modeling. There's a picket fence that needs to be installed in front of the house across the street from John Wallace's house.
Before you ask, while John's house is perfect miniature of the real thing, the house across the street - and it's fence - are purely products of my own imagination.
And I'm having a ton of fun doing it!
Wednesday, July 29, 2020

Subscribe to:
Posts (Atom)