First off, I painted up some more (and, as it turns out, the last) of the whistle posts I got from my buddy ChrisZ. They're super cool since they not only have recessed "W"s just like the prototype, but also include the beveled corners. You can barely make them out in HO scale, but they're there - just like they should be.
And because of those recessed "W"s, they're actually pretty easy to paint. Just spray on white & once dry, use a fine tipped brush to put some black in the Ws. As you can see above, you don't need to be at all perfect . . .
. . . because once the black is dry (and craft acrylics dry very fast, especially in these small amounts), you then go back over the Ws with white paint, drybrushed on until the black "outside the lines" disappears - as you can see above.
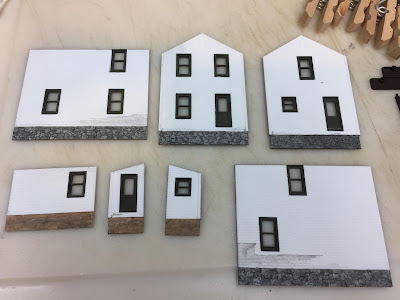
Since I was in the paint shop anyway (and enjoying more podcasts) I decided to tackle the house I'll be putting behind the tracks at Dividend. I'd sprayed the walls white a couple of weeks ago (when I also introduced this project, toward the end of the post) so it was time to paint the foundations.
The house has a stone foundation under the main house, and a concrete foundation under the addition. Having gotten acclimated to using multiple colors to get a better effect, I decided to use a couple of "concrete colors" and applied them using a leopard spotting technique.
I used that same leopard spotting technique using 4 different grays on the stone foundation . . .
. . . then I used my alcohol and india ink wash over all the foundations to tone down the spotting, blend everything together, and make the dividing lines pop.
Unfortunately, I must not have had the masking tape tight enough - or I used too much A&I - since it bled under. I figured I'd fix it with some more white paint later.
But first, I decided to give the window frames and doors a contrasting color of green to make this house a bit different from the other one. Jury's still out on whether it was faster to do all this masking & spray paint, rather than just painting it all with a brush. But I will attest to the fact that it was much less harrowing - and no steady hand required (so I could drink as much coffee as I wanted!)
Also, to give this house a different character, I decided to use some Tichy small shutters (p/n 8039). They're a perfect match for the size of the windows in this kit. Just put them on some masking tape to hold them . . .
. . . then spray everything with Rustoleum Camouflage Deep Forest Green (p/n 279175).
It took a LOT more time to do the masking than the painting - but, again, very low stress provided you make the masking tape nice and tight. This time, I rubbed/embossed all the edges of the tape with the side of a toothpick to make sure nothing would seep under.
Speaking of seepage - it was also time to touch up my earlier masking misfortune. Out came the white craft acrylic and a brush . . .
. . . and I just brushed right over it. I'm getting a LOT more patient with myself about not making things look perfect. And this certainly is anything but perfect. But it's a house literally right by the tracks and I also plan to weather it. So I don't think this'll end up looking all that bad - in fact, it may make it look just right.
Finally, I got around to planting the (formerly) white picket fence I put together and weathered. I used thick, gap filling CA to glue the sections to the arbor and glue the corner together. It's a pretty delicate fence and came out a bit bent, so it was critical that the mounting holes were straight. I drilled the holes with a 1/16" bit in my Dremel - the instructions suggested a 3/32, but I wanted a bit of play to make sure I could make the fence nice and straight during final positioning.
I filled the holes with Aleene's Quick Dry Tacky Glue and put the fence in. The extra play helped me get everything nice and straight, but I had to be a bit creative in bracing everything while the glue dried.
 |
| I also dusted on some Woodland Scenics Burnt Grass Fine Turf to cover up the glue & holes. I vacuumed it up once everything dried. |
An old boxcar body (which I used to use for airbrush practice) fit the bill - and the plot - nicely. Actually looks kinda cool.
But the proof is in the positioning. Everything lined up nice and straight.
So that's all the modeling for the moment. I've gone back to the bench to work some more on my K-1 mogul - still vacillating between taking the time to dial-in the TCS decoder motor control vs. just using a Tsunami2. But I won't be doing any operating sessions any time soon, so there's really no hurry on that so I can take my time.
In the meantime, I'm enjoying doing more modeling and making more progress.
Until next time!


I really like the way that foundation turned out - great technique!
ReplyDelete