

Wednesday, January 14, 2015

Sunday, January 11, 2015
Building Ballantine's Beer Distributor, Part 1
As the Valley Local heads south into Wethersfield, the first industry it encounters is the Ballantine's Beer Distributor. Click here for an introduction to this industry on my layout, and click here for all the posts I've done about it so far (you can also click "Ballantine" on the Topics list).


I discovered very quickly that even an easy-to-build kit will take a LONG time if you do it right - and by "right" I mean painting and preparing the parts as much as possible before assembly. Sure, if I'd just put this structure together - believing "all parts molded in appropriate colors" - it'd just look like a plastic building. Investing extra time and effort before assembly makes a huge difference.
Next up - brick mortar lines:
Like most of you, I do my hobby in fits and starts - all too often life hijacks modeling plans. So it was a while before I was able to get back to this project after the mortar lines were done. But, thankfully, today all the parts FINALLY got on the workbench for assembly ...
I don't know of ANY photos of this building before it was demolished, and have only a sketch John Wallace did from memory:
And, thanks to Bill Shanaman, I also have a photo of one wall as it was being demolished:
Given these bits of information, I finally decided to use Walther's Grocery Warehouse (aka Miranda's Bananas) as a starting point. Here it is as it comes:
 |
| Actually, this photo shows it much more finished and painted nicely. It doesn't look like this right out of the box. |
Strangely, the Walthers photo shows the truck loading dock side of the building (which will face the backdrop on my layout, but the track side is similar). If you imagine this building without the office on the roof, and red brick instead of stucco, and squint a bit while comparing to the sketch and prototype photo, you may agree it's a pretty good start. So let's get going!
First, I had to decide on colors and paint:
- Brick would be red (Floquil Southern Freight Car Red)
- Concrete would be Floquil Foundation
- Windows/Doors - rattlecan gray
- Roofs - PollyS Grimy Black
- Base - rattlecan brown
 |
| After painting the lower walls, but before painting the brick, I used a straight edge and X-Acto to remove the office "appendage" from the trackside wall. |
 |
| Then I had to mask to paint the brick. |
 |
| This was my First Ever masking job, so I did some research and many folks recommended Tamiya tape. I took my time lining things up, and it worked VERY well. I just used the (relatively) expensive Tamiya right where the paint separation would be - for any additional masking I just used regular inexpensive masking tape. |
 |
| I was REALLY pleased with the results of the masking! No bleed or anything. Here I am just painting the concrete sills by hand. |
Next up - brick mortar lines:
 |
| In a previous post I asked for advice on how to do the brick mortar lines - and I really appreciate everybody who weighed in both in the comments and by email. As you can see above, I tried a number of techniques (using - primarily - the "extra" office walls for practice), but finally settled on a wash of PollyS MILW Gray, thinned 5:1. Of course, after I did this John mentioned that Ballantine's likely would have painted its brick walls red - including mortar - to comply with Wethersfield historical sensibilities(!) |
 |
| But I'm pretty happy with how my gray wash worked and will likely use it in the future. (translation: I'm not undoing these cool mortar lines). |
 |
| FINALLY starting construction! |
 | ||
I painted all the small parts on their sprues for easy handling, but to save construction time, I used my sprue nippers (which I highly recommend, btw) to remove them all and divide them up in separate compartments.
|

 |
| Windows & doors go in first. I used Tenax most of the time - applied with a microbrush - but used the thicker glue (in the needlepoint applicator) for the loading doors (the microbrush had a hard time getting to the joint) |
 |
| Next is glass, applied with canopy glue- works like Elmer's white glue, dries totally clear. |
 |
| While waiting for the windows to dry (recommended handling time is 3 hrs) I decided to assemble whatever else I could. Here's the sign. Clamp parts in place, then flow Tenax along the joints. |
 |
| Although I didn't need the "roof-top office" I figured it might make a nice building in its own right - and I didn't need the spare parts for anything else - so I set it up in my gluing jig and, again, flowed Tenax along the joints. Here it is upside-down with the roof being attached. |
 |
| FINALLY! Walls are going up! |
From this point on, things go pretty quickly. Just be careful you make tight corners (make sure at least one of the gluing surfaces are paint-free and that all gluing surfaces are free of burrs). The kit comes with a base that helps line things up. Since I knew what side would face the backdrop, I planned to put that wall on last. That way any fudge-factor would be hidden from view. In between allowing joints/corners to dry, I added the roof-top vents and put together the chimney (note to self: paint vents gray/silver in the future).
Next up - finishing the walls, and adding the roof and loading docks, I'm not sure yet how I want to go about adding the loading dock roofs (they're at an angle and can't be clamped in place), and I discovered that removing that roof-top office wall may require some finessing (there's a gap in the wall top covers where it used to be).
But all in good time. Once the painting & wall prep was done, things went more quickly - but it still took me part of an afternoon & evening to get to this point. I'm really glad how it's turning out though. Hopefully I'll have it ready to go on the layout by next weekend - provided life doesn't get too much in the way...
Wintertime is the best time for modeling - so I hope you're able to get to your workbench too!
Friday, January 9, 2015

Wednesday, January 7, 2015

Sunday, January 4, 2015
Brick Mortar Lines
The last time I did mortar lines on a brick building was c.1983. I'd just built my first structure kit (a Plasticville brick city building, IIRC). It was already molded in red, so "No Painting Necessary." But I'd read somewhere that you could get a neat mortar effect by applying white paint to the walls and immediately wiping it off. It worked great.
Fast forward over almost 32 years later, and I'm ready to try again on my Ballantine's beer warehouse. But things have changed - I've become a more "sophisticated" modeler. I actually paint the brick walls on my kit (heh - it helped that the brick was molded a "stucco" color and I wanted my bricks to be red).
But therein lies the problem - adding mortar lines isn't as easy this time around.
I'd heard of a technique using joint compound, and I tried that first. My efforts are in the photo below:
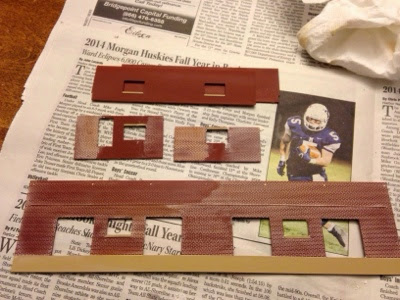
As you can see, the effect is underwhelming. I think the problem may be that the brick red paint I used was Floquil - flat flat flat. And I suspect the reason the compound isn't coming off the face of the bricks as nicely (as it would if the bricks were unpainted styrene) is that the flat brick paint has taken in some of the compound (it hasn't absorbed anything - the walls have been drying for almost two months(!)). Fortunately, that long wall is the wall that will be facing the backdrop. And the other walls won't be used in the final build, so I have some more chances to practice.
Fast forward over almost 32 years later, and I'm ready to try again on my Ballantine's beer warehouse. But things have changed - I've become a more "sophisticated" modeler. I actually paint the brick walls on my kit (heh - it helped that the brick was molded a "stucco" color and I wanted my bricks to be red).
But therein lies the problem - adding mortar lines isn't as easy this time around.
I'd heard of a technique using joint compound, and I tried that first. My efforts are in the photo below:
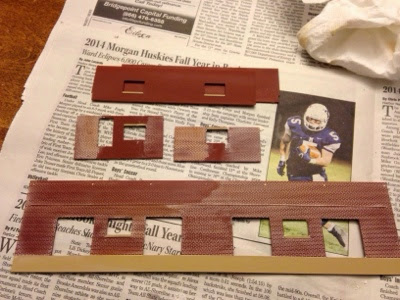
As you can see, the effect is underwhelming. I think the problem may be that the brick red paint I used was Floquil - flat flat flat. And I suspect the reason the compound isn't coming off the face of the bricks as nicely (as it would if the bricks were unpainted styrene) is that the flat brick paint has taken in some of the compound (it hasn't absorbed anything - the walls have been drying for almost two months(!)). Fortunately, that long wall is the wall that will be facing the backdrop. And the other walls won't be used in the final build, so I have some more chances to practice.
The next technique I tried was a wash of light gray PollyS (water based) paint, thinned 3:1 with acrylic thinner. That came out better, but still heavy (too light in color).
Finally, I'm trying thinning 5:1 with 91% isopropyl alcohol. Apply with a brush, then wipe off. That seems to be working ok, though I'm not sure about using alcohol rather than water (or acrylic thinner) to thin PollyS paint. But I thought the alcohol would evaporate more quickly and leave the color in the lines more easily.
Finally, I'm trying thinning 5:1 with 91% isopropyl alcohol. Apply with a brush, then wipe off. That seems to be working ok, though I'm not sure about using alcohol rather than water (or acrylic thinner) to thin PollyS paint. But I thought the alcohol would evaporate more quickly and leave the color in the lines more easily.
Let me know - as always, any thoughts/suggestions/guidance are MOST welcome!
So, whadja get for Christmas?
I love hearing the answers to this question, especially from fellow model railroaders. You may have gotten something I've never heard of and it's neat to hear about all the cool stuff (and get ideas for future shopping lists!).
Santa was good to me this year - not quite sure why since I thought I might be on the Naughty List - but I'm blessed to have a very loving and generous family. And since this is a model railroad blog, I thought it'd be cool to show you what I got...

Looking top to bottom:
- Building software: Making mockups this past fall turned me on to a cool process for making buildings quickly, and I'm hoping this software helps in that effort.
- Resin Casting How-To DVD: I'm hoping that I'll be getting to details soon and populating a layout with hundreds of details (pallets, barrels, etc) can get very expensive if you buy them all commercially. And I'll likely have to scratchbuild the supports for the Rt. 15 bridge over the north end of Wethersfield - and scratchbuilding just one and then casting/copying it will be much better than having to scratchbuild a dozen (and I'm hoping casting them will give me more consistent results).
- Corner punch: for cutting out window & door openings
- "Scenery Tips & Techniques" book: self-explanatory
- "Trackside in Search of Northern New England Steam" : not my specific modeling locale, but still New England and will provide LOTS of great photo reference material for modeling and weathering (all the photos are in color!)
- Resin casting starter kit from MicroMark: all the stuff I need to get started.
Also, not pictured, I got a New Haven gondola kit from F&C (I got one last year too that I haven't built yet, so I'm hitting critical mass for another assembly-line build - soon!), and an animated Ballantine sign (video in yesterday's post - if all you saw yesterday was a big black square, click here to see it). Finally, I used a gift card & money I got to order a distressing brush, another Dremel and drill press vise - both to be used in/on the Dremel workstation (drill press) I got last Christmas. Should come in handy for drilling all the grab iron holes I expect are in my future(!)
So what cool model railroad stuff did you get? Share in the comments below!
Saturday, January 3, 2015
Happy New Year!
I'm a little behind, having been out of state for the last week, but continue to watch this space: My New Year's Resolution is to Do More Model Railroading and make some progress on the layout (not to mention whittling down the number of freight car kits I have!)
I hope you and yours had a wonderful holiday season. Thanks for continuing to follow this blog, and for your comments/feedback. Your support and interaction is what makes this site - as well as this hobby - so worthwhile.
I hope you and yours had a wonderful holiday season. Thanks for continuing to follow this blog, and for your comments/feedback. Your support and interaction is what makes this site - as well as this hobby - so worthwhile.
Happy 2015!
Subscribe to:
Posts (Atom)