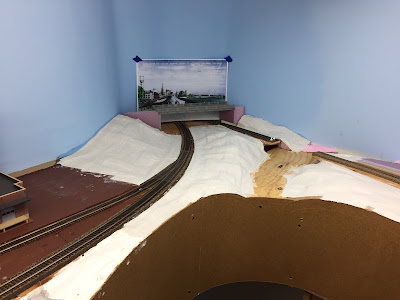
I'm still not quite comfortable with foam as a scenery base (click here for my erstwhile experience), so I rely pretty heavily on tried-and-true cardboard strips and plaster cloth. It's easy, relatively cheap, and - most importantly - I'm familiar and comfortable with it.
I started by hot gluing the first profile strips to the backdrop . . .
The terrain from Ballantine's to the Rt. 15 overpass is a gradual upslope, as you can start to see here.
Construction goes pretty quickly with hot glue and clothespins. I filled in the area between the Valley Line and the Berlin Branch with a small hill to visually separate the two. On the prototype they're miles apart - might as well do what I can to diminish their proximity. The Mattabessett River will be on the right there.
Despite my reluctance to using foam, I admit there are some times when it works much better than cardboard strips - and the area behind the Berlin Branch next to the wall is a good example. Just stack and glue. And rasp. LOTS of rasping - and mess! Not a fan of all those little static-charged particles, but the ShopVac came in handy, for sure!
This was the state of things as I turned my attention to the right & East Berlin proper:
One purpose for the East Berlin branch was to serve brickyards along the line - and the reason the branch went as far as it did was to serve Stanley Chemical, a fairly large paint supplier. On my (admittedly truncated) version of the branch, Kane Brickyard will be in the back right corner and Stanley Chemical will be in the right foreground. It's a fairly compact space, so after the scenery support is done my next step will be to make some mockup structures to see how/whether everything will fit.
Here's the same shot as above with the cardboard strips in. Note that in the narrow areas (foreground), I didn't need a crosspiece. Also note that I covered a gap between the plywood and the wall (on the right side) with a layer of cardboard. That'll all get covered with ground goop later.
While I could have easily covered this gap between the foam and the plywood with a layer of cardboard too (or foamcore as a base for a structure that'll go here), I decided to try some of my drywall mesh tape which is much thinner. All that's needed is something for the ground goop to hang on to.
Did I mention how fast this process goes? I swear, SO much more time is wasted used up by wondering what to do in a particular area than actually doing it. Plaster cloth, while a bit more expensive, is certainly better than plaster-soaked paper towels. I overlapped the sheets by about 30%, but in areas subject to some flexing (leaning on the fascia, for example), I used a double layer.
Compare this with the shot above - and, for that matter, compare these shots with where I was when I started. It's already starting to look better! Certainly evidence of some significant progress - and it only took a few hours!
With the plaster cloth done, the next step would be ground goop and the first layer of scenery, but I'm done here for the time being. Before gooping, I really want to figure out how the brickyard and Stanley Chemical are going to fit in. So more fun research is needed!
I was mentioning to Bill that one of the things I'm really enjoying about this section of the layout is that I don't know a lot about it - and there's not a lot of information available - so I can feel free to freelance a bit and not be so OCD about getting it perfectly identical to the prototype. Just conveying the impression - and telling the story of the line - will be accomplishment enough. And I'm discovering it's an effective antidote to Analysis Paralysis as well.
So I'll continue to surf this wave of motivation for as long as possible. Next, I gotta get back down into Wethersfield proper - and Goff Brook!


Hi Chris:
ReplyDeleteThis is a great post explaning/illustrating, simple, scenery techniques on your railroad. You certainly have a good way of "seeing" what scenery should look like for your area modeled.
BTW, having viewed several videos of the Valley Railroad excursion operatin including the recent track rehab north, can you tell me how many miles of this line is now in service? It looks to be around 5 miles from Old saybrook to Essex and maybe another 5 miles up to Deep river?
Many thanks,
Barry
Hey again Barry and thanks for checking in - especially with such a nice compliment! I've been trying hard to model the area accurately, without at the same time getting paralyzed by not being able to model it perfectly. It's a fine, delicate - and often an elusive balance to say the least. But I'm really glad if it conveys what I hope to.
DeleteAs far as VRR line in service, it's about 13.5 miles - though you rightfully point out it's even just a little bit further than that with the recent refurbishing of track through Haddam Dock Road. The first 4 miles of track from Saybrook Junction to Essex is only used for special occasions (Hand on the Throttle, special moves) and only regularly during "Saybrook Special" weekends in the summer. Otherwise, the track regularly in service goes as far as about MP 13 or so (our dinner train makes it up that far). The regular train and boat goes up to about Chrisholm Marina in Chester before making the trip back. All in all, a beautiful ride in a beautiful part of the country - but then I'm biased :^)
Thanks again for checking in - always great to hear from you!