Monday, August 14, 2017

More Modeling Monday: Goff Brook Farmhouse - main structure, addition, steps & porch

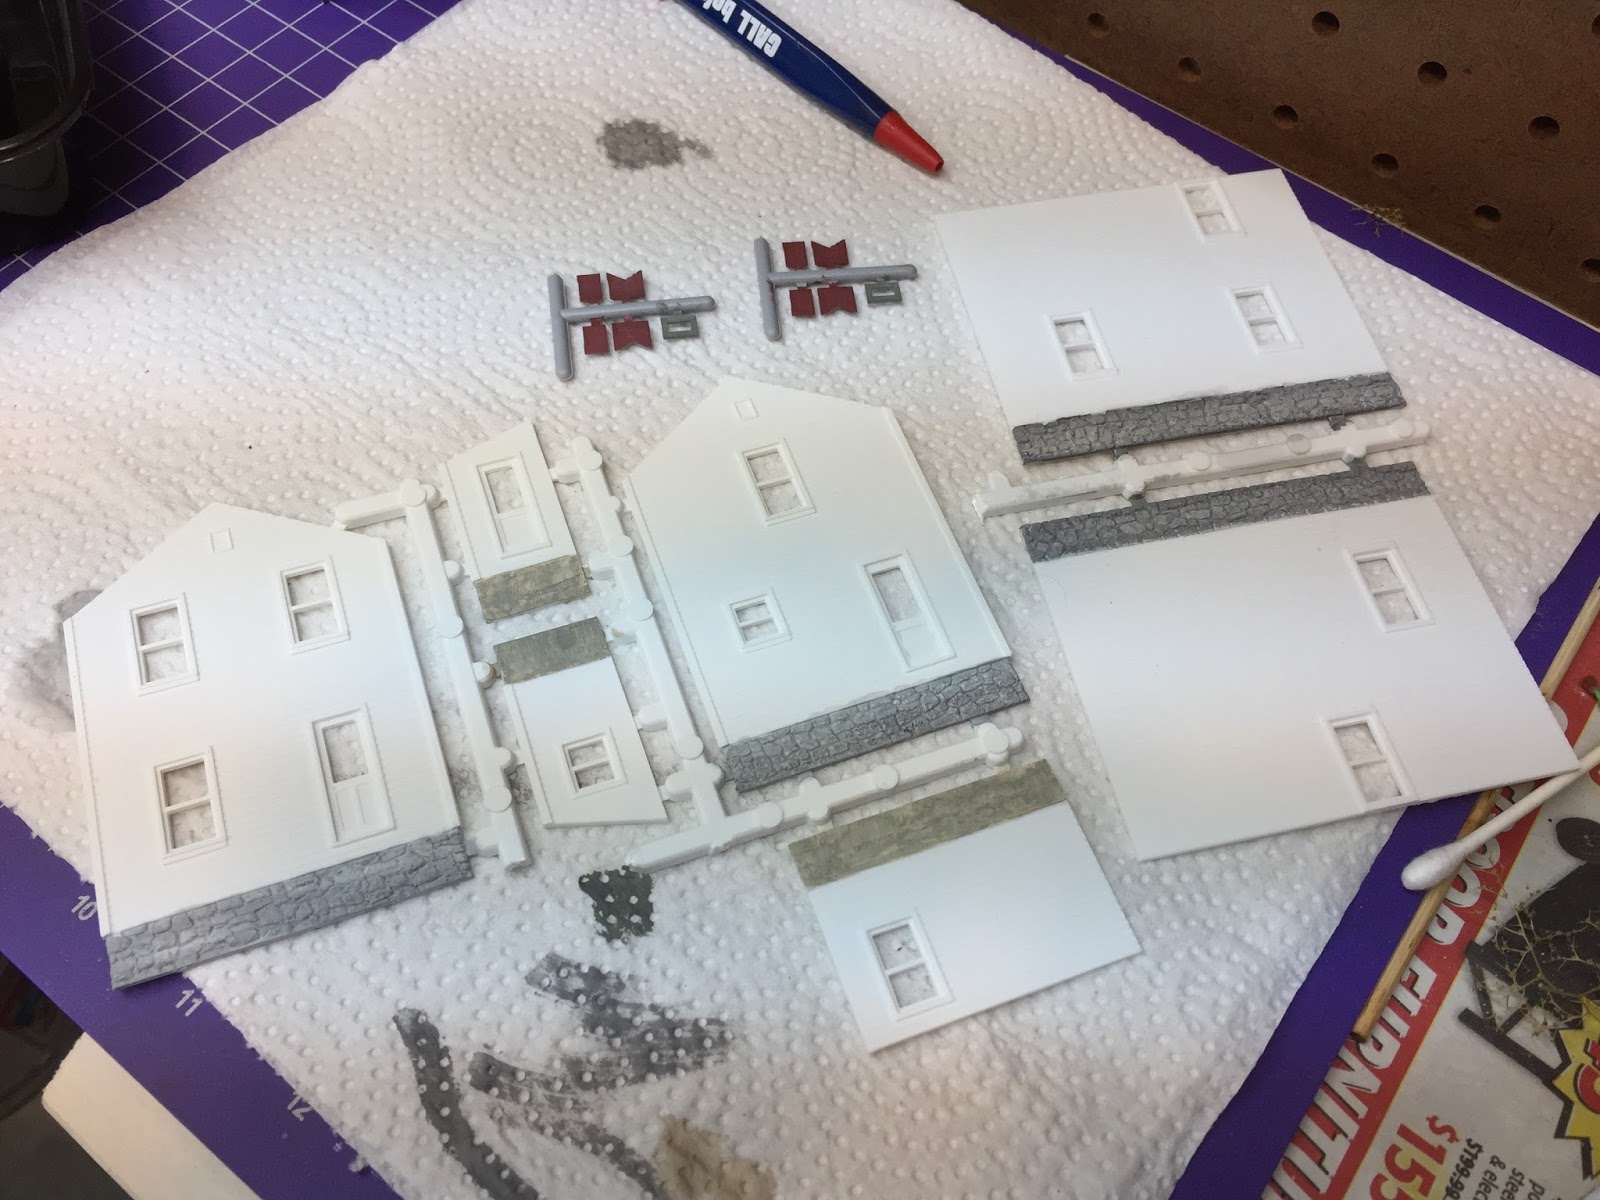
After all the prep and all the painting, glazing the windows & adding the curtains, removing the parts from the sprues and starting assembly, it's finally time to start assembly in earnest. Yes, I'm finally on steps #4 & 5 of the instructions(!) - assemble walls and roof.


As you can see, I'm really getting a lot of use out of this magnetic gluing jig. Not only does it have nice right angles in all 3 planes and a nice flat surface, but it's a "tray" that allows you to move your secured parts safely off your bench for drying.


So,while the main walls and roof were drying off to the side, I started assembling the lean-to addition. First step - like with the mating edges of the other walls - was to use a tip from my friend Dean and make a very slight angle so that the ends of the clapboards will mate tightly against the other wall.


I glued the two sides of the addition to the addition's back wall, let that dry, then attached the addition assembly to the back of the main house, using one of the magnets to press the house and the addition together. I also added the roof on the addition, making sure that the angled edge pressed tight against the back wall of the main house. Note: you could just as easily add the addition to the (other) side of the house if you'd rather.


At this point, I glued the porch support legs to the porch deck. Two things to note here: 1) you will likely need to file/sand the left & right ends of the leg assembly a bit to get it to wedge into the porch deck frame; and 2) make sure that the legs attach to the front of the porch deck - the side that has the flooring overhanging slightly. And don't forget - whenever you can - to scrape/remove any paint from any surfaces that will be glued. That'll make for a much stronger joint.
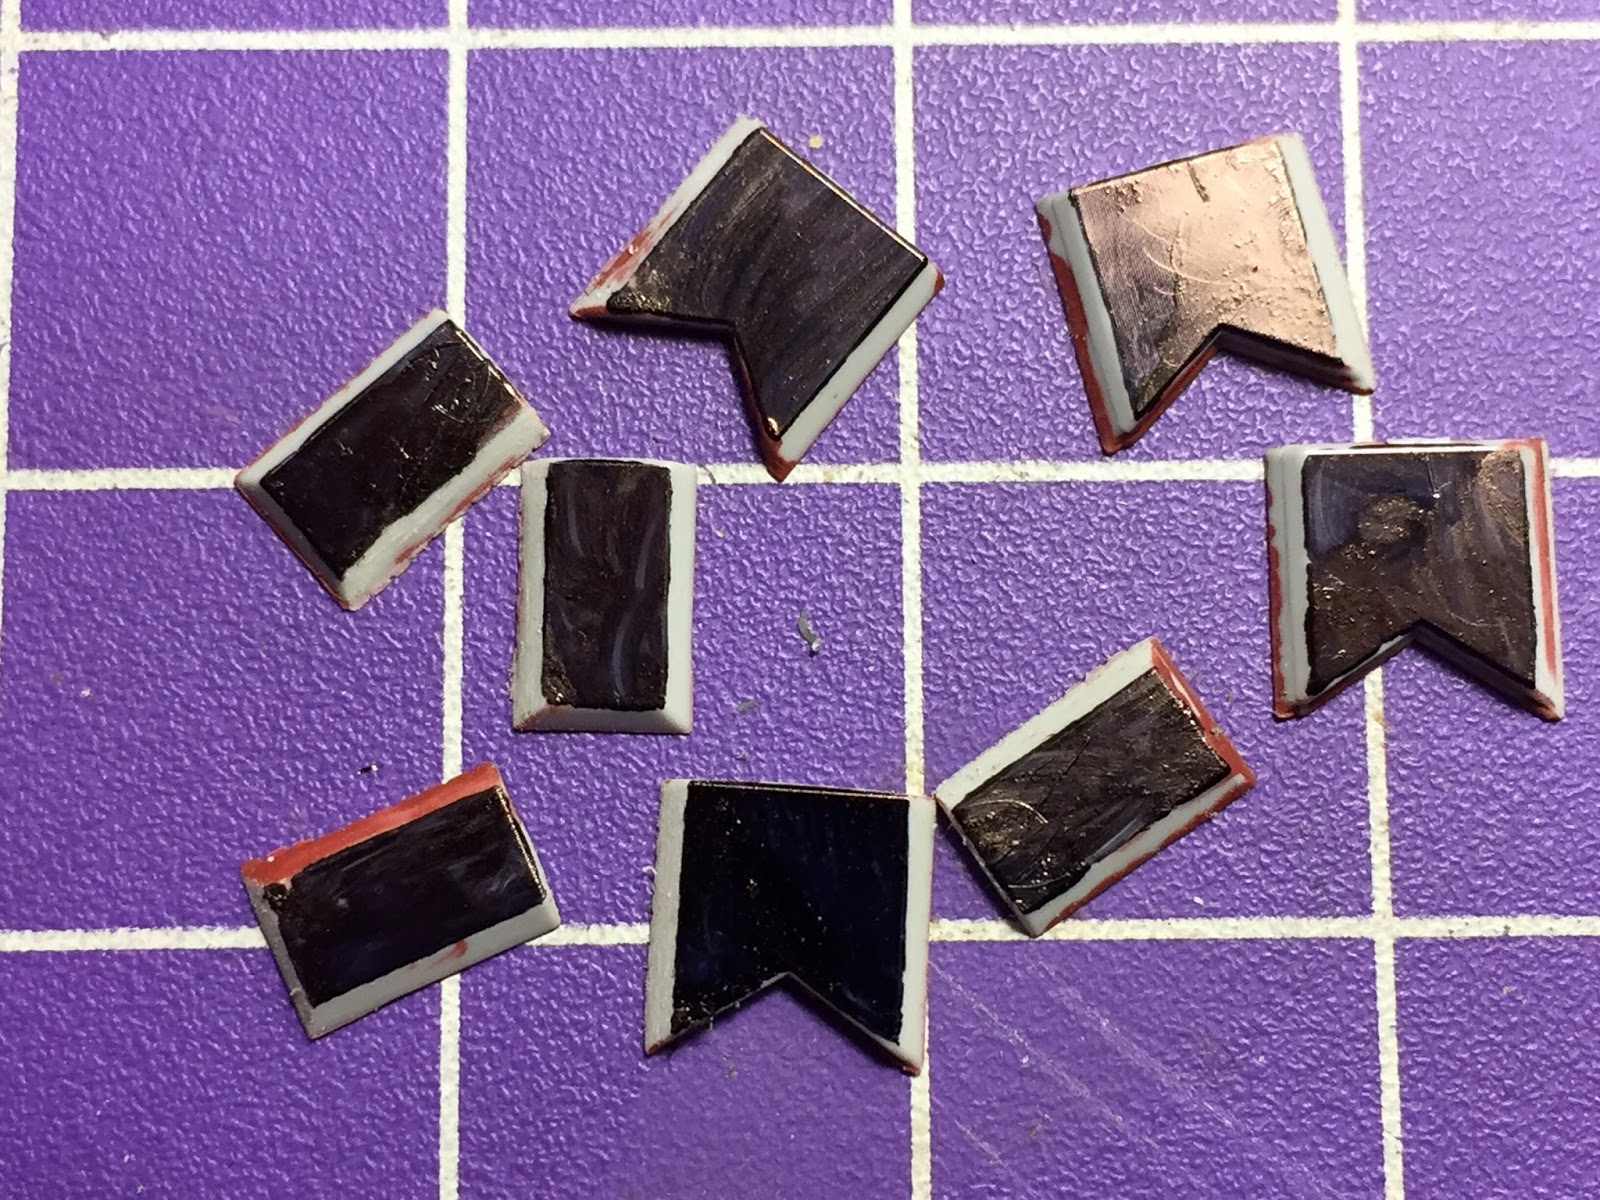

While all that was drying, I remembered to make sure that the inside of the chimney was black. I find that often the easiest way to "paint" small black areas - right at the bench - is to use a black Sharpie.


The chimney parts are so small, no bracing is needed and the edges are milled at 45 degree angles for assembly. Just be sure that the sides are glued at true right angles. Again, the gluing jig makes this easy.


While waiting for other things to dry, I assembled the outhouse. By 1948, the main house would have indoor plumbing and electricity (I would hope - at least my version of it will), so the outhouse will be heavily weathered and probably placed a little off-kilter somewhere out in the backyard. The photo above shows an easy way to ensure that the roof is centered properly - just glue it upside down.

I next turned my attention to the two stair assemblies. The stairs in this kit are the weak spot, literally and figuratively. They're a real pain-in-the-butt to put together and they're always vulnerable to damage (as I found out later).
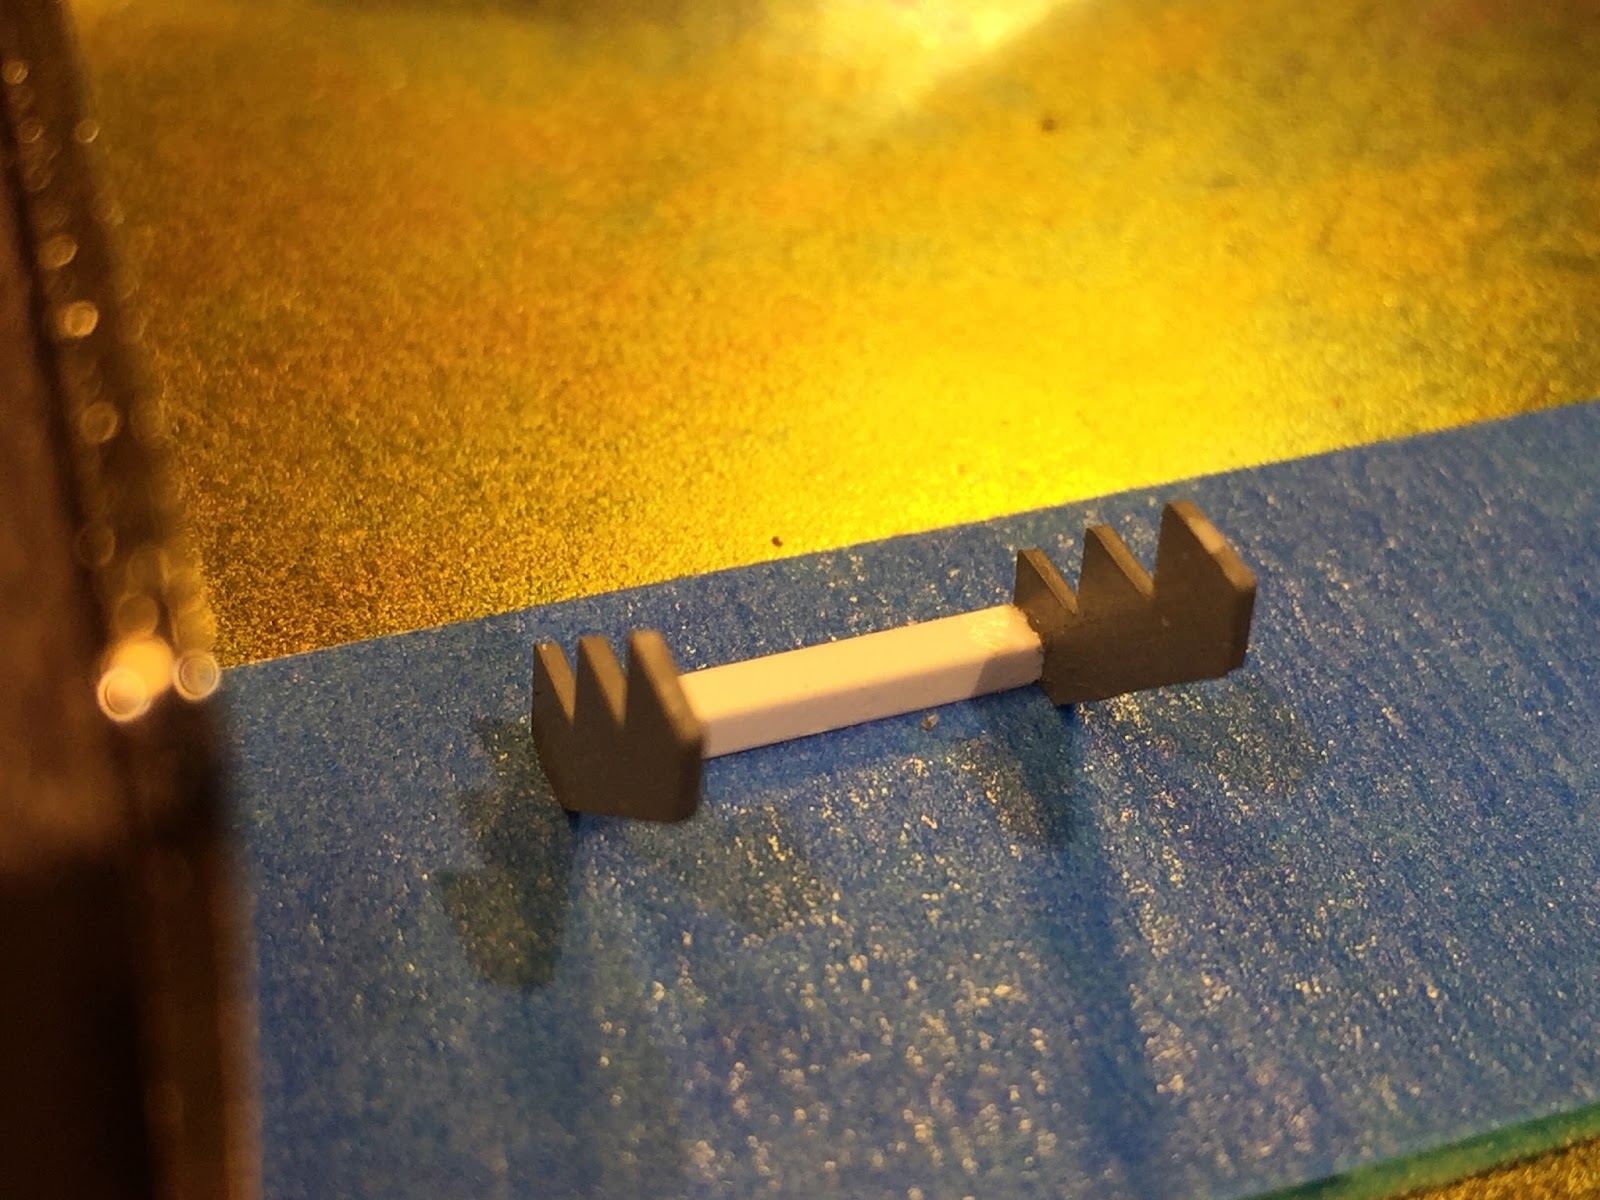

The stringers are supposed to be 1/2" apart and the instructions mention gluing a 1/2" long piece of the leftover 1/16" strip to the house and then adding the steps to it. I thought I'd be clever and glue the 1/2" piece to the stringers first as a spacer and then glue the whole assembly to the house at once.

To hold everything in place for gluing, I used a piece of masking tape - sticky side up, as shown above.


If you assemble your steps this way, be certain the spacer is flush along the backs of the stringers as well as along the tops of the stringers. You can see above that the left stringer is slightly higher. This plagued me later.


But ignorance is bliss, so I pressed on with assembly, figuring I'd just make sure the top step was level and let the spacer (which would be hidden) be at an angle. I used self-clamping tweezers to hold things while I used regular tweezers to apply the stair treads.


And here are the back steps, attached to the addition. My plan was easier in theory than execution. You can see that the top step is slightly angled, but as much of a pain as these steps were to put together, I decided I could live with that rather than redo them.


The porch roof frame was next. In my opinion, this kit relies too much on very small gluing surfaces. In the pic above, you can see what I mean. Next time, I may add little bits of square strip in the inside corners to strengthen these joints.


You can see I rely pretty heavily on this magnetic gluing jig. No less than four magnets holding everything square in the corner for gluing. Like the main walls of the house, I first glued two pieces together, making two 2-piece assemblies (2 "L"s), then I glued the 2 "L"s together.


Again, don't forget to remove any paint from gluing surfaces - especially critical here, where the mating surfaces are so tiny. Also be certain that the four pieces are flush on the bottom, otherwise your porch roof will be slightly off. Ask me how I know.


Continuing with the front porch, next step was to add the roof supports to the roof support frame. The photo above shows paint removal prior to gluing - just scrape with an x-acto.


Be sure not to force the supports at all when you insert them between the roof frame sides. File/sand to fit as needed, or else risk forcing the frame apart. It's also important that the supports be at a right angle to the frame, as shown above.


Once that all dries, it's time to add the porch itself to the house, as well as the porch roof support assembly. As you can see above, I used a scrap piece of balsa to support the back edge of the porch for gluing, and I used a magnet to press the porch against the house.

Adding the roof support was a bit tricky - you want to be certain the sides are level/parallel to the porch and that the frame is level from side to side. Lining up with the clapboards helps - and those same clapboards will make it obvious if your porch roof isn't perfectly level.

Turns out, despite my best efforts, my porch frame was just a wee bit torqued. You can just make out above that I'm using the end of my dial caliper to ever so slightly press down on the right side of the frame to keep it level while the glue dries.
* * *
This assembly session turned out to be pretty long since you can put some things together while you're waiting for other things to dry. So it goes fairly quickly, but it's still a lot to do.

But as you can see, it's starting to look like an Actual House! Not much left to do on the instruction sheet - just add main & porch roofs and chimney - but I want also to add that indoor plumbing (i.e. vent pipes) and some electricity (virtual/modeled only - I'm not planning at this point to actually light the building), all of which will require a little scratchbuilding. Stay tuned!

Friday, August 11, 2017

Friday Fun - A Modeler's Life Interview

I've mentioned before how big a fan I am of podcasts. They're the perfect antidote to a long commute or home projects, and the model railroad ones act as a surrogate "hobby shop cracker barrel" whenever you're working on your layout. I've even been on the other side of the 'cast a couple times before, having called in to Model Rail Radio, but this is the first time I've actually been featured on a podcast.


The "A Modeler's Life" podcast "is as much about the people in the hobby of model railroading as it is about the hobby itself" and features a wide diversity of folks - everyone from musicians, to truck drivers, border patrol agents, doctors, software engineers, professional railroaders (of course) and many more from, literally, around the world. It's one of most entertaining of the MRR podcasts out there and new episodes come out regularly - and it's long been one of my favorites (even before being interviewed).

I met the host, former Model Railroader contributing editor Lionel Strang, a couple of times at the big Springfield train show, but we were never able to actually visit for very long. That is, until one evening a little while back when this show was recorded.


So if you want to learn a little more about this crazy Valley Line project I have going on in my basement, as well as a bit about what I do when I'm above ground, give a listen. Thanks to Lionel and the rest of the AML crew for making me sound interesting - and hopefully not in the "peculiar" sense, but in the "hey-he-sounds-like-a-guy-I'd-like-to-get-a-coffee-with" sense.


Click here to download the MP3 through Libsyn
Click here to download using iTunes

Thursday, August 10, 2017

Goff Brook Farmhouse: Fail Repair, First Assembly

One of the things I'm learning a lot about during this project - and a lesson that I think will help alleviate some of my analysis paralysis - is that you can just about always fix any mistake you make in this hobby. Case in point:


You may recall that I discovered that my window masking had been a bit of a fail. I'd spray painted the backs of the walls flat black to keep light from coming through the walls, but needed to mask the molded-in window frames to keep the overspray off of them. Unfortunately, the photo above shows what happened.


After vacillating a bit, I decided try and fix this problem now, rather than regret it later. It was just a matter of brushing on some more flat black paint with a soft brush, being careful not to get it on the window glass (which, of course, is now installed).


Not perfect, but MUCH better, I think. NEXT time, I'll mask the windows, and then use a sharp blade to trim the masking tape to just cover the window itself. Then I'll use the spray paint. Lesson learned.


You'd think after all that, I'd finally be ready for construction. You'd be almost right. Most of the parts were still on the sprues for ease of handling, but now they had to be removed. I used a variety of tools to do this: Sprue nippers and side-cutting pliers for where the nippers couldn't reach. Then I needed to clean off any remaining parting lines and sprue points with a variety of files, sanding sticks, and my favorite chisel.


With the parts freed from the sprues, I used my mill file to ensure that all wall mating surfaces were perfectly straight and flat.


For bracing, the instructions call for adding a piece of the supplied strip styrene "1/16 from the edge of the wall and parallel to it." Turns out, the strip styrene they supply is about 1/16" thick, so I just set two of them side by side on the wall, and put the wall perpendicular to a piece of plate glass. That way I ensured that if the "gap" piece was flush with the edge of the wall, the "glued" piece would be perfectly parallel and the right distance from the edge. A couple daubs of Tenax applied with a microbrush tacked it in place. I then removed the "gap" piece and applied Tenax all around the brace.


Repeat the process for the other side of the end wall, both sides of the other end wall, and the side walls of the lean-to addition.


Next I used a very-handy magnetic gluing jig to true up the walls to 90 degrees and hold them in place while I applied more Tenax.


Do one corner at a time, repeating the process for the other corner.

And that's where things stand as of last night. I really thought I'd be further along, but an appointment yesterday went MUCH longer than expected. Thankfully, I think now that all the hard prep work is done, the rest of assembly should go pretty quickly.

A Few Words about Wordless Wednesday #182


The pic above is the full-image view of yesterday's shot (the cropped version that's most often seen was used a few posts ago) and it clearly shows NHRR K-1d #356, southbound just south of the Goff Brook bridge, hauling steel girders, ostensibly for the construction of the Baldwin Bridge over the CT River between Old Saybrook and Old Lyme, CT. I'm told that the girders were transported over the Valley Line (due to its noted high clearances) down to Deep River, CT where they were transloaded onto barges and floated down to the construction site.

The bridge was completed and dedicated on December 4, 1948, so I knew that this photo couldn't be any later than that, and - given the trees and foliage - couldn't be "3/48" which was what was written on the back of the photo. I figured the latest it could be was Summer, 1948.

John Wallace then pointed out that the date on the back of the photo is likely even farther off than I thought, noting that the #356 was gone off the Valley Line by spring, 1948 and replaced with #466. I'm not sure exactly when the 356 was replaced, since according to a motive power report commissioned by the railroad, the 356 was on the local on April 20, 1948.

In any event, it's pretty clear that this photo was shot during the summer, not spring, fall or winter. And I tend to agree with John - it's more likely summer of 1947 than 1948.  Contemporary accounts of the bridge's dedication noted that "it was completed in less than two years" and I doubt the support girders would have been delivered only 3-6 months before the bridge was finished.

Solving little historical mysteries like this is one of the most fun parts of prototype model railroading. For just a little while, you're transported back in time (though often down a rabbit hole!). One thing I know for absolute certain though - that house in the background was there then, it's still there today, and now I'm modeling it. And now it looks like I need to get some HO scale girders to add to a few of the trains . . .

Wednesday, August 9, 2017

Wordless Wednesday #182 - Goff Brook Farmhouse


Goff Brook Farmhouse in the background, with the Valley Local southbound
Just south of the Goff Brook Bridge, Rocky Hill, CT.
Writing on back says "3/48" but more likely summer of 1948.
TJ McNamara photo, NHRHTA Collection.

Tuesday, August 8, 2017

Tuesday Tips Two (Too?) - Goff Brook Farmhouse: Glues, Windows & a Fail

I figured when I got home after work tonight I'd finally get to start construction - all I had left to do was add the window glass and some curtains first. I even thought I'd get that done before dinner. But I was wrong.

I've heard of a bunch of different products for gluing "glass" (typically acetate or clear styrene) into our model windows, and like any good former armchair modeler, I have them all - even if I hardly ever use them. Of course "canopy glue" is the most-talked about, but I have (count'em) three different versions of Aleene's "tacky" glue I wanted to try out - especially since I've always thought the canopy glue was too runny.


So I set up a little experiment.- I'd use a different glue on each of the 15 windows I had to do and would decide which I liked best (jury will be out until tomorrow to see how they dried...)


I cut up the window stock (.5x.75", score & snap, repeat 15x), put a few drops of each glue in separate cups and used different microbrushes to apply it around the edges of the window frames. Self-clamping tweezers made the glass easy to handle and apply.


I had an old sheet of different "curtains" left over from a long-forgotten kit that I decided to cut up and use (I should have remembered to make some color photocopies first!), but any colored paper or cardstock could be cut up and be just as effective. Old manila folder stock is especially good for this purpose (and can of course be colored with markers if you don't like quite so much manila).

Things were going along fine until I picked up a window to review my handiwork . . .


Notice any problem here?

Yup, despite my last-minute decision to "solve" the translucent wall problem by painting the backs of the wall black was a little bit of a big fail. I thought I was oh-so-clever to mask the backs of the windows to keep the black overspray from coming through and spoiling the white window frames. But, as you can see, of COURSE there's no black paint in those masked areas to block the light.

Ooops! Good thing I (really, now, for sure) don't plan on lighting up this house. Ever.

In the future, I suppose I could either 1) cut my masking tape to match the window frame perfectly; 2) brush paint around the window, let that dry, and then mask and spray; or 3) just brush paint some flat black now (well, before window glass and shades are installed). Note: none of this is a problem if the window frames in your kit come separately - just paint the back of your walls without worry.

Fortunately, when all's said and done, it doesn't really matter all that much for my purposes - but it's certainly a lesson learned.


And here's where we are at the end of the night. Yes, you read that right. Actual construction still hasn't started. But I really, truly think that it will - finally - tomorrow. In the meantime, I think the curtains were worth the extra time they took to cut out and install.

Oh, and by the way, after using all four glues on about half of the windows, I ended up liking the Aleene's Clear Gel Tacky Glue the best and used it for the rest of the windows and curtains. It has a nice viscosity (not too runny) and, while all of these glues supposedly dry clear, having this one go on clear was strangely comforting.

Tuesday Tips - More Goff Brook Farmhouse Painting

With the two main colors spray-painted (prep & painting described here), it's time for some detail painting on the Goff Brook Farmhouse. It was actually a little more harrowing than I expected - and I made a mistake, which I think I was able to fix. So read on for some painting tips and lessons...

First off, here's my fun painting setup:


But what do we see here? (hold off on the OCD jokes)


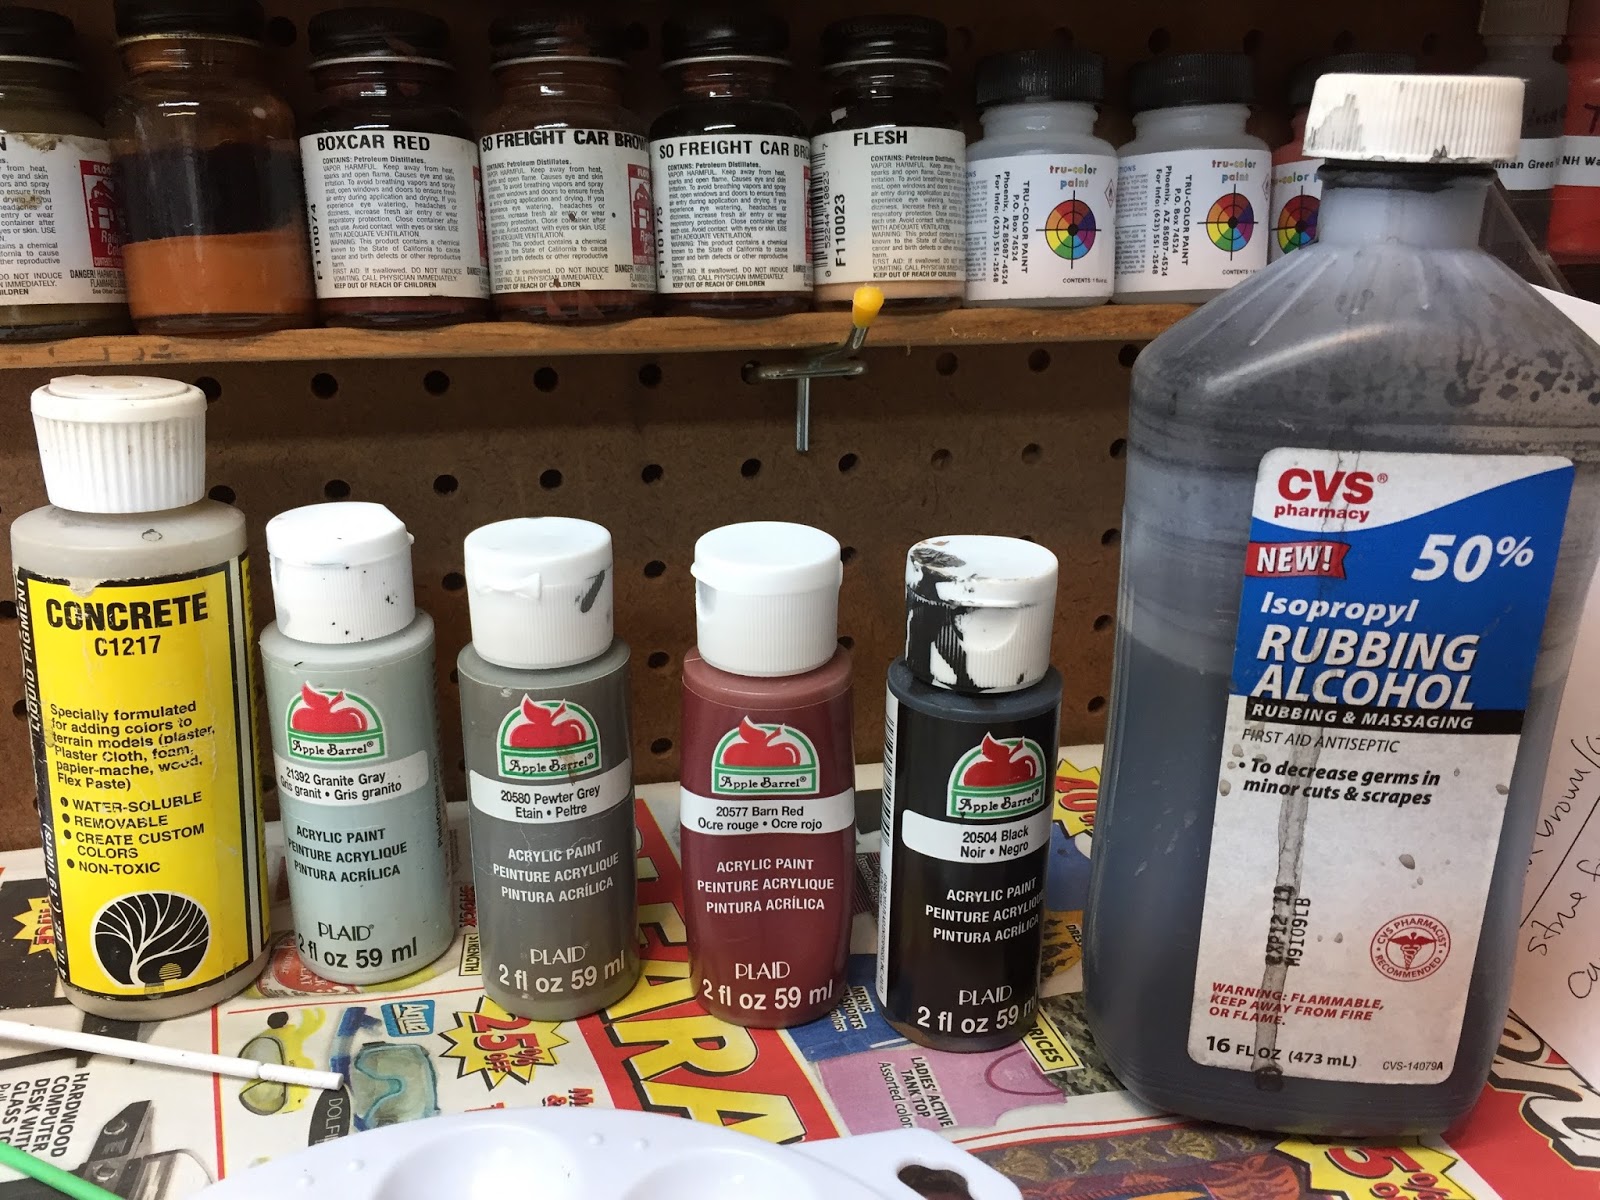
Based primarily on the MRH Acrylic Painting Guide, I have the following items at hand for brush-painting:
  1. Three cups of Armour-All Glass Cleaner for cleaning the brushes (1st dip/dirty, 2nd dip/rinse, 3rd dip/clean)
  2. Palette to hold the paint you're painting (don't paint right out of the bottle)
  3. Paints (which we'll get into a little bit below)
  4. "Ready Brush Tray" - bottom covered with the Armour-All, to keep brushes wet and ready for use.
At this stage, the parts are either flat white or flat gray. My prototype photo - thankfully - shows the window frames and the trim as white, like the walls. So all I had to do was some detail painting of the chimney and the foundations. 

There are two types of foundation on this kit, unfortunately molded right along with the bottom of the walls: stone under the main house, and concrete under the lean-to addition.


These are the acrylic paints I used - mostly $.50/bottle craft paints from Wal-Mart (granite gray, pewter gray, barn red, and black) and some Woodland Scenics "Concrete." Later, I needed to darken the colors a bit and the wash I made with the black was way too dark so I used the alcohol and india ink mix.


Being somewhat color-blind, painting has always - and continues to be - a fairly stressful experience for me. But I kept going, using the prototype photo (not to mention Pete's completed model) for reference. I started by using the concrete paint on the concrete foundation, but it came out way too light. Ditto for using the granite gray on the stone foundation. I ended up darkening them down with a black paint wash (which ended up being too dark), then lightening them with some thinner, then RE-darkening them with the india ink wash.

The chimney was easy - two coats of the barn red with a pewter gray cap (with a tiny bit of concrete mixed in, cuz I forgot to clean the brush thoroughly - but it looks good anyway).

I'm not super thrilled with how the foundations came out, but they're passable and will be weathered. I later masked the bottom edges of the white walls and brushed foundation color right up to the tape. I should have done that to begin with - I would not recommend freehanding it like I did. It's almost impossible to paint a straight line - or maybe it's just me.

But my biggest mistake was not deciding to paint the backs of the walls until it was almost too late. I figured it wouldn't be any big deal to leave the backs bare, but my friend Dean wisely reminded me that if I ever wanted to light this building, I'd regret not painting the inside black (the plastic walls - especially white plastic - would cause the house to glow if lit. Hardly a realistic effect). While I have no plans to light this - or any - building, it's certainly easier to deal with this before assembly in case I change your mind later.

So that's what I did.


I masked the edges where I knew I'd have to glue later (bonus - this prevented overspray from getting on the outside edges of the finished walls). And - critically - I masked behind the windows. Otherwise, black overspray would have gotten all over the cast-in window frames which are supposed to be white.


And here's where things are at this point - ready for assembly. Well, as soon as I take care of adding window glass and curtains...

So, some lessons I learned about structure painting:

  • Paint the inside/back of structure walls black if there's ever the remotest possibility that the structure will be lit sometime in the future. Don't even give it a second thought. That should be the first application of paint, right after removing flash & parting lines. And be sure to mask off the windows. That will a) give you a clean surface to glue glass to, and b) keep overspray from covering the window frames. I didn't bother doing the outhouse walls - there's no window, and it'll never be lit.
  • Mask multi-color schemes when possible. It's not always possible (think of molded-in DPM windows), but in the case of this kit it would have been easy to mask off the walls to paint the foundation (or vice versa).
  • Test colors on scrap if possible - at least until you work into a color/technique you're really comfortable with. I felt like I was chasing the foundation color back & forth a bit. And the Woodland Scenics concrete paint beaded up - which was totally unexpected. The washes I made didn't act as I expected either. So I did a lot of overdoing it and then wiping it off/toning it down, and having to redo it. Another lesson learned.
After being mostly an armchair modeler for over 30 years, you'd think I would have read & absorbed all the collective knowledge about how to do all this stuff right the first time. Lord knows that I tend to overthink things and not be comfortable even starting a project until I'm sure I'll be able to do it right.

But that leads perhaps to the greatest lesson of all:
  • You will never ever learn as much about a particular task or project until you actually do it. Mistakes are inevitable. Learning from them and pressing on is the only true path to success.
Onward to assembly!