"Oh the weather outside is frightful...." - literally. The commute home this evening was even more harrowing than this morning's drive in which, due to the ice encasing
everything both of the highways we use were closed -
after we got through #ftw! So it'll be a nice little diversion from the holiday hustle & bustle to go in our minds back to the end of August -
the last time I did an update on the scenery progress in East Berlin(!)
If you happen to recall (and, if you don't, I'm not at all surprised), I'd just been working on the coal yard, "planting" the East Berlin station (thanks to Dave Messer!), and experimenting with static grass between the rails.
Check out the post for the pics.
Well, truth be told, I've made a bit more progress in the area since then but given the busy Autumn travels, I haven't taken the time to update the blog about it. So, with apologies to the FB followers (who have already seen some of these pics), here's a bit of a slideshow of where things are going, if not quite where they're currently at. . .
 |
| I'd left off with just a little bit of static grass around the bases of the structures and just a bit over the end of the Stanley Chemical siding. But I needed a LOT more grass over the rest of the scene. First step was to cover the track, then brush on white glue wherever I wanted grass, then hit it not with static grass, but with fine ground foam (WS "Burnt Grass") as a base. |
 |
| I applied the ground foam over all the areas where I wanted grass. I figured this would provide some base color and "thatch" underneath the static grass later. |
 |
| It dried a bit splotchy, but it's ok if some of the "dirt" color comes through - later layers should blend it all in. |
 |
| Yes, that's a pretty hard line of demarcation between the "grass" and the "dirt" - my front yard isn't edged so well! But I'll soften that line a bit with the static grass later. |
 |
| After waiting a day or so for everything to thoroughly dry, I brushed on some more white glue and hit the grass areas with static grass (note that the "roughed up" the edges a bit). I used a mix of colors and lengths, blended "cocktail shaker" style a la McGuirk (just be sure to use paper cups for that, not styrofoam!). |
 |
| While that was drying, I decided to start a little grade crossing in the lot. These sticks are just RR tie material that came to me prestained. Just use white glue to attach them, and be sure your flangeways are clear. I haven't decided whether I'm going to fill in the middle with more ties - I'll probably just level it up with more dirt. |
 |
| Once the grass was dry, I replaced the station. Looks pretty good I think! (though it really needs a pretty heavy dose of weathering) |
 |
| I'll give my static grass effort here a C+ since so much of it is laying down. I used a technique Jim Dufour showed me (and which has been recommended by Marty and others as well) which involves waiting until the glue starts to set and then going over the grass again with a Shop Vac to "pull" it up so it stands vertically. I think my problem here is that I used mostly 10mm grass - which is not only a bit tall for this area, but its height makes it very tough for it to stand upright on its own, IMO. |
 |
| This area is looking a bit better though - but I do need to add some additional colors & textures to get away from the "paint-by-numbers" look. And I clearly need to "roughen up" those edges a bit more. Still looks too manicured. |
 |
| Yeah, looks just a little too nice. |
 |
| This is looking a little better, mostly cuz I went over the track again with more grass. |
 |
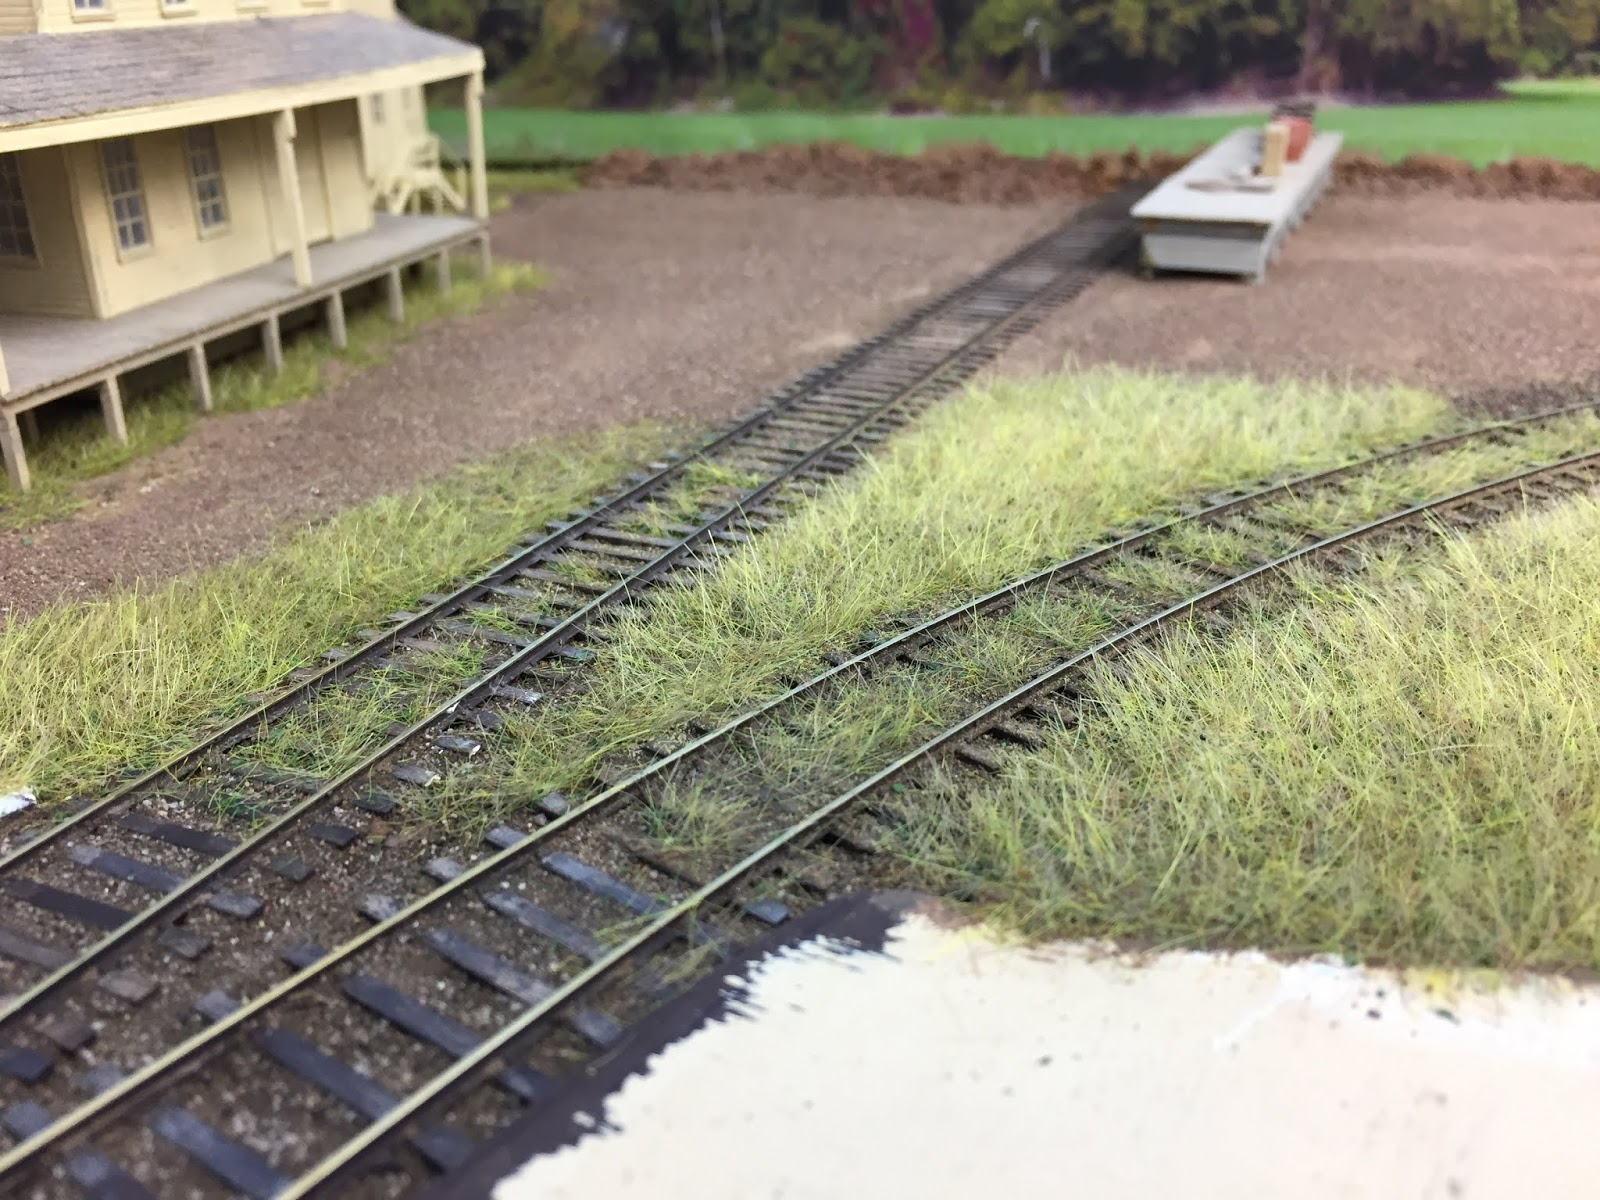
| Speaking of which, I experimented more with "grassy rails" in this area and am liking the effect. I'm going to need LOTS of grass between the rails on the Valley Line main - especially south of Middletown - so I really need to dial-in a reliable/repeatable process. |
 |
| My process so far is a bit time-consuming, but effective. The key is to try and get the static grass between the rails, but not on the ties. I'd always assumed the glue had to all be contiguous for the grounding wire to permeate the surface and provide the static charge throughout the area. Turns out, only the moisture has to be contiguous. In other words, as long as the whole area is moistened you'll get the static charge everywhere there's continuous moisture. Just apply glue only where you want grass to stick - and moisten the entire area, both glued and unglued. Here, I applied drops of undiluted white glue randomly between the rails & ties. Then I sprayed the whole area with "wet" water, plugged in my ground wire, and hit the whole area with grass. |
 |
| It looks an absolute mess at first, but don't worry. The grass will only stick to the glue. Once you wait for everything to thoroughly dry, vacuuming up the excess will reveal your handiwork - you'll just have grass where you want it. In this case, between the rails and ties. |
 |
| Add caption |
So that's where things stand, um, not "presently" but at least in so far as this post is concerned. As nice as this scene is shaping up, looking at the wall behind the station is a shock compared to the rest of the scene that has a backdrop. Soooooo...... guess where we'll be heading next? Hint: We'll be staying here in East Berlin, at least for the time being.


In a few weeks I plan to ballast and static grass a railroad yard in bad shape, and your blog post was perfect for giving me instructions on how to do it. Thanks!
ReplyDeleteI'm glad you're finding it helpful! You may want also to check out this post for a bit more detail on grassing: http://blog.thevalleylocal.net/2020/04/sunday-scenery-status-static-grass.html
Delete