Thursday, December 29, 2022

Christmas Past & Christmas Present(s)

If you read my post about Christmas Dreaming, you may have had a hint as to what this week's Wordless Wednesday was all about . . .


At the top is a copy of the very first track planning book I ever got. Unfortunately, the original was "weeded out" at some point over the last 40 years. But through the wonders of eBay (and a link sent by a friend - Bruce Wilson, I'm lookin' at you...), I was able to acquire as close to my original as possible - and even the correct printing - May 1982! This would definitely have been the same version I had all those years ago. And it just arrived 2 days after Christmas!

I pored over my first copy of that book for hours/days/weeks - and eventually, with the help of my dad, we built the Super Pretzel (Layout No. 110). No "Junior Pretzel" for us! (Layout No. 109). Mountains-in-Minutes "scenery" (essentially repackaged expand-a-foam) followed shortly thereafter and its oozing over the track - and everything else - gave me my first cold slap of reality in scenery making. But that didn't dampen my enthusiasm - especially when I could see a lowly local way freight shuffling cars into and out of sidings, going from town to town. At least in my mind's eye - imagination is as vivid as reality itself.

Unlike the "Blueprints" book, the Model Railroader is the 100% original real deal - January 1983 - the actual first model railroad magazine I ever bought, and which almost-single-handedly set the hook hard and turned me from a toy train runner into a model railroader. As you may be able to see from the worn pages and tattered binding, this magazine has been a faithful companion for going on four decades.


But enough about Christmas Past... As you can see from the pic above, Christmas Present brought me quite a haul. I doubt I was close enough to the top of the "Nice" list to justify such bounty, so Santa must've been especially understanding this year . . .

My level of sophistication may have increased and my focus may have narrowed in the years since I got my first Model Railroader magazine and track planning book, but I can attest to the fact that I'm just as excited about the hobby as I was back then - perhaps even more so. Unlike back then, I have space and resources to realize some of those long-ago dreams (though, alas!, lots less time it seems), and my skills continue to improve. 

I still dream of local freight trains plying their trade of "retail railroading" - but these days I can actually see some of that dream become reality. And that's a pretty wonderful gift all by itself.

Sunday, December 25, 2022

Christmas Dreaming - 1982

I didn't realize it at the time, but forty years ago today I embarked on a lifelong hobby. And it was entirely by accident.

Among the many gifts my little brother and I got that Christmas morning was a computer and a train set. While I was into computers, all the attention was on the train - especially since it prompted my great-grandmother, who happened to be visiting, to tell us about my great, and great-great, grandfathers' careers on the old Illinois Central Railroad. I'd always been into history, but the combination of family stories and a fascination with miniatures was pretty compelling. The computer faded into the background as my dad and I "helped" my kid brother with his train set.

The limitations of a simple loop of track prodded us to find a local hobby shop to get more track - and maybe even some "switchouts." Once there, if I'd just been nibbling around the hobby before, once I saw my first issue of Model Railroader, the hook was now firmly set. I had no idea you could actually recreate history in miniature like this. I'd always been fascinated by museum dioramas, but these dioramas were way bigger - and had action! And you could create whatever world you wanted, limited only by your imagination.

Ah, the dreamings of a young model railroader - no matter his (or her) actual age. Subsequent weeks and months followed a pattern familiar to many: dreaming about layouts and track arrangements, being confronted by limitations of space and time, the uneasy detente with other things competing for one's time, money, and attention. . . Is there anything quite like those early days, when the future is full of possibility and, not unlike Schrodinger's cat, you're just as likely to create a masterpiece as fail in the attempt?

It's been 40 years today since it all started. The train set disappeared over time (although the power pack survives to light the Christmas layout, pictured above), my hobby pursuits have gotten much more sophisticated, and my ambitions more realistic. But every once in a while, I get another taste of the initial excitement I experienced all those years ago.

And a gift from my mom & dad around Christmas last year (actually, for my birthday, which is a week later), provided a huge helping  - just in time for this year...

Yessir - that, my friends, is a bona fide Campbell's Soup train set, "Limited Edition 1982" - exactly like the one from that long-ago Christmas. Over the course of time, I'd forgotten what the cars looked like, but the red and white F7 diesel was instantly recognizable. Of course, it's more than just an old train set - it's wonder and dreams and possibilities distilled into metal and plastic. It's a reminder of my entry into a hobby that's given me a chance to meet people from all walks of life from all over the world, that's provided hours of stress relief (while sometimes inducing stress), that's helped me develop a number of different skills - many of which I've been able to use outside the hobby.

Most of all though, every time I see it - especially now that I have it set up around the Christmas tree - it reminds me of being full of hope, anticipating wonderful possibilities, and looking forward to the future. And isn't that the essence of being young, if not chronologically, at least young in heart?

Here's hoping this Christmas that you're able to capture and hold on to the joy and wonder of the season, to be a kid again - if only in your outlook - and to enjoy time with family and friends.

And if someone you know gets a train set for Christmas, beware - you may just have a front row seat to the start of a lifelong passion.

Merry Christmas!


Wednesday, December 21, 2022

Wordless Wednesday #422 - Christmas Layout

 Here are some pics from my Christmas layout to put you in the holiday mood. Hope you enjoy them and hope, even more, that you and yours have a Wonderful and Very Merry Christmas!


Monday, December 19, 2022

Modeling Monday: Adding "F"s and Builder's Plates to the 1109

Last time, I described how I forgot to apply "F"s and Builder's Plates to the side sill of the frame on the 1109 . . .

Once you notice them . . .

. . . you notice how naked the frame looks without them.

The frame was already painted and dull-coated, so here's what I did to fix the mistakes:

A decal applied to a dull finish will typically "silver" due to the air inevitably trapped between the finish and the decal itself. So the first step is to add a gloss finish. For that, I brushed-on Future where the decal would go, placed decal on Future, let dry, then applied an overcoat of Future to hide the edges of the decal.

I used the same process to apply the builder's plate decals to scale 1"x6" strip styrene. After the Future dried, I cut to length, and "painted" the white edges with a black Sharpie.

Finally, I glued the "plate" to the frame with a couple drops of thick CA.

Engineer's side builder's plate

Engineer's side "F"

Here's how it looks of tonight:


Next step will be to "spot" spray a dull coat to have the finish match. I plan to do that by airbrushing Testor's Dullcote, thinned 1:1 with lacquer thinner, and using a frisket (in this case, cardstock with a small cutout) to mask.

This mistake (along with the others I'm making on this "test" model :^) is teaching me some very important lessons: Mistakes are one of the most effective ways to learn, they are usually fixable, and the process itself builds skill and confidence. And the more you learn, the more you realize you can fix mistakes, and the more skill you develop, the more fun you'll have in the hobby.

And, ultimately, isn't fun one of the most important things you can get from a hobby?

What are some of your fails - and how did you fix them? Share in the comments - I know we'll all get a little jolt of inspiration and motivation from seeing how others have "failed" and fixed . . .

Sunday, December 18, 2022

SW1 #1109 - Another Fail - Forgot the Builder's Plate and the "F"

After my last post on painting & lettering the SW1, I realized I forgot a couple of decals - namely, the builder's plate and the "F" on the sides of the frame.

But in my defense, they're not all that visible in my prototype photos, so they were easy to overlook:

But you can see them in this nice broadside - especially when I highlight them :^) (as always, you can click on an image to enlarge it):

Now, the "F" is easy enough to figure out - I'm just going to use the "F" from the Accu-Cals set I've been using on the rest of the model (#5820H).

But what about the builder's plate? It's really hard to make out in the photos, so I spent a pleasant hour going down a quick rabbit trail researching EMD SW1 builder's photos. Spoiler Alert: there ain't much out there, but I did find this . . .

. . . which came from the always-so-very-helpful Boston & Maine Railroad Historical Society (the full PDF presentation is actually online here). It's not an SW1 plate from 1939 (when the 1109 was built), but it should be close enough - especially since it's essentially weathered black in all the prototype photos I have.

Next step was to see if I had such a decal on-hand. Thankfully, I do:

Microscale 87-48 Data for Diesels - Black and White (1940-1992)

I don't know the dimensions of the real-life builder's plate, but the decal measures a scale 6"x18" so I think it'll do.

So, a bit of a fail that I didn't take care of this already before I dullcoted the frame. But here's my plan to save it (thankfully, turns out it shouldn't be all that difficult):

WRT to the "F":
  • Apply a little Future with a brush to the spot where the "F" goes, using it like Microset to place the decal.
  • Place the "F" & wait to dry.
  • Brush an overcoat of Future to blend the decal.
  • Airbrush/spot spray dullcote over the area to match the rest of the frame.
  • (thanks to Andrew Castle who weighed in over at the Valley Local FB group that he's used this process himself and confirmed it'll work).
WRT to the Builder's Plate
  • I'm going to try something a little different here. . . The proto-photos show the plate as a plate (duh), which is to say, it has a thickness, so I plan to mount the decal on styrene to simulate a plate.
  • I'll apply the decals to thin styrene strip (thickness TBD) 6 scale inches wide.
  • Cut to length and glue to the side sill, per the protoytype photos.
  • Just have to figure out how to weather/tone down the silver lettering without totally covering it (the prototype got all dirty and black, but you can still make out the raised lettering - I can't do that here).
So stay tuned & we'll see how this all works out . . .

Friday, December 16, 2022

SW1 #1109 - Painting & Lettering (and some Fails/Saves)

The last time I did an actual, written update on the B&M SW1 way back on November 9, it was all ready for primer, paint, and lettering.  While there've been a few teaser posts documenting progress since then (and in one post, just dumping some progress pics), here's the MUCH longer detail on the process. . .

To prep for painting, the first step is to clean all the body parts and mask off the frame/chassis.


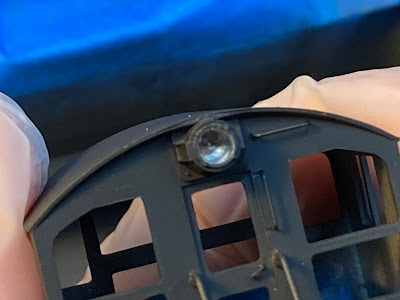
I also needed to mask off the rear light lens. For some reason, there was no way I could remove it so I figured this would be good time to try out some MicroMask. I just dipped a toothpick into the product and dropped a small drop in the center of the lens, allowing it to spread to the lens' full diameter.


For the paint itself, I decided to airbrush black Stynylrez.

Since the loco is all black, my buddy Ralph suggested I use this primer for paint, knowing that I'd be putting on a gloss coat for decaling anyway. I was skeptical, but it airbrushed like a dream and covered beautifully.

And the Micromask worked like a champ too. I just needed to use a toothpick to scrape a little bit so I could grab it with a tweezer and peel it off.

The next step was to apply a clear acrylic gloss to the body for decaling. Again, going on a suggestion from Ralph, I airbrushed Future floor polish for the gloss coat.


Things had been going so well up to this point, I supposed I was overdue for a fail. I'm still getting used to my double-action airbrush and applied a Bit Too Much Future to the front of the cab, and it began to run down the wall. ARGH!


Apparently, one of the reasons to use the Future is that it's self-leveling. So, after an SOS to Ralph, he suggested I actually add more Future(!) I'd actually planned to try and wick up the excess to remove it - but come to find out, that would certainly have ruined things. So I added more Future - and it fogged as you see in the above pic.

But I let it dry flat so it could have a chance of leveling out. . . and here's the result:


It's admittedly not perfect, but it looks a darn sight better than it did - and, in fact, looks a bit like a dent/bulge in the metal. Not a bad effect for a workaday switcher...

As an all-black loco, the addition of a little color is most welcome. And as it turns out, the Boston & Maine started painting "sun visors" on the cab windows to relieve the crews of the glare that resulted in the beautiful (but blinding) large "greenhouse" windows. Based on research over at the Model Railroader's Guide to B&M/MEC Diesel paint schemes Facebook group, the paint was one of two different greens - depending on the era. Apple Barrel Marsh Green was about as close as I could come with what I had on-hand. I just needed to add some materials to make it "airbrushable" (using this as a guide).


Consulting the prototype photos, it looks like the paint line occurs just as the windows start to curve down. Above is the rear window all masked. . .


And finished


And the front window finished. Just remember to spray the inside of the windows...

With the painting done, it's time focus on lettering and for that I have to thank David Hutchinson for the fantastic prototype photos - including one in color of the scheme I want to do!


I couldn't find any engineer's side pics of the 1109 in the right scheme, so this one has to do...


After thinking I had the decals ready to go for, literally, months, once I started "dry fitting" them to the hood, I discovered that the square heralds that come with the Accucals set are too small. UGH! 


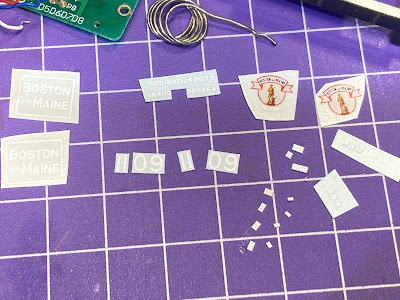
Thankfully, Dave came through with the right size heralds from the Microscale set, which also included better Minuteman heralds and end numbering.


Unfortunately, there were no numbers small enough to fit in headlight numberboards. But I found some freight car data and used some teeny tiny numbers from that set. In the pic above, I've cut out all the necessary decals - including the number board numbers, which had to be cobbled together. Yikes! Those four tiny bits are the four #9s I need - and they're only 1/32" wide(!)


It too a steady hand hand and good tweezers, but thankfully I was able to shoehorn the teeny tiny bits where they're supposed to go. I used Microset and Microsol per the instructions to fix all the decals in place.


The cab end lettering is centered over horizontal top of the windows.


And I centered the hood end lettering over the two side panels of the radiator screen.


Paying close attention to the prototype photos, I centered the Minuteman herald and numbers on the side of the cab wall.

I applied multiple coats of Microsol to the decals and they looked fantastic, settling down very nicely with no silvering.  My next step is typically to spray on a coat of Dullcote to seal the decals and provide a base coat for weathering. 

But I'd been hearing about adding a gloss coat instead to provide a "ramp" between the body shell and the top of the decals to make the decal edges totally disappear. Being a clear acrylic, fairly viscous, and self-leveling, I decided to try an overspray of Future.

And here's where the second fail occurred . . .


For some reason, the decals seemed impervious to the Future - it glossed everything BUT the decals. That's not silvering you're seeing in the pic above, but the difference in sheen when I bounce the light off of it.


While waiting to figure out what to do about that, I remembered I still needed to add the four door handles I'd left off so I could add the hood decals. But they had to be painted first. Have you ever tried to paint something this small?? Sticking them to some masking tape helps hold them in place.  Of course, I needed 4 - had 5 - and lost one - twice!! Fortunately, I also found it twice. Whew! Next time, I'll paint them on the sprue.


And at some point, I noticed one of the NBW castings I'd added next the sandbox grabs had fallen off.


Thankfully, I had some spares - so I used a black Sharpie to "paint" it at the bench, then glued it on with CA. Yeah - that's the casting at the intersection of lines - just a smidge larger than a poppyseed(!)


The only part of the body that I hadn't overcoated with Future was the engineer's side of the long hood. So I applied a coat of Tamiya Gloss Clear to that side and the result was perfect. So lesson learned - I'm not going to apply Future as an overcoat for decals, at least not over a decal I've affixed with Microset/Microsol (maybe they just can't get along).

The Tamiya gloss may not be as viscous and self-leveling as Future - and, therefore, less effective in causing decal edges to disappear (thoughts, anyone?) - but at least it helps, and without the bad side effects (no pun intended).

After the gloss coat dried, I applied a coat of Tamiya Semi-Gloss Clear over the entire body shell to provide a base for weathering which is next.


Again, not absolutely perfect, but turned out fine - much better than I'd feared.


Oh - and I Dullcoted the truck sideframes and the chassis as well, in order to provide some "tooth" for heavier weathering.


So this is where everything sits at the moment - "done" and ready for reassembly. And typically, that's what I'd do - put it all back together and in service, figuring I'd get around to weathering it "someday."

But among the many cool things about this project, the coolest is that it's really been a test bed for trying some new techniques and - most importantly - to just "go for it" without worrying that it's my flagship locomotive. It's "only" leased power, after all.

So - with a little guidance from my friend Ralph - I'm actually going to weather the 1109 before putting it on the layout. Then, it'll really be "done done" and I can enjoy it without the guilt of "man - I really gotta get around to weathering that engine..."

Here's hoping you can follow along to see how that goes. There may be some more fails, but if you/I learn something from them (especially how to fix them!), then they'll be worth it.