
But I have a virtual layout tour coming up on June 13, so I need to get back at it - and quick!
Modeling hasn't come to a total standstill though, thanks to my friend Chris Zygmunt. Early last month, he'd asked me if there were any details I needed for the layout. And it just so happened that I'd been working on grade crossings and had noticed some distinctive crossing signs when researching my line:
Now, admittedly, these signs were much more common up through the 1920s & 30s (which were when most of the photos I have of them were taken), but at least one lasted in Wethersfield after 1956, well after my era. Check out the following photo - you can just make out the sign just to the left of the order board:
 |
| Santa Special, southbound at Wethersfield, John Wallace photo |
And they weren't only on the Valley Line that late - here's one on the Lakeville branch even later . . .
 |
| Last Lakeville Local (NX-13), Twin Lakes, CT, October 28, 1965, Pete McLachlan photo |
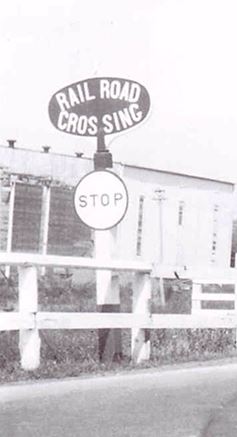
I don't know how common these signs were nationwide - or even in Connecticut. Suffice it to say though that when I went searching for some in HO scale, I came up empty. There are hundreds of the standard crossbuck (both 90 and 30 degree angles), and various other "old time" type signs, but nobody makes signs like these.
 |
| Dave Peters, Sr. collection |

First step in getting them ready for the layout is to remove any sprue remnants...

And then paint them, of course.

The lettering and border are raised, just like on the prototype, so I started by painting them white, figuring it'd be easy to add the black in the recessed areas, and wipe off the "excess" to reveal the white.
 |
| Believe it or not, these have two coats of white on them already. |

Turns out, given the raised lettering, it's MUCH easier to drybrush white on black than to try adding the black later. In my defense, I thought I could paint the black over the white and just wipe the black off the raised areas.
That technique worked well on these posts:


But the big difference is that the lettering on those is recessed rather than raised. So it was a (relatively) simple matter of painting white, adding a little black to the letter, then wiping off the black leaving some in the lettering.
So, after figuring that out, it was just a matter of repainting all the signs with another shot of spray paint - this time black - and then drybrushing them with some white.


The clarity of the castings varies somewhat - and the skill of the "drybrusher" sometimes varies as well - so they don't always come out perfectly. But considering that by my era they're pretty old and probably pretty well weathered, these are minor issues. And considering nobody else makes them in HO scale - or any scale for that matter - they're perfect for what I need.

Thanks SO much to Chris for making these - and I know they're perfectly true to prototype. I don't know if he's offering them in his online store yet, but be sure to head over there to check out what all he has. You'll definitely find more than a few things there that you won't find anywhere else!
Makeup sponge. Nice and flat, it works well for this sort of application. Just be sure to dab off enough paint before applying it, similar to a drybrush technique.
ReplyDeleteAnyway, these are really nice! Well done recreating a unique element.
Thanks for the plug Chris! Happy to be able to help this amazing layout. Also as Chris mentioned the signs are now available online on Shapeways. You can also get them from me directly by ordering through this link: https://forms.gle/wXde8a64HkgHPBDa6
ReplyDeleteExcellent work! Details like this make the differnce between a good layout and a great one.
ReplyDelete