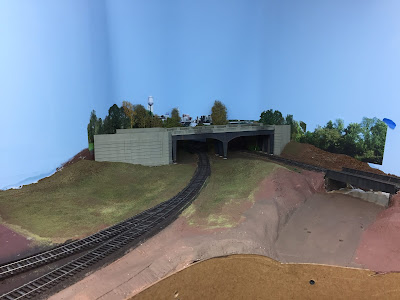
Here's where I am compared to where we were last time. As you can see (especially if you went back to check), I've now put the abutments in place and have the backdrop temporarily tacked up with some painter's tape.
In order to really figure out the optimal height of the backdrop, I had to re-set the bridge itself in place (of course, risking another part snapping off). The shot above is taken from "normal eye view" (how I see it) and confirms that the bottom of the backdrop is obscured - if not outright hidden from view - by the bridge itself.
I also wanted to be sure that the bottom of the backdrop would not be all that visible to other folks who are different heights than I am. So I figured I'd disguise it with some "trees."
Not only would the transition from foreground scenery to backdrop be disguised by actual trees, I also wanted the suggestion of a treeline around the holes in the backdrop and along the bottom edge of the backdrop (which would be just above said holes). So I cut up some stove scouring pads, shot them with hairspray, and poured on some flocking/leaves in the same colors that I used for the trees.
You can see the result in the photo above. The "treeline" goes right around the holes in the backdrop, and I've wedged some 3D trees right up against the backdrop to go between it and the abutments/bridge. I also took advantage of the bridge being out of the way to add scenery.
Quick note about adhesives: I used glue stick applied to the back of the backdrop photo printouts to glue them to the vinyl/masonite backdrop and used hot glue to attach the stove pads. The bridge abutments, and the overpass itself, will just always be placed in place for easy removal for track cleaning/access, etc.
And another lesson learned, when I went to remove the tape from the track. Be careful you don't stick it to your ties - especially if you went to the trouble to paint them. Even painter's tape - which isn't supposed to be as sticky as regular masking tape - took up some of the nice paint & drybrushing I did on the ties. I'm glad I discovered this here, toward the back of the scene. I'll know better for my foreground track.
I put the bridge back in place, again, to see how everything was looking - and from my view here, it's looking pretty good.
Next step was to continue to rough in the base scenery in the area. I applied ground goop and sprinkled some Woodland Scenics Green Blend Fine Turf, as well as Burnt Grass Fine Turf ground foam over the wet goop. . .
. . . wet it down with a spray of 70% isopropyl alcohol and then dribbled on a 50/50 white glue/water mix.
I saturated everything with glue - per what all I've read in my many scenery books - but was dismayed to see it running down to the low areas and pooling...
Over all though, the scene is starting to take shape.
To make things look a bit better until I mix more goop, I painted some more of the white plaster cloth.
And replaced the overpass . . .
After all of the vacillating and obsessing about how the Hartford skyline & backdrop in this area would look, I think it ended up looking pretty great. I know it's not perfect but it's a more-than-acceptable compromise for me to convey the sense of where the Valley Local comes from in the morning and goes back to in the evening. And that's an important part of the story - told all the more effectively by a little bit of colorized postcard and some rudimentary scenery.
I do have to admit though - I'm a little disappointed that the overall "tone" of the scenery appears too dark to my eye. I model September/October and think that overall it should be much lighter. I think the ground foam may be soaking up some of the brown paint in the goop - and it doesn't help that the brown paint itself is probably too dark. Finally, it seems that every time I wet any of the scenery materials, they darken - and keep that darkened look even when everything is dry.
Any help/tips/guidance on this - especially if you do anything differently - would be much appreciated, as always.
 |
| "DandHColonieMain" shouldn't have to squint too much here... |
Nevertheless, after having "Finish the Wethersfield section of the layout" on my annual Goals lists since I started those lists way back at the end of 2015(?!), it is SOOOOO nice to see Wethersfield really starting to fill in and take shape. And an unexpected benefit of this progress is that it's the best motivator I've discovered so far for making even more progress! The more I get done here, the more I want to do - even if it is scenery %^)


Don't use so much glue! If it puddles and runs, you're using too much. I like to brush it on lightly first. After applying your scenery material, mist on some rubbing alcohol. This will keep the scenery from darkening.
ReplyDelete