One of the hobby's lessons I keep having to learn - over and over again - is that it's ok to have to redo something, and it's often necessary to have to redo something no matter how well you thought you did it the first time. So, instead of waiting until you think you can do something "perfectly" go ahead and jump in and do it! Waiting just wastes time - and who wants to do that?!
Here's a case in point: Trackwork. Specifically, turnouts. Now, unlike scenery (just to think of a random example), I have NO problem jumping right into trackwork and trying all sorts of crazy things. I don't know if it's because I think of trackwork as a "left brained" type of thing - or if it's because most of my experience gets up to (and tends to stop) at the trackwork level, so I've got lots of practice doing it. I dunno - but the point is, I haven't any problem trying new things - and (here's the important point) redoing them if necessary.
The point of the case in point is... POINTS. Namely, that one of them came desoldered recently...
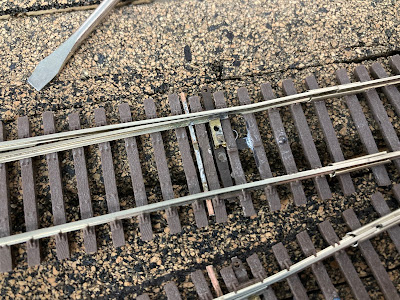
I noticed this as I was backing a cut of cars into this staging track (during one of
my recent "solo ops" sessions). In a long ago (and ill-advised) attempt to save some money on turnouts in staging ("it's 'only' staging"), I tried to make some old Micro-Engineering turnouts "DCC-friendly" by isolating the frog and cutting through the metal throwbar, reinforcing the points by soldering on a new/additional pc strip throwbar - as you can see above.
But moving the points manually (as in, with fingers) apparently, over time, will tend to work the solder joint loose. And that's what happened here - one of the points came unsoldered.
Now, I could have "just" resoldered the point - but the more I looked at it the more I figured that would be hard to do and may not have worked anyway. I'd probably end up unsoldering the OTHER point in the process. It's one thing to solder all this together at the bench - it's a different story to try and do it in place.
And, of course, there's no guarantee that the failure wouldn't just happen again sometime later.
So, since I happened to have a right-hand #6 turnout on-hand (albeit, an Atlas rather than M-E), I decided to just replace it instead.
Thankfully, I hadn't soldered the rail joints and - being in staging - hadn't even added "filler ties." So, for the most part, I was able to just slide the rail joiners along the rail enough to get past the rail joints and lift up the turnout (and, in this case, some surrounding track as well).
The geometry of the Atlas turnout is slightly different than the M-E turnout, but the length is very different. So I had to trim some of the surrounding flex track to fit.
Also, since - unlike the M-E turnout - the Atlas turnout doesn't have a "center-over spring" that locks the points in place, I had to fabricate my own from a piece of scrap piano wire.
Thankfully, since this is staging, I only need it to work - I don't need it to look that great (though, admittedly, this is how *all* the turnouts on
the "Airline" modules are thrown).
For the "on-stage" portions of the layout, I prefer the look of the Micro-Engineering turnouts. But the Atlas turnouts a pretty bulletproof, IMO, so are a perfectly suitable replacement in staging. And - as you can see here - pretty easy to change out if you find it necessary.


Chris, This is a problem all of us have with any turnout. Your approach to this is fine for the staging yard. But there is a way to replace the throw bars on turnouts in place that is minimally invasive to the scenery and ballast without changing track geometry especially if it works.
ReplyDeleteI have had great success replacing turnout throw bars with circuit board replacements with the turnouts in place. I use Clover House #1267 HO Scale PC Tie Throw Bar Strips. At $6.00 for 12 strips they should last a while. OR you can make your own. The clover house strips can be drilled and tapped if necessary. I have used Atlas turnouts quite a lot on my railroad. The same problem you are having with broken solder joints plagues the Atlas turnouts. The points are held in with pins on the throw bar. They tend to pop out of those pins. WHen they get to the point where they won't hold the points in alignment anymore I replace them with the Clover strips. They solder well to these strips being nickle silver. There are advantages to doing this. If you shim them up so they touch the stock rails you have another point of electrical contact to the bottom of the rail and points. They won't flex much which is a good thing for the solder joint. Make sure that you cut the circuit board tie between the points so you don't get a short. I use a razor saw before I install it. If your using under track turnout motors I also drill a hole in the center of the bar and cut two more gaps on each side. This just ensures that a short will not happen through the throw bar. It can also be used as a centering point. I always spread out the point rails a little farther from the Atlas point mounting so they don't travel as much. If your using motors you can reduce the throw. Just my two cents. Bill Shanaman