
After adding the final details (except for the lantern, which is on its way), I just had some final weathering to do.

Here are the steps I took:
- Applied an overall coat of semigloss.
- Using prototype photos as a guide, added major oil spills using dots of lamp black oil paint, "pulled down" with a brush dampened in mineral spirits.
- Added many minor spills and details using Tamiya Black Panel Line Accent Color (a.k.a. "Taco Sauce").
- Applied some burnt umber gouache "rust" to the handrails, grabs, cooler/lunchbox, and couplers.
- Waited 3 days for everything to dry thoroughly (mostly cuz I couldn't get to it again for that long - YMMV).
- Sealed the whole engine with a coat of Dulcote
- Rubbed the side of a pencil along the handrails, grabs, door handles, hood railings - anywhere crew members would be handling metal. Oh - don't forget the top edge of the lunchbox, step edges, top edges/corners of the truck sideframes, etc.
- "Freshened up" some of the oil spills with AK "Engine Oil" and Mig "Fresh Engine Oil" applied with a small brush.
- Applied black Pan Pastel to tone down the brass bell (no pun intended), more to the top of the stack, and along the top of the hood and cab roof.
Thanks again to The Mudfather for his extensive weathering advice & guidance, including all the final finishes noted above (except, notably, the Pan Pastel - which he most certainly would not have recommended :)
Once the final weathering was done, it was time to remove the masking tape, add a crew, and put everything back together!

I've really come to love the Walthers model. It just comes apart and goes back together so easily - thankfully! After removing the masking tape from the windows, I had to reinstall the glass, then glue the rear light mount back to the top/inside of the cab roof, press fit the rear light contact board to the cab, and route the wires/light back to the housing.
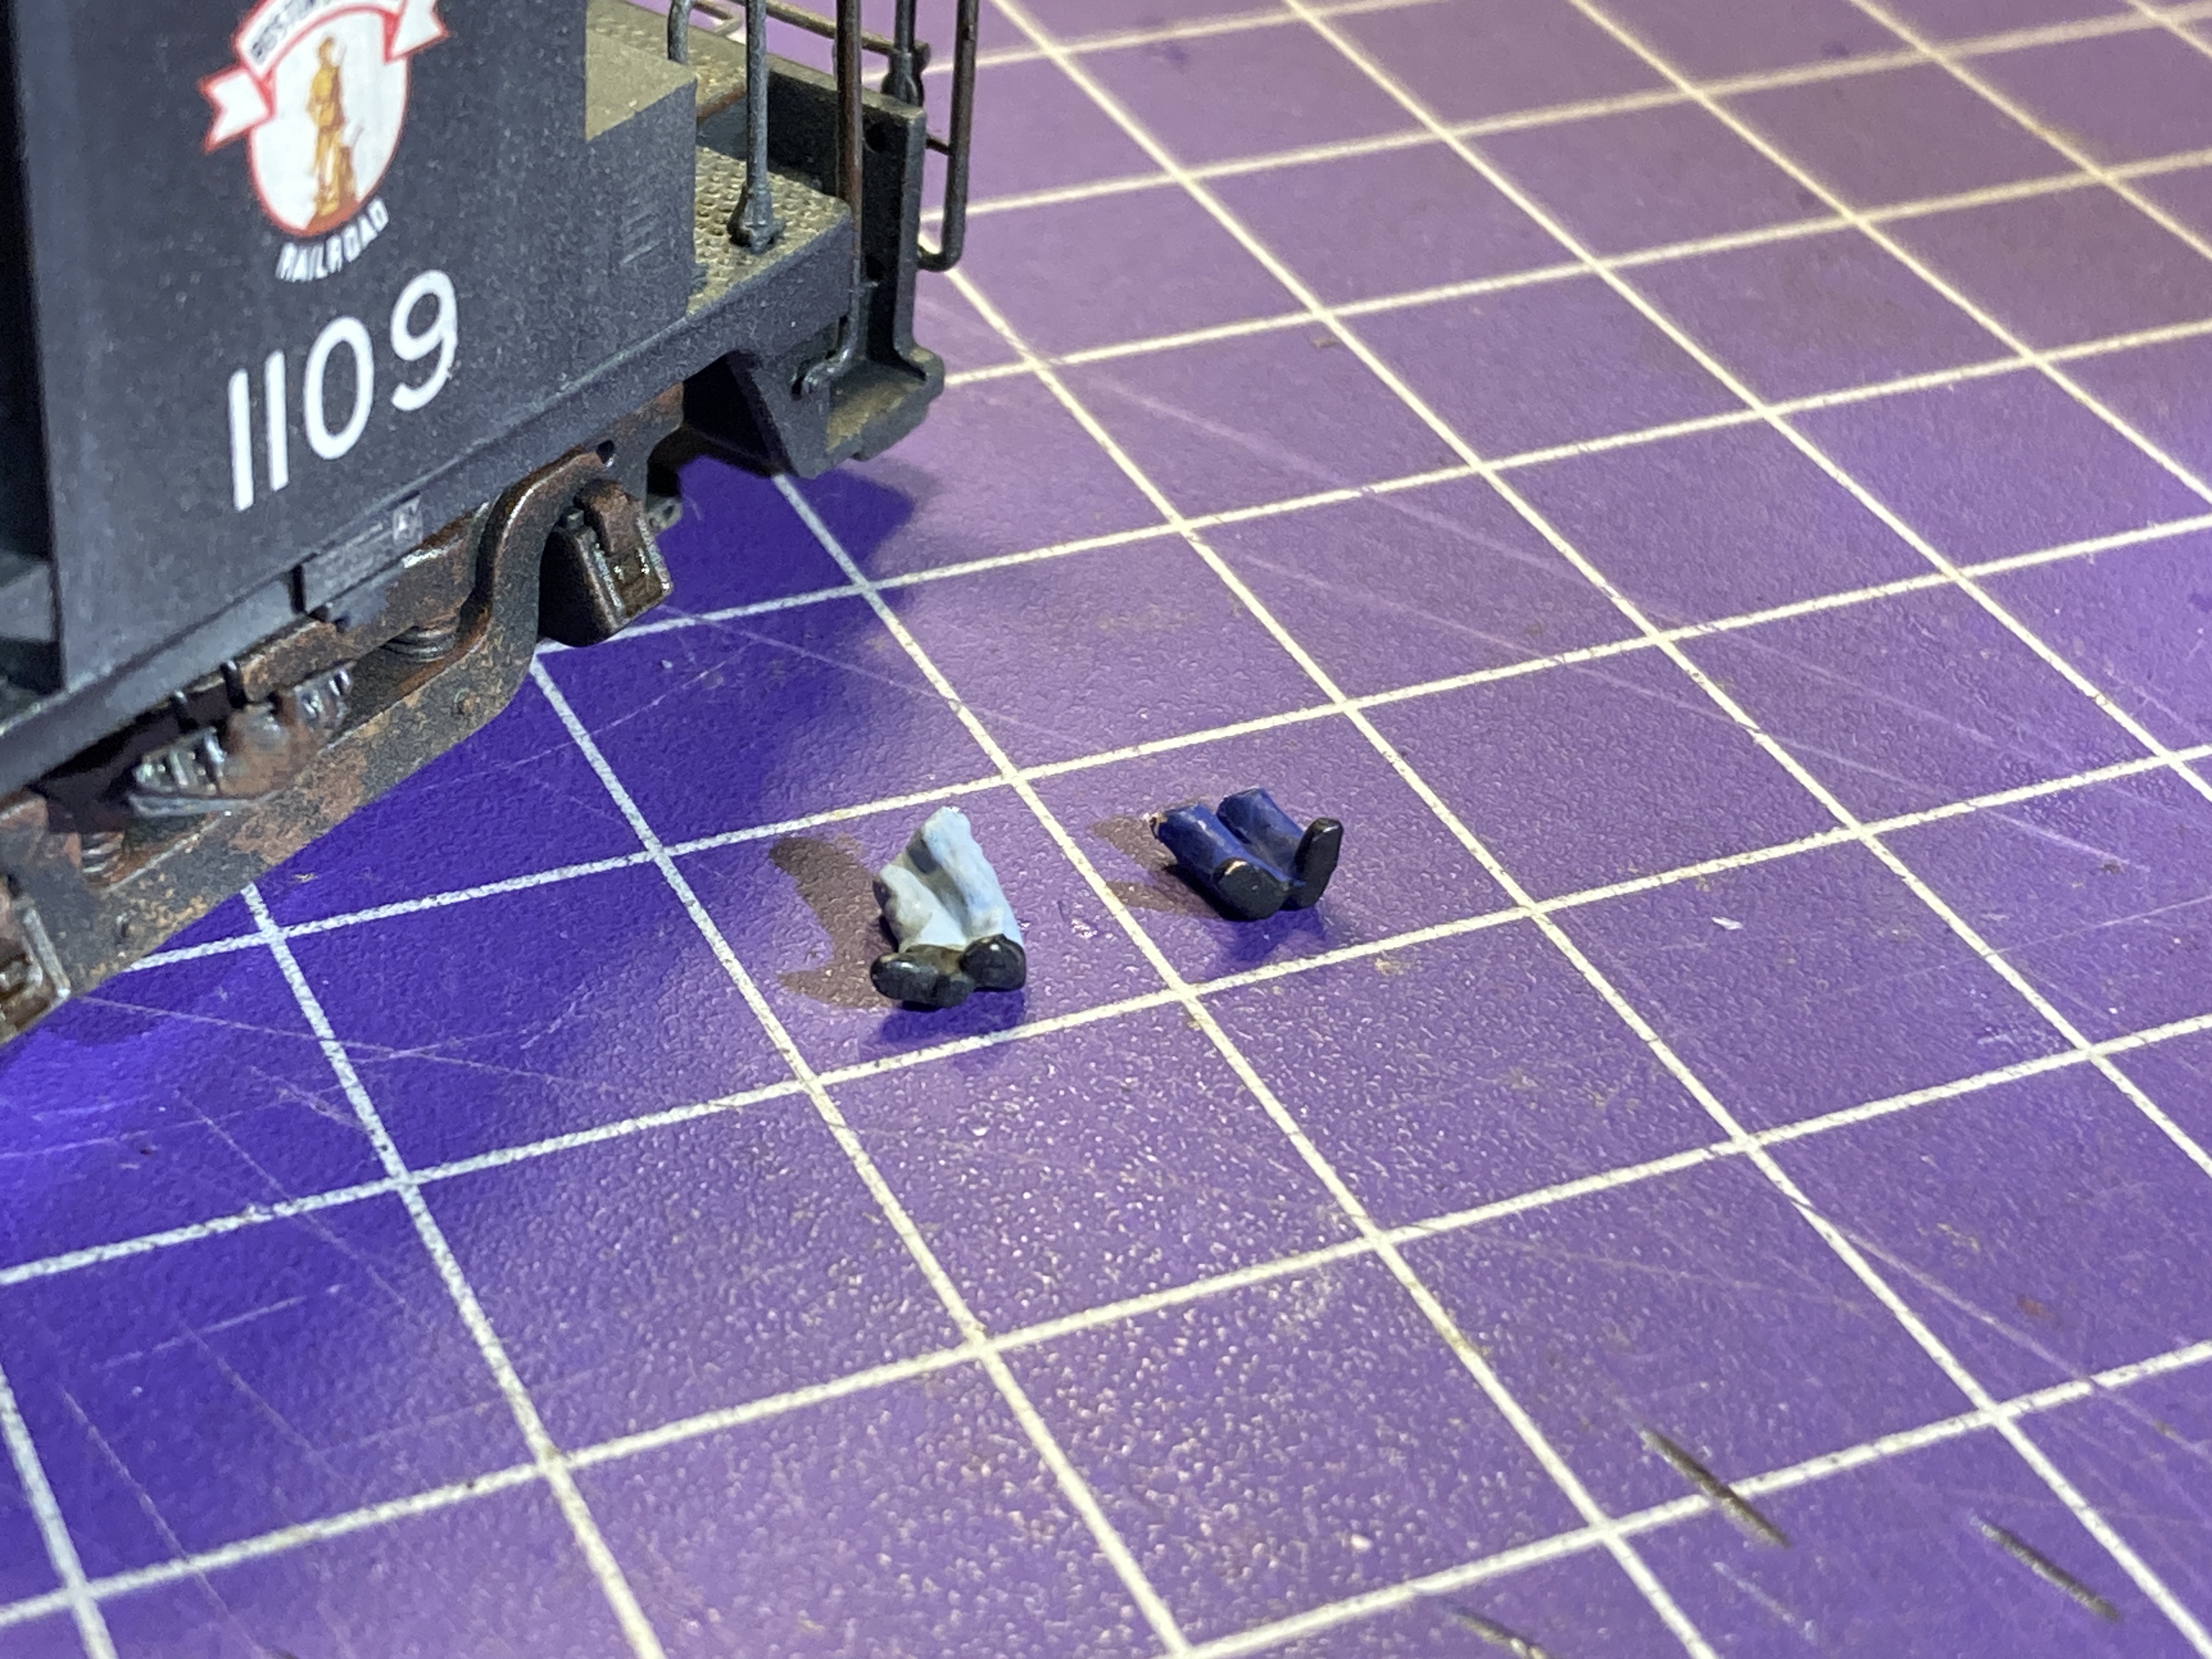
All along, I wanted to try and include a crew, but the Keep Alive takes up a lot of the cab space. Thankfully, it doesn't rise above the windows, so I figured I'd do a little surgery and see what I could come up with . . .
 |
| I think the Brotherhood may have something to say about my crew "accommodation" |

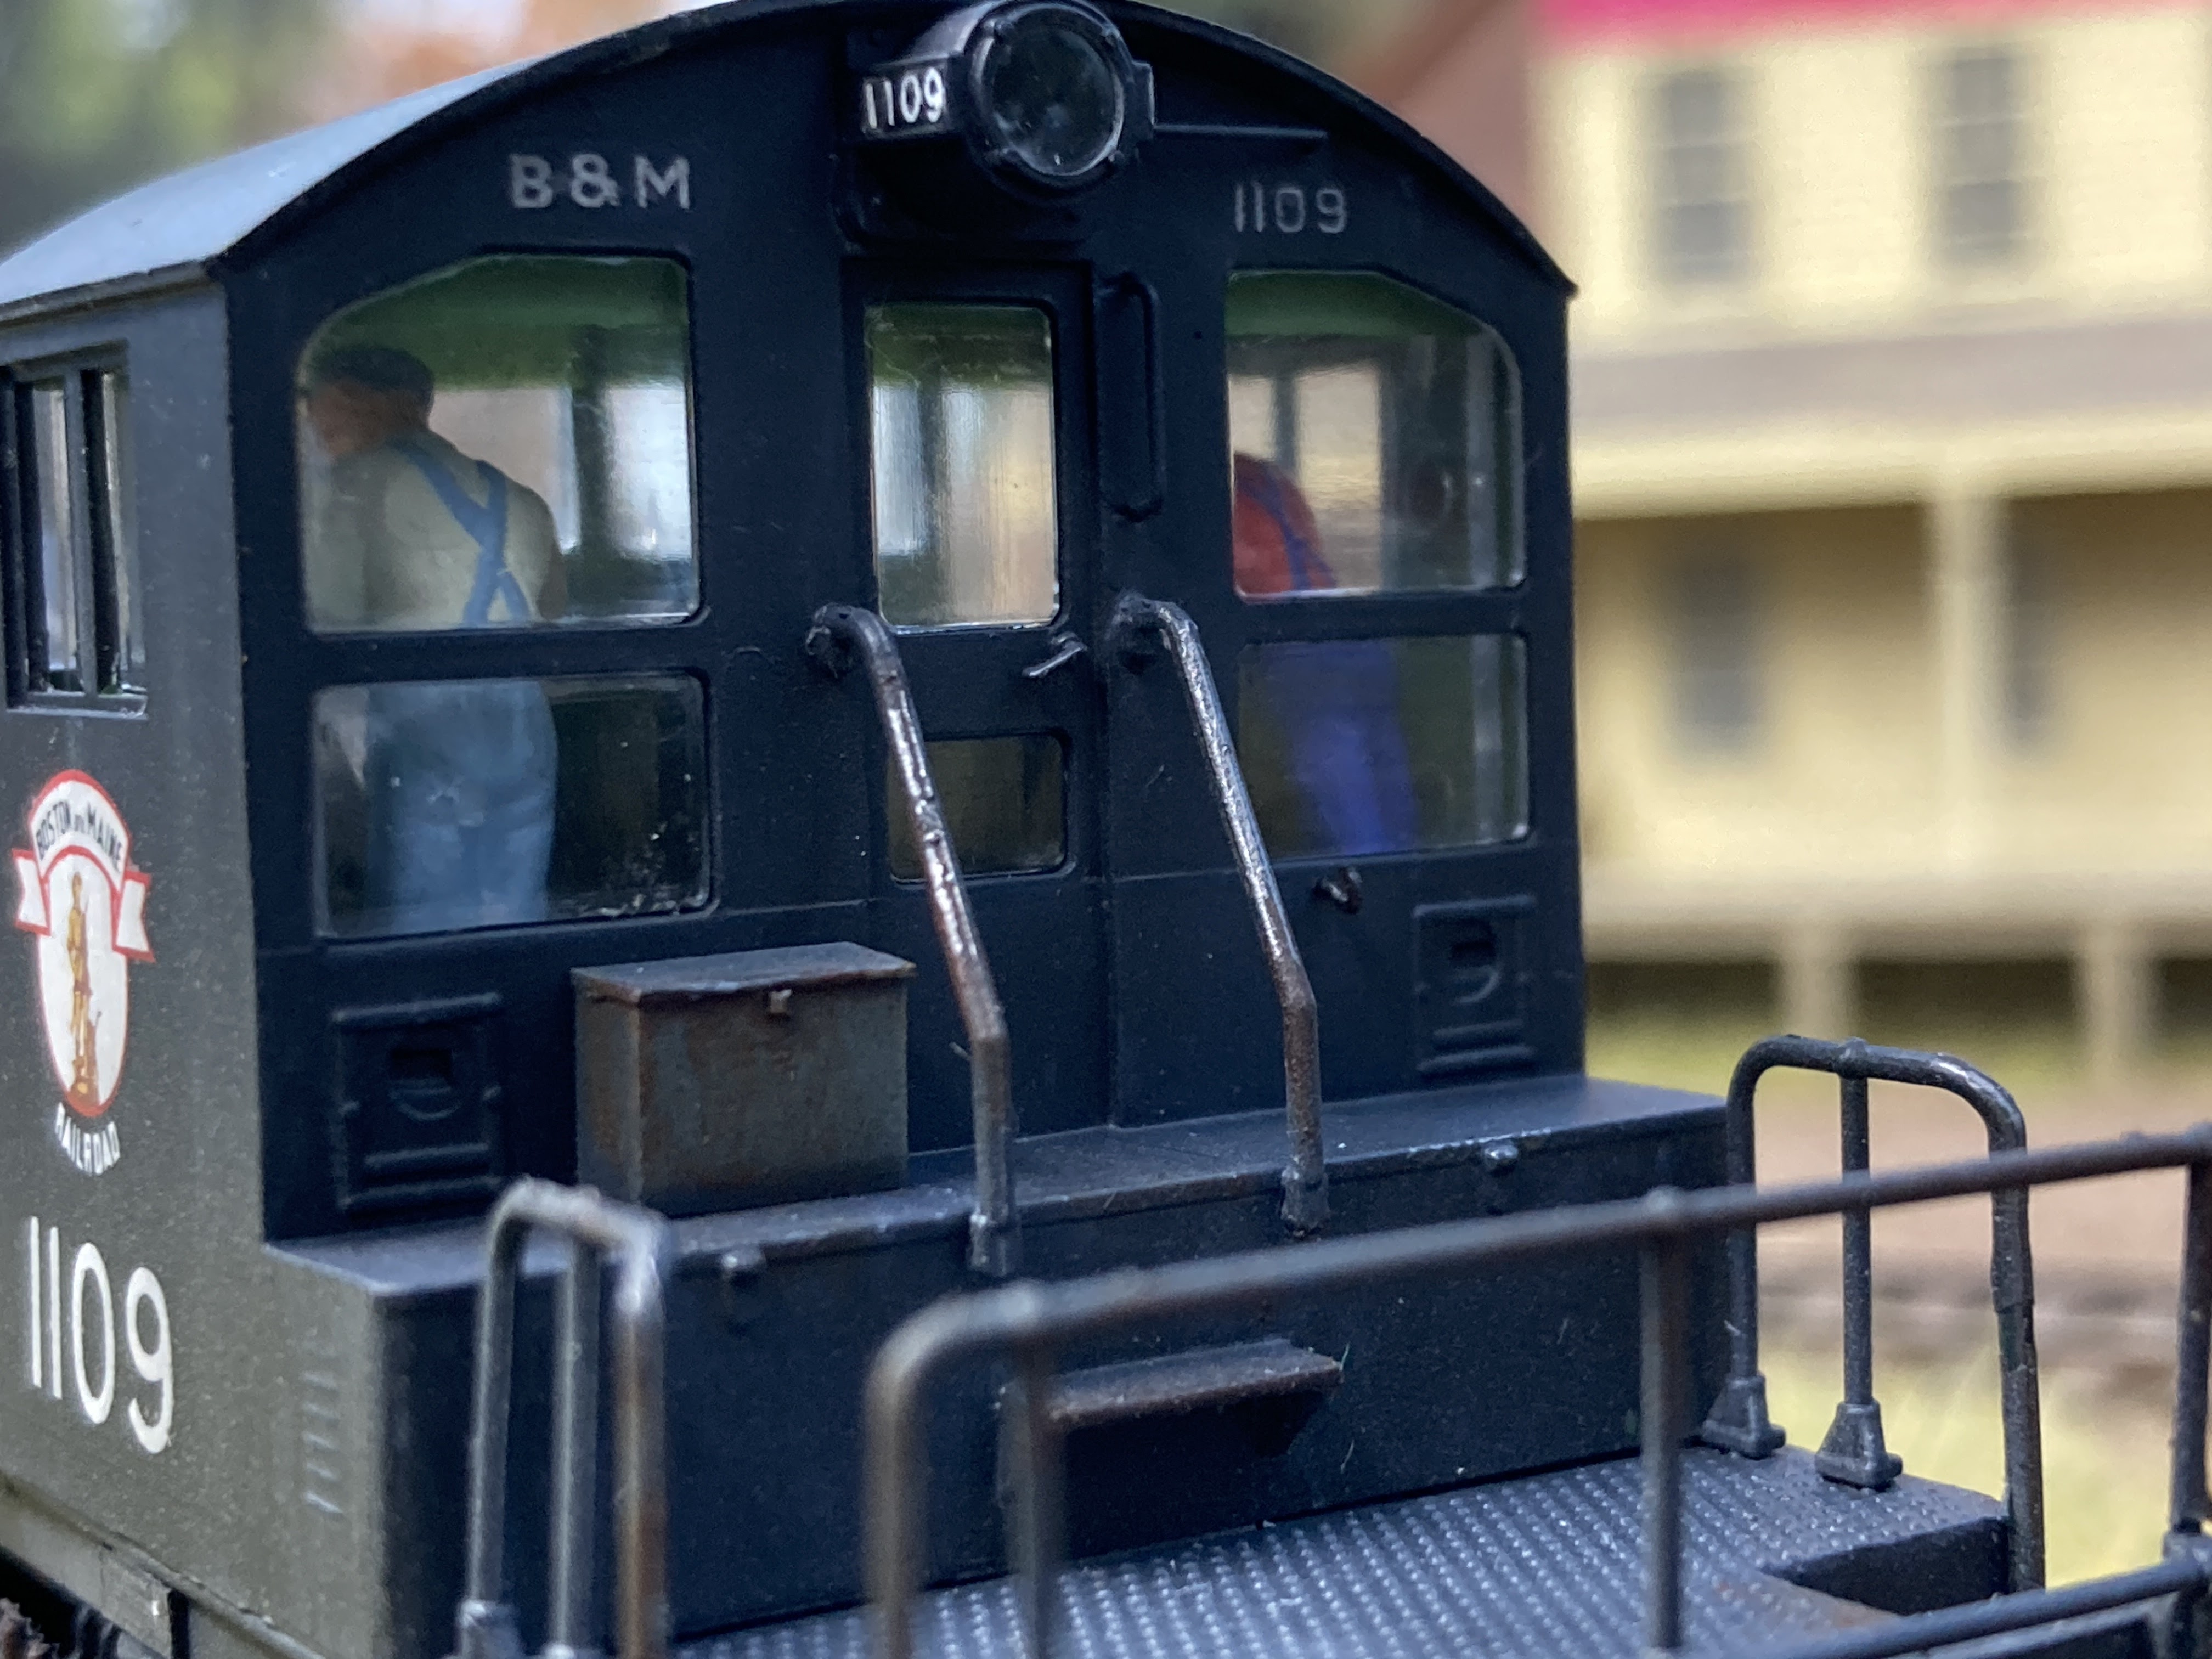
They're not super easy to see, but you notice if they aren't there and they sure to add a lot to the interior (and incidentally help to disguise the KA).
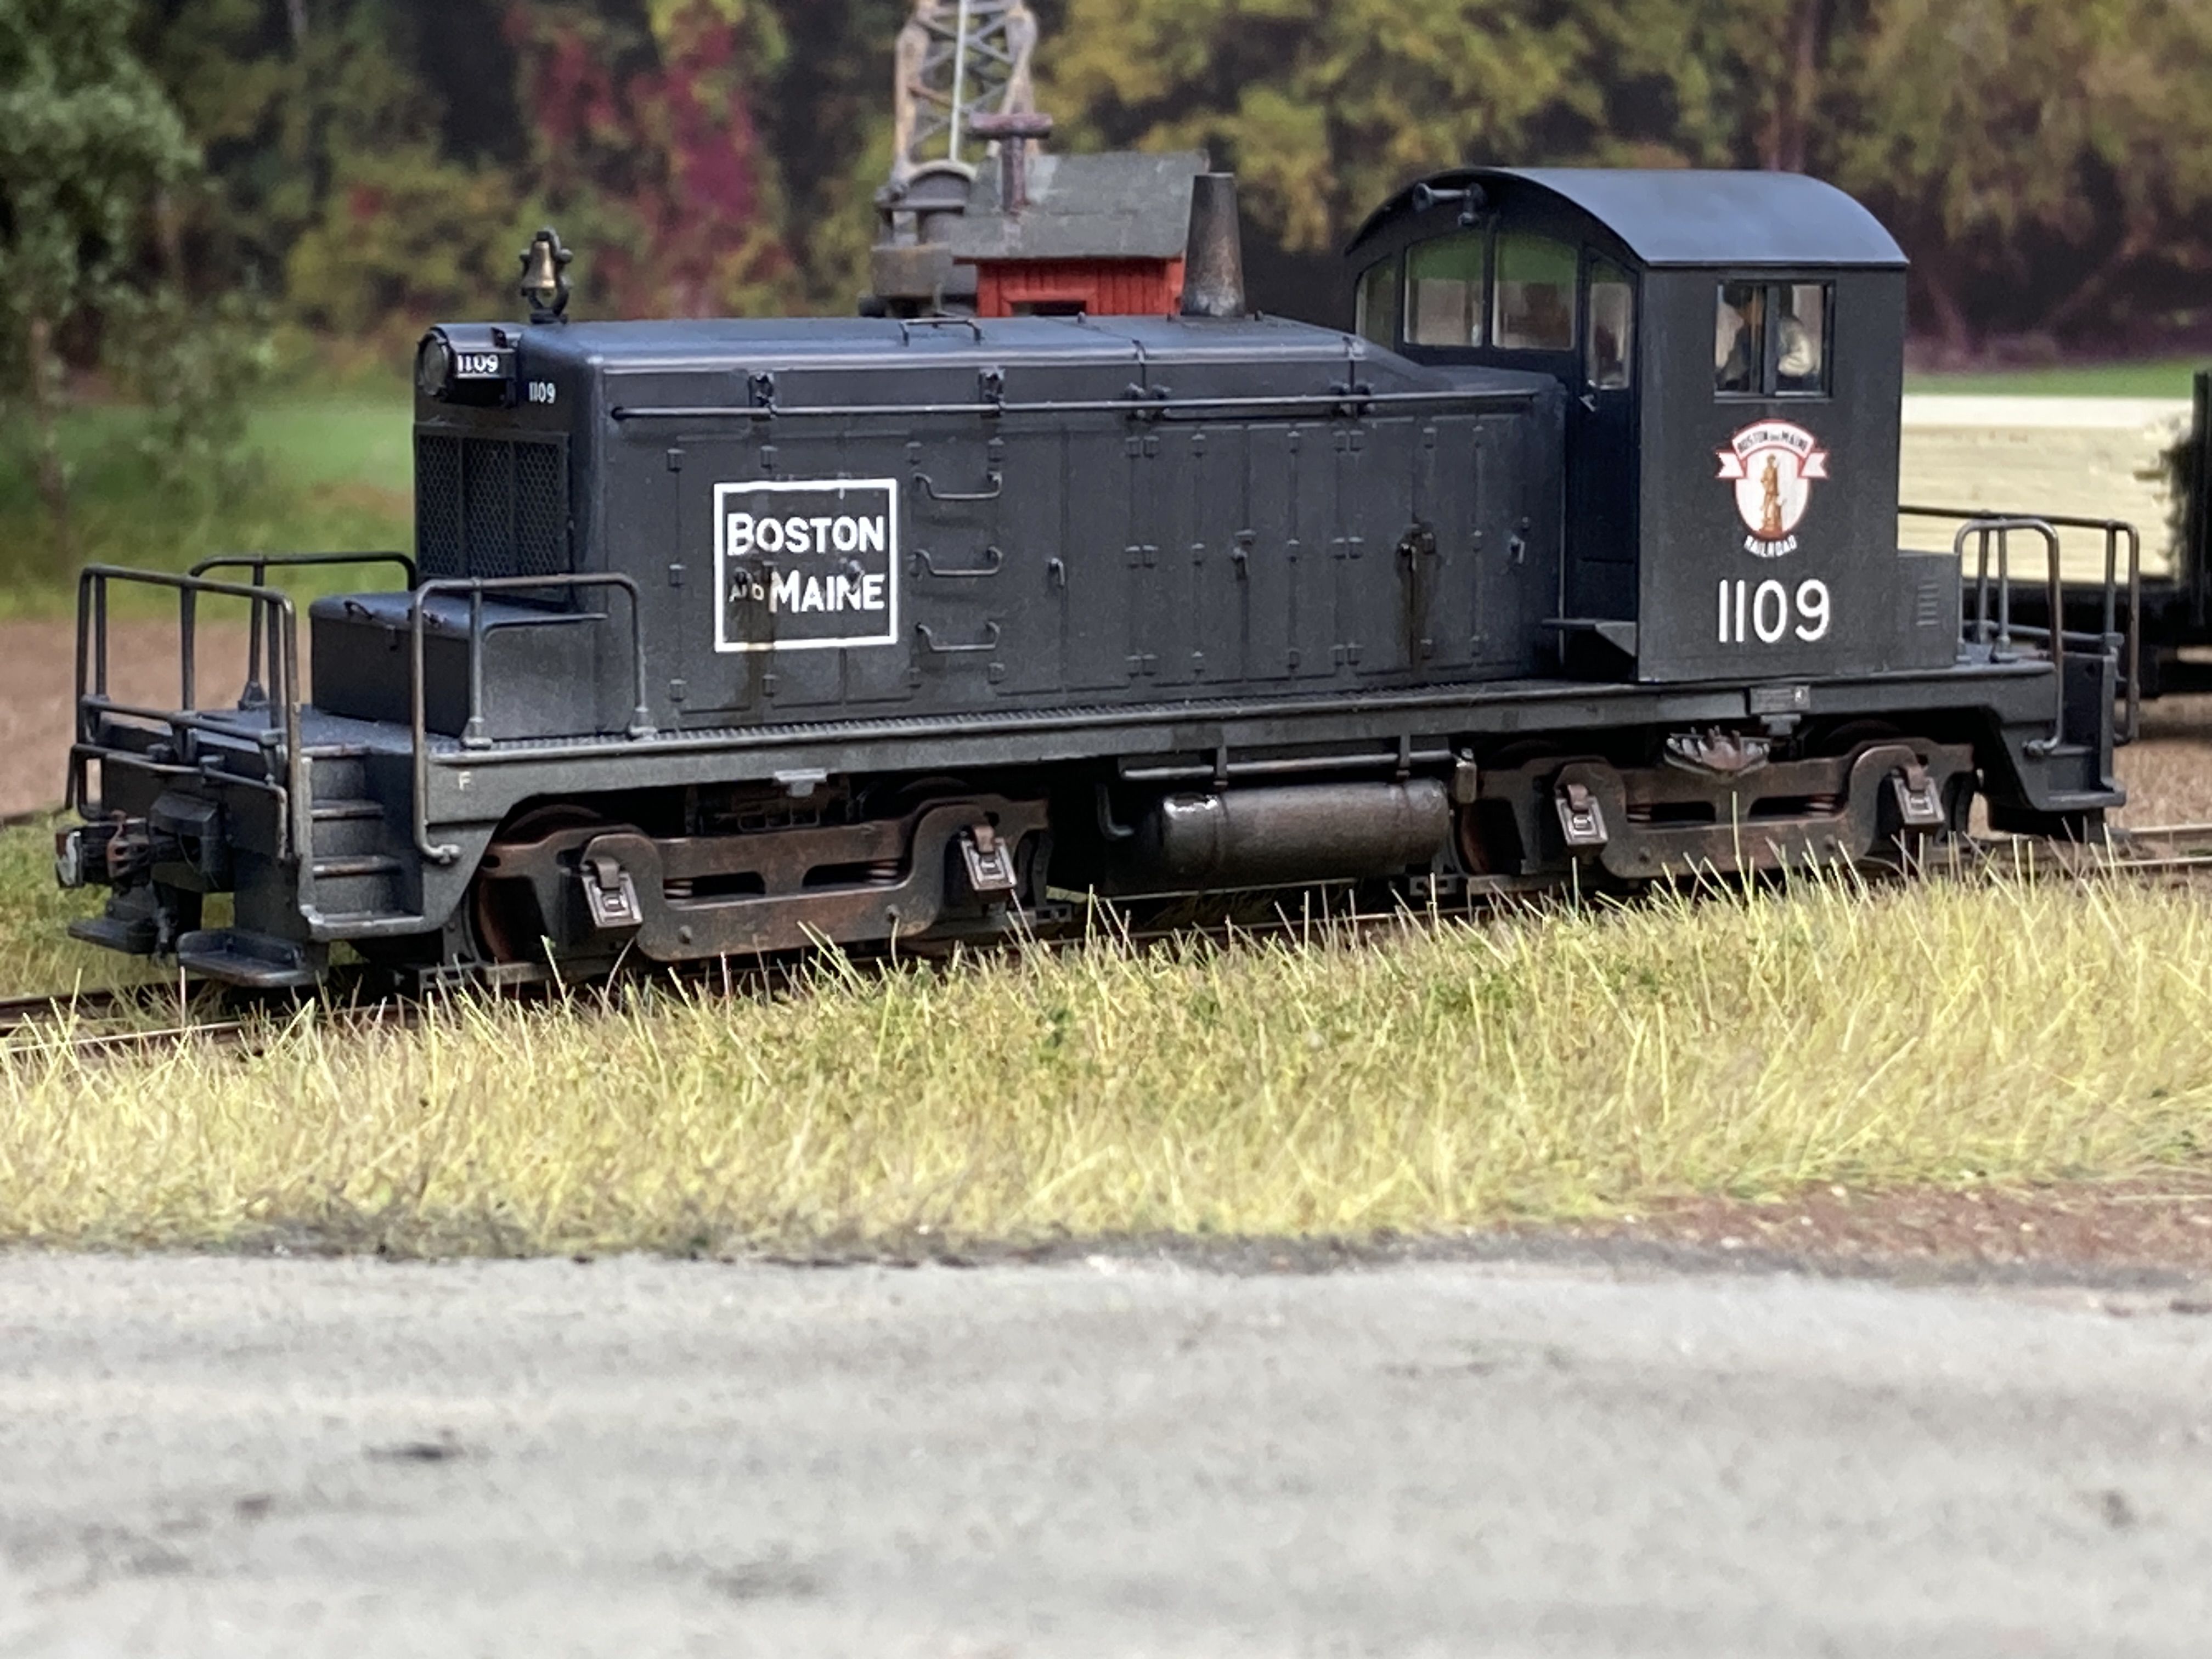
Once the crew were added (affixed in place with wax candle adhesive - I'll use thick CA if they start to come loose...), all I had left to do was insert the front light into the housing, put the hood on, then the cab, and FINALLY put it on the layout!
Enjoy the "finish photos" and the video - I hope to have more detail shots (and a much better video) in a future post (and remember, you can always click on the image for a larger view) . . .


From the first time I even considered modeling the 1109 way back in the fall of 2021, this project has been a group effort. While I may have been the one to do the "work," many have made this final product possible and deserve many thanks:
- First and foremost, Philip Taylor who I'd met through the A Modeler's Life (AML) podcast and who - when he heard I was looking for an SW1 model - sent me a brand new Walthers engine (and even the "right" 2nd run one!). Anyone that's been following this project knows that it's provide many, many hours of enjoyment.
- The Walthers model was painted for the PRR, and to model the 1109 in the livery I wanted, I needed decals. Dave Owens and Tom Murray came through with what I needed.
- A quick search of the internet pointed me to "The Model Railroader's Guide to B&M/MEC Diesel Paint Schemes" which not only educated me on all the different liveries, but is a wealth of information and photos.
- David Hutchinson - who happens to be the moderator/owner of that FB group - gets a HUGE thank you for not only providing many prototype photos of the 1109 right off the bat, but he also contributed some critical detail parts and additional decals. I couldn't have finished the detailing and lettering without his help.
- Hunter Hughson and Seth Lakin provided some fantastic articles and prototype information that was priceless early on and helped me figure out what details I was going to need.
- Speaking of details, thanks goes to Rick Abramson and John Kasey for additional details I'd forgotten.
- And finally, this project could not have been truly finished without a good "finish" - and by that, I mean weathering. Other than a quick dusting with chalks and dulcote, I'd never truly weathered a locomotive before - especially not based on prototype photos. But Ralph Renzetti (a.k.a. "The Mudfather"), someone else I met through the AML, offered to help - being my "training wheels" and guiding me through the process. No small feat considering he lives in Canada(!) We spent many hours "together" in my paint room, with him watching over my shoulder via FB Messenger Video and my iPad. One of the biggest challenges in weathering - for me at least - is knowing what materials to use, when to use them, and what they're (in)compatible with. Knowing Ralph was there to keep me from totally screwing up such a nice loco gave me the confidence to go for it. The final finish is the direct result of his helpful guidance..
Being a New Haven modeler, I never considered the 1109 as anything more than "just" a "leased" loco (so why do it at all? click here for that story), so I figured it'd be a good project to practice on and develop some new skills. No risk of screwing up one of my NHRR locos . . .
But as the project evolved, and more folks became involved, the 1109 became so much more - and I don't mind saying that it's become my favorite diesel. And I've definitely learned many new skills that I'm looking forward to using on future projects!
Now that this loco is done, I really need to get back to the layout. There's only a few weeks left until the Big Springfield show and it'd be great to get some scenery down in Essex before then. Onward!
What a great model...detailed and weathered just right (for my tastes anyway). Thanks for showing us the weathering techniques, re; poling pole, exhaust stack...love it!!!!
ReplyDeleteRick
The loco looks great Chris!!! And I couldn't take my eyes off the backdrop behind the bridge!
ReplyDeleteChris, you've done a great job and you took instruction well, even though I had to twist your arm a few times. Now that this is your favourite loco, maybe you'll be brave enough to try another. It was fun watching over your shoulder and coaxing you along!
ReplyDelete(the MudFather)