

Showing posts with label Goff Brook Farmhouse. Show all posts
Showing posts with label Goff Brook Farmhouse. Show all posts
Wednesday, February 13, 2019
Sunday, July 1, 2018
First Article Published!
Happy July Everyone! And even happier for me since this month's issue of Model Railroad Hobbyist magazine includes an article I wrote about building the Goff Brook farmhouse - my first ever published article(!). I think you can go to it directly by clicking here, otherwise you'll find it on page 140.

In other news, it's been a busy week on the Valley Line as I prepared for - then hosted - an ops session, just getting it in under the wire in June. I plan to have a post up how that went within the next day or so - so stay tuned!
Monday, October 16, 2017
Homemade Tripod
As you may have guessed from my Wordless Wednesday post last week, I'm starting to try out some layout/model photography. I used to be an amateur photographer of sorts back in '80s/early '90s but didn't keep up with it. And when I got the urge to dip my toe in again, I realized that the New Digital Age had totally blown past me. My equipment - state of the art back when I got it - was now obsolete. Besides, who "needs" all that stuff when you have a great camera right on your phone?
Well, looks like I do. The iPhone photos I take for this blog - while nice enough - don't really cut it when it comes to trying to get a photo published. Go figure %^)
Soooo..... I've gotten back into things a bit by doing some research and trying to catch up. I'd purchased a second-hand Nikon Coolpix P4 a few years back, but having a "camera" in my pocket, I wasn't motivated to learn much about it. But during my research, I heard about an old article by Brooks Stover in the 2011 issue of Great Model Railroads where there was supposedly a sidebar about taking layout photos with a point and shoot digital camera. Thankfully, one of my friends had that issue and let me see the sidebar (thanks again Pieter!)
What a find! Turns out, Mr. Stover used a Nikon Coolpix P4 to shoot all the photos that were published in the article - AND his sidebar described a cool, homemade tripod he fashioned to get the camera in close to his models and still hold it level and steady.
Allofasudden, I had all the motivation I needed to learn how to get the same results from my P4. But first, I decided to make the tripod.


Many of us have placed our camera phones and small P&S cameras right on the layout to get unique and more-realistic shots - that's the main advantage they have over full-size DSLR cameras. But in order to keep the camera perfectly still while taking those shots, you need to use the self-timer on your camera (or a Bluetooth/wireless shutter release), and if your camera has to rest on uneven terrain, you have to use a tripod - and this particular design is fully adjustable and not much larger than the camera itself.

Now that I've figured out the "stability" part of taking a good shot, I still need to work on lighting & white balance. I have LOTS of light on the layout - but they're all "daylight" fluorescents. Great for seeing car numbers, not so great for photography.

And they're all up above the layout, of course, which can create aggravating shadows. But using a "bounce fill card" (aka a sheet of white paper) brightens up some of the shadows, at least.

I've got a lot to learn and a long way to go, but after lots (and lots) of trial and error, I finally got what I think is a pretty decent shot of the Goff Brook Farmhouse. Of course, the background (wall, door) will have to be Photoshopped out, but the foreground looks pretty good. What do you think? Any and all constructive criticism wanted and welcome!
Shot Particulars:
Well, looks like I do. The iPhone photos I take for this blog - while nice enough - don't really cut it when it comes to trying to get a photo published. Go figure %^)
Soooo..... I've gotten back into things a bit by doing some research and trying to catch up. I'd purchased a second-hand Nikon Coolpix P4 a few years back, but having a "camera" in my pocket, I wasn't motivated to learn much about it. But during my research, I heard about an old article by Brooks Stover in the 2011 issue of Great Model Railroads where there was supposedly a sidebar about taking layout photos with a point and shoot digital camera. Thankfully, one of my friends had that issue and let me see the sidebar (thanks again Pieter!)
What a find! Turns out, Mr. Stover used a Nikon Coolpix P4 to shoot all the photos that were published in the article - AND his sidebar described a cool, homemade tripod he fashioned to get the camera in close to his models and still hold it level and steady.
Allofasudden, I had all the motivation I needed to learn how to get the same results from my P4. But first, I decided to make the tripod.
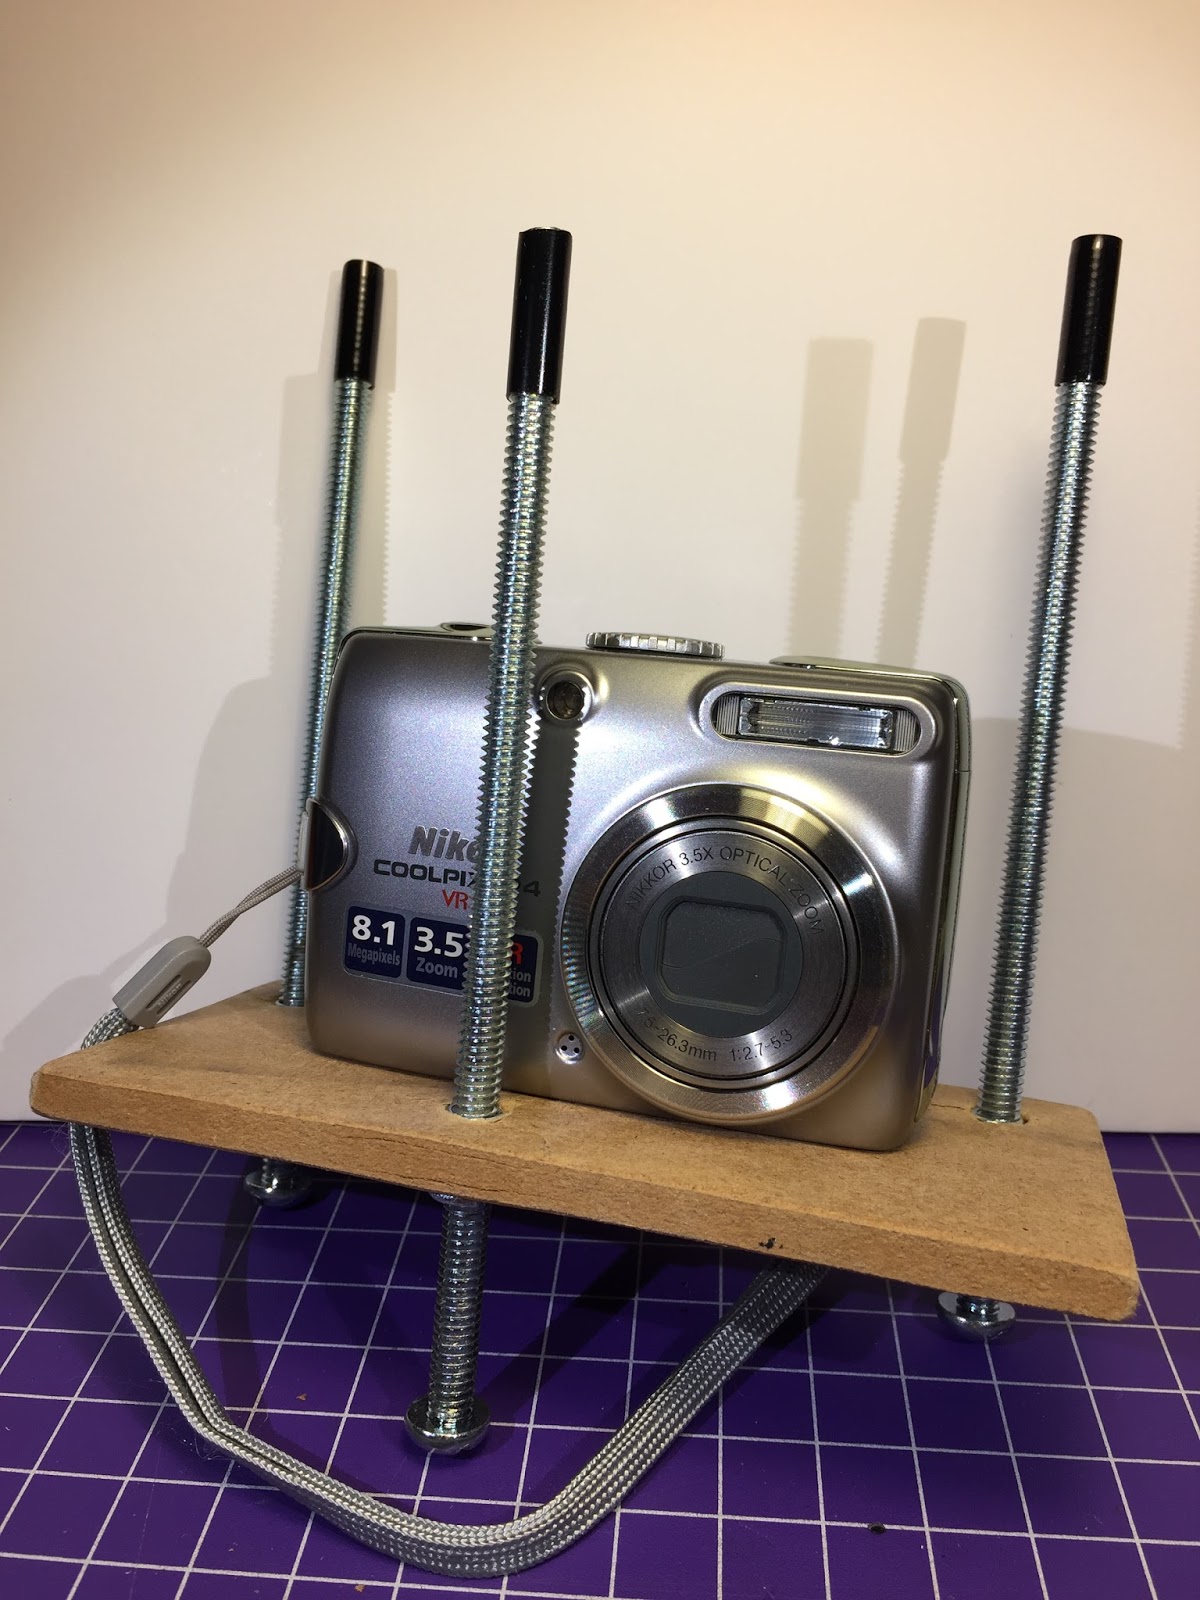
- One 1/4" piece of masonite, cut to 2.5" x 5.5" (or whatever size will accommodate your camera)
- Three 6" long 1/4"x20 carriage bolts (you can get by with shorter if your terrain is flat-ish)
- Three pieces of 1/4" heat shrink tubing, cut to 3/4" long

- Three 1/4" tall T-nuts, threaded for 1/4"x20
- One 1/4"x20 thumscrew, 1/4" long
- One 1/4" washer
Construction is pretty straightforward:
- Cut the masonite to size
- Center your camera on the masonite
- Eyeball where to locate the 3 carriage bolts. Mark & drill 5/16" holes
- With the camera centered, lift it up slightly at the front and mark where you see the tripod mount hole; do the same from the side, to give you the location for the tripod mount hole. Mark & drill a 5/16" hole
- Use a file/rasp to round all the edges/corners of the masonite and clean up the holes
- Press the T-nuts into the holes, place the masonite on top of a scrap piece of wood and hammer them in (I made the mistake of putting the masonite right on the concrete basement floor "for a good, solid backing" and promptly trashed the threads when they got banged into the floor)
- Thread the carriage bolts through the T-nuts; "screw on" the heat shrink tubing for "grips" (it'll thread on - no need to heat it)
- Add the washer to the thumbscrew, push it through the tripod hole and screw it into the camera to attach it to the masonite (the washer is necessary to keep the thumscrew from bottoming out in the camera's tripod mount hole)
It took almost as long to type all that out as it did to actually built the tripod. When you're done, you'll be able to use your camera like this:

Many of us have placed our camera phones and small P&S cameras right on the layout to get unique and more-realistic shots - that's the main advantage they have over full-size DSLR cameras. But in order to keep the camera perfectly still while taking those shots, you need to use the self-timer on your camera (or a Bluetooth/wireless shutter release), and if your camera has to rest on uneven terrain, you have to use a tripod - and this particular design is fully adjustable and not much larger than the camera itself.

Now that I've figured out the "stability" part of taking a good shot, I still need to work on lighting & white balance. I have LOTS of light on the layout - but they're all "daylight" fluorescents. Great for seeing car numbers, not so great for photography.

And they're all up above the layout, of course, which can create aggravating shadows. But using a "bounce fill card" (aka a sheet of white paper) brightens up some of the shadows, at least.

I've got a lot to learn and a long way to go, but after lots (and lots) of trial and error, I finally got what I think is a pretty decent shot of the Goff Brook Farmhouse. Of course, the background (wall, door) will have to be Photoshopped out, but the foreground looks pretty good. What do you think? Any and all constructive criticism wanted and welcome!
Shot Particulars:
- Nikon Coolpix P4
- Aperture Priority, stopped down to the smallest available, f7.6
- 1/9th sec
- ISO 50, 8 megapixel, "Fine" setting (highest quality options available)
- Macro setting, auto focused
- 3264x2448 pixels; 300dpi
- Auto White Balance (layout lights only, no flash)
- Exposure Bias -0.3 step
Wednesday, October 11, 2017


Friday, August 25, 2017
Friday Farmhouse Finish: Weathering the Goff Brook Farmhouse
After an even dozen posts about my building of the farmhouse at Goff Brook, I think I'm just about ready to call it done. Having finally ginned up the courage to weather it, all that's left to do is plant it in the layout - which I'll hopefully get around to soon. Just want to build a garage for it first and see how the scene will lay. And like the layout generally, in one sense it'll never be "done" - there will always be more detail I can add (figures, stuff in the yard, etc) - but it is now at least at a "level of done-ness" that I'm comfortable moving on to other things.
So, speaking of the weathering . . .
After my conduit calamity, I consulted the prototype photo much more closely to help guide my weathering effort. I wanted to depict a decently-maintained rural house (i.e. no peeling paint effects, etc.) that happens to be right next to the railroad during the Steam Era (in my case, Autumn 1948).
Given that the prototype photo was just taken a couple weeks ago though (i.e. not the steam era), I used it primarily as a guide for weathering the roof. I weathered the rest of the house assuming that, with it being white, coal soot from home heating and passing locomotives would make the paint a bit dingy, with some streaking from rainfall.
Having never weathered a building before, I didn't know whether to use chalks, pan pastels, or washes. I've gravitated towards dry media for my freight car weathering and weathering the one bridge I've done so far, but Bill wisely suggested I practice on a scrap piece of clapboard first.
It may have been the unpainted (raw plastic) nature of the scrap I used, but the chalks and pastels didn't really give me the effect I was looking for, so I tried the traditional india ink wash. Good thing I was working on scrap - it came out WAY too dark. I then opened a bottle of Hunterline Weathering Mix I'd picked up at Springfield a few years ago but hadn't used yet, figuring the light gray would give a subtler effect.

I used a soft-bristled brush to streak the wash vertically on the walls - holding the house upside down so that the wash would tend to collect a little under the clapboards, highlighting them. Like with most weathering, I'm discovering that you really need to be patient and not do too much at once. While you can wipe off some of the excess, it's much better to build up the effect gradually. The key is to know when even "just a little bit more" would be too much. And that 6th sense only comes with practice.
So I practiced on the side of the house that will face the backdrop :) and worked my way around to the other, more visible sides. I also used the wash around the stone foundation to make it "pop" a bit more.
After getting the walls about where I wanted them with the wash (and I still wondered whether I went just a bit too heavy), I decided to add some powders and pastels - especially on the roof.

The three main pastels I used were Black, Neutral Gray, and Raw Umber. The black went on pretty heavily as soot around the top of the chimney, and as mold & soot streaks down the roof and walls. I used the gray to "sun beat" (lighten) the roofs a bit and add some contrast (and also lighten any black that was too black). The raw umber was just used sparingly here and there for some additional contrast & mud splatters. I also used it with the gray to weather the "wood" porch floor.
And here's the finished product - suitably sooty, but hopefully not as bad as a coal country company house...


And here it is (temporarily) in place on the layout . . .

Unfortunately, the bright lights reflect a bit off the roof, but that's easily remedied. Fortunately, while the weathering looked a little heavy at the bench, under layout lighting conditions it looks much better.
As I mentioned at the beginning, I still have a bit more I want to do here: "plant" the house, add a walkway, mailbox, power lines, garage, and such (not to mention the dog!) - and I gotta figure out how to "mow" the lawn . . . . But I'm ready to move on to other projects. Need to go "north" to work on the Valley Coal Co. scene as well as get back to the Rt. 15 overpass.
For now though, I think I'll take a little bit of time to enjoy having completed my first house, with weathering and everything!
Friday, August 18, 2017
Friday Fun? Goff Brook Garage
Now that it's all done but the weathering, the Goff Brook Farmhouse needs a neat little one car garage. Fortunately, there's a kit for that . . .
According to the instructions, "this kit was designed to be quick and easy to assemble" and the "unboxing" (well, "unbagging") photo shows all the parts that are included. . .

Note that they're not the same height (off by a couple of clapboards). So I started to check the other parts. . .
Another mismatch :^(
And finally (inevitably and most clearly) . . .

I'm pretty sure the corner of the side wall and the corner of the end wall must match - and of course the end walls and side walls must match each other. I'm not being sarcastic - this will/would have been my first laser-cut wood kit. BEST has a great reputation and I've seen their displays at Springfield and such and always wanted to try one of their kits, but this one - the one that was supposed to be an easy introduction - has me flummoxed.
Am I missing something here? Have any of you built one of these kits before? Maybe I just got a mistake-in-production dud?
 |
| Much thanks to PeteL for the kit! |

Unfortunately, that may not be all the parts that are needed. My first clue to this came when I dry-fit the door . . .
 |
| Uh oh |
I wasn't sure whether the wall was too short (though the mismatch between the top of the back wall next to the side wall should have been a clue), or if the door opening had to be extended up.
So, I took out my handy caliper and started comparing parts . . .
 |
| Height of the "door side wall" |
 |
| Compared to the other/"window" side wall |
 |
| Front end wall |
 |
| Back end wall |
 |
| Corner where front and "door" side wall must meet |
 |
| Compared to "door" side wall |

I'm pretty sure the corner of the side wall and the corner of the end wall must match - and of course the end walls and side walls must match each other. I'm not being sarcastic - this will/would have been my first laser-cut wood kit. BEST has a great reputation and I've seen their displays at Springfield and such and always wanted to try one of their kits, but this one - the one that was supposed to be an easy introduction - has me flummoxed.
Am I missing something here? Have any of you built one of these kits before? Maybe I just got a mistake-in-production dud?
Thursday, August 17, 2017
A Few Words About Wordless Wednesday #183 - A Conduit Tale

As I was wrapping up the final construction post for the Goff Brook Farmhouse and posting the "finish pic" above, I mentioned that I could just "visit the prototype and see what it looks like" to get a guide on how to weather it.

Well, I clicked over to review the prototype shot I'd taken - and got a bit of a shock. See what I did there? A hint is in the title to this post - as well as in the pun.
Yup, I'd inexplicably poked the electrical service conduit through the roof(!) Now, in my defense, I had consulted a very thorough clinic on how to model electrical service, and coulda swore that's how it was supposed to be done. But when I went back to check, it looks like the conduit only goes through the roof when it's necessary to get the weather head at least 10' above ground (low sheds roofs, etc). Otherwise, it's safest to have it under the eave - and less chance of someone on the roof coming into direct contact with the weather head & wires.
I should have reviewed my prototype photo earlier.
Now, I was going to see if anybody would notice - but the problem with me is that now I had noticed. And I've been down this road often enough to know that the hemming/hawing/vacillating about whether or not to fix it often takes longer than actually just fixing it.
So I decided right away to go ahead and fix it. Here are the steps I took (in case you ever find yourself in a similar situation which - hopefully now that you have the benefit of my experience here - you won't):
- Carefully pry the conduit out of the side of the wall. Cushioned tweezers will prevent chipping the paint.
- Clip off the old bent end of the wire (the "weather head"), pull the conduit through the hole and set it aside.
- Fill hole with Squadron Green Putty (I really need to get myself some stryrene rod, which would have worked better here).
- Sand lightly when dry (I use a variety of sanding sticks, from "coarse" down to "extra fine"
- Apply another coat of putty and sand when dry.
- Decant the same color spray paint used for the roof into an old bottle cap and use a microbrush to replace the paint in this area and cover everything up.
- Cut the conduit to a shorter length (based on the prototype photo!) and bend a new weather head.
- Add a styrene 2x4x12 to the wall for mounting the weather head end of the conduit.
- Replace conduit, gluing in place with CA
- Realize that the repaint you did looks a little rough and takes the light differently.
- Decide to respray the roof . . .


I think it looks MUCH better - and it's
I've certainly learned a lot through this build and have built up my confidence that I can recover from most mistakes. But if I'm doing it right, I'm only making new mistakes - so the learning continues . . .
Hopefully my sharing all the fun and folly along the way has been at least a little entertaining, if not super educational!
Wednesday, August 16, 2017
Tuesday, August 15, 2017
Tuesday Tips: Goff Brook Farmhouse - Final Details, Final(?) Fails
Well, after almost a week, I finally see the light at the end of the tunnel on this project - unfortunately, while the light wasn't an on-coming train, there was a pretty annoying motor hand car on the track in the form of a couple more fails. But first, a few tips . . .
The next step was to install the porch and main roofs. The porch roof went on the same way as the roof on the addition - add glue to the top of the porch roof frame, and the beveled edge of the roof, center carefully, and press to fit.
Speaking of glue, a quick sidebar on the glues I used on this project:

For any styrene joints I could clamp tightly ahead of time, I used Tenax applied with a superfine microbrush. It welds the joint together and cures almost instantly.


I used a bag of ballast, formed to conform to the roof, to weigh it down while the glue cured.
With that, the house itself was "finished" according to the instructions (except for the chimney), but I thought adding some additional stacks/vents and and electrical service would add some additional interest and look more authentic.


I applied a drop of the Testor's to the box and added the dial . . .

. . . then routed out the back with an .060" drill bit in my Dremel, being careful not to break through the front (a foot/speed pedal really helps here). I bent the wire and clipped it so that most of the curve was gone (that way it'd fit into the wall more easily). Then I used my thin CA to glue the box to the wire.

Unfortunately, as I was moving the house around trying to figure out where to locate the conduit, I accidentally hit the back stairs and part of them broke off. ARGH!!!!

Fortunately, they broke off at the glue joints. A smarter man may have just glued the part back on. But no - I took this opportunity to level the stairs. So - yup - I decided to take them all the way off and redo them.

As if I'd forgotten what pain these were the first time I built them - and they still didn't want to behave. You can see above what I contrived to keep the right side down and level while the glue dried overnight.


And just like that - I dub the Goff Brook Farmhouse DONE! Though not "finished" - I still have to gin myself up to add the weathering which will really cause it to pop. ANY AND ALL advice you might have on how best to do this would be MUCH appreciated. My left-brain is pretty comfortable with building, but my right-brain is pretty weak. I need all the artistic help I can get!
It's only been a little over a week, but this build seems to have taken much longer - maybe since I've been reliving it along the way by posting about it here. Thankfully, based on the comments (as well as direct emails), many of you are enjoying the journey. As I've mentioned before, I really appreciate the camaraderie and the feedback is especially appreciated.
I think I'll put this aside now for a bit in order to do some weathering research. But that may be as easy as just visiting the prototype and seeing what it looks like!
The next step was to install the porch and main roofs. The porch roof went on the same way as the roof on the addition - add glue to the top of the porch roof frame, and the beveled edge of the roof, center carefully, and press to fit.
Speaking of glue, a quick sidebar on the glues I used on this project:

For any styrene joints I could clamp tightly ahead of time, I used Tenax applied with a superfine microbrush. It welds the joint together and cures almost instantly.
For styrene joints that don't fit quite so tightly and/or if I need a little more working time, I really like the Testors/Model Masters liquid cement - it has a higher viscosity (it's thicker) so has some gap-filling properties and a slower (though still quick) cure rate. The needlepoint applicator is also handy.

For joints between styrene and something else (metal or wood, as you'll see later), I used Zap CAs - the viscosity depending on the application. Since the joints on this project were relatively tight, I used the thin CA to get in and bond.
So for the main roof - like with the other roofs - I used the Testors with the needlepoint applicator, applying the glue on tops of the side and end walls. But the angle of the roof was slightly off, not matching the gable peaks exactly. Instead of pressing it down and holding it in place by hand while waiting for the glue to dry, I came up with another tip:

I used a bag of ballast, formed to conform to the roof, to weigh it down while the glue cured.
With that, the house itself was "finished" according to the instructions (except for the chimney), but I thought adding some additional stacks/vents and and electrical service would add some additional interest and look more authentic.

Typically, you could make a stack/vent (for a bathroom, for example) from styrene rod. But I didn't have any on-hand, so I improvised using a toothpick (which is approx. 4"diameter scale) "painted" with my black Sharpie.
The electrical service was a bit more involved. I started to search the google on the internet machine to see if anybody had scratchbuilt one of these before. There are commercial parts available (and a bunch on Shapeways) and I may use those for future projects, but I didn't want to wait.
My search teetered on the brink of another rabbit hole and I found this really cool clinic on modeling electrical and phone service, but no details or instructions for scratchbuilding what I needed.
Then it occurred to me - I could just go outside and measure MY electrical service. The meter box is 8.5" wide, 14" tall, and 4.5" deep. The dial is about 5.5" in diameter. Here's what I came up with:

- Service Box: a piece of .060x.188" styrene strip, cut to 4.5" wide
- Dial: .060" dia styrene rod (didn't have this on-hand, so used a bit out of my scrap box)
- Conduit: 20 gauge solid wire with the insulation stripped off
I applied a drop of the Testor's to the box and added the dial . . .

. . . then routed out the back with an .060" drill bit in my Dremel, being careful not to break through the front (a foot/speed pedal really helps here). I bent the wire and clipped it so that most of the curve was gone (that way it'd fit into the wall more easily). Then I used my thin CA to glue the box to the wire.

Unfortunately, as I was moving the house around trying to figure out where to locate the conduit, I accidentally hit the back stairs and part of them broke off. ARGH!!!!

Fortunately, they broke off at the glue joints. A smarter man may have just glued the part back on. But no - I took this opportunity to level the stairs. So - yup - I decided to take them all the way off and redo them.

As if I'd forgotten what pain these were the first time I built them - and they still didn't want to behave. You can see above what I contrived to keep the right side down and level while the glue dried overnight.

And the positioning that had caused the accident in the first place ended up being wrong. When I placed the conduit on the side of the house, it wasn't perfectly vertical. And anybody that knows me personally knows that would really really bother me. So, out came the Squadron Green Putty, applied with the smallest of screwdrivers for a "palette knife," and every so gently sanded later. Then I drilled another hole.
Fortunately, a little white paint hides the mistake. And while I was down in the paint room, I sprayed the conduit/meter assembly with gray primer.
While that was all drying, I located and drilled holes for the bathroom stacks/vents and where the electric conduit goes through the main roof. Then it was just a matter of gluing on the chimney with the Testor's and press-fitting the toothpick stacks in the holes, secured with thin CA.
Once the electrical conduit was dry, I threaded it through the roof, marked how tall it should go, and bent/snipped the wire that that point for a weather head. Then I pressed the bottom of the conduit in the hole in the wall, secured with thin CA.


And just like that - I dub the Goff Brook Farmhouse DONE! Though not "finished" - I still have to gin myself up to add the weathering which will really cause it to pop. ANY AND ALL advice you might have on how best to do this would be MUCH appreciated. My left-brain is pretty comfortable with building, but my right-brain is pretty weak. I need all the artistic help I can get!
It's only been a little over a week, but this build seems to have taken much longer - maybe since I've been reliving it along the way by posting about it here. Thankfully, based on the comments (as well as direct emails), many of you are enjoying the journey. As I've mentioned before, I really appreciate the camaraderie and the feedback is especially appreciated.
I think I'll put this aside now for a bit in order to do some weathering research. But that may be as easy as just visiting the prototype and seeing what it looks like!
Subscribe to:
Posts (Atom)