

Showing posts with label Rocky Hill. Show all posts
Showing posts with label Rocky Hill. Show all posts
Wednesday, August 23, 2017
Thursday, May 18, 2017
Wordless Wednesday #171 - On Thursday
(sorry 'bout the snafu with the pic for this week's Wordless Wednesday - tried posting from my phone and it looked like it worked, but apparently hadn't. So here it is... again-ish)


Wednesday, November 30, 2016

Thursday, December 3, 2015
The Valley Local on Video(!)
Since Trevor put the bug in my ear the other day, I decided to try shooting some video on my layout. Credit (and many thanks) goes to Bill for the scenery & structures. At least I can lay claim to the trackwork. And the freight cars.
I hope you'll enjoy these short vignettes despite the fact that they're shot freehand with my iPhone (maybe Santa can help me out with that) and they're, um, color - a rarity in the Autumn of 1947.
So, without further ado, I think I hear a train comin' . . .
Wednesday, December 2, 2015


Wednesday, August 26, 2015
Wordless Wednesday #83
 |
| Need to learn PhotoShop so I can edit out all that background. Or remember to just put up a blue piece of posterboard... |
Thursday, August 13, 2015
Throwback Thursday #1: Rocky Hill - Then & Now
I don't know if it'll become as regular a feature as "Wordless Wednesday," but Throwback Thursday will give me an excuse to post some early construction photos - which will hopefully be especially interesting now that I've started some scenery and made some significant progress. Well, at least I'll find them interesting...
For my first TBT, here's a shot of the Rocky Hill/Wethersfield peninsula laid out on the floor:

The Rocky Hill area is being mocked up at the left there. Early on, I thought I could have a turnout further back ("north") along the turnback curve to make a longer siding, but that proved unworkable. That quonset hut is a little "south" of where the station ended up being. And you can make out another turnout template - and loading dock - where I thought I could fit the foundry. But - alas! - I didn't have enough space.
But I think it worked out ok in the end. Here are a couple of shots from just a few days ago standing (very roughly) in the same location:
 |
| Of course the layout is up off the floor now, which changes the perspective a bit. |
 |
| End of peninsula, with prototype reference photo on the fascia, looking south toward the station. You can see the models better if you enlarge the pic. |
Speaking of that first photo - it may be the first time I've given any hint of how I go about track planning. Just briefly - I do some rough chalk sketches on the floor (mostly just the major curves and tangents) to make sure things have at least a chance of fitting as expected. Then I lay out paper on the floor and use turnout templates and a sharpie to mark out where the track will go. It's a long trial-and-error process to try and fit things. And, as you can see, not everything makes the cut.
Literally. Once I get the track layout settled, I cut it all out from the paper and use those cutouts as templates for cutting the plywood subroadbed. You have to be careful to label things well - especially where you have to cut across the track/subroadbed. Just be sure to label each end of the paper - and the plywood - so you can match everything up later.
I may go into my process in more detail in a future post (especially if there's a little clamor for it :^) but for now, it's just cool to see how much this area has changed. After doing so much historical research and seeing on the prototype how often things change for the worse or are lost entirely over time, it's neat to see an area change for the better - even if only in HO scale.
Sunday, August 9, 2015
First Layout Tour!
(just a quick reminder that you can subscribe to this blog by email if you want to get notices of new posts automatically)
I had no idea where I was going to end up when I agreed to do a little talk last March. PeteL is head of clinics for the Nutmeg Division of the National Model Railroad Association, needed somebody to fill a vacancy he had for the March meeting, and asked if I could help. He'd seen my presentation of "A Day on the Valley Local" and thought it'd be interesting for the club (especially since their meetings take place right along the Valley Line) and would be no trouble for me to do (since I already had the PowerPoint done).
The presentation went well, folks seemed to enjoy it, and the club's head of layout tours asked if I'd be willing to host an open house to see my layout at some point. I'd heard a lot about these open houses, how motivating they could be, and was curious how I'd fare. So I agreed, and a date "far away into the future" (or so I thought) was set.
Let me just say - now, from first hand experience - that agreeing to host a tour of your layout, as stressful as it can be, is the best thing you could do to help you make a LOT of progress on your layout. The best comparison I can think of - if you'll excuse the pun - is training. I raced my bike for almost 10 years, and if it wasn't for the fact that I had races to train for, there's no way I'd be getting my butt out of bed at 5:30 on a winter morning to ride. But knowing that a race was looming was what got me going. And I found the exact same thing to be true for having this open house event.
So, if you haven't done one yet, Just Do It - it'll be the best thing you can do for your layout.
As for my First Open House, it went great! Everything ran well (thanks to Bill, Dick, Pete and Roman for ironing out some last-minute glitches), I had about 30 people show up (at least according to my Guest Book, which I
And now, for those of you who couldn't make it this time, here are some photos from a most wonderful day...
 |
| The NMRA provides this cool lawn sign so folks can find you. And you can see my new ride in the driveway (shhh.... don't tell Bill . . .) |
 |
| It was a beautiful day, but even without lots of folks, it was starting to get stuffy in the basement. So since I turned on the AC and didn't want to have to keep answering the door, I figured a sign would do. I like the script herald - hopefully it made up for the first - of many - reminders to sign the guest book. |
 |
| After you come through the door, but before heading down to the basement, there were some snacks and my iPad with the Valley Local website on it, in hopes that folks would stop and sign the guest book. |
 |
| The Old Saybrook scene is the first thing you see when you come down the stairs. I had just finished the balloon track, wye, and sidings behind the station early that morning. Thankfully, everything ran well through here. Note the prototype reference photos on the fascia (also done about an hour before show time) - that show what I'm trying to model in this spot. |
 |
| As you turn around, behind you is the Agent/Operator's Desk. I'd set it up with some NHRR paperwork and had the iPod playing some '40s music to set the mood. |
While my main keepsake of the day would be the guest book (which is why I so much wanted folks to sign it), the missus reminded me to make sure I took some pictures of the people too in order to commemorate the day. Unfortunately, I wasn't able to get photos of everybody - especially during the busiest times - but I was able to get a good representation, especially early in the day . . .
 |
| Roman and Dave at the entrance of the "North End" room (Wethersfield to Middletown). That's the siding for what will eventually be Middletown Meat Packing, at the south end of town. |
 |
| Bill and Lee at Middletown. Looks like Bill is trying to tone down the volume on the S-2 which was so loud it actually made it difficult to have conversations. |
 |
| I'm standing where Bill was in the previous photo and looking back toward the south end of Middletown (on the right side of the aisle) and the only completed prototype scene on the railroad so far, Rocky Hill there on the left. |
 |
| Dave and Tim - thankfully, some folks had name tags. I might consider having those at the "entry table" next time. As much as folks don't like them, they really are pretty helpful. |
 |
| Back at the staging area, Roman is working on a kink in the track - helped with new spikes that I ordered from Tom's Trains which were personally delivered during the tour (thank you!). Looks like Lee is having more fun than Pete here... |
 |
| Bill doing some switching at Rocky Hill. It was great having a few guys operating trains during the day - it gave me a chance to visit (and to take these pictures!) and gave folks something fun to see. |
 |
| Rocky Hill - my favorite scene on the railroad, probably because it's my ONLY completed scene on the railroad. Bill was right - it was good to get at least one scene done for the open house so that visitors could get a taste of what we're trying to accomplish. |
 |
| Trackwork and rolling stock by me - structures and scenery by Schneider (Bill) |
 |
| I'm super happy with how this area came out. Given the discussion about New Haven Railroad structure colors, note that the freight house - still in use by the railroad here in 1947 - is recently painted a simple all-brown scheme. |
 |
| Note here (and in the pics just above and below) how the station - no longer in use by the railroad - is in an older paint scheme and is showing its age. Note also the scratchbuilt NHRR specific crossbucks. Custom lettering on stryrene strip, mounted on weathered code 70 rail (also by Bill - but at least that's a boxcar I built, coupled to the engine:^). |
 |
| It's October, 1949 now and the Valley Local has gone diesel...Here's the 0615 southbound at Rocky Hill. Remember, you can always "embiggen" an image by clicking on it. And you may want to do that especially with this pic, if only to see the cool telegraph and telephone signs on the corners of the station. |
 |
| Diesel-powered Valley Local, northbound at Rocky Hill. I really need to learn PhotoShop so I can eliminate |
 |
| Steam pinch-hitting on the Valley Local southbound rounding a curve between Wethersfield and Rocky Hill. |
 |
| Ahhhh.... PhotoShop.... that's more like it! THIS is a pretty great shot - which I can say without boasting since I didn't take it. Bill took this pic and did the doctoring - so now I can say "scenery, structures, and SKY by Schneider...) |
 |
| Rocky Hill is all quiet now. That cool tall switchstand is one of Rapido's new products. Perfect for the New Haven, and it really completes the scene. |
 |
| I didn't do it for any accolades, but this was really cool and is very much appreciated. This, along with my guest book and photos, are prized keepsakes of a great day. Thank you again to all who were able to visit! |
Friday, August 7, 2015

Wednesday, July 22, 2015

Monday, July 13, 2015
Rocky Hill Scenery Started
Sunday work sessions are whirlwind 4-hr affairs, tucked in between brunch & dinner. Bill and Pete made it over to continue the scenery in Rocky Hill that they started last week and I tried to keep them supplied with all the necessary resources, from materials to tools to the-all-important-snacks. As you'll see in the photos, we got a lot done!

Early on, they determined that it'd be a good idea to put the stone foundation for the Rocky Hill station in place and scenic around it. This, despite the fact that the station isn't built yet - there's just a mockup structure. Since it's so critical that the foundation footprint be spot-on, I decided to confirm that the mockup's footprint was accurate. Good thing I did. It wasn't. Even worse - I can't determine the actual footprint size from the Sanborn map.
If ANYbody has any information on the footprint dimensions of the Rocky Hill station and the freight house (or miracle of miracles - if you actually know where I can get plans!), please let me know. In the meantime, we're estimating the footprints based on the Wethersfield freighthouse/station kit.
BTW, the station footprint is sketched in in the photo above, and I hot glued some foam core to start the platform area.
Thankfully, my false start and insufficient research didn't diminish the progress Pete & Bill were making. And the proof is in the pics . . .

They tell me that "there's still more to add" but it sure looks pretty close to finished to me! I still need to figure out what - if anything at this point - I'm going to do for a background here. Nothing's really needed to be on the backdrop though, which is why I chose to start the scenery in this area.

It's starting to look pretty good! I'm glad I had a good scenery stash on-hand, but this process sure eats up lots of material. The results are worth it though - especially the first time you see a scale model in a scene you'd only ever seen in your mind.
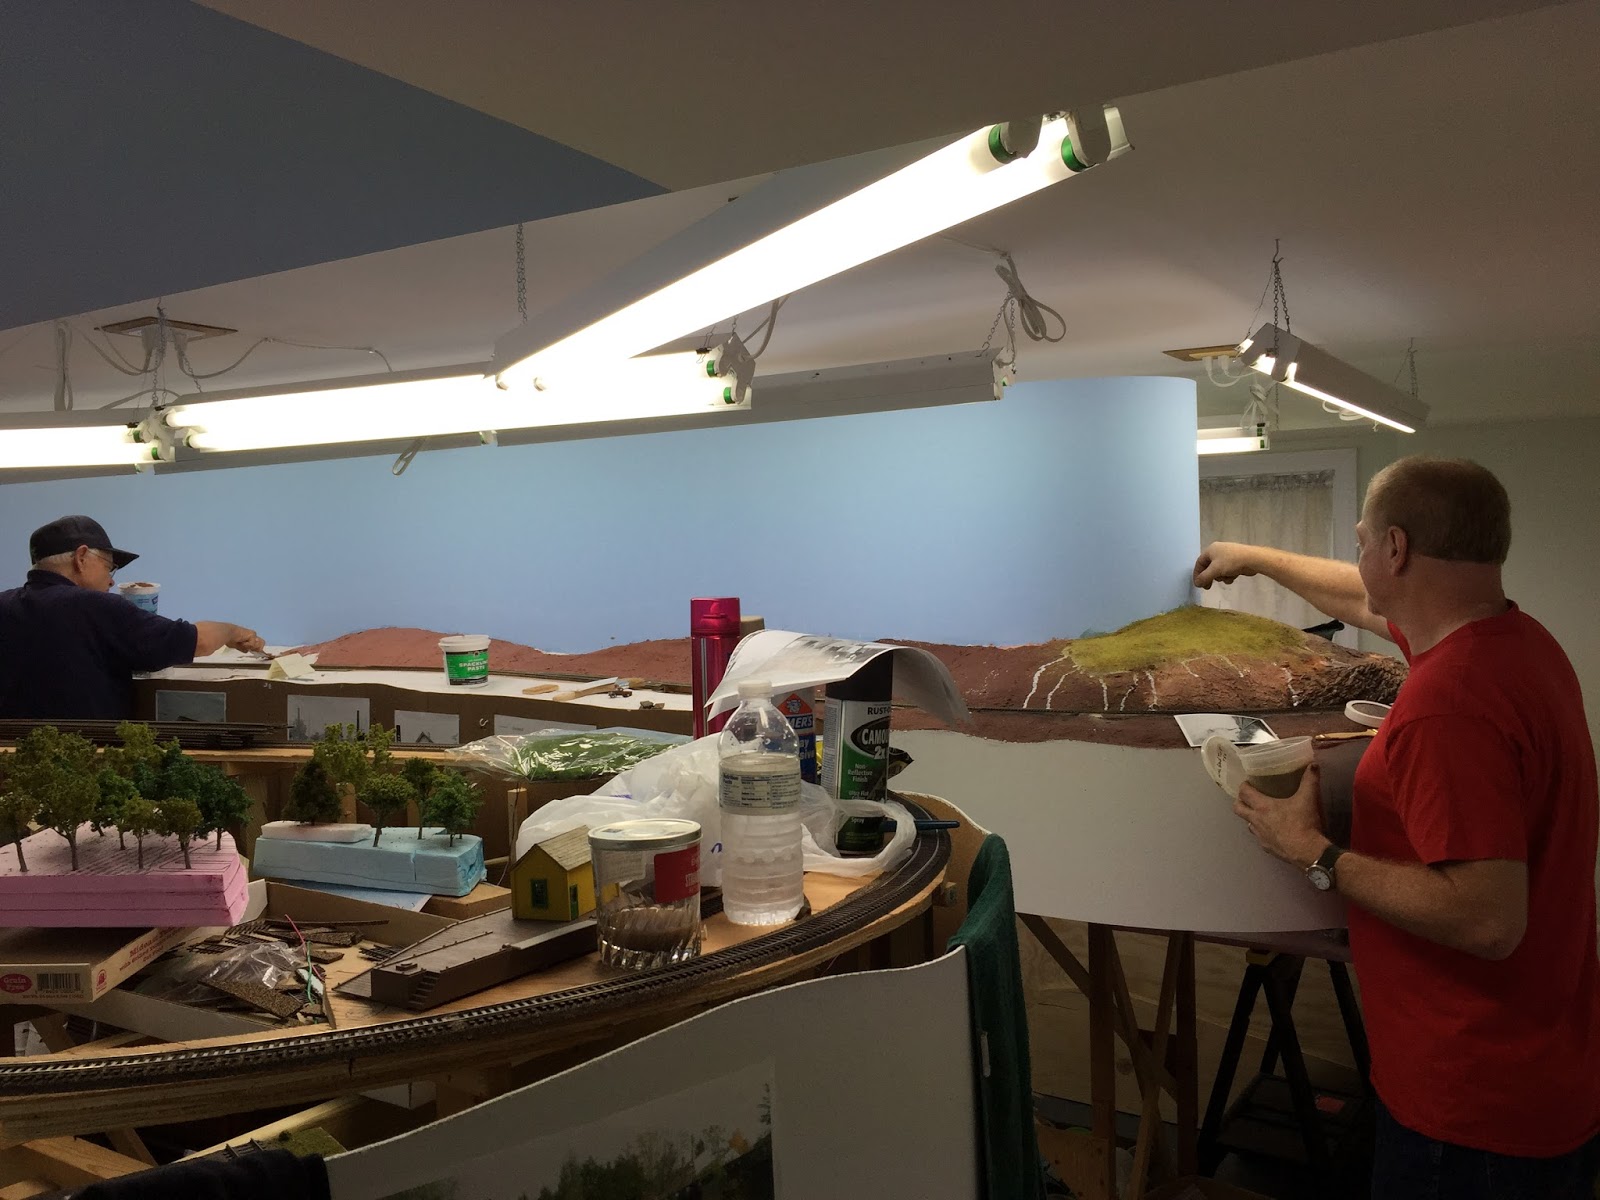 |
| Pete's in Dividend staying ahead of Bill, who's adding more to the area just "north" of Rocky Hill. |

Early on, they determined that it'd be a good idea to put the stone foundation for the Rocky Hill station in place and scenic around it. This, despite the fact that the station isn't built yet - there's just a mockup structure. Since it's so critical that the foundation footprint be spot-on, I decided to confirm that the mockup's footprint was accurate. Good thing I did. It wasn't. Even worse - I can't determine the actual footprint size from the Sanborn map.
If ANYbody has any information on the footprint dimensions of the Rocky Hill station and the freight house (or miracle of miracles - if you actually know where I can get plans!), please let me know. In the meantime, we're estimating the footprints based on the Wethersfield freighthouse/station kit.
BTW, the station footprint is sketched in in the photo above, and I hot glued some foam core to start the platform area.
Thankfully, my false start and insufficient research didn't diminish the progress Pete & Bill were making. And the proof is in the pics . . .
 |

They tell me that "there's still more to add" but it sure looks pretty close to finished to me! I still need to figure out what - if anything at this point - I'm going to do for a background here. Nothing's really needed to be on the backdrop though, which is why I chose to start the scenery in this area.

It's starting to look pretty good! I'm glad I had a good scenery stash on-hand, but this process sure eats up lots of material. The results are worth it though - especially the first time you see a scale model in a scene you'd only ever seen in your mind.
Thursday, March 5, 2015
A Few Questions About Wordless Wednesday #58
After seeing yesterday's Wordless Wednesday, you might be wondering the same thing I am . . .
First, the pics:

.jpg)
First, the pics:
These two photos are (supposed to be) of the freighthouse at Rocky Hill, CT. They're taken at two different times - March, 1929 and, um, "later" (late 30s? 1940s?) - and taken from roughly the same location (south end of the building, looking north).
Here's my question: Why do they look so different?
At first, I assumed that the smaller entry door had just taken the place of the larger freight door on the south end of the building (which must've been filled in). But upon closer inspection, that doesn't make sense - note where the window is, especially in relation to the wainscoting. Why would anyone bother moving a window like that?
Before I can focus on doing scenery in Rocky Hill, I'd like to at least get some building mockups done. But when it comes time to actually building a model of this building, I'd sure like to know what the deal is with this south end wall.
Anybody know the story?
Tuesday, March 3, 2015
Tuesday, October 28, 2014
More Fun with Mockups: Wethersfield Lumber, Rocky Hill Stations
I only have one photo of Wethersfield Lumber, and it's just a blow-up portion from a much larger aerial. You can't see much, but it's better than nothing - and confirmed that the Walther's Walton Lumber Co. kit will provide a good stand-in, at least until I get better photos.

But before plunking down $55 for a kit, I figured I'd make a mockup of the main building. Walthers provides the overall dimensions, so it was just a matter of measuring out the matboard, cutting & gluing:
After doing Wethersfield Lumber, I installed a mockup of Rocky Hill station that Dick did and the Rocky Hill freight house that Roman did. You can see them here in place, temporarily propped up on the bank of the CT River, just like the prototype:

Here's a shot looking south toward the freighthouse and station....
Which I include primarily because it has (hopefully) more than a passing resemblance to this prototype photo:
If you haven't yet, I hope you'll try doing some structure mockups for your layout. They're really quick and a great source of modeling motivation - and you can start seeing right away how your layout will eventually look.
But before plunking down $55 for a kit, I figured I'd make a mockup of the main building. Walthers provides the overall dimensions, so it was just a matter of measuring out the matboard, cutting & gluing:
 |
| I discovered AFTER I'd already made a few mockups that I have this handy-dandy assembly jig from Micro-Mark. I HIGHLY recommend it! |
 |
| Since the building is pretty large, and the roof was going to be in two sections, I decided to install this ridgeline brace. |
 |
| The roof area was large & unwieldy, so I decided to do it in two sections, using masking tape to join them and provide a hinge. |
 |
| And here's the finished product! At least I know the Walthers kit will fit and - as importantly - how its size looks in the overall space. As you can see, since it's just a mockup, I didn't bother with the complicated roofline or building-length cupola. But this works just fine for now. |
Here's a shot looking south toward the freighthouse and station....
 |
 |
| I won't be able to include that cool house to the left since it'd be in the aisle |
Monday, June 16, 2014
Goff Brook road bridge (Middlesex Tpke/Old Main St)
How many times do we pass something every day and never pay it any attention? How often have we passed by a demolition site of an old factory, for example, and think "ARGH! I always meant to get a photo of that!" - and now it's too late. Hopefully, it only happens to you once or twice before you learn your lesson and get your photos when you can. Unfortunately for many of us, we're still learning that lesson.
That's when historical research can really help fill the gaps. I - as well as my friend John Wallace - rode/drove over the Old Main Street bridge over Goff Brook in Rocky Hill dozens, if not hundreds, of times. Unfortunately, neither of us got a photo of the bridge before it was recently rebuilt. Here's what it looks like today (scroll to the bottom of the post), but what did it look like in 1947? Nobody knows for sure - at least nobody I've talked to so far.
Earlier this year, I'd contacted our state DOT in hopes that they had some historical photos of the bridge (since it used to be the Middlesex Turnpike and the main road between Hartford and Old Saybrook), or at least a photo of it before it was rebuilt. They directed me to the Town of Rocky Hill since, now downgraded to local road status, the town would have done any upgrading. So last week I finally got around to checking with the Rocky Hill Public Works Department - and got a little breakthrough.
The department head was actually on his way out for the day when I caught him, but he was intrigued with my project (after being initially concerned why I wanted such information) and - best of all - he said he'd taken a photo of the bridge before they started the repair work. He assured me that "only from the deck up was done" and that "the deck and abutments are about 90 years old."
Yesterday, he emailed me the photo he took . . .

While all I can be sure of is that this is how the bridge looked as of April 17, 2008, unless/until I get any additional photographic evidence to the contrary, I'll assume this is how it looked in 1947 (but without those modern guardrails, natch). JohnW, for his part, said he expects this is what it looked like - and that's good enough for me, for now.
But that won't keep me from following up on just one more lead - a fellow at the Rocky Hill Historical Society who I'm told has a "treasure trove" of Rocky Hill images. Who knows, I may just be able to get an even older photo of this bridge after all. Of course, if you have - or know where I can get, an older photo, please let me know.
In the meantime, anybody have any ideas on what to use to model those cool railings? Maybe some O scale steam locomotive stanchions?
That's when historical research can really help fill the gaps. I - as well as my friend John Wallace - rode/drove over the Old Main Street bridge over Goff Brook in Rocky Hill dozens, if not hundreds, of times. Unfortunately, neither of us got a photo of the bridge before it was recently rebuilt. Here's what it looks like today (scroll to the bottom of the post), but what did it look like in 1947? Nobody knows for sure - at least nobody I've talked to so far.
Earlier this year, I'd contacted our state DOT in hopes that they had some historical photos of the bridge (since it used to be the Middlesex Turnpike and the main road between Hartford and Old Saybrook), or at least a photo of it before it was rebuilt. They directed me to the Town of Rocky Hill since, now downgraded to local road status, the town would have done any upgrading. So last week I finally got around to checking with the Rocky Hill Public Works Department - and got a little breakthrough.
The department head was actually on his way out for the day when I caught him, but he was intrigued with my project (after being initially concerned why I wanted such information) and - best of all - he said he'd taken a photo of the bridge before they started the repair work. He assured me that "only from the deck up was done" and that "the deck and abutments are about 90 years old."
Yesterday, he emailed me the photo he took . . .
While all I can be sure of is that this is how the bridge looked as of April 17, 2008, unless/until I get any additional photographic evidence to the contrary, I'll assume this is how it looked in 1947 (but without those modern guardrails, natch). JohnW, for his part, said he expects this is what it looked like - and that's good enough for me, for now.
But that won't keep me from following up on just one more lead - a fellow at the Rocky Hill Historical Society who I'm told has a "treasure trove" of Rocky Hill images. Who knows, I may just be able to get an even older photo of this bridge after all. Of course, if you have - or know where I can get, an older photo, please let me know.
In the meantime, anybody have any ideas on what to use to model those cool railings? Maybe some O scale steam locomotive stanchions?
Subscribe to:
Posts (Atom)