Showing posts with label Throwback Thursday. Show all posts

Thursday, August 3, 2023

Throwback Thursday - NERPM 2016


Not sure who took this photo or how it ended up on one of my thumb drives (so if you took it - or know who did - please let me know!), but I just discovered it and it sure makes for a great "Throwback Thursday!"

As best I can deduce, this must've been taken during a "make and take" clinic hosted by Don Valentine during the 2016 NERPM. He was showing us how to convert an Accurail kit into a pretty accurate rendition of a Grand Trunk Western door-and-a-half boxcar. I even finished it - eventually. Click here for the details.

But what really caught my eye - and prompted me to share the photo here - was the now-familiar faces and future friends assembled here. . .

Of course, Don himself (facing the camera, looking down) who I already knew . . . But I'm also seated right next to Ron Poidomani (I don't think we'd even met yet) and at the same table with Jim Dufour (whose layout I'd just seen on a layout tour the previous year).

Since this photo was taken, Ron and Jim have become great friends and fellow collaborators. Little did I know then, while obviously intently focused on what I was doing at the time, that I'd be getting a lot more than an accurate boxcar out of that clinic.

Such stories are testament to what a great hobby this is.

Thursday, July 13, 2023

Throwback Thursday: Wood Ops Session & Jason Fontaine's Layout

Hopefully you've noticed the progress on the layout lately . . . As I mentioned in my last post, I've been exchanging before-work workouts for before-work layout work and I've been making steady progress. But it's time to swing the mental health pendulum back a bit since 1) while mental fitness is important, so is physical fitness - and I haven't been on the bike or treadmill in over a week; and 2) (and, I'll confess, more due to this>) I really should wait until all the Sculptamold, plaster, and ground goop fully cures before proceeding.  So while I wait for that, I'll get back in the saddle at the sunrise. . .

But hearing about my workout schedule is likely the LAST reason you'd be here . . . so let me turn back the clock a few weeks for this edition of Throwback Thursday and tell you about a day in late June when I got to operate on a cool switching layout and got to visit an amazing basement-filling empire that's soon to be retired . . .

I first met Alexander Wood at the NER Convention back in '21, and he was instrumental in helping me sort out some shorts and even got to operate on the Valley Line for the first time that October. So we were long overdue to get together for an ops session on his layout. He needed to wait until getting settled into his new place, but you can see in the pic above that he's well on his way with an engaging switching layout. No structures or scenery yet, but he's been focusing on getting his ProtoThrottle dialed in and it's a testament to his configuration, as well as his track arrangement, that even "just" switching cars became very immersive. Thanks for the invite Alex - very much looking forward to seeing your layout evolve even further!

Moving from a layout-just-beginning to the other end of a layout's life to a layout-about-to-be retired, my buddy Pete and I headed up to Massachusetts to visit Jason Fontaine and his beautiful Southern New England Rwy. layout before he started dismantling it due to an upcoming move down south. . .


The SNE Rwy. is based on an actual railroad that was proposed to be built by the Grand Trunk from Palmer, MA to Providence, RI. It started out as the last major railroad building project in the region, but its president went down with the Titanic and the project stalled and eventually died.


But in Jason's world, and with a little help from alternative history, the SNE was built and thrived, eventually making it into the 1950s era he models.


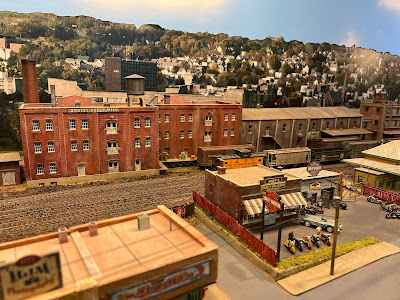
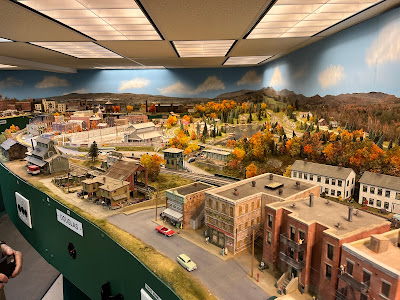
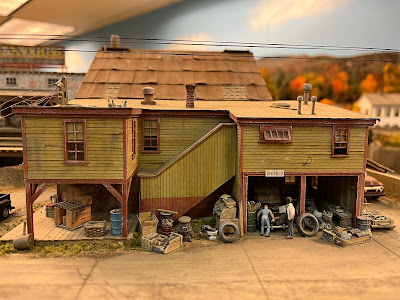
And what models they are! As you can see from the pics, everything is superdetailed and fully built-out. They say a layout is never finished, but this one has to be pretty close!


And it runs as well as it looks. While I'm so grateful I got to see this layout (on the strong recommendation of none other than Marty McGuirk!) before it followed its prototype into history, I'm sorry I never got to operate on it. I had Jason describe a train going from one end to the other and was really impressed with the way he had it all designed.


He'll be the first to admit to getting a lot of help along the way and his good friend, the sadly recently departed Dick Elwell, was a big part of that and a great inspiration. In fact, anyone familiar with Dick's Hoosac Valley layout will recognize the heavy Elwell influence in the SNE Rwy.


But enough talk - since "a picture is worth a thousand words" I'll let the photos tell the rest of the story (with additional info in the captions) . . .

Speaking of Elwell influence, folks that saw the Hoosac Valley will find this scene especially familiar.

While the rugged mountain scenery around the helix is more "northern" rather than "southern" New England, there's no mistaking the season . . .

Seldom attempted, and never - to my knowledge - actually accomplished . . . a full HO scale race track, complete with spectators!


Fully strung power lines are an Elwell - and now apparently also a Fontaine - trademark.

I found the elevation changes all around the layout particularly compelling - no flat-top tables here...


This diner has a full interior and lighting so you can see it.


A huge thanks and shoutout to Jason for being so generous with his time and allowing Pete and I to visit his gorgeous layout on relatively short notice. Jason was a welcoming host and is a great example of the wonderful folks we meet in this hobby. While we'd just met a few hours earlier, by the time we left and I got this selfie, I felt like we'd already become great friends. I hope, despite his up-coming move, that we'll be able to stay in touch - and I'm really looking forward to hearing what he has planned for his next model railroad!

As you might imagine, I took a TON more photos and only shared a representative number here. But if a picture... well, you get the idea.... then what about a video? That'd be worth "millions" of words, I'd wager. So hereya go - and enjoy!


Thursday, October 22, 2020

Throwback Thursday: More on the Car from which the Headlight came...


W-162

As I try to piece together where my locomotive headlight came from, I received some additional information from Bill on the car where it ended its service...

The car was built at the Worcester, MA plant of Osgood Bradley Car in 1907.

As built, the car was copper clad with a truss-rod under frame and open ends.  One window was located on each end to the left of the doors.

The letter board was also copper clad with “New York New Haven and Hartford” spelled out in gold-leafed cast aluminum letters.

The interior of the car as built had an African Mahogany interior.  Seating had mahogany walk-over frames with burgundy plush upholstery.  Ceiling panels were painted light apple green with a dark green band surrounding each panel with a gold leaf stenciled pattern applied.  The cars are equipped with Pintsch gas lightning fixtures.

In 1929, #1591 and a number of other copper clads were rebuilt at Readville Shop for suburban service.  The car received a steel under frame, steel ends and electric lighting.  The interior woodwork was painted over and the car renumbered #4404.

When removed from passenger service, circa 1949, it was rebuilt again for wire train service as W-162.
As an example of early push-pull, the lead end of the car had the steel on the end removed, the end window from the opposite end was installed on the right side of the door.  Hand operated windshield wipers were installed on these windows.

A Golden Glow headlight was installed on the roof end cap and whistles for signaling installed.  An air pressure gauge and brake handle were also installed.

On the interior, the seats were removed, lockers and tool bins and a desk for the foreman were installed.  Heating was by means of two coal burning stoves, one on each end.

The car operated on the Bridgeport wire train for most of its time in company service.


Thursday, August 27, 2020

Throwback Thursday - Cape Cod Train

This Throwback Thursday is either "just a little back" or "waaaaay back", depending on your perspective. 

In one sense, it was just last week - last Friday, August 21st to be exact - that The Missus and I took a day trip out to Cape Cod (first time out of state this year!). And it just so happened that while we were headed through Sandwich, MA - after just having come across the canal - we heard a train horn and were able to catch the Cape Cod Central's morning excursion heading back east to Hyannis.


In another sense though, this post goes back to 26 years ago last Friday when I proposed to The Miss (who later became The Missus) aboard that same train - but that time, it was a dinner train and was heading westbound along the Cape Cod Canal at sunset.

Strange coincidence that we happened to see the train last Friday - we don't usually, and actually wasn't seeking it out (it didn't even occur to me that it'd be running, with COVID and all, and especially it not even being a weekend). But getting away for a day to where it all started over a quarter-century earlier, and then actually seeing the train as well, was pretty cool.

Thursday, April 16, 2020

Throwback Thursday: Finishing the Lumber Co Siding

It's been over 3 weeks since I gave you a full view of the progress in Wethersfield. You can click here for that post, but suffice it to show - here's where things left off:


All the ground goop is in and basic fine ground foam covers the whole base. For this initial coat of scenery, and to get a variety of tones for my early Autumn look, I use a combination of Woodland Scenics (WS) Burnt Grass, Earth Blend, Green Blend, and just a little bit of Earth.

I've also finished the roads (here's 1, 2, 3 posts on those) and grade crossings (except for weathering them):


With the roads and basic ground cover in, I decided to go back and finish up the siding at Wethersfield Lumber.

Ever since I decided to modify the siding, despite previous misgivings, and based not only on Dave Messer's recommendation, but also on a plan I just happened to find, I'd been wondering how best to scenic it.

The first step was to start "burying" the siding a bit by raising the surrounding terrain up to rail height. I used regular drywall topping and once it dried I painted it with my earth colored paint.

For the lumber yard itself, I decided to use the same process I'd used to make a dirt road (click here for the details). I painted the lumber yard area with black paint, covered it all with dirt, misted it with 70% alcohol, dropped on diluted white glue, then topped it with more dirt.

While that was drying, I added a small grade crossing - basically just RR ties in the gauge to protect the flangeways.

A downside of my dirt-covering process is that there's a LOT of excess dirt. Even though it's "dirt cheap" (see what I did there?) I didn't want to just vacuum it up and waste it. So first I brushed the excess into a pile and scooped it up with a "dustpan" I made from an old switchlist.

After a light brush and vacuum, the lumber yard area looks a bit like the dirt road I'd made before, with some black showing through. Creates a nice, weathered effect IMO. Next, I used some Minwax stain to color the ties at the grade crossing.

Here's an overview of the area at this point.

And a closeup of the grade crossing before it was filled in and the siding "ballasted" with dirt.

First I covered the track with the dirt...

... then applied alcohol with a pipette to allow the glue to flow....

... then added the glue . . .

. . . . and added MORE dirt on top of that to ensure I'd have a dry rather than wet look.

The lumber shed has a "concrete" floor, but there's nothing where the siding itself is. I didn't think that looked very realistic (the floor should be relatively even over, and covering, the track), so I decided to make a floor to cover the track.

I used strip styrene in a thickness to match the railheight.

Painted it, and glued it in using Duco Cement.

While I was at it, I also added some wheel stops.

The final step on the siding was to add some cinder ballast and start some base groundfoam.
If you've seen the layout tour video I posted last week, you know that things are a bit further along in Wethersfield, but - alas! - the blog is lagging behind just a bit. But don't worry - I'll get you all caught up asap. Meanwhile, I hope you're enjoying seeing the progress & I'll try and do a better job of keeping up!

Thursday, November 15, 2018

Throwback Thursday: The Choice of the '80s

If you've been on the Valley Local website (you do know about the website, right?), you may already know this from my "About" page, but I was introduced to the hobby 36 years ago this coming Christmas. Like many newbies, I went in both feet first - made a lot of mistakes and learned a lot in the process.

A couple of years in, I decided to become a "serious" modeler and that meant learning how to airbrush.

So I got myself an airbrush and - typical of me - my first project was painting a green & orange scheme New Haven Alco S-2 locomotive (heh - sound familiar?). Now, I wasn't sophisticated enough to mask & do the little curve of green between the cab and the hood, but I could certainly paint the two parts separately. I did - and it came out pretty nice, if I don't say so myself (shortly thereafter I sold that engine for double what I paid for it, based on the "custom" paint job).

Then, inexplicably, I didn't touch the airbrush again - or much else in the hobby -  for over 25 more years(!!). Despite my early success, its mystery continued to grow way beyond any reasonable proportion to reality.


When I went to pick it up again a few years ago, all the lost time really hit me. Heh - maybe it was the fact that I still had the original packaging and Propel can (partially used on that Atlas S-2). But it was just the kick in the pants that I needed. And thankfully - with some help & guidance from my friends - I'm no longer intimidated by airbrushing. Heck, I almost even find it fun.

Proof I actually still use Badger's "Choice of the 80s"- although, given the current state of my airbrush booth, you'll have to take my word for it.
Don't make the same mistake I did. There's nothing in this hobby that you should be too scared to try. And the longer you wait, the more time passes during which you could have made all the inevitable mistakes - and you'd be an expert by now (even if almost).

So give that scary thing a try - especially if you have something that's been sitting around for over 30 years just waiting to spend some quality hobby time with you.

Thursday, November 9, 2017

Throwback Thursday: The Circle of Life


This shot was taken at Connolly Drive, Old Saybrook in November 1987.  By me. But - as they sometimes say - "there's a lot more to the story."

At the time of this photo, I was into the 3rd month of my first Autumn without school since kindergarten. I'd just graduated high school the previous June and moved out of the house - and into a boxcar - literally the very next day.

Lest you get the wrong impression, no, I wasn't kicked out of the house. I just have very supportive parents and they agreed to let me put off college "temporarily" while I pursued my dream of working on the railroad. So the day after graduation, I packed bag and baggage and moved into an old Pullman Troop Sleeper (which looks very much like a boxcar - and I could never convince my mom that it wasn't) next to the enginehouse at the Valley Railroad to become one of the youngest full-time steam locomotive firemen in the US at that time.

The previous November, 1986, I'd attended the VRR's Railfan Day and - long story made short - was invited to volunteer in the restoration shop. I did that for a few months and, once I turned 18 in January, I was able to start my training as a fireman. I spent that first summer after high school living my dream.

By November though, the novelty had started to wear off just a little. I still loved what I was doing, but watching so many of my friends go off to college was tougher than I'd expected. I couldn't help feeling like everyone was moving on with their lives except me.

But when Railfan Day, 1987 rolled around, I had the weekend off and was free to do some railfanning - getting on the "other" side of the camera for a change. I had a blast chasing this "photo freight," headed by a newly-restored & painted New Haven U25b (the railroad's last locomotive), all the way down to Old Saybrook. I'd never noticed Connolly Drive before, but since it was one of only three major grade crossings south of Essex, it was a "must shoot." The fact that there was still an old home signal/semaphore I could use to frame the shot was an unexpected bonus.

What was even more unexpected is what happened almost exactly 20 years after I took this shot.

I continued working for the railroad as I started college, but gave it up as my academic workload increased. Then I met my future wife, went to law school, got married, and started my career. We lived in Shelton and Milford before deciding to try finding a place in Old Saybrook, where we'd spent so many fun summer day trips over the years.

As luck would have it, the only house we could find that we could afford and that didn't need a lot of work was - you may have guessed - on Connolly Drive. We moved there in July 2007, about 150 yards west of the spot where I'd stood to take the photo freight photo almost exactly 20 years earlier.

And as if that weren't enough, twenty FIVE years to the month after this photo was taken, I was out railfanning the VRR and saw that same guy I'd seen way back during Railfan Day 1986, and I got a second invitation to (re)live my dream. I started firing again the next month and have been working on the railroad again (though only part time this time) ever since.

I don't remember exactly what I was thinking as I clicked the shutter way back then - 18 years old, working on the railroad, my whole life in front of me and having no idea where I'd end up. But I couldn't possibly have imagined then the path my life would take - that I'd be living along the tracks in Old Saybrook with a wonderful wife, a good career, and the privilege of being blessed enough to live my childhood dream again in middle-age.

Thursday, August 27, 2015

Throwback Thursday: NCE ProCab Wireless Antenna

Way back in 2003, I purchased a state-of-the-art wireless DCC system - the NCE ProCab.

It's worked well over the last dozen years - as much as I've actually used it, which hasn't actually been all that much. I've done much more layout construction (and moving) than operating over the years.

But one day I got invited to an ops session at Craig Bisgeier's Housatonic RR and - bonus! - Tony Koester was going to be there as well and I was looking forward to meeting him. Craig was an awesome host, and the ops session was great (well, until the "burning booster" - but that's another story). But one of my first conversations with Tony still haunts me. . .

At one point during the session, we were chatting and Tony noticed the wireless NCE ProCab I'd brought along to use. Like the photo above, it had the long whippy antenna. "Wow - haven't seen one of those in a while. Be careful you don't poke your eye out."

Alas, my ProCab still has that whippy antenna, but I hear tell that there is a "fix" - some way you can do without this antenna and connect/route some antenna wire internally. I'd really like to do that - especially since it's more likely the antenna will knock over trees or other details rather than poke somebody's eye out (though you never know).

Have any of you done this conversion? How well does it work? If you have any info on how to do it - or, ideally, know where I can find a step-by-step article - lemme know!

(edited to change "antennae" to "antenna" where appropriate. Ooops!)

Thursday, August 13, 2015

Throwback Thursday #1: Rocky Hill - Then & Now

I don't know if it'll become as regular a feature as "Wordless Wednesday," but Throwback Thursday will give me an excuse to post some early construction photos - which will hopefully be especially interesting now that I've started some scenery and made some significant progress. Well, at least I'll find them interesting...

For my first TBT, here's a shot of the Rocky Hill/Wethersfield peninsula laid out on the floor:


The Rocky Hill area is being mocked up at the left there. Early on, I thought I could have a turnout further back ("north") along the turnback curve to make a longer siding, but that proved unworkable. That quonset hut is a little "south" of where the station ended up being. And you can make out another turnout template - and loading dock - where I thought I could fit the foundry. But - alas! - I didn't have enough space.

But I think it worked out ok in the end. Here are a couple of shots from just a few days ago standing (very roughly) in the same location:

Of course the layout is up off the floor now, which changes the perspective a bit.
End of peninsula, with prototype reference photo on the fascia, looking south toward the station. You can see the models better if you enlarge the pic.
The difference is pretty amazing - and would be especially impressive if that first photo of the mockup hadn't been taken almost four(??!!) years ago (11/25/2011, to be precise). I clearly work in fits and spurts. Fortunately, I've been in a, um, spurt lately.

Speaking of that first photo - it may be the first time I've given any hint of how I go about track planning. Just briefly - I do some rough chalk sketches on the floor (mostly just the major curves and tangents) to make sure things have at least a chance of fitting as expected. Then I lay out paper on the floor and use turnout templates and a sharpie to mark out where the track will go. It's a long trial-and-error process to try and fit things. And, as you can see, not everything makes the cut.

Literally. Once I get the track layout settled, I cut it all out from the paper and use those cutouts as templates for cutting the plywood subroadbed. You have to be careful to label things well - especially where you have to cut across the track/subroadbed. Just be sure to label each end of the paper - and the plywood - so you can match everything up later.

I may go into my process in more detail in a future post (especially if there's a little clamor for it :^) but for now, it's just cool to see how much this area has changed. After doing so much historical research and seeing on the prototype how often things change for the worse or are lost entirely over time, it's neat to see an area change for the better - even if only in HO scale.