Showing posts with label Modeling. Show all posts

Monday, December 18, 2023

Bethel Cottages - Porch Narrowing & Assembly (pt.4)

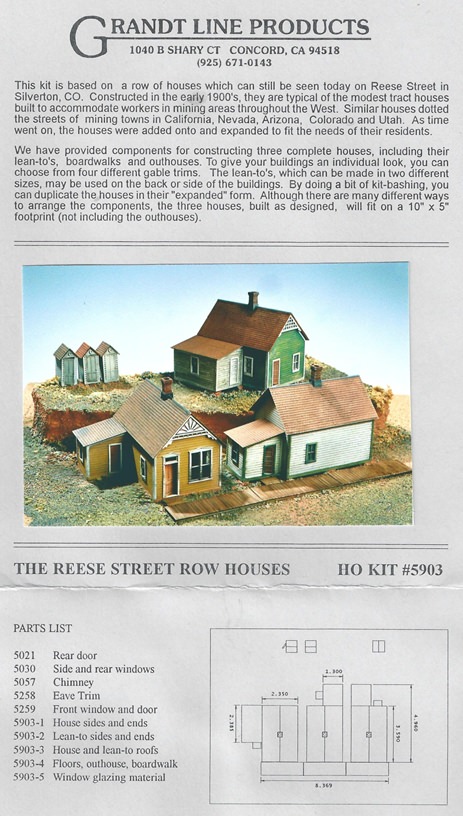
As we continue building the "Bethel Camp Cottages" (click here for part 1, here for part 2, and here for part 3), it occurred to me . . .

. . . Other than its overall proportions, the other thing I liked about the house I borrowed from Somerset as my temporary stand-in (pictured above) was the little porch. 

FYI, these kits are now available from San Juan Details, who acquired the former Grandt Line kits.

Unfortunately, while the gable trim on the house kits I'm using is great and really evokes the "camp cottage" look I'm going for, they don't have any sort of porch. So I got the bright idea of using the floor and roof parts from the lean-to addition provided in the kits to build some back porches. Having a back porch rather than a front porch may seem a bit odd, but since the cottages face away from the Connecticut River, I figured a rear porch would give my little camp denizens a nice place to have a cup of coffee and enjoy the view.


Unfortunately, the lean-to parts are a bit too wide, so I had to narrow the floor and the roof.


And in a bit of overkill, I reached out to my friend ScottL, who is a professional home builder (among many other talents) and he sent me this handy - and very detailed - diagram on how to build the porch.

In the end, I ended up doing a lot of eyeballing...


You can see in the photo above how I shortened/narrowed the lean-to floor by about 6 boards. The front porches included in the kit are actually just little stoops, so I used the 6 boards I'd removed from the lean-to floor to create a larger front porch, as you see with the house on the right.


I also narrowed the porch roofs by about 1/4" to match the width of the porch (which, in turn, matches the width of the cottage).


Using Scott's blueprint as a guide, I realized that the depth of the porch roof would need to be reduced as well, or else the roof would have WAY too much overhang. Coincidentally, I removed about 6 courses/rows of shingles to get a depth that looked right. Thankfully, these seams - which actually aren't too prominent - will be totally hidden by the roofing material I'll add later.


To give the porch roof a bit more strength & stability, I added a ledger board to the back wall of each cottage using "2x4" strip styrene, glued right on the highest clapboard before the clapboards start to narrow. The rear edge of the roof will rest on this, just like the prototype.


While I could have just used 4x4 strip styrene for the porch posts, I dug through my Tichy assortment box and came up with exactly the number of posts I needed for the three cottages (6). These are Tichy #8092, shortened about 1/8" in order to allow the roof to pitch down.

Here are all the parts, ready for assembly (including a porch roof section that still has to be narrowed).

And here it is added to the cottage.

Once I showed this photo around, some folks pointed out that the roof looked a bit thin - like it needed a bit more structure.


So, instead of actually doing individual rafters, I decided to simulate them by just adding fascia board around the perimeter of the roof. I think you'll agree it looks much more realistic this way.


The last step on the roof was to paint the fascia boards to match the trim color. Believe it or not, especially considering my historic fear of airbrushing, I masked off the fascia boards and airbrushed them to match the rest of the trim.

With that done, all that's left to do is the roofing material itself and final painting and these cottages are within striking distance of being finished! Check in next time as we wrap up this build . . .

Thursday, December 14, 2023

Bethel Cottages - Painting and Wall & Roof Assembly (pt.3)

Getting back to building the "Bethel Camp Cottages" (click here for part 1, and here for part 2), it's a matter of preference when you do your painting. Some folks paint everything and then assemble. I've always thought that a bit more difficult since it requires you to plan WAY ahead in choosing your colors - and you may mess things up a bit with glue while you're assembling. But if you assemble everything first and then paint, it's tougher to paint windows/trim/etc.

So it's usually best to consider the order project-by-project and do what will be easiest and most effective for that particular project. In this case, I thought it best to paint early in the process.

Of course, that meant I had to figure out what colors I wanted to use . . .


I started by noting (on the post-it) what colors I wanted generally, then I went looking for those colors - or at least close to them - in my stash of craft paints. You can see in the pic above what I chose.


I brush painted the walls, trim, and porch floors, and that worked fine with multiple coats (thankfully, the paint dries quickly - especially when helped with a hair dryer :^) but I kept getting lousy coverage on the windows, doors, and porch posts.


So I decided to airbrush those. While I could have made my craft paints "airbrushable" (per an old RMC article discussed here), I decided instead to find some "close enough" colors in my stash of Tamiya paints.


Once all the parts are painted, the real fun starts - putting the parts together so they start looking less like parts and more like a building!


At many points throughout the process of building these former Grandt Line kits, I realized how much more advanced they are than the "typical" plastic structure kit. Case in point: I couldn't get away with just one piece of clear styrene on the windows. As you can see in the pic above, the window castings are actually offset - just like the prototype. So of course I needed two separate "window panes", using calipers for precise measurement so the panes would fit inside the recesses. For what it's worth, I used my go-to adhesive for windows: Aleene's Clear Gel Tacky Glue - dries just like it says - clear.


Once the details (windows, doors) were added to the walls, I used 1-2-3 blocks to help me assemble the walls and keep them square.


Once the main structures were done, I next needed to build the roofs.


Thankfully, a 90-degree block made that pretty easy.


And lastly - the coup de grace - I added the beautiful gable trim included in the kits that really makes these little cottages stand out!

Most folks would probably consider these structures just about done - and I almost did. Then it occurred to me that it'd be nice to provide a nice place to look out over the river . . . So be sure to check in next time to see how that turned out...

Monday, December 11, 2023

Modeling Monday - Camp Bethel Prototype Pics & Starting to Model (pt.2)

Since the "something completely different" (aka my Atlas RS-3 project) is sidelined for the time being, it's time to turn my attention back to the cottages at Camp Bethel along the line in Haddam, CT.

I'd heard that Camp Bethel was an old camp meeting grounds, but the only one of those I'd ever seen is in Oak Bluffs, on Martha's Vineyard island. The cottages there are all very meticulously restored and very Victorian and Queen Anne. So I was eager to see what Camp Bethel would look like, especially if I was going to model it.

Unlike its island counterpart, there's a much wider variety of restored and "original" houses in Camp Bethel and many have been pretty heavily modified. But it was nice to get a feel of the place - and to realize that the model kit houses I had on-hand would help create a fine representation . . .


While all of the houses technically face toward the center of the campground, you can see in some of the photos how they back up to the top of the bluff overlooking the Connecticut River.


I think this will allow me to set up an ideal scene on the top of the hill between East Haddam and Shailerville bridge - I'll have the "fancy" front of the cottages face away from the river (and toward the aisle) and put porches on the back so that folks can sit and enjoy a nice view of the river.

To see how that would look, I made some temporary mockups by photocopying the walls from the kit . . .


I pretty quickly discovered that the stock kits would be a bit larger than I wanted - all the better reason to photocopy/mock them up first.


So I cut them down to a size that was closer to the stand-in I'd robbed from Somerset. These smaller editions will work out much better.

It's a lot easier (and better) to cut up paper before committing to cutting up a perfectly good kit. And since I knew from my cut-up mockup that the smaller size would work, it was much easier to "ruin" the kit by cutting it down to the size I wanted.


The challenge with shortening the walls is figuring out how to disguise or otherwise hide the seam/joint. So I decided to cut along the edge of the corner trim as you see in the photo above.


Once all glued back together, the seam/joint virtually disappears! And don't forget to shorten the roof sections to match. I just cut off about 3/4" off of one end - which I plan to point toward the back - and made sure to orient the space for the chimney closer toward the back as well (on the stock it, it's centered).


With the walls and roof sections shortened, the next step is to wash the parts in preparation for painting - which we'll cover next time!


Monday, April 11, 2022

Modeling Monday: DEY-5 #0604 - Painting

Given this week's Wordless Wednesday post, and the fact that I haven't posted about my DEY-5 build since March 22, I guess I'm not very good at build logs. As you saw on Wednesday, the 0604 is all done, except for some painting touchup and weathering (and some final dialing-in of the decoder programming). But rest assured 1) I will continue to document the build here, if for no other reason than 2) I'll be starting on DEY-3 #0967 next - and it'll be good to jot down what I did on this build so that I can remember it for the next build.

And I'm hoping the DEY-3 project will be documented much more contemporaneously with the actual build, and will include more detail.

At least that's the plan.

But for now, for my own reference, and for those of you that are interested in how the DEY-5 came together, read on and stay tuned...

* * * * * *

After adding the grabs to the hood (see the end of the last post for where I left off), I used the cast-on NBWs on the back of the resin cab as a guide for where to drill the holes for the little grab iron next to the rear headlight, as well as the long, vertical handrails on either side of the cab door.

With the "robust" details done (I decided for the moment to hold off on the special whistle assembly and cab signal box, both of which I learned later would be robust enough), I decided the next step would be to paint.


As you see in the photo above, I decided to paint the cab before assembly, figuring it would be too difficult to paint the inside or to add windows once the cab was put together - and much easier to decal/letter. But this ended up making final assembly more stressful than it needed to be, and it turned out I still needed to do some additional touch up anyway. For the DEY-3, I'll assemble the cab first.

The first step in painting is to prep the parts. I used isopropyl alcohol (70%, I think) and gently brushed the parts with an old toothbrush. After that, I only handle parts with gloves on.


Once everything was nice and dry (I think I left everything overnight, though didn't really have to since the alcohol dries quickly), I gave everything a coat of Tamiya Fine Surface Primer to even things out (especially the 3D printed resin cab, which still had some very faint striations from the printing process) and give everything, especially the metal grabs and slippery plastic handrails, some good "tooth" for the paint to hold on to.

According to the research, the DEY-5s were all delivered in Pullman Green, with black railings, frame, and trucks, and lettered with Dulux Gold (yellow) lettering. Now, there is MUCH debate over what model paint best replicates the New Haven's Pullman Green - and I've seen models painted in shades so dark they're almost black to lighter shades that are closer to the NH's Hunter Green. Tru-Color Pullman Green was recommended to me, so that's what I used. I think it looks great - especially under my lighting and on my layout - but it's noticeably lighter than the NHRHTA's special run of Atlas S-2s (which used paint based on an actual prototype color chip from the NHRHTA's Color Guide).


For the railings, I used Tru-Color Black - a much easier choice. And don't forget to shoot the bell and coupler box covers with the black as well.


This is only the second locomotive I've ever painted - and the first was way back around 1986. Heh - it was also an Atlas S-2, IIRC. I even used the same airbrush - a Badger 200 (the Choice of the 80s). This 'brush is super easy to use - it's basically a glorified spray can. The trigger is only on/off, but at least you can adjust the spray pattern. I thinned the paint 3:1 (paint to Tru-Color thinner), adjusted the pattern to about 3" diameter at 6" away, and remembered to trigger on/trigger off past the piece.

Results below:


Not bad for my first attempt, although the finish wasn't quite as smooth as I'd hoped. I learned that this "orange peel" effect can happen if you spray from too far away. The paint dries a bit before it actually hits the model. I really didn't want to strip it though, so I decided to try and even it out with an additional coat of paint.


I don't know if I just got lucky, or if this is a typical way to save an orange peel finish, but it worked! It's admittedly not as perfectly smooth as a factory-painted model, but I'm happy with it - especially considering how bad it could have been. Heh - and I'll be weathering the loco eventually anyway, so there's always that. As long as it's smooth enough for decaling, that's good enough for me.

With the painting done, I set everything aside to dry thoroughly before continuing. Given my work schedule, I think this ended up being about a week. At least I knew the paint was adequately cured!

That's it for now - As always, please be sure to chime in with guidance, advice, and anything you'd have done differently.

Next time - Applying the new, custom-made (and now available to you) decals!

.