Monday, October 31, 2016

Modeling Monday: Berlin Branch Bridge

It's easy, when up to your eyeballs in prototype modeling, to forget how fun modeling itself can be. Sure, all the required research is fun and it's amazing when a scene comes close to replicating the real thing, but sometimes that process can be a bit overwhelming. And when your skills aren't (yet) up to the task to recreating all the prototype detail you've discovered, it can be stressful.

That's the "downside" (if there really is one) to having too much information. Conversely, one of the consolations of not having enough info is that you're more free to do what "looks right" - and just enjoy the modeling process itself. Case in point: the bridge over the Mattabessett River (aka Little River) on the East Berlin branch of the Valley Line.


On the prototype, and on my layout, it marks the entrance to the old East Berlin station area and the final customer on the branch - Stanley Chemical Co. (paint manufacturer).

That's the old freight house in the background.
The best thing though is that it looks mighty close to this MicroEngineering through girder bridge kit:

Micro Engineering 50' Thru Girder Bridge Single Track -- Model Train Bridge -- HO Scale -- #75520

So I got myself one, read up a little on the 'net to make sure there weren't any surprises/notes for building it properly (there weren't - the instructions are very straightforward), and got to work. I'll let the photos tell the story (with a little help from the captions...)

Ah, new kit parts - all cleaned of flash and waiting for assembly. Such promise!

This was one of the trickiest steps - attaching the bracing to the sides, while keeping everything true - aided by some squares and fast-acting Tenax.

Cross braces installed, which makes the whole assembly much more rigid.

Then the longitudinal braces - these go under where the rails go and fit in between the cross braces. It's a little tricky to line everything up, but taking your time will yield a satisfactory result. Otherwise, don't worry - this is all obscured somewhat by the bridge track itself.

The strips representing the riveted stock have to be glued onto the top of the girders - but first the tops of the girders need to be rid of any "bevel" resulting from the molding process. Taping sandpaper to glass plate and rubbing back and forth will get things nice and flat.

Not totally necessary, but NWSL's Chopper is very handy for making perfectly true cuts - helpful for fitting strip ends together. If you can't get the ends to fit satisfactorily snugly, you can always fill in with a little putty.

NOW it's starting to look like a bridge! I'm fitting the bridge track here to mark what ties need to be removed in order to settle it down properly. And note that I did not curve the top corners at the ends of the bridge, in keeping with the prototype.

And here's the bridge track with the ties removed.

And put in place. You can see where the track has to be modified in order to sit down amongst the cross pieces.

The "wood" tie end bracing is styrene, but the ties themselves are delrin. The instructions recommend Walthers Goo to attach the bracing to the ties, but I find that too messy (stringy) so used contact cement instead, applied with a microbrush.

Just apply to the tie ends as above - trim to length once set.

And here it is all done, except for guardrails and weathering.


I'll use this photo of the Shailerville bridge guardrails as my guide for when I place the Berlin bridge on the layout.

And here it is, lightly weathered, and temporarily placed where it'l go on the layout.
This was a really fun project that didn't take too long (a few evenings?) and is just the type of project to help keep up your modeling mojo. Now "all I have to do is" put the Mattabessett/Little River underneath it - and finish the Berlin Branch....

Sunday, October 30, 2016

Thursday, October 27, 2016

Throwback Thursday: Ghosts of Railroads Past

(In the "spirit" of the season - and of Throwback Thursday, I hereby repost this from last October. I think you'll agree it's especially fitting this time of year...)

A big part of my motivation for recreating the Valley line is to keep alive the memory of the men & women who were responsible for getting the stuff of life delivered to you, each and every day.  From coal for winter heat or a bicycle to ride in the summer, for over 100 years in this country the stuff of life was delivered by rail.  And sometimes, if you're lucky, historical research will unearth a ghost or two.

Given that Halloween is approaching, here's a question for you:  Do you believe in ghosts?

The answer for me depends on what kind of ghosts you mean. I don't believe in the creepy un-dead or goulish wanderings of departed souls. But I do believe in the ghosts of the past - the hauntings of a place by the memories of the people who were there. Who were they? Did they have dreams and plans like we do today? While dead people don't actually haunt us, the spirits and memories of the past can - and often do. Especially if you're paying close attention.

During this time of year especially, if you keep your eyes open and know where to look, you can see some of these ghosts of the past materializing.  You have only to slow down, pay attention, and keep your eyes peeled. Here's just one example for those interested in the history of railroading in the Connecticut River Valley...
Bridge far
Railroad line from Middletown to East Berlin.  Trust me, it's there - somewhere...
I passed this spot a dozen times back during the summer when I was riding my bike to work, but only recently did I spot a ghost of the old railroad line between Middletown & Berlin across this field. Do you see it there in the distance? How about if I zoom in . . .

Bridgeclose
Stone arch bridge, Middletown - Berlin line
You'll have to excuse the camera quality of my phone, but if you tilt your monitor just right, you should see, just beginning to poke out of the trees, this beautiful stone arch bridge. The railroad was abandoned and torn up years ago, and the trees have long since reclaimed much of the roadbed. But this bridge remains - a monument to the memory not only of the railroad, but to the spirit of the men who built it.

If during your travels you stop at a spot like this and imagine, even for a few minutes, how those men lived, what their hopes were and whether they ever achieved them, you might see some ghosts.

And if you're especially quiet, you may even hear in the sound of the leaves floating by on the breeze a whisper of thanks from those men for not letting them be forgotten.

Tuesday, October 25, 2016

New Haven RR Firing Manuals

As this project evolves, I've discovered that I've grown as interested in prototype paperwork & ephemera as in the modeling itself. Of course, things like employee timetables, engine assignment books, and other paperwork inform prototype operations. But even other items like locomotive operation manuals - while not very relevant to a model railroad - certainly make for interesting reading, and may even enrich your operating experience further.

At the recent NHRHTA Reunion/Train Show, I came across a few such items...


... which I enthusiastically added to my collection. But one thing I saw, that I really, really wanted ended up not being for sale . . .

Thanks very much to MelR for the pic. I was apparently too gob-smacked to think of taking one myself.
This is a firing manual for the New Haven Railroad (and Central New England Rwy) dating from the 1920s. I expected such a thing existed, but I'd never actually seen one before. Now that I know it exists, I'll be on the lookout. In the meantime, maybe the owner will change his mind . . .

Speaking of NHRR firing manuals....
John with the NHRR scoop Randy got for me
Long time readers of this blog know that one of the primary inspirations for my Valley Line project is John Wallace. His photos and reminisces of firing on the Valley Local during the late 1940s has enriched the entire project. He also put me on the scent of something else I never knew existed.

A later version of the New Haven's official steam locomotive firing manual!

As a fireman on the present-day Valley Railroad, either booklet would be highly prized. John said he'd been given one by Ted Michalicki, one of the regular firemen on the local, but it'd been lost to time. I knew there was a copy at the UCONN library, but ever since he mentioned its existence, I'd been on the lookout for one myself.

Finally, one showed up on eBay. And I got it.


I haven't read through it yet, but even just flipping through is pretty cool. The illustrations are really neat and informative, but the most interesting thing I've discovered so far is the publication date - 1946.

On my website (you do know there's a website that goes with this blog, don't you?), I have a page describing the End of Steam in the Connecticut Valley. On the New Haven Railroad, at least, 1946 was just about the last year of steam. Their newest steam locomotives - the I-5 Shoreliners (4-6-4) were almost 10 years old by then. Seems strange that they would have devoted any resources at all to producing a new manual on how to fire a steam engine.

But I'm glad they did. While the relatively-small 2-8-2 I hand fire is no match for a stoker-fired Hudson, it'll still be neat to sit by the fire and see if I can't get a few tips on how to use my "new" NHRR coal scoop.

Monday, October 24, 2016

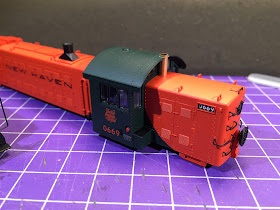
Modeling Monday: New Haven RR class DERS-1b (RS-1) #0669

After concentrating so much on ops sessions (both prep as well as fixing punch list items between sessions) and the structures/scenery for Old Saybrook (though, admittedly, mostly a support role to BillS), I'm psyched to get back to a bit of actual modeling. As in, at the workbench.


Ah! the wonderfulness of old radio shows/music playing, a fire in the RR stove, and burning your fingers on a brass tube you're grinding down (shoulda remembered to hold it with a pair of pliers). Those are among the true joys of modeling for me. And anybody that's followed this blog for a bit know that my favorite modeling revolves around rolling stock (see what I did there?). Building resin freight cars and detailing locomotives based on a specific prototype are what I most enjoy doing. Just witness my DERS-2b project as proof.

So next up in the "shop" is DERS-1b #0669 - which was responsible for my "era creep" many months ago. As you can see above, I've already dismantled it. Fortunately, unlike the Proto1000 RS-2, this Atlas model already has lift rings, stand-alone grabs and fine pilot detail. But in order to make it a New Haven DERS-1b, I need to add the following details:

  • Hand brake chain & hangers
  • Signal hoses
  • Wabco E-2 horns (fore and aft)
  • Passenger car buffers
  • Air brake distributing valve
  • Steam heat pipes
  • Steam generator details
I made an executive decision not to add marker lamps & MU stands as I had on the DERS-2b. Just way too much trouble for what they add. I may scratchbuild & add MU details at some point in the future, but once I discovered that the Custom Finishing part wouldn't fit as it had on the RS-2, that ended that.

And don't even get me started on New Haven-only details such as the raised rear number boards, the different location of the fuel filler overflow pipe, not to mention the different locations of the fuel fillers themselves. If I worried about them, this model wouldn't get done for A Very Long Time.

So, first up - and the biggest visual bang for the time spent - are steam generator details on the short hood. And the first of those is the most intimidating - but might as well jump right in the deep end and start drilling a LARGE hole in the top of the (factory painted) cab...


Friend JohnK suggested that I simulate the exhaust stack going through the cab roof by fitting a 1/8" styrene tube between the hood and the roof and then adding a "washer" of material on top of the roof. That would avoid such delicate drilling.

But I'm stubborn - sometimes in a bad way - and doubted that that would look right. So I started drilling with a #60 drill, centered between the end of the cab and the edge of the roof, and gradually increased the drill diameter until I got to a 1/8" drill bit. Heh - it was that last little bit that finally broke through the roof edge that I had hoped to preserve. But to my eye, I think it looks fine - and certainly shows that the stack is all one piece.

Oh, and I decided to use brass tube rather than styrene so that the stack edge(?) would be thinner (and the opening/inner diameter larger). It looks much closer to the prototype - again, to my eye anyway.


The biggest challenge so far (other than drilling such a precise hole) has been to get the right length. The stack has to barely protrude above the top of the roof. I'm using the cab vent height as a guide.


You may have to click for a larger image (you can always click on an image to make it larger), but you can see here that I'm pretty close. Just a bit more filing to do.


It's amazing how the addition of one little(ish) detail can really start to change the look of a stock model and make it start to look like the prototype. Just have to paint the tube - then I think it'll look just right (despite having broken through the edge of the roof).

Since the Atlas model came with so many details already done, I hope the DERS-1b doesn't take as long as the DERS-2b. I may not have it ready in time for the next operating session, but I'm certainly going to try. I hope you'll enjoy following along - and please chime in with any tips or suggestions you have, especially if you've detailed one of these models before!

Sunday, October 23, 2016

NHRHTA Reunion 2016

Whew - Quite a weekend! It started out Friday night with a small open house for folks coming in from out of town for the New Haven Railroad Historical & Technical Assn's Annual Reunion/Train Show on Saturday - including fellow blogger JoeS & his lovely wife, up from PA, MikeR & his missus from MA, DaveM & ReggieD, also from PA, BillC & BillL from NJ, BobA, DickO, & BillS from closer by (CT), and JimW all the way up from FL(?!). Thanks to all of them for taking the time to visit the Valley Line.

NHRHTA's show this year was at the Valley Railroad and, by all accounts, it was a resounding success. What could be better - a train show, great presentations, and not one but TWO steam-powered trains doing trips throughout the day, with a diesel powered lunch & dinner train as a bonus?! And if that wasn't enough, the entire day was capped off nicely by a "dinner in the diner" aboard the Essex Clipper.

All in all, a really fun weekend.  Here are some photos from the past couple of days . . .

During the open house - MikeR is showing me how impressed he is with the tower that BillS built. (photo by Mike's missus - Melanie aka Mel)

Some of the guys - Mike, Bob, BillL - during the open house (pic by Mel)
DickO & DaveM having a convo at Old Saybrook.

Overview of the Saybrook station area (pic by Mel)
One of my visitors - DaveM - surprised me again by coming bearing gifts . . .


Mentioning that I needed some head-end equipment, he presented me with this great Pennsylvania RR REA refrigerator car. And speaking of cars, included in his bag of goodies was a car (automobile), a panel truck and - the piece de resistance - a coal dump truck lettered for Valley Coal. How cool is that?! Everything on wheels in the above photo came courtesy DaveM - Thank you again Dave!

After a late night Friday night of running trains and generally great conversation, Saturday morning came early. I got some coffee & donuts for me and Bill & helped set up the display table. Unfortunately, I didn't get any pictures of the train show itself, Bill's great display for Rapido, or any of the presentations. Argh! I did, however, get a couple of new acquisitions:


The MAIN thing is, of course, the lantern. I know it's an Adams & Westlake (heh - "Adams" - so I had to get it, right?) and it has the embossed NYNH&H on the glass to go with the markings on the top. But other than that, I don't know much about it, how old it is, etc. So if there are any lantern experts out there, please weigh in in the comments (or contact me directly via email)!

Given my evolving interest in interlocking towers due to having a model of Saybrook tower on my layout now, I got the little booklet on the left dealing with all the rules/instructions for dealing with towers. On the right is a little exam booklet for steam locomotive firemen (unfortunately, questions only - no answers(!)) And under them all is what I think is a headrest cloth from a passenger car. It'll make a nice addition to the railroad den (aka "train room") upstairs.

After the show, we had just enough time to get ready to board the dinner train...

This is not the dinner train, but this was happening in the yard right before we boarded. (pic by Mel)

The dinner train itself is a great example of gone-by elegance and a slower, more civilized pace (at about 8mph, actually) (pic by Mel)
As much fun as the show was, the dinner was even better. I had great table companions (BillS, his missus and daughter) and most of the car was taken up by other show attendees which made for a lot of laughs and a great night.

Whether or not you're a fan of the New Haven RR, I hope you'll consider attending the NHRHTA Reunion & Train Show next year. With any luck/hope, it'll be taking place at the Valley Railroad again which guarantees - no matter what particular railroad you follow - if you're a train buff, you'll have a truly amazing day!

Friday, October 21, 2016

Friday Fun: New Equipment at Old Saybrook, Autumn 1948

It's late 1948 and you're trackside in Old Saybrook when you're lucky enough to see the New Haven Railroad's latest passenger equipment going both ways . . .


The Super8 movie camera is a little blurry, but at least it's color (cutting edge these days).

After all the excitement, a station stop is a little less dramatic, but you take a photo anyway since it's such a nice view from the Rt. 1 overpass...


Later that night, under cover of darkness, you quietly climb up the ladder on the water tank to sneak a peek into the signal tower to watch the operators do their job.


But the thing that fascinates you most are all the little lights on the control board, mounted high on the wall.


And you think to yourself - "one of these days, I'm going to try and make a model of that..."

Thus ends just another day on the Shoreline during the Autumn of 1948.

If you're in the area tomorrow, don't forget to check out the New Haven Railroad Historical & Technical Assn's Annual Train Show - this year held at the Valley Railroad in Essex, CT. Check out the flyer for more details - including my presentation on Modeling the Valley Line at 11a.

Hope to see you there! And if you see me, be sure to say hello!

Wednesday, October 19, 2016

Wordless Wednesday #141

Old Saybrook, CT - HO Scale. Only the sky is 'shopped. Click to enlarge.

Tuesday, October 18, 2016

"Too Much" - Two Years Later

I just realized that this past Sunday, October 16, marks exactly two years since I had a minor meltdown crisis in the hobby. I was about to give it up - I'd gotten in over my head and felt overwhelmed by the scope of the project I'd started. I thought I'd taken on way too much.

This feeling of being overextended in the hobby is pretty common and is fueling the popularity of starting small(er) and building layouts that are actually achievable. Admittedly, setting realistic goals based on your available resources of time, money, and help is critical to avoiding the indigestion of biting off more than you can chew. But what if you find yourself already in the middle of a large layout project?

Thankfully, I came out of the other side of that long tunnel and actually managed to expand the layout (actually, almost doubled the size), thanks to a little a lot of pushing help from my friends. But I had to go through a bit of a mental process before proceeding. If any of this sounds familiar to you, and you're considering giving up, I hope you find this (re)post encouraging.

(originally posted 10/16/2014)

I have a confession to make. I considered giving up the hobby recently. Now, lest you think me fickle, let me explain. My story might help if you've had the same feelings at some point.

After making lots of progress over the summer, I found that I'd hit a roadblock unlike others I've confronted before. Like many layout builders, I've had to work through a variety of obstacles, but this was different. I started getting this growing sense of dread just about every time I'd think of going into the basement. There was just Too Much. Too Much to do, Too Much to build, Too Much to plaster & paint. Just. Too. Much. Instead of being fun, the layout started feeling a lot like a second job.

Some folks embrace this - Tony Koester comes to mind - explicitly stating that you have to have the mind of a project manager in order to stay disciplined, on task, on budget, and on time, or else you'll never finish. This of course makes lots of sense considering the magnitude of the project he's taken on. But size of project is relative. Depending on the level of detail you want, for example, even a relatively small layout can become overwhelming. Either way, building a layout starts feeling a lot like work and you'd rather model from the armchair - or worse, watch TV - than go back to the basement.

Most folks - especially model railroaders - believe you can never have enough. You never have enough space, rolling stock, engines, etc. So whenever you can, you buy, Buy, BUY and if you're blessed with a large space - especially a basement - You Must Fill It with all the layout you can. Sound familiar?

But this is a grave mistake. You end up with Too Much - a basement full of benchwork, but no scenery; shelves full of kits, but never enough time to build them all; grandiose plans, but little enthusiasm or energy to seeing them through to completion. And the hobby press sometimes - perhaps unwittingly - adds to the discouragement by highlighting impossibly large, beautifully finished layouts.

Is it any wonder that, in trying to figure out how to convert one's growing pile of stuff to the masterpiece in one's mind, so many of us throw up our hands in frustration and begin looking longingly at the armchair?

That's where I've been lately, but I think I'm finally starting to come out of the funk. I just wish I'd paid attention to all the advice out there to start small, build modules, or - most drastic of all - do a "chainsaw layout." But while it's too late to start over - and yes, I've considered it - I can change my mindset about what I have. I can treat each town on my layout as its own module, and concentrate on that. That'd certainly be less overwhelming than feeling like I have to build, scenic, and "structurize" all the way from Hartford to Middletown all at once and right away.

You can even eat an elephant if you do it just one small bite at a time.

So, I've stepped back from the ledge of layout oblivion and have, hopefully, rediscovered some of the motivation I've lost. I've taken a deep breath, reminded myself that this is supposed to be a hobby, and am focusing on doing smaller sections - and smaller projects - one at a time.

A couple of other things have helped as well:
  • Seeing some layouts on Facebook and such that are more "accessible" - by which I mean, are in a state where I find myself thinking "hey, I could do that" rather than "OMG - I could never do that!"
  • Discovering some new photos of and information on the line I'm modeling, thus rekindling some of the passion for why I started this project in the first place (bonus: this can be one benefit of taking a sabbatical as an "armchair model railroader")
  • And, perhaps most important, calling on a few friends to help me out.  Too often we consider ourselves "lone wolf" modelers when sometimes - if not often - what we really need is the benefit of another set of eyes, another perspective, and - yes - another pair of hands helping out. I've been the beneficiary of this sort of help & support in the past; I just have to remember to tap into that whenever I'm feeling in a funk. Actually, that's pretty good advice for life generally. And with the internet and social networks, even the most remote of modelers can avoid being a lone wolf.
While you might sometimes find yourself under the burden of too much stuff to do on your layout, one thing you can truly never have too much of is the camaraderie, help, and support of your fellow model railroaders. Thanks to the readers & commenters on this blog - as well as to others who share their experience on their blogs, FB, etc. - for being such a big part of that network.

So stay tuned for more progress on The Valley Line - it may be a little slower, but it will hopefully be a lot more sure.

Thursday, October 13, 2016

Down the Rabbit Hole..... (LokProgrammer)


One of the best - and sometimes worst - parts of this great hobby of ours is that there are So Many Different Things To Do, so many skills to develop. Right off, carpentry, electrical, photography, artistry/scenery, and - of course - model building come to mind. But what about historical research (towns, freightcars, operations), home remodeling (if you have to finish your basement for the layout), project management (especially helpful for a large layout), and web development/computer skills (blog writing, etc)? The list is just about endless and it's Oh So Easy to find yourself going down a rabbit hole and having your otherwise-laser-focus (um, well, if you're not me) diverted from making progress on your layout.

The advent of sound decoders - and the tweaking of same - has added to the ever-growing list of rabbit holes. Now....you can usually just plop a standard sound decoder into your engine, set it and forget it. All you have to do is get the right prime mover and change the address. But ESU/LokSound has raised the ante. Substantially. Their decoders allow you to upgrade the firmware using their LokProgrammer - and to make so many adjustments to the sounds (including adding your own) that it's truly mind-boggling.

The photo above shows the extent of the rabbit hole I've gone down: ESU manuals in the 3-ring binder, LokProgrammer hardware at the back, LokProgrammer software on the laptop, paper for notetaking, 0510 on the programming track, old-time radio show on the iPad.

I've been trying for a few days now to get this RS-2 running & sounding the way I want, but I'm still not quite there. The decoder install and initial programming was done (quite well, I might add) by Mike Rose Hobbies. I got a LokSound Select/direct/micro decoder, power pack (capacitor) and special "Confaloned" settings. Then ESU came out with Full Throttle and an independent brake.

  • Good news: I can upgrade the ESU decoder to the latest Full Throttle version very easily.
  • Bad news: I thereby lose all the cool settings I had.
I did get some information on how to "backfill" the old/cool settings into the upgraded decoder, but I'll be dipped if I can get that to work successfully. Every time, the old settings just overwrite the new ones and I'm back to where I started.

So, I decided to just start from scratch, learn to fish a bit, and try and set up the decoder myself. And here I am, a bunch of evenings later, and I'm still not where I want to be.

Hellooooo Rabbit Hole!

I have a Tsunami in my K-1 mogul that I love - it has an independent brake on F7 and momentum/sound settings that causes the stack to really talk when you crank up the throttle, but all you hear is rod clank when you shut off. And it'll coast for miles feet until you apply the brake (which is accompanied by an audible brake squeal). That's the experience I want to replicate, albeit on a diesel (heh - no rod clank expected). I just haven't yet figured out how to do it.

So, if any of you have a LokSound decoder with Full Throttle and have it set up in a way you like, I'd love to hear about your experience. And if, like me, you also have a Tsunami setup with the brake and sound settings I describe and have been able to replicate the same behavior/sound on your Full Throttle decoder, I'd be especially interested in learning how you did it.

In the meantime, I'll try and claw my way back up the sides of this hole I've found myself in.

Wednesday, October 5, 2016

Wordless Wednesday #139

Old Saybrook station, looking southwest

Ditto