Monday, November 30, 2015

The Simplicity of a Stolen Hour

Most of us typically wedge in hobby time sometime after dinner and on weekends when possible, but occasionally I can steal some time from the wee small hours of the morning. When I was bike racing, I'd typically wake up a bit after 5am to train and I still occasionally see that time of day now that I'm, um, "retired" from racing. But not often.

An exception to my general rule of "sleeping in" (heh, til 6:30) occurred one recent morning. I'd woken up at my old usual time, and was - inexplicably - wide awake. The responsible thing to do (health-wise) would have been to get out on my bike, or at least go for a run. But the responsible - or at least much more fun - thing to do, was to go down in the basement. And not to get on the treadmill or trainer.

I took advantage of the "found" hour to glue down some track at the Saybrook Wye and lay some roadbed "north to Essex" (on the liftout).


I've seen folks using cans of soup and vegetables to hold their track down. You can use bottled water as well.


Tacking down the roadbed to Essex.

I've written before how important it is to have little projects ready and available to tackle so you can always make some progress on your layout, no matter how incremental or small an amount of time you have available. And sometimes you can do one of these simple projects during some time you've stolen from other things (like sleep, apparently).

Cheshire Branch Videos

Just a quick post to point you to the two videos I took during my visit to Jim Dufour's Cheshire Branch railroad. Keep in mind that they don't really do the layout justice, but - although shot freehand - the image stabilizer did a good job of keeping things steady.

You can see more (and better) videos here (many of which were posted by FlyingYankee59 (who is much better at this than I).

But for a quick taste, click on the vids below - Enjoy!


Sunday, November 29, 2015

Admiration as Motivation: Jim Dufour's Cheshire Branch

Thou shalt not covet.
Exodus 20:17

During this time of Thanksgiving, we take time to be grateful for all we have and to appreciate all the little and big ways we've been blessed. Long-time readers of this blog have seen me go on (and on) about how wonderful it is to live where I do, how nice a space I have, how loving and supportive my wife is. And all of that is - and continues to be - true. But they say confession is good for the soul. So here goes:

I want Jim DuFour's model railroad.

Jim's layout depicts the Cheshire Branch of the Boston & Maine Railroad c. 1947-1951 and is one of the best examples of how a model railroad can be used to transport us to a different time and place. It has everything I want in a model railroad: great scenery - true to the geography of the places modeled, flawless operation - even of finicky brass steam engines, and the highest fidelity to all aspects of this particular section of the B&M, from the signal types used to the particular type of guardrail used along Route 12 in southern New Hampshire. And he's done it all by modeling 5 consecutive towns in a fraction of the space I have available. His exhaustive research and obvious skill have created a world where it doesn't take much imagination at all to believe you've taken a time machine and landed right in the middle of a Philip Hastings photograph. Except better - you can interact with the world Jim's created. And it's in color.

Jim and I met at the NE ProtoMeet a couple years ago and discovered right away that we were on almost-identical paths modeling wise - the only difference  being that he's modeling a B&M branchline and I'm modeling a New Haven RR branchline. Well, that and he's obviously much more talented and further along than I am. But it's been really cool to discover how similar our mindsets are and what we want to accomplish with our modeling.

Since I'd been a distant admirer of his layout for a while, I took a chance when I heard that he was having an open house and all-but-invited myself over, dropping Bill's name (hoping that would help rather than hurt :). I needn't have worried though, he graciously extended an invitation to visit and see the layout in person.

I took almost 10 rolls of film 240 pictures while I was there - everything from the vintage 1948 calendar, to the fastclock control panel, to - of course - the layout itself. Most of my shots were for my reference (his State Line area looks almost the spittin' image of much of the Valley Line, especially the southern end), but I got a few that are worth sharing here. I'm sure others got much better shots than I did, and I hope they'll mention so and give us a link in the comments. That way we can all appreciate Jim's accomplishment.

There's a fine line between inspiration and discouragement. All too often, my reach exceeds my grasp and I've sometimes wondered if I've taken on too much. But seeing the Cheshire Branch in person reminds me of what can be accomplished and that motivates me to keep going with my own effort.

In the meantime though, please pardon my occasional covetousness.

And enjoy this little taste of southern New Hampshire in the summer of 1948...

You come onto the layout from staging at State Line. I've never been to State Line, but if the accuracy of the rest of his layout is any indication, this scene is a spot-on model of the real location. But - to me - it looks the epitome of so much of the New Haven's Valley Line that I took probably 2 dozen photos here alone.


Symbol freight headed out of State Line westbound (compass northwest toward Bellows Falls, VT).


The next town on the line is Fitzwilliam, NH

Westbound freight rounding the bend, approaching Troy.

Local freight stopped at the Troy station for orders.

Later, near dusk, symbol freight BX-1 westbound through Troy, NH

Westbound with Mt. Monadnock in the background

Ditto

The cuts at Troy Ledges

After Troy Ledges, the next station is Webb. The eastbound local is waiting on the siding.

Just west of Webb 

I hope you've enjoyed this tiny taste of the Cheshire Branch. Be sure to click the links in the text above for additional photos and videos.


Wednesday, November 25, 2015

Wordless Wednesday #95 - Happy Thanksgiving!

Over the River and Through the Woods....
Valley Local carrying passengers southbound
over Shailerville Bridge, Haddam, CT

Sunday, November 22, 2015

Control Panel Wiring

Now that the control panel is all up and mounted, here's how I wired it up. . .

I needed to power 14 switch machines, including 2 crossovers which would have to be wired together so that they would throw together. The control panel would be on a wall on the other side of the (small) room from the layout & machines - about 8 feet away "as the crow flies" - but as it turned out anywhere from 25-36' away "by wire." In order to keep things cheap economical, I used a 500' spool of plain brown 2-gang (2-wire) lamp cord to provide the power from the panel to each machine. Each wire is also 18 gauge, so should be large enough to carry enough current that distance without too much voltage drop.


In the above photo you see the terminal strip between the machines and the bus wires going to the panel. The wires from the machines come up from the bottom while the wires to the panel go out through the top. I wired one machine at a time, attaching a 2-gang wire to the machine, labeling it, and running/connecting it to the terminal strip (also labeled). Click here more detail on wiring the machines.

I ran what turned out to be 25' of wire from the terminal strip, up & over the door between the staging yard room (shop area) and the layout (as above) . . .


. . . then punched through the doorframe and bottom of the stairway . . .


. . . under the stairs and up along the back of the stairway footer wall . . .


. . . to the back of the wall where the panel would be mounted. And then repeated the process 12 times (thanks to Pete for LOTS of help with this part of the project!) In the photo above, you can see that each wire is labeled - I ran one at a time in order to keep track of them all (I couldn't expect to have found 12 different colored wires - especially being color-blind!).

So that concluded all the wiring between the layout and the panel location. Now, back to the panel itself. . .


You may recall my (what turned out to be a minor) debacle whereby I discovered that the panel was too thick for the toggles to be mounted. As you can see above (and read about here), I used a spade bit to rout out where the toggles would go. The pic above shows the first wire of the power bus installed (the green wire going right-to-left with insulation removed where the wires to the toggles would be attached), the first toggle installed, and connection to the first pair of LEDs. Click here for details on how I wired the LEDs to indicate switch machine direction (polarity).


To keep everything neat and organized - and to make it MUCH easier to connect all my lamp cords later - I installed another terminal strip inside the control panel cabinet. Wires from the toggle to the switch machines get connected to this terminal strip. You can also see in this pic the other power bus (the red wire) and the remaining connections (short wires going from the power bus to the toggles), as well as wires to the terminal strip and LEDs.


Here's a closeup view of all the wiring completed. I still have no idea why I drilled that 13th toggle hole - or why I took the time to rout it out - when it wasn't needed. Oh well.


Here's a closeup of one of the LED pairs wired up. Notice the resistor joined to the anode (long leg) of one bulb & the cathode (short leg) of the other bulb. The remaining legs are joined as well (and of course all the connections are soldered). Wired this way, one bulb will light when the toggle is switched one way, and the other bulb will light when the toggle is switched the other way. For further explanation of this wiring, click here.

I've made mention of the power bus a couple times already. Power comes from the DC terminals of an old 12v MRC power pack I picked up at a local hobby shop for $5.


I used lamp cord (again, since it has the two wires) to go between the power pack and the two 14ga bus wires inside the control panel cabinet which run along the length of the panel (see above). The lamp cord is connected to the bus wires via two screws (poor man's terminal strip) . . .


. . . but the other end of the lamp cord is connected to a SOCKET (female part of the plug).


Attach the plug (male part) to the wire coming from the power pack. This arrangement allow me to easily connect & disconnect the power pack to/from the panel. But you want to be sure and use the SOCKET on the panel-side so you (or anybody else) are never tempted (or able) to plug the panel directly into a wall socket, via an extension cord or otherwise. I don't even want to think of the FLASH!!! that would result(not to mention the smoke, and possibly fire).

Speaking of fire hazards, note also that despite the heavy gauge lamp cord and such, there is NO house current going through any of these wires or into the panel. All of the power comes through the powerpack/transformer and is only 12v (& 1 amp) max when it gets to the panel.


And here's an overview shot of the completed panel wiring. Power comes in through a 1/4" hole drilled through the bottom right corner (and in turn comes from the power pack as discussed earlier) and goes through the bus wires to the toggles. The toggles simultaneously control polarity to the switch machines and alternate lighting of the LEDs. All the wires you saw fanned out under the stairs earlier are coming through a large hole drilled through the back of the panel and through the wall and are connected to the terminal strip. Again, each wire is labeled to keep track of them all (big thanks to Tom for passing them to me from inside the wall!)


And here's the panel in-service above the Agent-Operator's desk. I'm really proud of how it all came out - especially since having it at all was the result of a (mostly) off-hand remark I made way back when I was first starting the Saybrook scene - "Gee, wouldn't it be cool to have all these turnouts remotely controlled by a tower operator just like the prototype - we could put a panel above the operator's desk over there. We'd "just" have to run some wires to it - should be easy."

Well, I wouldn't say it was exactly "easy" but once I thought it through it was fairly easy work - just a lot of it. I had a couple setbacks along the way, but those turned out to be pretty minor all things considered. And the result is - to my mind - the proof that the work was definitely worthwhile.

I can't wait to get things cleaned up and run some trains through Saybrook Junction - S.S. 102!

Friday, November 20, 2015

A Tease and a Tip

The control panel is mounted!


But this is just a tease for now - although it looks like it's done done, with LEDs lit up and all, it actually still needs to have all the switch machine power wires connected. I'll get into that when I do my post on control panel wiring. Click on the image to embiggen, It should be at least a little reminiscent of this:


Of course, I don't have an actual tower to mount the panel in, but mounting it above the Agent/Operator's desk I have is the next best thing, I think.

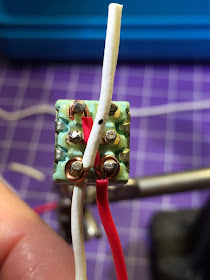
So I just have a little bit of wiring left to do. I've mentioned before How Much Wiring there is in this thing - and it's not even that complicated! But I had to wire up a dozen DPDT toggle switches (the first 6 were done by Pieter and Dick - thanks again guys!) and they had to be wired so that I could reverse polarity (and thereby, reverse the direction of the switch motor and move the points on the turnouts). That meant I had to come up with a good way of making that little "X" of wires that has to go between 4 of the 6 poles on a little DPDT toggle.

So here's a tip I came up with - follow along and let me know if it makes wiring these things easier for you too...


We'll actually start at the end - the above pic is where I had to end up for Every Single Toggle.

  • Two wires pointed straight down off the bottom two poles go to the LED panel indicator bulbs;
  • Two wires pointed down at an angle & connected to the middle two poles go to the power supply wires;
  • Two wires pointed out the "top" & connected to the top two poles go to the switch machine.
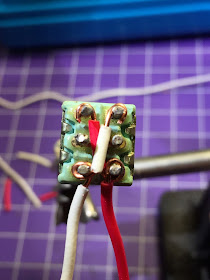
The wires I'm gonna show you how to do - and which were really difficult for me to do until I figured this out - are the ones going from "southwest" (lower left pole) to "northeast" (upper right pole) and vice versa ("southeast" to "northwest"). These are the wires that allow the toggle to reverse polarity.


The key is to remove about 1" of insulation from the end of the wire, then make a loop to go around the first pole. The pic above shows what you're trying to accomplish.


Here's a better pic (above) showing how I start. I've done the red wire already and just started the white wire, having removed 1" of insulation and made my loop.


Then I slide the insulation back on and mark where to cut it.

Next, I take the insulation back off, cut it, slide it back on, and make my "hook" in the end of the wire - like this:


It actually takes about as long to describe as it does to do. But, as you can see, the result is a VERY compact wiring job that keeps everything all nice and snug and - most important - insulated.

At this point, all I had to do is add a little flux and solder. Alhough the resulting "mechanical" joints are actually pretty strong all by themselves, you'll still want to solder the connections to keep things from coming loose.

If you try this out, be sure to let me know how it works out for you. And if you have a better - or even just a different - way to do this, let me know!

Finally - one last little gimme tip:


Poor (& lazy) Man's Power Tester

It's not bad enough that I'm so cheap I actually wired up an old 12v bulb to two alligator clips for testing track and such (rather than buy an actual current tester). But I was also too lazy to remove wires I'd already screwed into the terminal strip to test them (I'd forgotten to test them beforehand). No problem - just clip your El Cheapo tester to a couple of scrap pieces of wire and stick'em into the strip.

Looks like the wires work after all! (just don't stick those wires into a wall socket...)

I've got a small work session planned for tomorrow evening wherein I'll (hopefully) finish up the control panel wiring and test all the switch machines. Here's hoping everything goes smoothly. . . As much as I've enjoyed doing the control panel and am very happy with how it's coming out, I'll be ready to dive into something new.

Speaking of which, what are your thoughts on Tortoise switch machines? I have just a few more turnouts I'd like to power and am considering trying them out . . .

Thursday, November 19, 2015

Control Panel Construction

Layout progress often occurs in fits and starts - and it's seldom linear. Sometimes you'll be working on benchwork, sometimes on track, sometimes on scenery, structures or rolling stock. I've been working on my control panel lately - otherwise known as the Old Saybrook Model Board.

A Model Board is basically a control panel in an interlocking tower that will allow a tower operator to operate switches (turnouts) remotely from the tower. I first introduced the need for such a panel in this post and then shared some of the construction mistakes I've made along the way.

Now that's I've started wiring it up though, I figured it was safe to share some build/progress photos and a short description of how I went about it.

The first step is to make up the track diagram. I'd started by using Atlas Right Track software, but you could use Paint or some other graphics program of your choosing. Friend BillS offered to clean up my diagram (actually, he redid it) and sent it back to me in a PDF file in the dimensions I needed:


Here's a printout of what he sent. It was large enough (approx 12" x 31") that I needed to take it to Staples (which has the ability to do large printouts) to get it printed. Cost me $4 for each print (would have been cheaper if it had been just a little smaller, but I needed the next-larger size). The photo above shows my starting to mark where to cut it down to the precise size I needed.


I plan to mount the panel on the wall above my operator's desk, but I knew it'd be much too heavy to just hang like a picture. So the panel itself is mounted on a plywood board back, which is wide enough to reach across the studs on the wall. I'll screw it directly into the studs.

The frame of the panel is made up of 1x3 boards which are secured to the plywood back. No particular reason for 1x3s other than I had them on-hand. But if you're mounting your panel to the wall, you do need for it to be deep enough to accommodate toggles and wiring.

Attaching the plywood back to the 1x3s


Considering the size of the panel, I used 1/4" thick masonite for rigidity, but beware - as I discovered, this thickness is a bit too thick for toggles and the LED bulbs typically used in such panels. It ended up being ok, with some modifications (namely, routing out the back to accommodate the toggles), but be mindful of the balance between rigidity and ease-of-installing the components you want.

I attached the masonite panel front to the 1x3 frame using a loooong piano hinge. Best. Thing. Ever. I'd considered using some door hinges that I had on-hand, but for the $10 the piano hinge cost me, I have the peace of mind that the panel will never go askew. As you can see above, I clamped the hinge in place to hold it while I drilled the pilot holes for the screws. By the way, after much debate with myself, I decided to mount the hinge on the outside of the box - I think it works better that way, but YMMV.


I also used three cabinet magnets to hold the panel in place when closed. Since the whole thing will be mounted vertically on the wall, I couldn't rely on gravity to keep it from flying open. Just note where the toggles & LEDs will go - that you don't end up running into where the magnets are and have to move them. Ask me how I know.

I also prepainted the framing flat black, in keeping with the prototype.
(Sidebar tip: The panel is actually "Floquil Grimy Black" - but don't worry, I didn't used a bazillion 2oz bottles and a tiny brush. I made up a paint sample of the Floquil color and took it to Home Depot for them to make up a quart of flat to match. I wouldn't try airbrushing it, but keep this little tip in mind in case you have particular colors you want to match to paint larger things like fascia, valences, walls, etc.)


Now it's really coming together! I temporarily clamped the diagram to the masonite, after having punched holes along the bottom to accommodate the piano hinge screws that were poking up through the panel (and would poke through even more if I'd used 1/8" masonite). Those screws will be covered later by some molding. To avoid tearing too much much of the paper, I drilled small (1/8") pilot holes through the paper into the masonite everywhere there would be a panel light or a toggle.


Then I removed the paper and used the pilot holes as a guide for drilling the final 1/4" holes.

Next I ran glue stick over the whole face of the panel and mounted the paper diagram - carefully lining it up with the edges and smoothing it out from the center. Then it was just a matter of using one of the LED bulbs to finish punching holes in the paper to the proper diameter. Bonus: any rough paper edges would go into the hole.


Here's the final product - with molding in place. Those 3/4" corner moldings actually turned out to be the most expensive part of the project. I used my power miter saw to cut the 45 degree angles and used my table saw to rip off the side of the bottom molding. I also marked on the back of the bottom molding where the hinge screws were poking up and drilled dimples into the molding (using the tip of an 1/8" drill bit) to provide clearance for them, thus:

Don't worry - the recesses actually do line up. I just had moved the molding to one side. Just be very careful not to drill all the way through.


As you can see, that bottom molding sits nice and snug over the pointy bits from the hinge. The ripped off side of the (previously corner) molding allows the panel to open fully.


And here it is open and I'm just starting to do the wiring (you can see the LED wires poking up there at the right).

I'm really, really happy with how this all came out, despite a couple challenges along the way. While I've built plenty of benchwork - and am pretty good at it - I'm no carpenter and I've never built anything close to cabinet level stuff. This hardly qualifies as high-end cabinetry, but it's the closest I'll probably ever get.

Bottom line though is that it'll do the job. After I finish installing all the wiring (which I'll cover in a future post), I'll mount it to the wall and start connecting all the switch machine wires. Then, with all those toggles and lights operating, it'll really look - and operate - like a true interlocking tower model board!

I hope you'll take some encouragement from my experience here to try building your own panel - and if you do, be sure to let me know how it goes!


Wednesday, November 18, 2015

Monday, November 16, 2015

Spade Bit Router

Thanks to all of you that weighed in with tips/suggestions for how to salvage my control panel after last week's debacle. Taking some of that advice, and using tools I have on-hand, I solved the problem of a control panel board that was too thick . . .


Yup, I went ahead and used a spade bit and power drill, freehand. I figured I really had nothing to lose if things went badly - I'd already resigned myself to totally redoing the board.


But, as you can see, it turned out fine. Granted, doing this isn't for the faint-of-heart - and I took my time and vacuumed out bits regularly to keep track of my progress. My toggles are 1/2" square, so I used a 5/8" spade bit hoping that was large enough to clear. It mostly is, but it would have been even better if I'd had a slightly larger bit, which I don't.

The only downside (other than the high risk) is that the spade bit has two little "points" on each side of the blade which results in that "trough" you see right at the outer edge of the hole. You have to be really careful that those points don't come through the other side of the board. The upside is that I already had 1/4" holes drilled, and the center point of the spade bit used that for centering. So everything came out nice and straight.


Lest you think I'm getting a little cocky, I readily and heartily admit that I would not have even attempted this if this was plywood rather than masonite. Fortunately, the masonite behaves really well - provided you drill slowly and steadily.


With recesses made for all the toggles, I could start on the very long and tedious process of wiring everything up. What you see above are the toggles, and for each toggle two wires going down to the power bus, two wires going down to the LEDs and resistors, and two wires going up to the terminal strip (where the wires from the switch machines will come in and connect). Thanks to Pieter and Dick, these six toggles were already prewired for me - and it still took me a couple of evenings to even get this far. I have the remaining 7 toggles to wire up myself - which will slow things down further.

And all this just so I can have remote operation of a dozen turnouts with panel indicators. I shudder to think of what all is involved in building and wiring up a full CTC board and signalling system! At least I only have to do this once (I hope!)