Monday, June 30, 2014

Ops Session - 6/27/2014

With a few more work sessions under my belt and some resulting progress (and due to the fact that my supremely-supportive-spouse was out with a friend), I decided to have a quick operating session last Friday. I already mentioned it here, but thought you'd enjoy some additional pics - especially since I tried a new paperwork system and debuted my new Agent/Operator's Desk!

I plan to get into the details of the new ops paperwork in a future post, so for now I'll just do a quick walkthrough...

Long-time readers will recognize the "snacks" table from previous sessions - the snacks aren't out yet, but the operators' tools are: clipboards (for holding switchlists), skewers (for uncoupling), and aprons (for holding clipboards, skewers, etc)

You also may recognize the Bulletin Board from previous posts - with the addition of track maps for the entire railroad, all the better to aid the Agent/Operator

My new paperwork required the addition of a new position - Agent/Operator.  Well, it didn't require it per se - but it's certainly more fun with it, especially with this cool desk (what turned out to be a very useful hand-me-down from my downsizing parents).  Railroad ops paperwork and requisite green shade lamp in evidence.

New operator William (left) was paired with now-veteran operator Joseph on the Air Line Local.  They're switching Mill Hollow prior to heading to Middletown.

Veteran operators (and oft-helpers) Roman and Pete operate a VERY long Valley Local southbound through Rocky Hill on the way to the Middletown meet with the Air Line Local.

It all converges in Middletown where the two lines cross and the two locals meet to exchange cars.  Looks like William is getting a little stressed.

But despite the stress, there are smiles all around.  Except for Pete, apparently, who is still trying to figure out how to stuff 10 pounds of cars in a 5 pound bucket.

Nice (and repeated) view of the Valley Local in Middletown with the rear of the Air Line Local in the yard.

Not-so-great shot of the Air Line Local's engine (NH R-1 #3304) just south of the Middletown diamond.  The Air Line comes in from the west (through the wall).  Prototype photo of the scene attached to the wall.
Despite some of the car repairs I had to do (mostly due to faulty couplers), I was very happy with how well everything worked, from the trains themselves to the new paperwork.  I especially liked my new role as Agent/Operator and the fun of doing "official" railroad paperwork at an actual desk.  Very railroady!

Already looking forward to the next session which, as motivated as I've been lately to work on the layout, should only be a matter of weeks (rather than months) away!

Sunday, June 29, 2014

Middletown Tower - Q&D

Operating sessions are good for so many reasons - one of the most cited of which is the motivation you get to make progress on your layout in time for the session.  But that's not the only time ops sessions can give you motivation.  Sure, they can give you BO - and that motivates you to get to the workbench, but that's only getting your layout to staus quo ante.  It's not progress.  Other times - I would argue many other times - an ops session motivates you to make a change, either to trackwork, paperwork, etc.

This time - my session this past Friday - I got inspired to tackle a structure project.  Here's one of the scenes I saw during that session:

Middletown Yard, looking northwest. Valley local in foreground; tail of Airline local in background.
Specifically this:

A random tower building of unknown origins, I'm embarrassed to admit.
Picking it up, it reminded me very much of this:

Tower SS F-279 at Middletown diamond. Eastbound Airline local approaching, Valley line in foreground.
And so last night, after I finished taking care of my BO, I ended up with this:


This'll be Middletown Tower - Quick & Dirty.  Re-kit the building, cut it down to prototype size, add a new styrene front wall, rebuild.  The first step is done.  Next is to find some clapboard siding. . .

It'll be interesting how close I can come to finally finishing a signature structure on my layout - and how quickly.

Saturday, June 28, 2014

B.O. - an ops session fact of life

I had another operating session last night, trying out some new ops software & some other things. I'll do a more detailed post on that later, but for now I want to encourage you & your operators not to be afraid of BO.

As in Bad Order cars :)

Any operating session can result in some minor damage to cars, faulty couplers, etc, or just plain glitches that - thanks to Murphy & his Law - only crop up when folks visit to run the layout. Whenever those problems occur, the solution is to do what the prototype railroads do - pull the car for later repair. 

I've designated a drawer for such cars - keeps then out of the way and makes it easy to transport them up to the workbench. Here's the crop from last night, sitting next to me ready to get fixed. 


Nothing major - just a bunch of minor things that, once done, will make these cars ready to go back into service for the next ops session (which is good, considering I discovered that my railroad is woefully short of boxcars - but that's another story)

BO - don't fret about it, just do whatcha gotta do about it and move on :)

Thursday, June 26, 2014

April 20, 1948: A Treasure Trove of Engine Assignments

I'm not gonna lie - while I certainly enjoy sharing the information I'm gathering and organizing it all here in one place, my motives aren't entirely selfless.  The other big reason I do this website/blog and give presentations is in the hope that I'll get even more information.  Thankfully that's been happening here and there, and the result is that I have more information to post/share/etc.

During a recent presentation (and on my 'site), I mentioned that I'm still looking for New Haven Railroad Engine Assignment Books from before 4/24/1949 - and most preferably the one from September, 1947. Well, I'm still looking, but thanks to Mike Ribuffo, via Bill Lupoli, I have a copy of something almost as good - and much more interesting.

As the New Haven Railroad was transitioning from steam to diesel power, it wanted to get a handle on how its new policy was going, especially since (to quote the correspondence) "the motive power situation is changing so rapidly."  So it commissioned a report (to the delight of future researchers like me), asking its Research Department to review the utilization  of all locomotives for one typical day.  The day chosen was Tuesday April 20, 1948.  Here's a sample of the locomotives you would have seen on the Valley Line that day:

  • K-1 mogul #356 was holding down its usual assignment on the Valley Local.
  • J-1 mikado #3022 was on the Air Line Local.

By this time, the Shore Line Locals had already been dieselized:

  • DEY-5 (Alco S-2) #0604 was on the New London-Cedar Hill local
  • DEY-5 #0612 was on the Cedar Hill-New London local and also acted as the New London switcher.

And according to the earliest Engine Assignment book I have, just one year later the Valley Line was completely dieselized:
  • Valley Local was using DEY-3 (Alco S-1) #0947
  • Air Line Local was using DEY-5  #0606
  • New London-Cedar Hill Shore Line Local was using DEY-5 #0612
  • Cedar Hill-New London Shore Line Local was using DERS-1b #0669
So what happened to the steam engines?  Again, the railroad's proclivity for reports comes to the rescue. According to condemnation records that show the final disposition of every locomotive on the New Haven (which makes for some sad reading, btw), it appears that #356 ended its life on the Valley Line, being condemned March 29, 1949.  The #3022 lasted a bit longer, but was finally condemned November 23, 1951 - well into the Diesel Era on the New Haven.

<shakes head to get out of a growing funk>

I'm glad, at least on my railroad, it's always a beautiful autumn day along the Connecticut River in 1947 and New Haven steam power still rules the rails.

Wednesday, June 25, 2014

Tuesday, June 24, 2014

Work Session: Scenery, Backdrop Repair, Leveling Dividend

I'm so messed up.  I took up running in the depths of winter, I've often biked in the snow, and this past weekend - during a Top Ten Summer Day - I was in my basement working on my model railroad.  I may need a refresher on what seasons are appropriate for what hobbies, but, like Mike Rose, I tend to work in spurts, when the motivation hits.  And motivation for layout building has been hitting hard lately. Mike's a cyclist too.  Maybe it's a thing.

If I wasn't already motivated, I also scheduled another operating session for this Friday evening.  Any layout owner will tell you that a looming ops session will get you going like nothing else.  Amazing how deadlines help get things done.  So, despite the gorgeous weather, my buddy Roman came over to help me get through some of the punch list.

Long-time readers may remember that the two 2x8' modules I built (and which are stand-ins for the Air Line) can be operated with DC as well as DCC power.  To accomplish this, I installed cut-out switches so that the two sources of power wouldn't be on at the same time & I could choose which one to use.  While *I* know what those toggles are for, I wanted to be sure that nobody would mistakenly throw them (especially since I also use toggles on the modules to change frog polarity).  So Roman brought over his label maker and did some labeling:

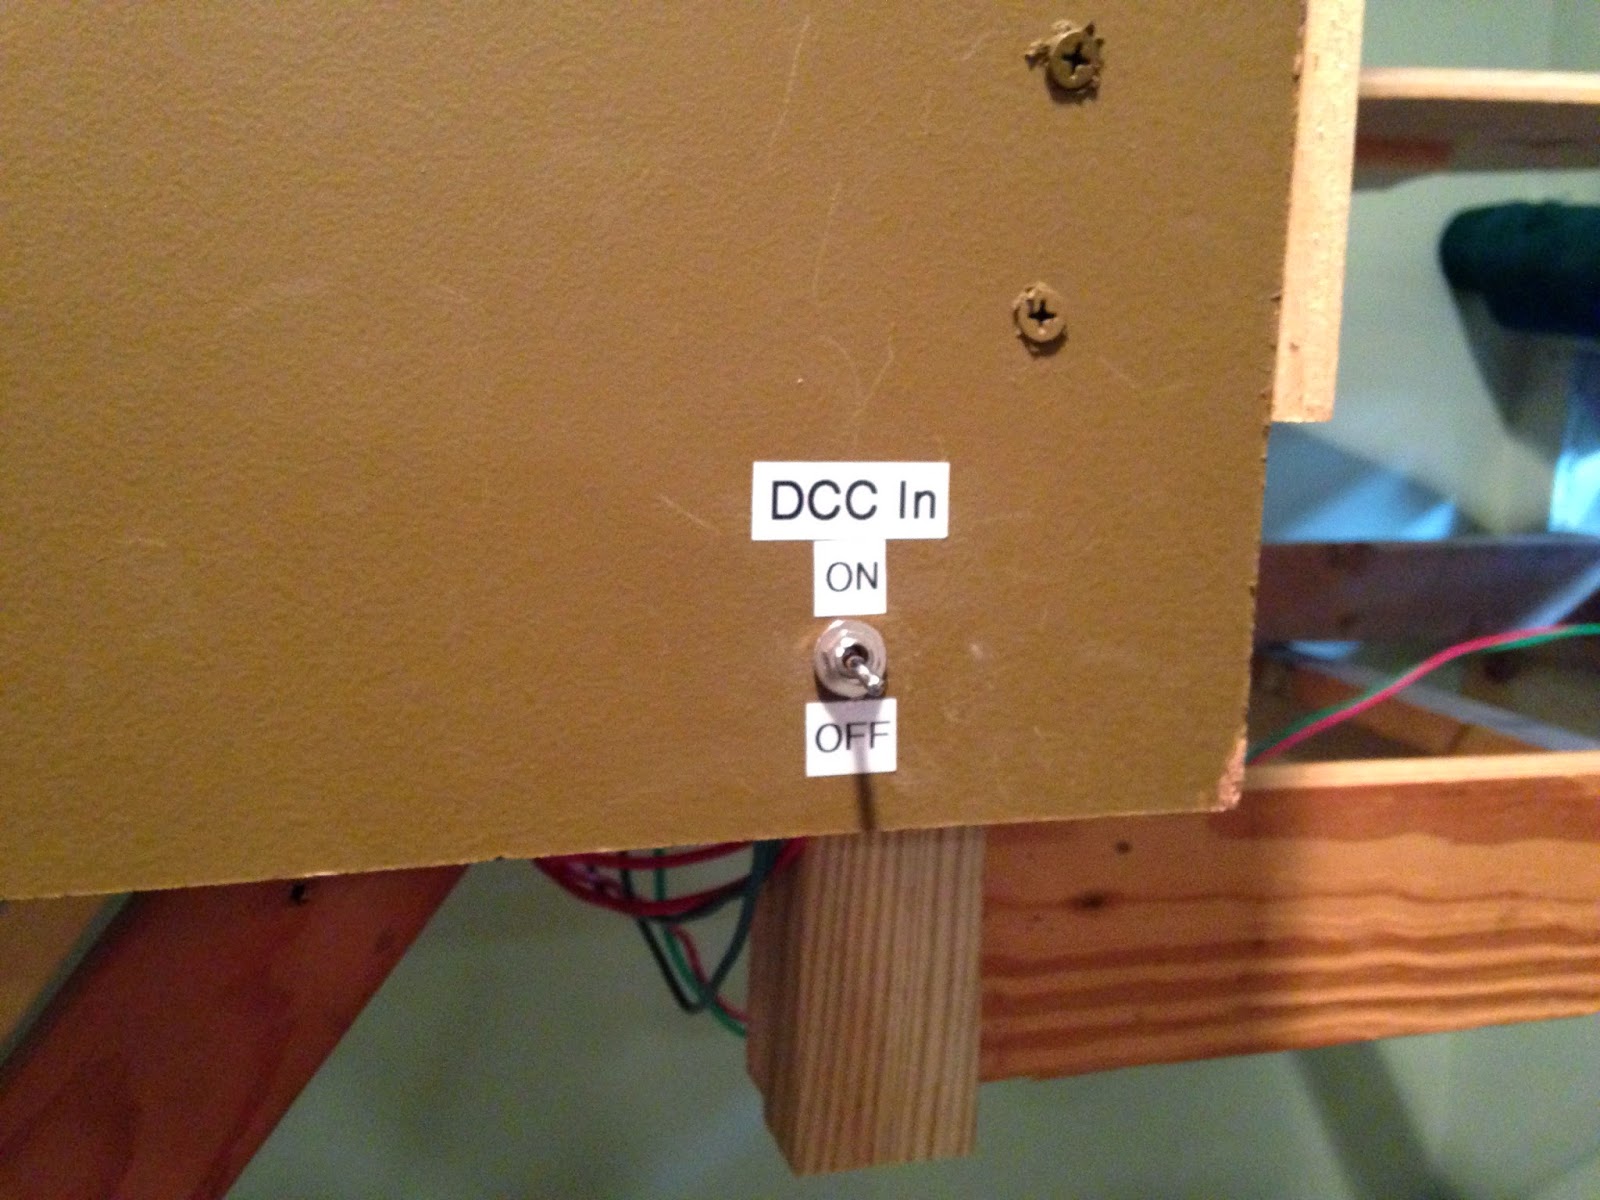
Switch where the DCC bus comes into the modules.  Turning this off electrically separates the modules from the rest of the layout.  I also have a "DC Power" switch on the other module to cut-in the DC power to the modules.
You can see this switch in context in the photo below (at the right end of the Mill Hollow module).  The other toggles on the fascia control frog polarity and there's a schematic of the town's track layout taped on it as well.


One other thing Roman did with his labeler was label each of the toggles with a number then add that number to the corresponding frog/switch on the schematic (click on image to "embiggen"):


The last time we had an ops session, Roman was on the Air Line local, switching the towns on these modules. Suffice it to say that the crews found the frog toggles very confusing and there was a lot of shorting out (with the companion squawk of the circuit breaker buzzer).  Hopefully having all the frogs & toggles numbered & labeled will at least reduce confusion if not eliminate it.  But even so, this is only a temporary solution until I can determine whether frog juicers can be used on the modules, despite the fact that I occasionally use DC power rather than DCC (e.g. do the juicers just not funciton?  Or will they actually get damaged?).

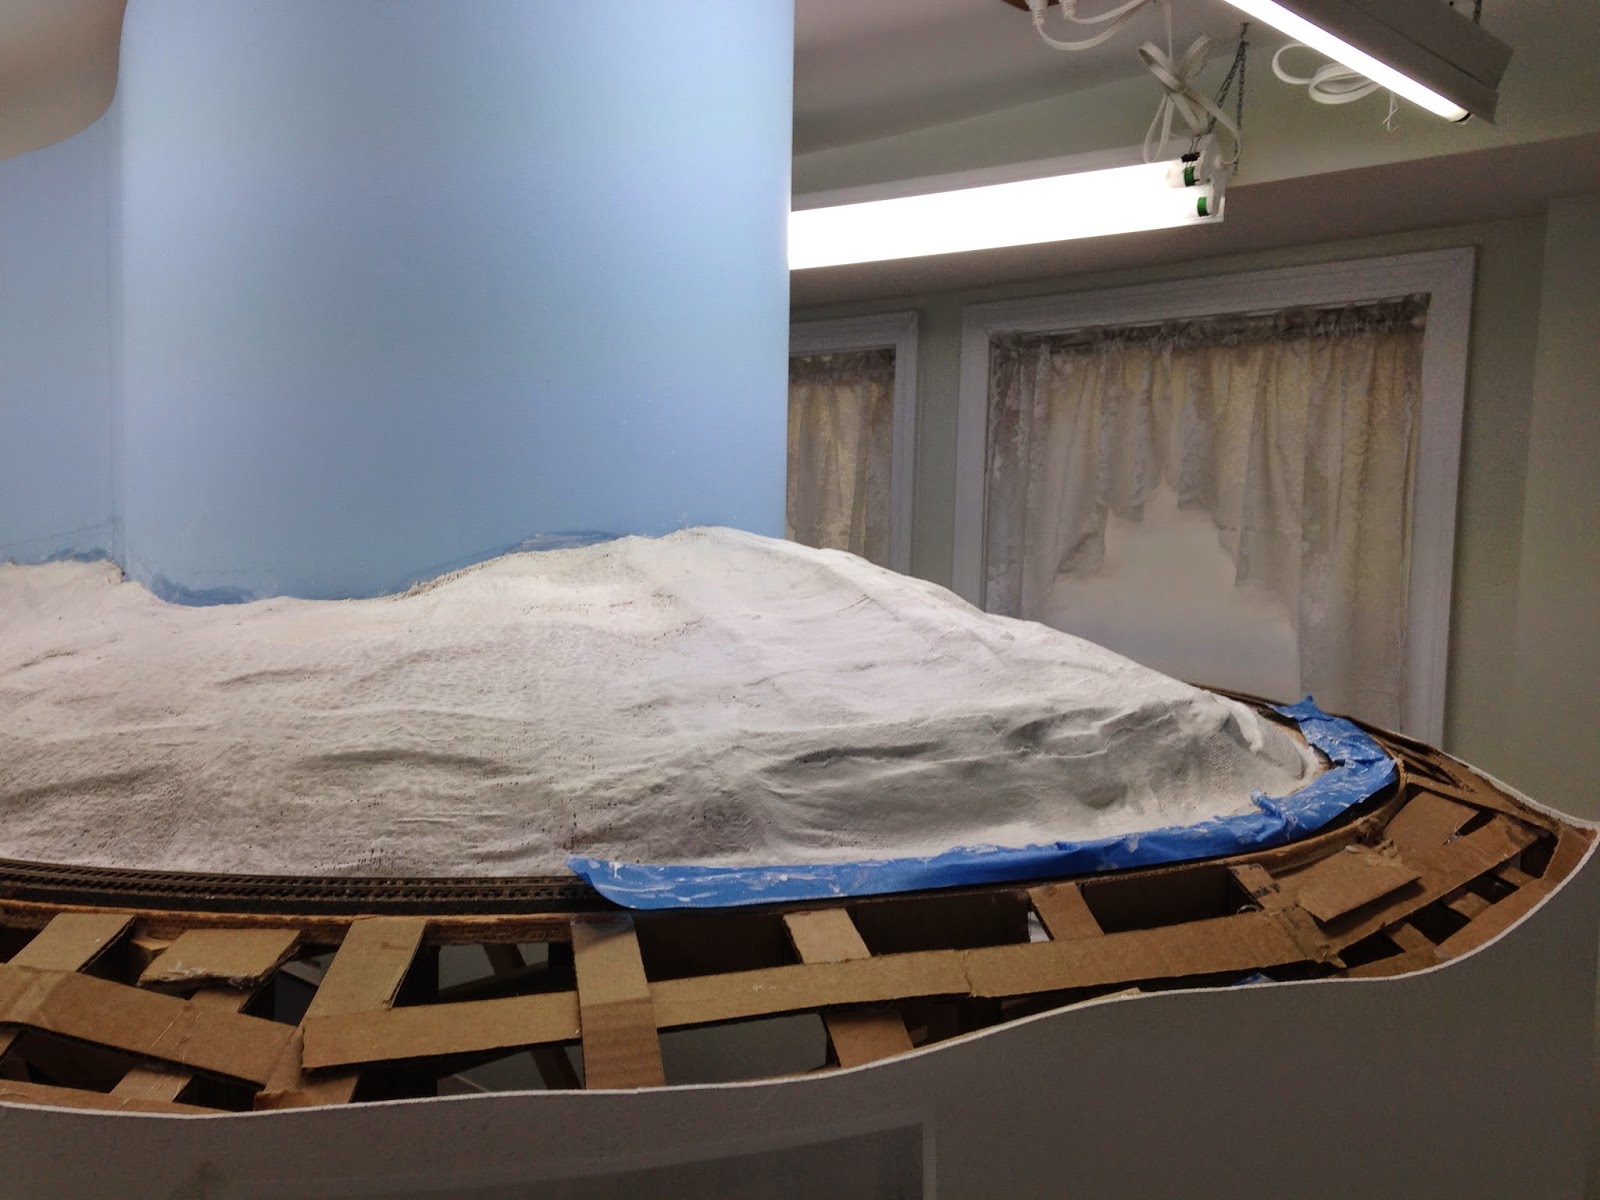
After the labeling was finished, Roman got started on a project he'd been itchin' to do ever since he completed some cardboard webbing - Plaster Cloth!

He started laying plaster gauze at the end of the "blob" and headed south through Rocky Hill . . .

. . . and down to Dividend . . .

. . . and just a bit further north . . .

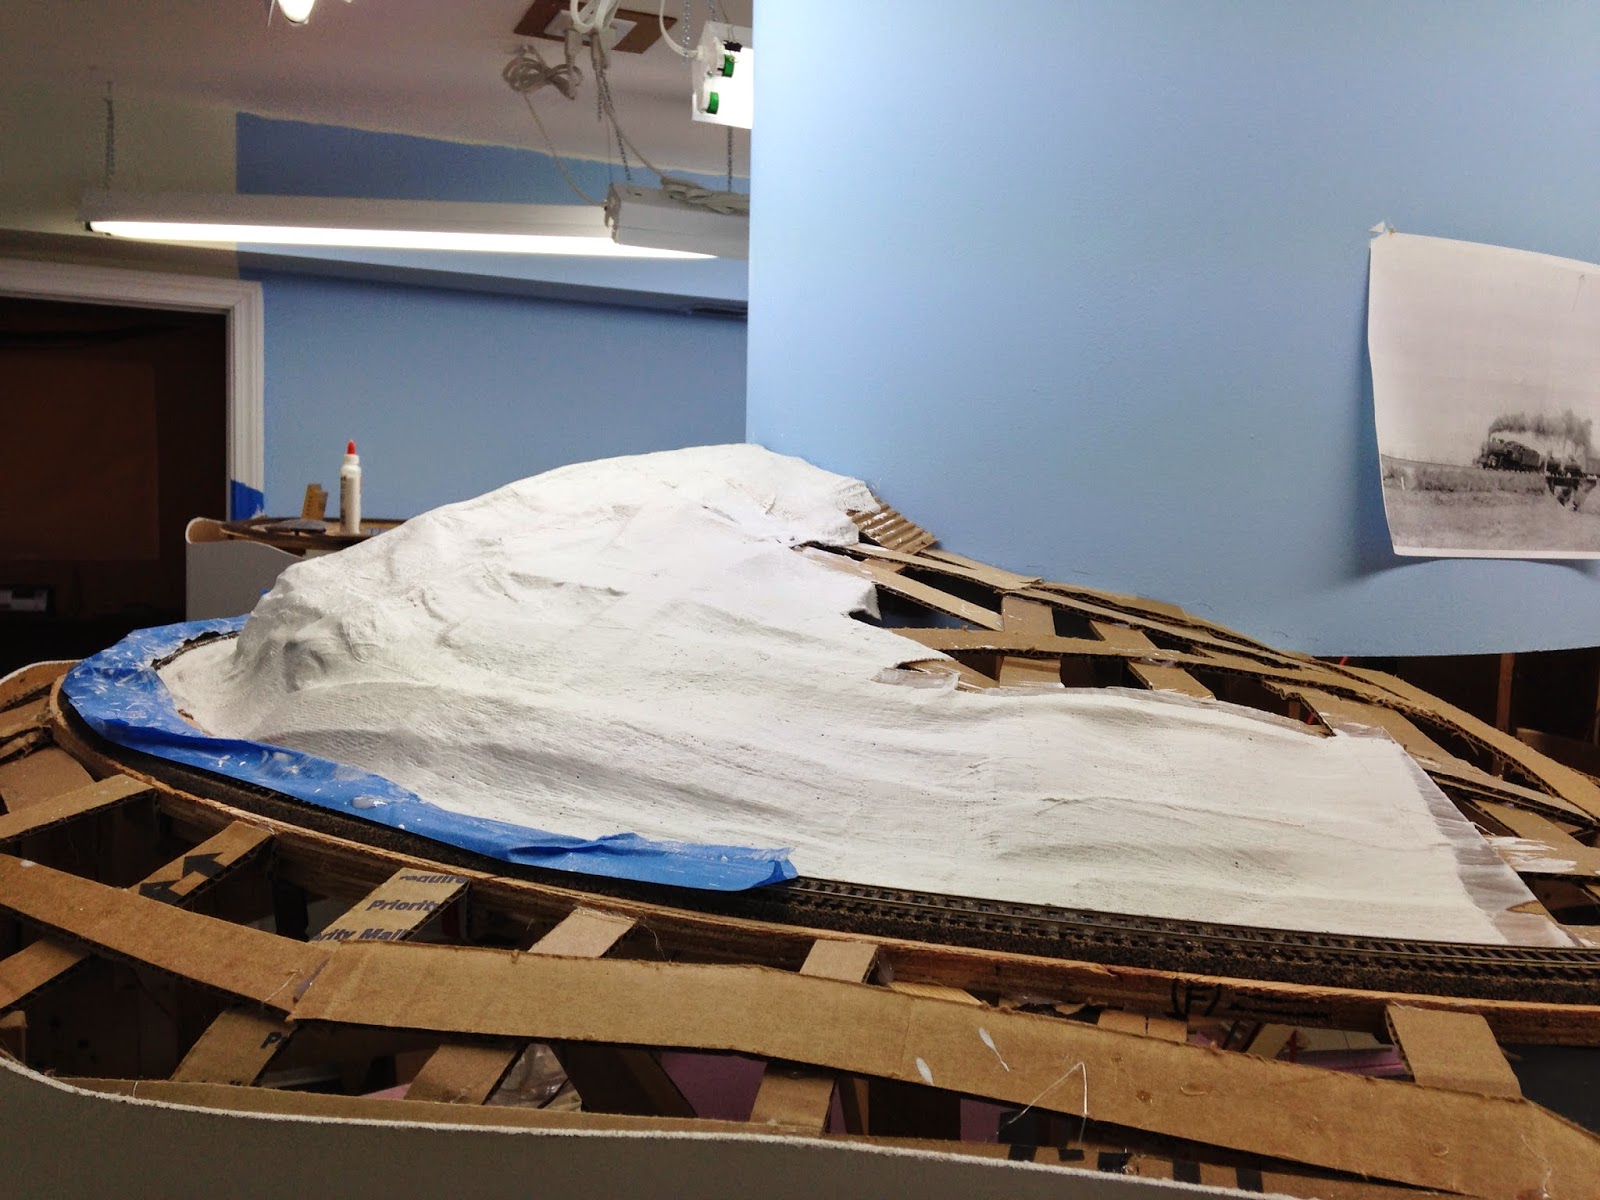
. . . to just short of Goff Brook - where scenery waits until I can SOMEDAY build & install the Goff Brook road bridge.
Despite the fact that we used plaster gauze (rather than plaster-dipped paper towels) and put down drop cloths, there was/is still a LOT of mess.  Even after vacuuming up what I could, there are still spatters of plaster & "plaster water" all over my nicely painted floor :(  I think it'll clean up with a bucket of warm water, Murphy's Oil Soap and some elbow grease, but we really need to come up with a better system if possible.

And Note to Self: Always, always, always - Cover Your Track!  'nuff said.

Speaking of track, while Roman was up to his elbows in hill-making, Randy came over to help put in some feeders.  A couple more "humps" had developed in the trackwork, so I used my handy-dandy Dremel to cut some "relief" gaps.  Things settled down nicely, but those now-electrically-isolated sections had to be re-energized.

In addition, during a previous work session, Bill had installed a Shinohara turnout in Cromwell to create an additional siding for the Lee & Sons Coal Co. trestle.  I just had Randy solder feeders to the four rails past the frog - forgetting that Shinohara turnouts are "non-DCC friendly" - all the rails and frog are connected together and the points direct the power to each route (aka "power routing turnouts").  Of course I only remembered this when I turned on the system and immediately got a short.  Out came the Dremel, down went the cut-off disk, and this is what it looked like when I finished:

One cut, just past the frog, converts a Shinohara turnout from "non-DCC friendly" to "good enough to run DCC, but not the solution I would have settled for if the turnout hadn't been glued down"
Three things to keep in mind with this "solution":

  1. Like with even "DCC friendly" turnouts, if the points are thrown against you, you will get a short.  But on a turnout modified like this, the short will occur as soon as the wheels hit the frog.
  2. You will also short if a metal wheel bridges the gap between a point rail and a stock rail.
  3. The point must make good contact with the stock rail in order for the point/closure rail/frog assembly (which is all electrically one piece) to get power.

Finally, this morning I decided to skip my usual morning bike ride (remember from earlier how motivation works for me...) and get down to the basement instead.  I had 90 minutes, which I figured would be just enough time to tackle another problem that's been bugging me - the "alligatorization" of my backdrop seams.

Here's a typical seam, showing the alligatoring.  For a closer view, either click on the image, or click here for a better pic and an explanation of how I think this happened.
I've had some success with fiberglass mesh tape in patching household walls, so I'm hoping it'll work for my backdrop too.

Works like tape - peel off the right amount, cut, and apply sticky side down.
The mesh seems to me to do a better job of holding the topping and really binding things together.

I used DAP Vinyl Spackle over the mesh-taped joint.  It's supposed to be a bit more flexible.
I'll apply another coat tonight, then sand & paint it.  I'll let you know how it works out - especially whether any flexing of the backdrop causes the seams to crack again.

I was pleasantly surprised that the taping/topping job went much quicker than I expected, so - buoyed by 
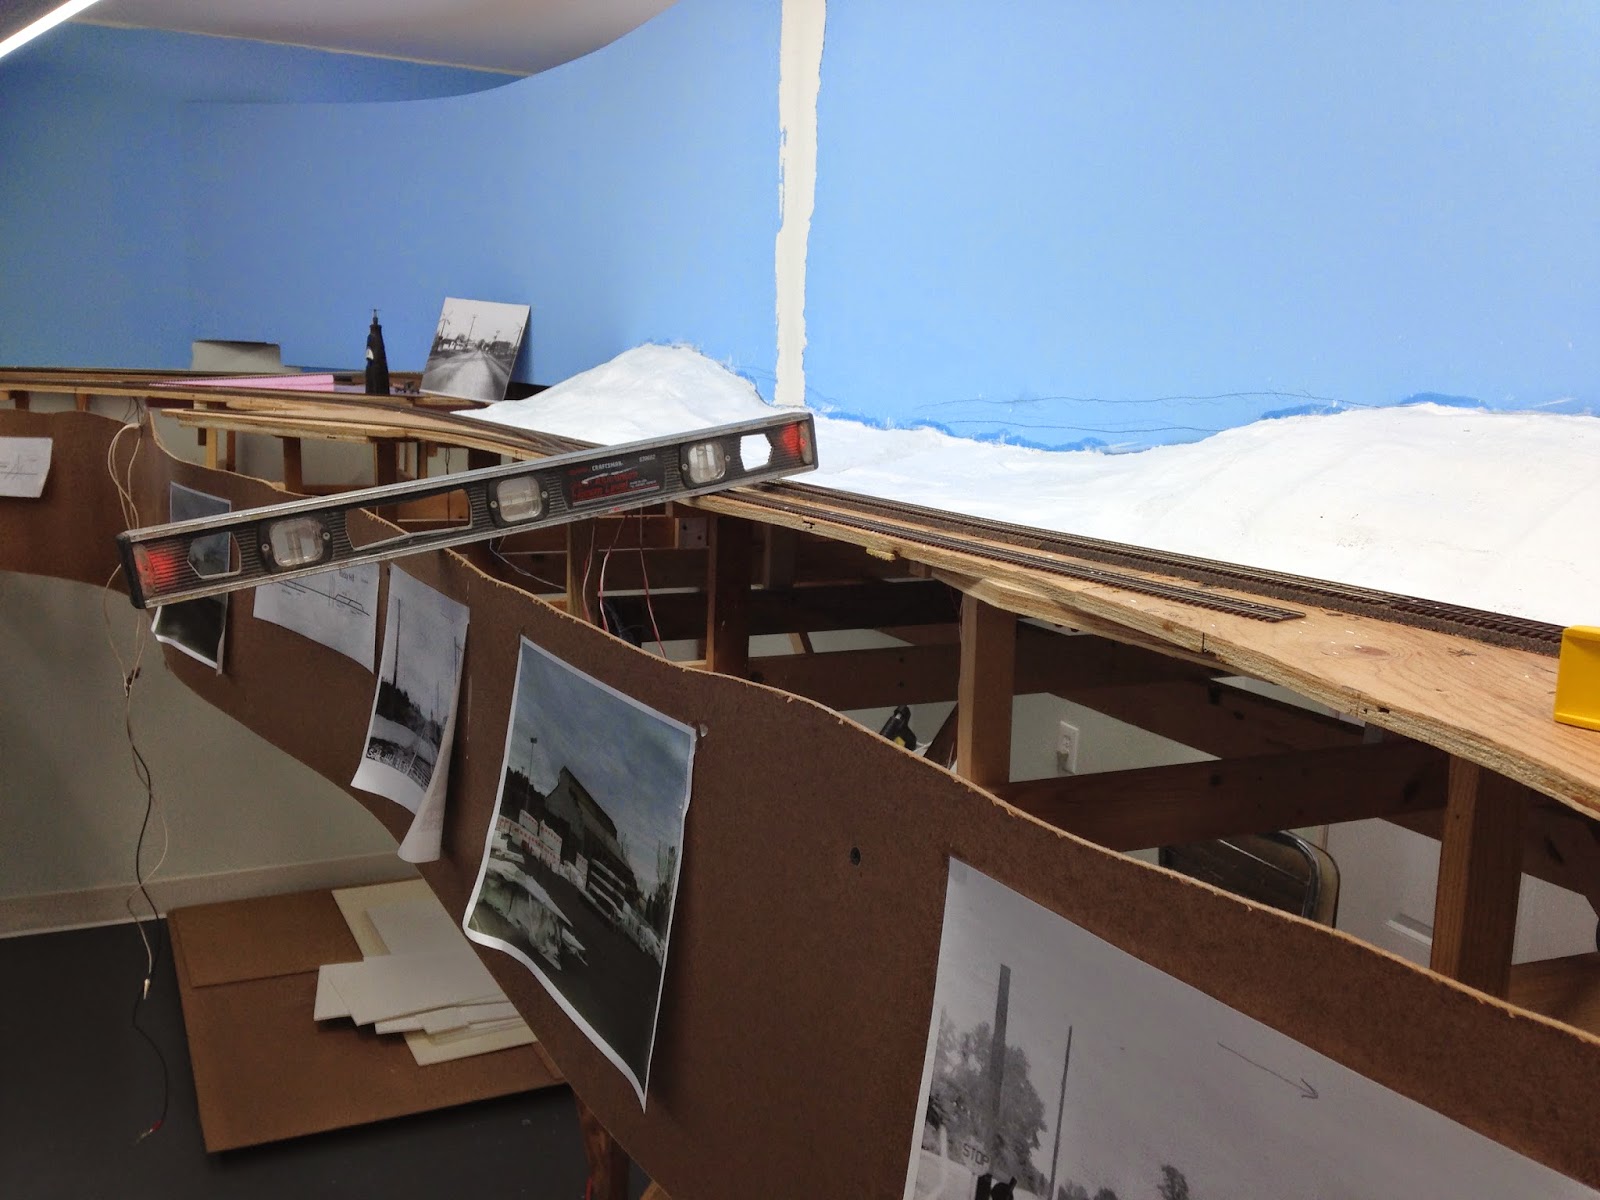
yesterday's success changing the topography in Wethersfield - I decided to do it again in Dividend (another area that should be much flatter than it was going to be).  But first, a couple of prototype photos to show what I mean:

Dividend (section of Rocky Hill), showing old Billings & Spencer building - later became warehouse for Hartford Rayon.

Same view as above, taken 10/23/2010.
As you can see, it's relatively flat - though the Billings & Spencer building is on a level a little lower than the mainline.  You can see better in the photo from 1929 how the switchback track goes downgrade.

I don't have enough room to have that much grade separation between the main and siding, but my siding does at least come down off the cork roadbed(!) - that's about all the suggestion of a grade separation I can fit in.  Nevertheless, there's no way there should be this much grade separation:

Way too much grade-separation

Leveling it out requires the fascia to be raised about 2"

I raised the fascia to just about level using the same clamping technique I used in Wethersfield - but this time it was even easier since I didn't have to deal with any cardboard webbing.

I had to get ready to go to work so I had to leave things as-is-above - but not a bad 90 minutes' work.  It's finally dawning on me how smart it is to take advantage of chunks of time, no matter how little you think they are.  As long as you have a good to-do list (bonus points if it's organized by estimated time to complete each task!), you can dive right into something whenever you have a chance.

For too long and too often I've waited until I have large chunks of time to get in the basement and work on the railroad.  At that rate, I don't get much done - big chunks of time seldom seem to happen.  But with my recent spurt of motivation - and a good working punch list (not to mention a little lot of help from my friends), I'm finally making some progress!

Monday, June 23, 2014

3/4hr for 3/4"

Well, after all of the agonizing and wondering whether or not to try and change it, modifying the topography in Wethersfield ended up taking less than an hour total.

And as Trevor commented, it was more than well worth it – at least I think it's a huge improvement.

Check out the photos:

I started by lowering the background hill and hot-gluing in a backer so I'd have something to attach the new gap-filling plaster cloth to.

Another view, looking "north"

Then I clamped the fascia to hold it in place, removed the screws, raised the fascia (more than 3/4" as it turned out), and re-clamped, as here

The raised, and now level, area around Fernwood Street (south of Jordan Lane w/a Ballantines mockup in the background)

View looking "south" at Wethersfield station (from Fernwood St)

And the "money shot" - the primary reason for doing what turned out to be a simple fix - to level out the station area to make it more prototypical
Compared to what it looked like.... well, if you know anything at all about the prototype, there really is no comparison .
After this experience, I'd encourage you to make any changes sooner rather than later to things that are bugging you. It may - and likely will - be much easier to do than you think and you'll be happier in the long run.

Incidentally, I'm really happy with the traditional L-girder benchwork and masonite backdrop/fascia.  It's certainly not innovative, this benchwork system has been around for probably 40-50 years, but I discover more and more how versatile it is - especially when you need to change things.

Saturday, June 21, 2014

When 3/4" makes a difference

I've been obsessing a little about the terrain and topography in Wethersfield - how, because of the way I constructed things, there is a slope where there shouldn't be a slope. Wethersfield is generally pretty flat but my layout – at least so far – isn't so flat.

This is primarily because of the way my backdrop and fascia turned out. As you can see in my previous post here.

But when I went to measure I discovered it's "only" 3/4" off:


Now that may not seem like a lot, and in the pictures perhaps you don't really get the full effect. But in this photograph you'll see what I mean:


That's quite a slope - especially when you compare it to the prototype here:

(apologies for the picture of a picture but this is just a quick drive-by post)
This is a really iconic scene for Wethersfield and in fact for much of the layout. So I really want it to be as correct as possible.

So, I'm contemplating redoing the fascia somehow and after discussing things with Randy and Roman last Thursday I am seriously considering just laminating another piece of fascia over top of this one and bringing things up to level.

Fortunately, with benchwork you only have to do things once and you want them to be done right. Well, I guess you only need to do things twice(!) but then at least I should be really done and I think it will look a lot better.

Stay tuned to see how it turns out!

Friday, June 20, 2014

Fun Stuff Friday - So You Want a Model Railroad

I've been able to post a lot of content this week - certainly more than I have in a while (welcome summertime!), and I hope you're enjoying it.  But Fridays are often a good time to absorb and process, as well as a welcome chance to take it a little easy.

So, herewith, I post another edition of Fun Stuff Friday where I share some random, railroady thing I think you will enjoy that may or may not have anything to do specifically with the Valley Line.

This little video illustrates a little bit of the obsession model railroaders experience.

But remember - I, and many readers of this blog, are railroad modelers not model railroaders.  What we do is Serious Historic Preservation, not just playing with trains.

Really!


Thursday, June 19, 2014

Valley Line Freight Ops in the Late 1940s

A basic question every prototype modeler must confront at some point is "what trains operated on the line during the time I'm modeling."  The earlier your era, often the harder it is to find the answer to this question.

Fortunately, the New Haven Railroad published a little booklet titled "Arranged Freight Train Service."  Also known as a "symbol book," this document listed all of the freight trains on the railroad and what schedule they generally maintained.  As far as I can tell, new books were issued at regular intervals on or around the same date as the employee timetable.

The symbol book I really need for my chosen era is the one issued September 28, 1947, but - alas - I haven't yet found a copy.  What I do have though are relevant parts from the book from the previous year (9/29/46) as well as April 25, 1948 and April, 1949.  So, based on the information I have on-hand, I just have to make some educated assumptions about operations in the Autumn of 1947.  Here's what I discovered (remember, you can always click on images to enlarge):


Symbol Book #76, September 29, 1946

The Valley Local
Turning to the section titled "Hartford Division Local Service" (p. 153), I see that such service generally occurred every day except Sunday & legal holidays, unless otherwise specified.  Looking down the list, I see #7 (aka Hartford Division Local #7 or HDX-7) is the Valley Local.  It leaves Hartford at 9:30am and goes to East Berlin (via Middletown) on Mondays, Wednesdays and Fridays and to East Haddam on Tuesdays, Thursdays, and Saturdays.  It connects at East Haddam with the New London-Cedar Hill Local (aka PDX-2, more on that in a minute) and the Shore Line crew (i.e. PDX-2) does the switching in East Haddam.

The Air Line Local
Continuing in the Hartford Division Local Service section (p. 154), I see that train #12 runs from Cedar Hill to Colchester and back - HDX-12, aka the Air Line Local.  It goes on-duty at Cedar Hill yard at 9am and services all the towns to Colchester, including Middletown where it meets and exchanges cars with the Valley Local.

The Shore Line Local(s)
Saying "the" Shore Line Local is a little misleading since there were actually at least three of them listed in the Providence Division Local Service section (p. 157) .  But relevant to my layout, I need only concern myself with two: The Cedar Hill-New London local (PDX-1) and the New London-Cedar Hill local (PDX-2). PDX-1 went on-duty at 9am in Cedar Hill and PDX-2 went on-duty at New London at 12:30pm. Interestingly, the eastbound local (PDX-1) didn't service the towns of Pine Orchard, Stony Creek, and Westbrook, but instead brought cars bound for those towns to Old Saybrook to hand them off to the westbound local (PDX-2).  For its part, the westbound local skipped the towns of Lyme, Black Hall, Millstone, Madison, and Guilford, leaving cars destined for those towns at Old Saybrook for the eastbound local to handle.  There was clearly a lot of interchange of cars at Old Saybrook, but I don't know what time that interchange took place.  I suspect - especially given the big difference in on-duty time - that the cars were just left.  Unlike the typical interchange between the Valley Local and Air Line Local, the two Shore Line locals were probably not in Saybrook at the same time.

As an aside, while I'm not there yet, I do plan to model Old Saybrook.  And when it's operational, my layout will have the distinction of being the home of four separate and distinct local freights.

But which Shore Line Local exchanged cars with the Valley Local in East Haddam?  It depends on what year you're talking about, and in 1946 it was PDX-2 - the New London-Cedar Hill local - that went up the Valley line.

Symbol Book #?, September 25, 1948
I only have a very small part of this symbol book, so I don't even know the number.  I do, however, see the Valley Local is on page 156 and this edition contains more-detailed schedule information.  See below:


The only substantive change in two years is that the local now leaves Hartford at 7:30a, an hour earlier than in 1946.

The page for the Air Line Local shows similar detail, and an earlier departure as well (7:45a):

The Shore Line Locals leave earlier too - 8:00am (PDX-1) and 11:15 (PDX-2):


PDX-2 still goes up the Valley to East Haddam in 1948, but the coolest thing about the info in this edition of the symbol book is that it shows when the two Shore Line locals were in Old Saybrook: PDX-2 got there at 12:14p and left for East Haddam at 12:35.  Just 5 minutes later, PDX-1 arrived and didn't leave Old Saybrook until 1:10pm.

Symbol Book #?, April ?, 1949
As I detailed on my website, diesels had supplanted steam on these locals by the spring of 1949.  Freight service changed quite a bit too in the seven months since the prior symbol book was issued.


You can see that the Valley Local (HDX-7) is now a M/W/F only job, departing Hartford at 8:30, and it no longer services East Berlin.  The Air Line Local (HDX-12) now has that chore, running (crawling, actually, given the poor track) up to East Berlin on Tuesdays/Thursdays/Saturdays.  PDX-1 (the Cedar Hill-New London local) goes up the Valley line now, and the exchange of cars happens in Essex rather than East Haddam.  Unfortunately, the information I have doesn't include PDX-2 so I'm not sure what it does in 1949.

As you can see, prototype modeling really is all about the details and prototype operations can vary widely, even within the span of a few short months. Thankfully, railroads tended to be very paperwork-heavy, keeping records of just about everything imaginable.  The secret to having prototypically correct operations is to find those records if you can.  The thrill of that hunt and the research that's involved is just another fun aspect of our hobby.

Tuesday, June 17, 2014

BOs in lieu of ETTs (for now...)

I've finally started to catch up a bit on some model railroad blogs and Trevor Marshall's blog is certainly one of my favorites.  Way back on May 5th, he did a post on the Employee Timetable he created for his layout and, since I want to create an ETT myself at some point, I've already bookmarked his ideas.  I highly recommend reading his post if you want to create a model-railroad-appropriate ETT.

I'm not quite ready to do an ETT myself yet, so I've done the next best thing - set up a Bulletin Board (thanks to my buddy Randy).  On it I can post - you guessed it - Bulletins!  Well, more specifically, Bulletin Orders.


The Bulletin Order (BO) tells operators anything special they need to know in addition to anything that would normally be in the ETT or the Operating Rules.  This is especially helpful on my layout where there are some, um, particularly specific ways of doing things.  But more on that in a minute.

What's included in the Bulletin Order?
  • The date & number of the order (BOs supercede previously issued BOs)
  • The number & edition of the ETT and Operating Rules that are in effect
  • Any speed restrictions or tracks out of service
  • Any signals out of service
  • Additional orders and notices
  • Any timetable special instructions or amendments
So, what's all that mean for my model of the Valley Line?
  • I can impart some authenticity to my layout by referencing the ETT and Rules that were actually in effect on the date I'm modeling.  In my case, I operated on Tuesday, October 14, 1947 (you can tell what day it is by checking the calendar on the bulletin board, naturally :).  On that date on the actual New Haven RR, Timetable #164 and the 10th edition of the operating rules were in effect.
  • There's a liftout between the two modules, so I note a speed restriction between the stations of "Somerset" and "Draper."  I also note a prototype speed restriction that acutally existed on the curve north of Rocky Hill station (which also has the benefit of lengthening the mainline run).
  • I haven't yet installed the flashers that the prototype had at Main Street (Middlesex Turnpike) in Cromwell, so I note those signals are OOS (out of service) and require trains to stop & protect there.
  • Until I get some FrogJuicers, I'm using toggle switches on the modules to control turnout frog polarity, so I note that under "Additional Orders and Notices."
  • Finally, since I have a 10-car limit in runaround capacity in Middletown yard, I note under "Timetable Special Instructions/Amendments" that trains departing Middletown yard cannot exceed 10 cars.  I also have an "award winning" (inside joke) depressed-center flatcar that is VERY light when unloaded - so I require it to be placed just ahead of the caboose when being moved empty.
You can see the result of all this in the document below.  Every operator gets a copy of the latest Bulletin Order with his other paperwork (Clearance Form A & Form 19) and, according to the Rules, he must review the bulletin board in case there are any last-minute changes.

Until I can get around to compiling a model-appropriate version of the New Haven ETT - as Trevor has done with his CN version - I think BOs will suffice quite nicely.

What do you think?


Monday, June 16, 2014

Goff Brook road bridge (Middlesex Tpke/Old Main St)

How many times do we pass something every day and never pay it any attention? How often have we passed by a demolition site of an old factory, for example, and think "ARGH! I always meant to get a photo of that!" - and now it's too late. Hopefully, it only happens to you once or twice before you learn your lesson and get your photos when you can.  Unfortunately for many of us, we're still learning that lesson.

That's when historical research can really help fill the gaps.  I - as well as my friend John Wallace - rode/drove over the Old Main Street bridge over Goff Brook in Rocky Hill dozens, if not hundreds, of times. Unfortunately, neither of us got a photo of the bridge before it was recently rebuilt.  Here's what it looks like today (scroll to the bottom of the post), but what did it look like in 1947?  Nobody knows for sure - at least nobody I've talked to so far.

Earlier this year, I'd contacted our state DOT in hopes that they had some historical photos of the bridge (since it used to be the Middlesex Turnpike and the main road between Hartford and Old Saybrook), or at least a photo of it before it was rebuilt.  They directed me to the Town of Rocky Hill since, now downgraded to local road status, the town would have done any upgrading. So last week I finally got around to checking with the Rocky Hill Public Works Department - and got a little breakthrough.

The department head was actually on his way out for the day when I caught him, but he was intrigued with my project (after being initially concerned why I wanted such information) and - best of all - he said he'd taken a photo of the bridge before they started the repair work.  He assured me that "only from the deck up was done" and that "the deck and abutments are about 90 years old."

Yesterday, he emailed me the photo he took . . .


While all I can be sure of is that this is how the bridge looked as of April 17, 2008, unless/until I get any additional photographic evidence to the contrary, I'll assume this is how it looked in 1947 (but without those modern guardrails, natch).  JohnW, for his part, said he expects this is what it looked like - and that's good enough for me, for now.

But that won't keep me from following up on just one more lead - a fellow at the Rocky Hill Historical Society who I'm told has a "treasure trove" of Rocky Hill images.  Who knows, I may just be able to get an even older photo of this bridge after all. Of course, if you have - or know where I can get, an older photo, please let me know.

In the meantime, anybody have any ideas on what to use to model those cool railings?  Maybe some O scale steam locomotive stanchions?